
Are you tired of cluttered spaces and empty walls? Hanging shelves on your wall is a simple way to add storage and style at the same time.
But if you’ve never done it before, the process might seem tricky or overwhelming. Don’t worry—you’re about to discover easy, step-by-step tips that make hanging shelves a breeze. By the end of this article, you’ll have the confidence and know-how to transform your walls into organized, eye-catching displays.
Ready to get started? Let’s dive in!
Choosing The Right Shelves
Choosing the right shelves is key for a successful wall shelf project. The shelves must suit your space, style, and needs. Picking the wrong type or material can lead to weak or unstable shelves. Think about the room, what you want to store, and how the shelves will look. This helps you find the best fit for your walls.
Types Of Shelves
There are many shelf types. Floating shelves have no visible brackets, giving a clean look. Wall-mounted shelves use brackets for support. Corner shelves fit into room corners and save space. Ladder shelves lean against the wall and offer a casual style. Choose a type that fits your room layout and usage.
Materials And Styles
Shelves come in different materials. Wood shelves offer warmth and classic style. Metal shelves bring a modern or industrial feel. Glass shelves add lightness and work well in small spaces. Styles range from rustic to sleek and minimalist. Pick materials and styles that match your room’s decor and personal taste.
Weight Capacity Considerations
Weight capacity matters for safety and durability. Heavy items need strong shelves and secure mounts. Check the shelf material and bracket strength. Drywall alone may not hold heavy loads; use wall studs or anchors. Always know what you will place on shelves to avoid accidents or damage.
Gathering Tools And Materials
Before you start hanging shelves on your wall, gathering the right tools and materials is crucial. Having everything ready saves time and prevents frustrating interruptions. It also boosts your confidence, especially if this is your first DIY project.
Essential Tools List
- Drill:A cordless drill makes drilling holes quick and easy.
- Level:Ensures your shelves are perfectly straight, avoiding that annoying tilt.
- Stud Finder:Helps you locate wall studs, which are key for supporting heavy shelves.
- Screwdriver:Useful for tightening screws, especially in tight spots.
- Measuring Tape:Accurate measurements mean your shelves fit perfectly where you want them.
- Pencil:For marking drilling spots and alignment points.
- Wall Anchors and Screws:These hold your shelves securely, especially if you can’t drill into studs.
Helpful Accessories
- Masking Tape:Stick it on the wall to mark drilling spots without damaging paint.
- Protective Goggles:Safety first—protect your eyes from dust and debris.
- Drop Cloth or Old Sheet:Keeps your floor clean while drilling or sanding.
- Leveling Shims:Useful if your wall isn’t perfectly flat.
- Vacuum or Dustpan and Brush:For easy cleanup of dust and debris afterward.
Have you ever started a project only to realize you’re missing a key tool halfway through? Gathering your tools and accessories beforehand means you can focus fully on the fun part—designing and installing your shelves. What’s the one tool you can’t live without for your home projects?
Preparing The Wall
Clear the wall surface from dust and dirt to ensure strong shelf support. Use a stud finder to locate studs for secure mounting. Mark the spots carefully before drilling holes.
Preparing the wall is a crucial step to ensure your shelves hang securely and evenly. A little preparation can save you from a lot of frustration later. As you embark on this project, start by evaluating the wall space to ensure it’s ready for installation.Finding Studs
Locating studs in your wall is essential for hanging heavy shelves. Use a stud finder, which can be purchased inexpensively at any hardware store. Run it along the wall until it indicates the presence of a stud. If you don’t have a stud finder, tap the wall lightly; a solid sound usually means you’ve hit a stud, while a hollow sound indicates empty space.Marking Placement
Once you’ve found the studs, mark them with a pencil. This gives you a reference point for where your shelves will be anchored. It’s a good idea to use a level to ensure your markings are perfectly horizontal. Remember, precise markings lead to evenly hung shelves, which not only look better but also hold weight more effectively.Checking For Obstacles
Before drilling, it’s crucial to check for potential obstacles like electrical wires or plumbing. You can use a wire detector to identify any hidden hazards in the wall. This step is often overlooked but can prevent accidents and costly repairs. Have you ever accidentally drilled into a water pipe? It’s an experience best avoided with a little precaution. By preparing the wall thoroughly, you create a solid foundation for your shelves. This preparation not only ensures safety but also enhances the overall appearance of your space.Mounting Brackets And Supports
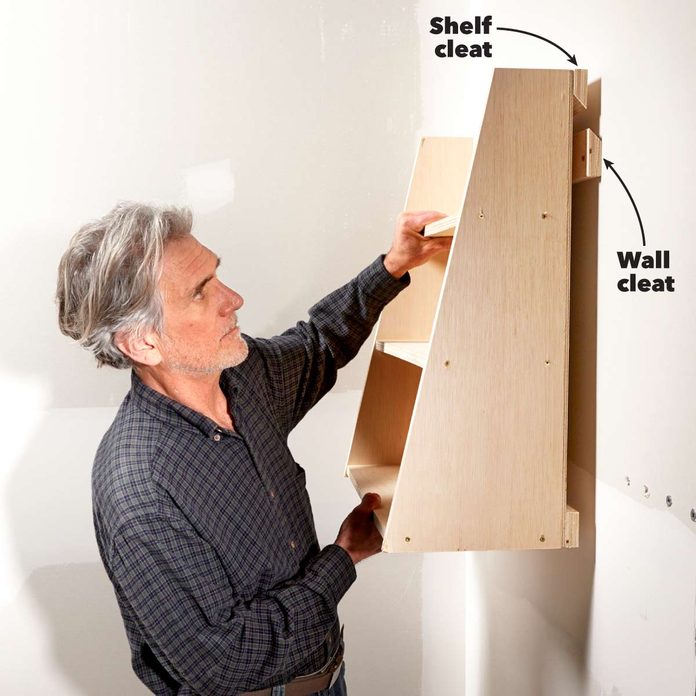
Mounting brackets and supports are the backbone of a sturdy and safe shelf installation. Choosing the right type and securing them properly ensures your shelves will hold weight without wobbling or falling. Let’s break down how to pick and fix these essential parts with confidence.
Selecting Brackets
Not all brackets are created equal. Think about what you’ll put on your shelves—heavy books need stronger, metal brackets, while lightweight decor can work with simple wooden or plastic ones.
Measure the depth and length of your shelf to find brackets that provide enough support. Look for brackets with a weight rating that exceeds your expected load. Have you checked if your wall type requires special anchors or brackets?
Drilling Pilot Holes
Drilling pilot holes makes securing brackets much easier and prevents your wall from cracking. Use a drill bit slightly smaller than your screws to create these holes precisely where the brackets will go.
Mark the exact spots using a level to keep everything straight. If you hit a stud behind the drywall, drill directly into it for maximum support. Otherwise, use wall anchors to hold the screws firmly.
Securing Brackets
Once your pilot holes are ready, it’s time to attach the brackets. Hold the bracket in place and drive the screws through the holes into the wall or anchors with a screwdriver or drill.
Double-check the bracket is flush against the wall and doesn’t wiggle. Tighten screws firmly but avoid over-tightening, which could strip the holes or damage the bracket.
Have you tested the brackets by applying some pressure before adding your shelf? This quick check can save you from future problems.
Installing The Shelves
Installing shelves may seem straightforward, but proper execution makes a huge difference in durability and appearance. Careful attention to how you place and secure the shelves ensures they not only look great but also hold weight safely. Let’s break down the key steps to get your shelves perfectly installed.
Positioning The Shelf
Start by deciding exactly where you want your shelf on the wall. Consider the height and spacing between shelves if you’re installing multiple. Think about what you’ll place on the shelf—heavier items need stronger support and sometimes closer to studs.
Use a pencil to mark the desired position lightly. Double-check by standing back and imagining the final look. Does the spot feel balanced in the room? Your eye can catch details a tape measure might miss.
Leveling Techniques
Ensuring your shelf is level is critical for both functionality and aesthetics. Use a spirit level across the shelf brackets or the shelf itself to check. If you don’t have a level, a simple app on your phone can do the job well.
Sometimes walls aren’t perfectly straight, which can throw off your level line. In those cases, prioritize the shelf’s level over the wall’s imperfections to avoid crooked shelves. Adjust marks accordingly before drilling.
Final Fastening
Secure the shelf firmly by choosing the right anchors or screws for your wall type—drywall, plaster, or brick all require different fasteners. Drill pilot holes to prevent cracking and ensure precise screw placement.
Tighten screws just enough to hold the shelf firmly without damaging the wall or shelf brackets. Once fastened, give the shelf a gentle shake to test stability. If it wobbles, reinforce with additional anchors or brackets as needed.

Credit: shelfology.com
Troubleshooting Common Issues
Hanging shelves can sometimes lead to problems. Knowing how to fix common issues saves time and effort. This section helps you solve frequent shelf-hanging problems. Simple fixes keep your shelves sturdy and your walls neat.
Uneven Shelves
Uneven shelves spoil the look and can cause items to fall. Check if brackets are level using a spirit level. Adjust the screws or reposition brackets to balance the shelf. Sometimes the wall itself is uneven. Use shims behind brackets to even out gaps. Re-measure distances between brackets to keep shelves straight. Small adjustments make a big difference in shelf alignment.
Loose Brackets
Loose brackets make shelves unsafe. Tighten all screws holding the brackets firmly. If screws do not hold, try longer or thicker screws. Use wall anchors for extra support in drywall. Choose anchors designed for the weight of your items. Avoid over-tightening, which can damage the wall or strip screws. Secure brackets properly to keep shelves stable and safe.
Wall Damage Repair
Wall damage may happen during installation or removal. Fill small holes with spackling paste or wall filler. Smooth the surface with a putty knife and let it dry. Sand the area gently to blend with the wall. For larger holes, use a patch kit before filling. Paint over repaired spots to match your wall color. Repairing walls keeps your space clean and ready for new shelves.
Safety Tips And Best Practices
Hanging shelves on the wall requires careful attention to safety. Proper safety tips and best practices protect your walls and belongings. They also keep you safe during installation. Following guidelines ensures your shelves hold weight securely and last longer.
Weight Distribution
Distribute weight evenly across the shelf. Uneven weight causes shelves to tilt or fall. Place heavier items near the wall brackets or studs. Use multiple brackets for longer shelves. Avoid overloading shelves beyond their weight limit. Check the shelf material and wall type for weight capacity. Proper weight distribution prevents damage and accidents.
Regular Maintenance
Check shelves regularly for signs of wear or damage. Look for loose screws, brackets, or wall anchors. Tighten any loose parts immediately. Clean shelves to avoid dust buildup, which can hide problems. Inspect the wall around the shelf for cracks or holes. Regular maintenance extends shelf life and ensures safety.
Avoiding Common Mistakes
- Do not ignore wall type; drywall needs anchors or studs.
- Avoid using weak or wrong fasteners.
- Measure twice before drilling holes.
- Do not hang shelves too high or too low.
- Use a level to keep shelves straight.
- Do not overload shelves with heavy items.
Avoiding these mistakes reduces risks and makes shelves stable. Safe installation means safer living spaces.
Credit: www.familyhandyman.com

Credit: www.youtube.com
Frequently Asked Questions
How Do I Find Studs To Hang Shelves Securely?
Use a stud finder to locate wooden studs behind drywall. Mark the stud positions for drilling. Anchoring shelves into studs ensures strong support and prevents falling.
What Tools Are Needed To Hang Shelves On Walls?
You’ll need a drill, level, screwdriver, tape measure, pencil, and wall anchors or screws. These tools help ensure accurate placement and secure mounting.
How High Should Shelves Be Hung On The Wall?
Shelves are usually hung 48 to 60 inches from the floor. Adjust height based on shelf purpose and room layout for easy access and visual balance.
Can I Hang Shelves On Drywall Without Studs?
Yes, use heavy-duty drywall anchors or toggle bolts. They provide strong support but avoid placing very heavy items on these shelves.
Conclusion
Hanging shelves on the wall is simple with the right steps. Choose strong anchors for heavy items. Measure carefully before drilling holes. Use a level to keep shelves straight. Take your time to avoid mistakes. Shelves add space and style to any room.
Enjoy organizing your things neatly and easily. Try it yourself and see how well it works. Small effort, big difference.


