

Are you ready to transform your space with a stunning, modern touch? Installing 3D architectural wood wall panels is a simple way to add depth, texture, and warmth to any room.
Whether you want to create a cozy living area or a striking feature wall, these panels can completely change the look and feel of your home. In this guide, you’ll discover easy-to-follow steps that make the installation process smooth and stress-free.
Keep reading, and by the end, you’ll have the confidence to install your own 3D wood panels like a pro. Your walls are about to become the highlight of your home.
Choosing The Right Wood Panels
Choosing the right wood panels is crucial for a successful 3D architectural wall installation. The panels must fit the room’s use, style, and budget. Understanding different types and materials helps you pick panels that last and look great. This section guides you through the main factors to consider before buying wood panels.
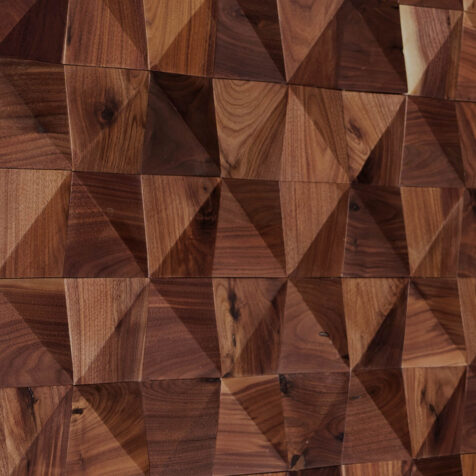
Types Of 3d Wood Panels
3D wood panels come in various designs and textures. Some common types include:
- Geometric patterns – offer a modern, clean look
- Natural wood grain – provide a warm, rustic feel
- Carved designs – add artistic and detailed touches
- Layered panels – create depth and shadow effects
Choose a type that suits the atmosphere you want. Different shapes and reliefs can change the room’s mood dramatically.
Selecting Wood For Durability
Wood type affects how long your panels last. Hardwoods like oak, maple, and walnut resist dents and scratches. Softwoods like pine are easier to work with but less durable. Consider these factors:
- Moisture resistance for bathrooms or kitchens
- Ease of maintenance and cleaning
- Resistance to insects and decay
Pick wood that fits the room’s conditions and your maintenance plans.
Matching Panels To Room Style
Wood panels should blend with your room’s design. Think about:
- Color tones that complement furniture and decor
- Panel size and pattern scale fitting the room size
- Overall style—modern, rustic, classic, or minimalist
Matching panels well makes the space feel balanced and inviting. Panels that clash with the style can look out of place.
Credit: woodywalls.com
Preparing The Wall Surface
Preparing the wall surface is key to a smooth installation of 3D architectural wood wall panels. A clean, even wall helps the panels stick better. It also makes the finished look neat and professional. Take time to prepare the wall carefully before starting the installation.
Cleaning And Smoothing The Wall
Begin by removing dust, dirt, and grease from the wall. Use a mild detergent with water and a sponge or cloth. Rinse with clean water and let the wall dry completely.
Check the surface for bumps or rough spots. Sand these areas gently using fine-grit sandpaper. A smooth wall ensures good panel adhesion and a flat finish.
Repairing Imperfections
Look for holes, cracks, or dents on the wall. Fill small holes with spackling paste or wall filler. Use a putty knife to spread the filler evenly.
Allow the filler to dry fully. Then, sand the area smoothly so it blends with the rest of the wall. Large cracks may need special repair or professional help.
Measuring And Marking Layout
Measure the wall’s height and width carefully. Plan the panel layout to avoid small or awkward cuts at edges.
Mark vertical and horizontal lines lightly with a pencil. These lines guide panel placement and keep the design straight and balanced.
Double-check all measurements and marks before attaching panels. Accurate layout saves time and prevents mistakes during installation.
Gathering Tools And Materials
Gather all necessary tools like a level, measuring tape, and adhesive before starting. Choose quality wood panels and ensure you have enough for your wall size. Preparing materials first makes the installation smoother and faster.
Gathering the right tools and materials is the cornerstone of successfully installing 3D architectural wood wall panels. Without the right gear, even the simplest tasks can become daunting. But with a well-stocked toolkit, you’ll transform your space with ease and confidence. Let’s dive into what you need to get started.Essential Installation Tools
You’ll need a basic set of tools to ensure a smooth installation process. A tape measure is crucial for accurate measurements, while a spirit level will help keep your panels straight. Don’t forget a utility knife for precise cuts and a pencil for marking. A power drill is indispensable for drilling holes and securing panels. Consider using a miter saw if your project involves angled cuts. Having these tools at hand will make your work efficient and professional-looking.Adhesives And Fasteners
Choosing the right adhesives and fasteners can make a significant difference. For adhesives, a strong construction adhesive is vital to keep the panels firmly attached to the wall. Liquid Nails or similar products work well. Fasteners like nails or screws provide additional support. If you’re working with a drywall, using anchors can prevent any future mishaps. The combination of adhesives and fasteners ensures your panels stay put for years to come.Safety Equipment
Safety should never be an afterthought. Equip yourself with safety glasses to protect your eyes from dust and debris. A dust mask is essential to avoid inhaling fine particles. Gloves can protect your hands from splinters and sharp tools. It’s also wise to have ear protection if you’re using loud power tools. Prioritizing safety allows you to focus on the task and enjoy the process without unnecessary risks. Embarking on this DIY journey, have you considered what tools might simplify your project? With these essentials, you’re not just gathering materials—you’re laying the foundation for success.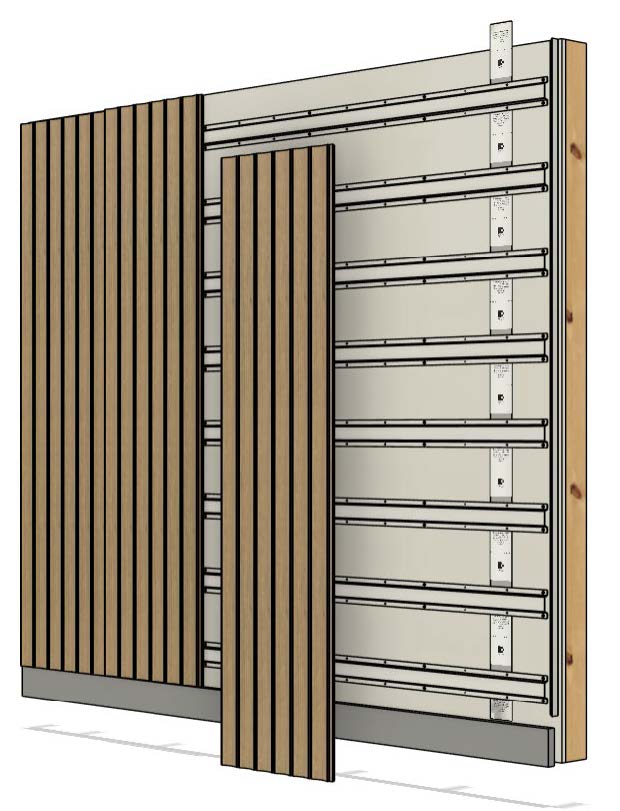
Credit: windfall.design
Installing The Wood Panels
Installing 3D architectural wood wall panels transforms a plain wall into a stunning feature. The process requires care and precision for best results. Prepare your tools and workspace for a smooth installation. Follow clear steps to ensure panels fit perfectly and stay secure.
Starting From A Corner
Begin installation at a corner of the wall. This provides a solid reference point. Place the first panel flush against the corner. Check that it is level using a spirit level. Mark the panel’s position lightly with a pencil. Starting at the corner helps align all other panels straight.
Applying Adhesive Correctly
Use a strong wood adhesive designed for wall panels. Apply the glue evenly on the back of each panel. Use a notched trowel to spread adhesive in a grid pattern. Avoid applying too much glue to prevent mess and waste. Press the panel firmly against the wall after applying adhesive.
Securing Panels In Place
Hold each panel in place for a few minutes to bond. Use finishing nails or small screws if extra security is needed. Drive nails into panel edges to hide them later. Use a nail gun for faster work and a cleaner finish. Check panels often with a level to keep alignment.
Cutting Panels For Edges And Outlets
Measure gaps near edges, corners, and outlets carefully. Mark panels where cuts are needed using a pencil. Use a jigsaw or handsaw to cut panels to size. Cut slowly and follow marks precisely for a neat fit. Sand edges lightly to remove splinters before installation.
Finishing Touches
Finishing touches complete the look of 3D architectural wood wall panels. These steps ensure a smooth, polished surface that highlights the design. Proper finishing makes the panels last longer and look professional. Focus on filling gaps, sanding, and applying the right color or finish.
Filling Gaps And Seams
Gaps and seams between panels can distract from the overall look. Use wood filler or caulk to fill these spaces neatly. Choose a filler that matches the wood type or color closely. Apply with a putty knife and press firmly into gaps. Let the filler dry completely before moving on. This step ensures a seamless, clean wall surface.
Sanding And Smoothing
Sanding removes rough edges and excess filler. Use fine-grit sandpaper for a smooth finish without damaging the panel texture. Sand gently along the grain to avoid scratches. Wipe the surface with a damp cloth to remove dust. Smooth panels help paint or stain adhere better and give a refined look.
Staining Or Painting Panels
Choose stain or paint based on your desired style. Stain enhances natural wood grain and adds warmth. Paint provides a uniform color and modern feel. Apply thin, even coats with a brush or roller. Allow each coat to dry before applying the next. Finish with a clear sealant for protection and durability.

Credit: woodywalls.com
Maintenance Tips
Maintaining 3D architectural wood wall panels helps keep their beauty and durability. Regular care prevents dirt buildup and damage. Simple steps can extend the life of your wood panels and keep them looking fresh.
Cleaning Wood Panels
Dust the panels regularly using a soft cloth or duster. Avoid harsh chemicals that can damage the wood finish. Use a damp cloth with mild soap for deeper cleaning. Wipe gently to remove stains without scratching the surface. Dry the panels completely to prevent moisture damage.
Preventing Damage
Keep sharp objects away from the panels to avoid scratches. Control indoor humidity to prevent wood warping or cracking. Place furniture and decorations carefully to avoid bumps. Avoid direct sunlight on panels to reduce fading. Use protective pads on items that touch the panels.
Repairing Minor Issues
Fill small scratches with wood filler or wax sticks matching the panel color. Sand lightly around the damaged area for a smooth finish. Reapply wood stain or sealant to blend repairs. For loose panels, reattach using appropriate adhesives or fasteners. Act quickly to prevent minor issues from worsening.
Frequently Asked Questions
What Tools Do I Need To Install Wood Wall Panels?
You need a measuring tape, level, adhesive, nails, hammer, and saw. A stud finder helps for secure mounting. These tools ensure precise and safe installation of 3D wood wall panels.
How Do I Prepare The Wall Before Installation?
Clean the wall surface, remove dust, and repair any damage. Ensure the wall is dry and smooth. Proper preparation improves panel adhesion and final appearance.
Can I Install 3d Wood Panels On Uneven Walls?
Yes, but you may need to use shims or a leveling compound. This creates a flat surface for proper panel alignment and secure attachment.
How Long Does It Take To Install Wood Wall Panels?
Installation usually takes 3 to 6 hours depending on wall size and experience. Preparation and drying time are additional factors to consider.
Conclusion
Installing 3D architectural wood wall panels can change any room’s look. The process is simple with the right tools and steps. Measure carefully and prepare your wall before starting. Take your time to align each panel correctly. Clean the surface after installation for the best finish.
Enjoy the new texture and style in your space. Small efforts bring big changes to your home. Try this project and see the difference yourself.


