
Are you looking to make your home smarter and more energy-efficient? Installing a Lutron motion sensor switch is a simple way to do just that.
Imagine never having to fumble for a light switch again—your lights turn on automatically when you enter a room and turn off when you leave. It’s convenient, saves energy, and can even boost your home’s security. In this guide, you’ll learn exactly how to install a Lutron motion sensor switch step-by-step, even if you have little or no electrical experience.
Keep reading, and you’ll be enjoying hands-free lighting in no time.
Tools And Materials Needed
Before you start installing your Lutron motion sensor switch, gathering the right tools and materials is essential. Having everything ready not only saves time but also makes the process smoother and safer. Missing a tool midway can turn a simple task into a frustrating experience.
Essential Tools For Installation
- Screwdriver Set:Both flathead and Phillips screwdrivers are needed to remove the existing switch and secure the new one.
- Voltage Tester:This helps you confirm that the power is off, protecting you from electrical shocks.
- Wire Strippers:Needed to strip insulation from the wires for proper connections.
- Needle-Nose Pliers:Useful for bending wires and making tight connections.
- Electrical Tape:For safely wrapping wire nuts and exposed wires.
Materials Required
- Lutron Motion Sensor Switch:Ensure you have the correct model compatible with your wiring setup.
- Wire Nuts:These secure your wire connections and prevent short circuits.
- Faceplate:Often included with the switch, but double-check to avoid mismatched sizes.
Additional Tips
Check if your home’s electrical box has a neutral wire. Lutron switches often require it, and missing this can halt your progress. If you’re unsure about your wiring, consulting a professional might save you time and ensure safety.
Have you ever started a project only to realize you lacked a critical tool? Avoid that by setting up your workspace with these essentials. It makes the installation process straightforward and reduces unexpected delays.

Credit: www.youtube.com
Safety Precautions
Turn off the power at the circuit breaker before starting the installation. Use a voltage tester to confirm no electricity flows to the wires. Wear insulated gloves to protect against electric shock during the process.
Installing a Lutron motion sensor switch can enhance your home’s convenience. Before starting, consider safety as a priority. Safety precautions ensure both a smooth installation and your protection. Always take time to prepare thoroughly.Turn Off The Power
Switch off the power at the circuit breaker. Confirm it’s off using a voltage tester. This step prevents electrical shock. Never skip this vital action.Read The Instructions
Before starting, read the Lutron switch manual. Understand each step clearly. Manuals provide specific details and warnings. This knowledge prevents mistakes during installation.Use The Right Tools
Gather necessary tools like screwdrivers and wire strippers. Having the right tools ensures efficiency and safety. It reduces the risk of errors or injuries.Wear Safety Gear
Wear gloves and safety goggles. Protect your eyes and hands from any potential harm. Safety gear reduces the risk of accidents.Check For Loose Wires
Inspect the wires for any loose connections. Secure them properly to avoid hazards. Loose wires can cause short circuits or fires.Test The Sensor
After installation, test the sensor’s functionality. Ensure it operates as expected. Testing confirms both safety and effectiveness.Identify Wiring Types
Identifying wiring types is a crucial step before installing a Lutron motion sensor switch. Understanding the wires in your electrical box helps ensure a safe and correct installation. It prevents damage to the sensor and your home’s electrical system.
Most homes have different wiring setups. Knowing which wire does what will make the installation smoother. It also helps to avoid confusion and potential hazards.
Identify The Line Wire
The line wire carries power from the electrical panel to the switch. It is usually black or red. This wire is always live, even when the switch is off. Use a voltage tester to confirm which wire is the line.
Locate The Load Wire
The load wire connects the switch to the light fixture. It carries power to the light when the switch is on. This wire is often black or red but different from the line wire. Identifying this wire ensures the sensor controls the light properly.
Find The Neutral Wire
The neutral wire completes the electrical circuit. It is usually white. Some older homes may not have a neutral wire in the switch box. The Lutron sensor requires a neutral wire to function correctly. Check for this wire before installation.
Check For The Ground Wire
The ground wire is usually green or bare copper. It protects against electrical faults. Connect the ground wire to the sensor for safety. This wire does not carry current during normal operation.
Use A Voltage Tester Safely
Turn off the power at the breaker box before handling wires. Use a voltage tester to identify live wires. Test each wire carefully to avoid shocks. Label wires with tape for easy reference during installation.
Turn Off Power
Before you start installing your Lutron motion sensor switch, turning off the power is the most important safety step. Working with electricity without cutting the power can cause serious injury or damage. Taking this precaution protects both you and your home.
Locate The Circuit Breaker
First, find your home’s circuit breaker panel. It’s usually in the basement, garage, or a utility closet. Look for the breaker that controls the room where you’ll install the motion sensor switch.
If you’re unsure which breaker controls the light, flip breakers one at a time and check if the light turns off. This simple test helps you identify the correct switch without guesswork.
Switch Off The Power
Once you find the right breaker, flip it to the OFF position. This stops electrical flow to the switch box you’ll be working on. It’s a quick action that makes your installation process much safer.
After turning off the power, use a voltage tester on the switch wires to confirm there’s no electricity. Never skip this step—visual confirmation isn’t enough.
Double-check For Safety
Even if the breaker is off, sometimes power can still flow due to wiring quirks. Testing the wires ensures you won’t get shocked while handling them. It’s a small step that prevents big accidents.
Have you ever underestimated a safety step and regretted it? Taking this moment to double-check can save you from costly mistakes and injuries.
Remove Existing Switch
Removing the existing switch is the first step in installing a Lutron motion sensor switch. This process requires caution and attention to safety. You must turn off the power to the switch at the circuit breaker. This prevents electric shock or injury during removal.
After switching off the power, confirm it is off by testing the switch. Use a voltage tester or a simple light fixture. This ensures the wires are not live, making the removal safe.
Gather Necessary Tools
- Flathead screwdriver
- Phillips screwdriver
- Voltage tester
- Needle-nose pliers
Remove The Switch Cover Plate
Use a flathead or Phillips screwdriver to remove the screws. Keep the screws in a safe place for reuse. Gently pull the cover plate away from the wall. This exposes the switch and wiring.
Unscrew The Existing Switch
Unscrew the mounting screws holding the switch to the electrical box. Hold the switch firmly while removing screws. Pull the switch out slowly to reveal the wires.
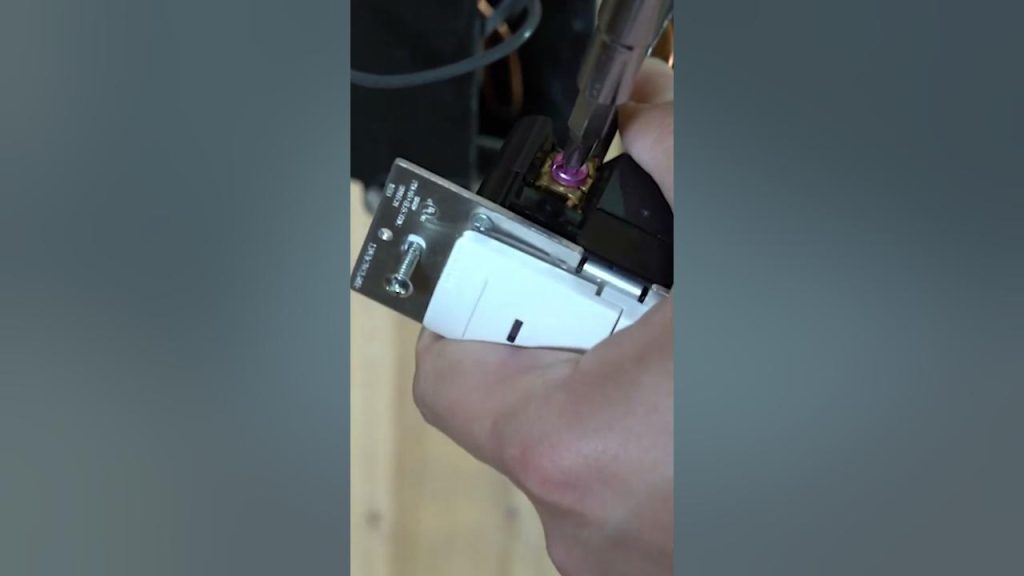
Disconnect The Wires
Note the wire connections or take a photo. This helps during new switch installation. Loosen the terminal screws or release wire connectors. Carefully separate all wires from the old switch.
Credit: ledco.ca
Connect Wires To Sensor
Connecting wires to the Lutron motion sensor switch is a key step in installation. Proper connections ensure the sensor works safely and efficiently. Pay close attention to wire colors and secure them well. This avoids electrical hazards and keeps the sensor responsive.
Match Wire Colors
Identify each wire by its color before connecting. The black wire usually carries power. The white wire is neutral, and the green or bare wire is ground. Connect the sensor wires to matching colors only. This prevents short circuits and malfunction.
Use Wire Connectors
Twist the matching wires together tightly. Then, cover them with wire connectors. Wire connectors keep wires from touching other wires or metal parts. They also provide a strong, safe connection. Check each connector for a snug fit before pushing wires back into the box.
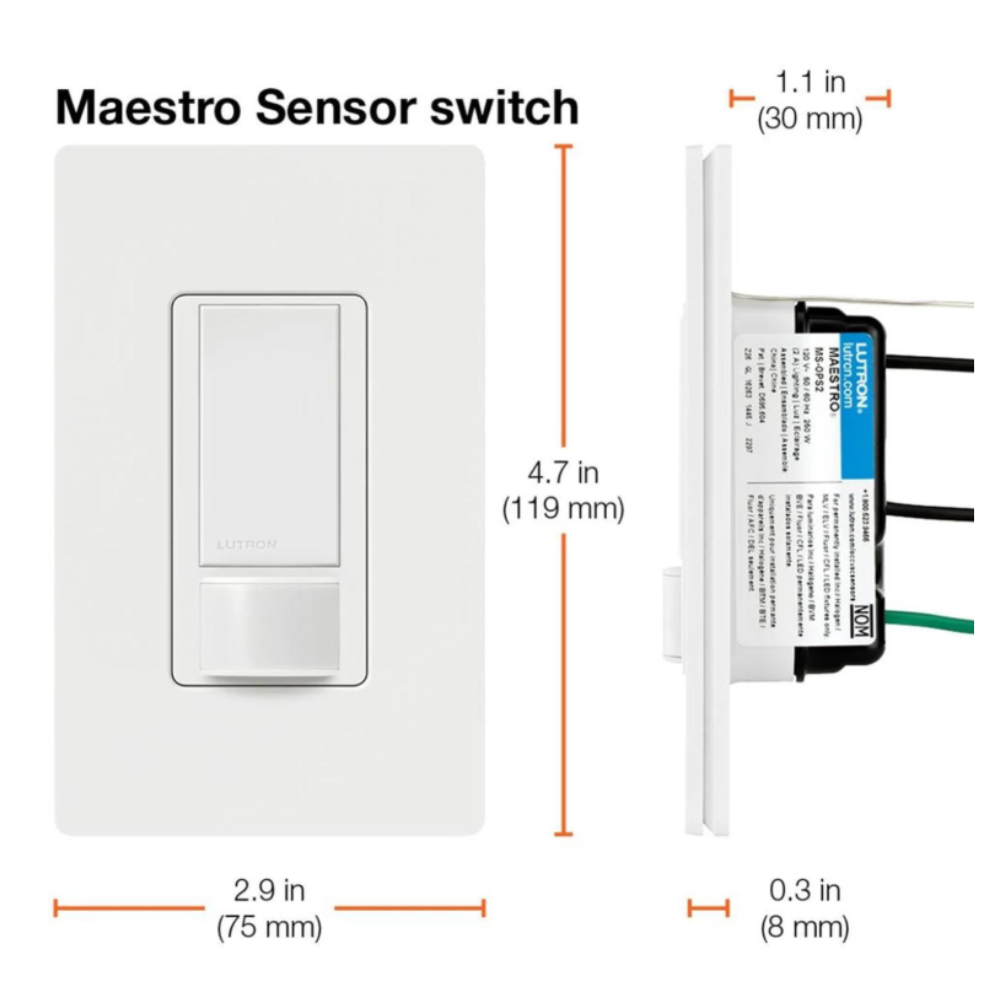
Mount The Motion Sensor Switch
Mounting your Lutron motion sensor switch correctly is key to its performance and your satisfaction. The right placement ensures it detects movement accurately without false triggers. Let’s focus on how to securely and effectively mount the switch in your home.
Prepare The Electrical Box
Before mounting, check that the electrical box is clean and free of debris. You want a smooth surface to ensure the switch fits snugly. Tighten any loose wires or screws to avoid issues later.
Have you noticed how a loose switch plate can cause flickering lights or poor sensor response? Secure wiring prevents such problems.
Align The Motion Sensor Switch
Hold the motion sensor switch against the electrical box and align it properly. The sensor’s lens should face the area where you want to detect movement. Avoid pointing it toward windows or direct light sources to prevent false activation.
Think about the room’s layout—where do you move most? Position the sensor to cover these zones effectively.
Attach The Switch To The Wall
Use the screws provided with your Lutron switch to fasten it to the electrical box. Tighten them evenly to keep the switch flat against the wall. Be careful not to overtighten, as this can damage the switch or wall plate.
Remember, a secure mount reduces wear and extends the life of your switch.
Install The Wall Plate
Once the switch is mounted, snap or screw on the wall plate. This step not only improves aesthetics but also protects the switch and wiring. Choose a wall plate that matches your decor for a seamless look.
Have you ever overlooked this step and ended up with a dusty or damaged switch? A wall plate guards against that.
Restore Power And Test
After carefully wiring and securing your Lutron motion sensor switch, it’s time to restore power and test the installation. This step is crucial because it confirms whether your new switch functions correctly and safely. Without proper testing, you might face unexpected issues or even damage the device.
Turn On The Circuit Breaker
Locate the circuit breaker that controls the switch you just installed. Flip it back to the “on” position to restore power to the room. If you’re unsure which breaker controls the switch, turning them on one by one is a simple way to find the right one.
Once power is restored, your Lutron motion sensor switch should light up or display a status indicator. This instant feedback tells you that the device is receiving electricity and is ready for testing.
Test The Motion Detection
Walk in front of the sensor to check if the light turns on automatically. The sensor should detect your movement and trigger the light within a couple of seconds. If the light stays off, double-check your wiring or the switch’s settings.
Also, test the switch’s auto-off feature by moving out of the sensor’s range. Does the light turn off after the preset delay? This helps you confirm the sensor’s timing is working as expected and saves energy by preventing lights from staying on unnecessarily.
Adjust Sensor Settings If Needed
Your Lutron motion sensor switch usually allows you to customize settings like sensitivity and time delay. Use the small buttons or dials on the device to tweak these parameters. For example, increasing sensitivity can help in detecting smaller movements.
If the light turns on too easily—say, with pets moving around—you might want to reduce sensitivity. Testing these adjustments in real-time helps you find the perfect balance between convenience and energy savings.
Confirm Manual Override Functionality
Try turning the switch on and off manually to ensure the override works. Sometimes, you want to keep the light on regardless of motion, especially during parties or late-night reading. Your ability to control the switch manually adds flexibility to its automation.
Does the manual switch respond immediately? If it lags or doesn’t work, there might be an installation issue you need to revisit. This quick check avoids frustration later when you rely on the switch for daily use.
Adjusting Sensor Settings
Adjusting the sensor settings on your Lutron motion sensor switch is essential for optimal performance. Proper settings ensure the sensor detects motion accurately and controls the lights efficiently. You can customize the sensor based on the room’s activity and lighting needs.
Sensitivity Adjustment
Sensitivity controls how much motion the sensor detects. Higher sensitivity picks up small movements, while lower sensitivity ignores minor actions. Adjust this setting to avoid false triggers or missed detections.
- Locate the sensitivity dial or button on the switch.
- Turn the dial clockwise to increase sensitivity.
- Turn it counterclockwise to decrease sensitivity.
- Test by moving in the room to check detection range.
Fine-tune the sensitivity until the sensor reacts only to desired motion.
Time Delay Settings
Time delay controls how long the lights stay on after motion stops. Set the delay based on room use and personal preference. Longer delays save trips to turn lights back on.
- Find the time delay control on the switch or app.
- Select a delay time, usually from 30 seconds to 30 minutes.
- Choose shorter times for busy areas or longer times for less traffic.
- Observe the lights after motion stops to confirm delay length.
Adjust the delay to balance energy savings and convenience effectively.
Credit: www.homehardware.ca
Troubleshooting Tips
Check all wire connections carefully to avoid loose or incorrect wiring. Test the sensor in different lighting conditions to ensure proper function. Resetting the switch can help fix common issues quickly.
Installing a Lutron Motion Sensor Switch can enhance your home’s lighting efficiency. Yet, sometimes issues arise. Troubleshooting these problems ensures your switch operates smoothly. This section offers practical tips to solve common installation issues, helping you achieve optimal performance.Check Power Supply
Ensure the switch receives power. Double-check the circuit breaker is on. Use a voltage tester to confirm electricity flows to the switch.Verify Wiring Connections
Incorrect wiring can cause malfunctions. Review the wiring diagram in the manual. Ensure each wire connects to the correct terminal. Tighten any loose connections to avoid intermittent power issues.Sensor Sensitivity Adjustment
The sensor may not detect motion. Adjust the sensitivity settings. Locate the adjustment dial on the sensor. Increase sensitivity gradually until motion is detected effectively.Test Light Bulbs
Non-compatible bulbs may not work with the sensor. Use bulbs recommended by Lutron. Test with different bulb types to find the most effective ones.Reset The Sensor
A reset can resolve many issues. Turn off the power to the switch. Wait a few minutes and turn it back on. This refreshes the sensor settings.Inspect For Obstructions
Ensure nothing blocks the sensor’s field of view. Curtains, furniture, or decorations can obstruct detection. Clear the area around the sensor for optimal performance.Consult The Manual
The manual provides specific troubleshooting tips. Refer to it for detailed guidance. Each model may have unique features or requirements.Frequently Asked Questions
What Tools Are Needed To Install A Lutron Motion Sensor Switch?
You need a screwdriver, voltage tester, wire stripper, and electrical tape. These tools ensure safe and proper installation of the switch.
How Do I Turn Off Power Before Installation?
Switch off the circuit breaker connected to the switch. Use a voltage tester to confirm no power is present.
Can I Install A Lutron Switch Myself Safely?
Yes, if you follow instructions and turn off power first. If unsure, consult a professional electrician for safety.
How To Connect Wires For Lutron Motion Sensor Switch?
Match the wires by color: black to black (hot), white to white (neutral), green to ground. Secure with wire nuts.
Conclusion
Installing a Lutron motion sensor switch is simple and quick. Follow each step carefully for safe setup. Test the switch to ensure it works properly. This device helps save energy and adds convenience to your home. Enjoy hands-free lighting control with minimal effort.
Now, your space feels smarter and more efficient. Keep these tips handy for future installations.


