
Is your attic feeling too hot or damp? Proper ventilation can fix that—and protect your home from damage.
Installing ventilation in your attic might sound tricky, but with the right steps, you can do it yourself and save money. You’ll discover simple, clear instructions to get fresh air flowing where it matters most. Ready to improve your home’s comfort and energy efficiency?
Let’s dive in and make your attic a healthier space.
Credit: www.roofingcontractor.com
Benefits Of Attic Ventilation
Installing proper ventilation in your attic offers several important benefits that directly impact your home’s comfort, energy efficiency, and structural health. Many homeowners overlook attic ventilation, but it plays a crucial role in maintaining a healthy living environment and protecting your investment. Understanding these benefits can help you see why adding ventilation is worth the effort.
Preventing Moisture Build-up
Moisture often collects in attics due to temperature differences between inside and outside air. Without ventilation, this moisture can turn into condensation, leading to mold growth and wood rot.
I once noticed dark stains and a musty smell in my attic. After installing vents, the moisture problem disappeared, and the air felt fresher. Proper airflow stops moisture from settling, keeping your attic dry and your home healthier.
Reducing Energy Costs
Ventilation helps regulate attic temperature by letting hot air escape during summer and cold air circulate in winter. This balance reduces the strain on your heating and cooling systems.
If your attic overheats, your air conditioner works harder, driving up energy bills. Adding vents can lower these costs by maintaining a cooler attic and improving overall home comfort.
Extending Roof Lifespan
Heat and moisture trapped in your attic can damage roofing materials over time. This leads to premature wear, shingles curling, and even leaks.
Installing attic ventilation can protect your roof from these risks. It prolongs the life of shingles and structural components, saving you money on repairs and replacements later.
Types Of Attic Ventilation
Choosing the right type of attic ventilation is crucial for maintaining a healthy home environment. Different vents serve unique purposes and work best when combined effectively. Understanding these options will help you make smarter decisions for your attic’s airflow and overall energy efficiency.
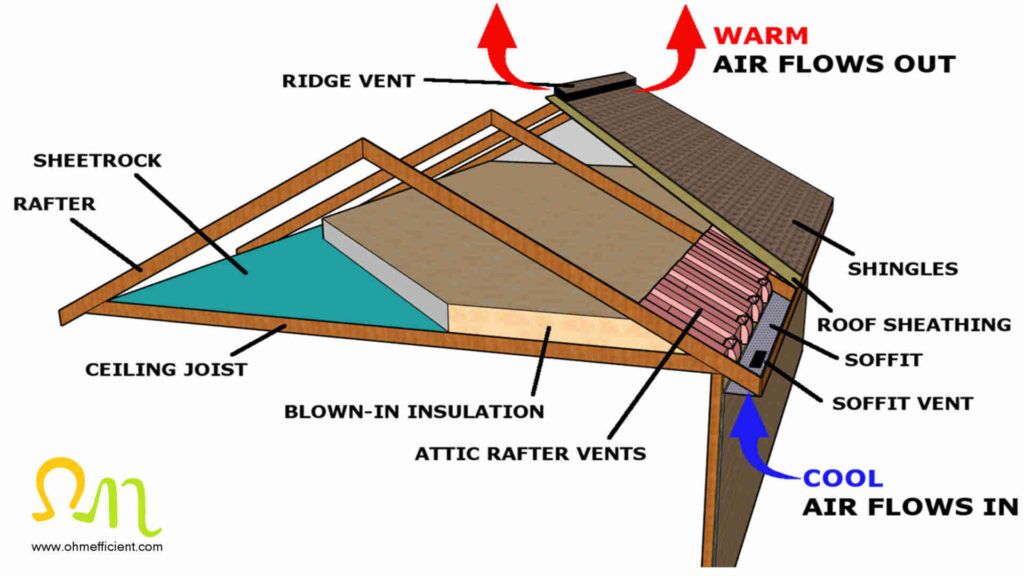
Soffit Vents
Soffit vents are installed under the eaves of your roof. They allow fresh air to enter the attic from the outside, creating a pathway for air to flow upward.
If your attic lacks proper intake vents, warm air can get trapped, causing moisture problems. Soffit vents work best when paired with exhaust vents, promoting continuous air circulation.
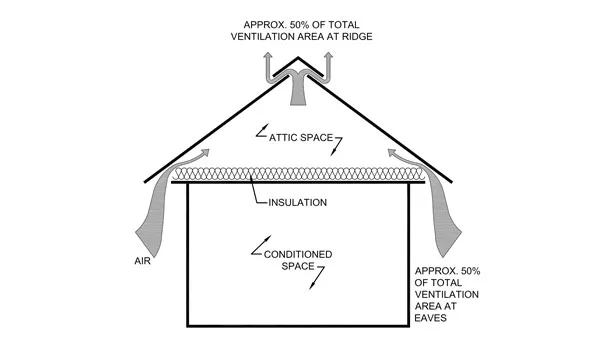
Ridge Vents
Ridge vents run along the peak of your roof and act as exhaust vents for hot, stale air. They work silently and blend well with your roofline, making them a popular choice.
One advantage is that ridge vents provide even ventilation along the entire roof length. But they need proper soffit vents below to allow cool air to enter.
Gable Vents
Gable vents are placed on the triangular walls at each end of the attic. They help exhaust warm air but don’t provide intake ventilation.
These vents are easier to install if your attic already has gable ends. However, relying solely on gable vents might not be enough for balanced airflow.
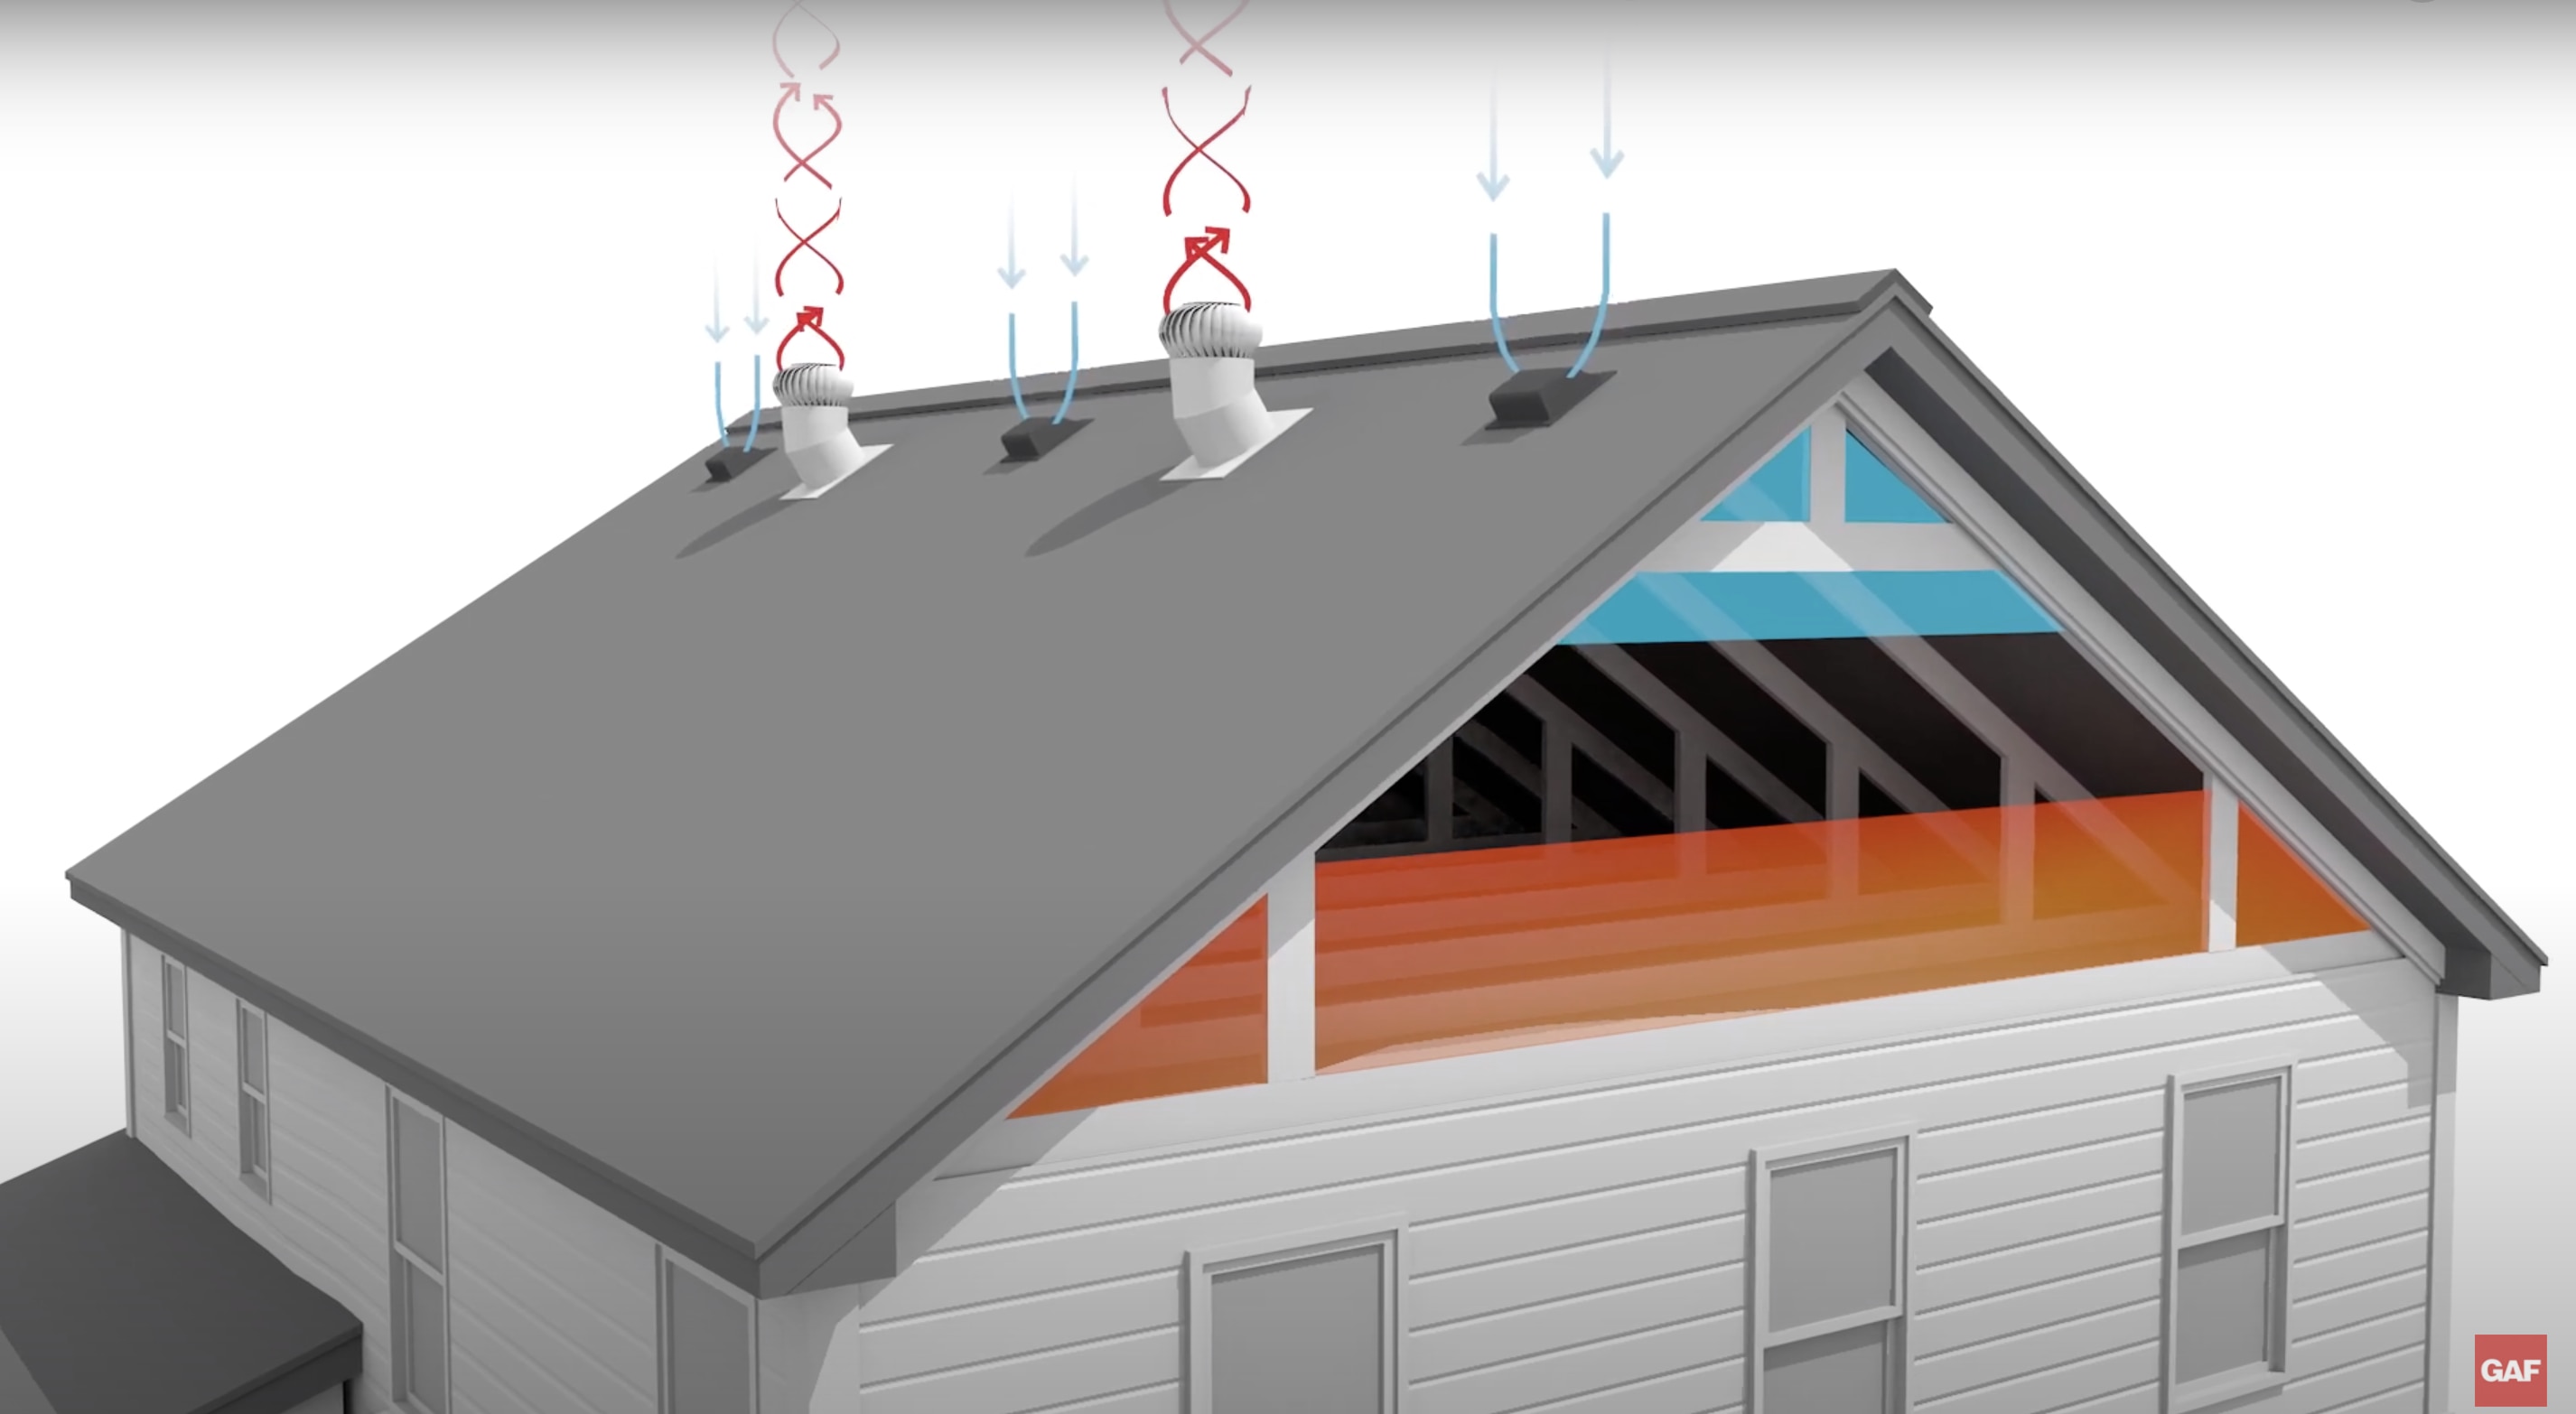
Turbine Vents
Turbine vents, also called whirlybirds, spin with the wind to pull hot air out of the attic. Their motion actively increases ventilation without electricity.
Though effective, they depend on wind speed to work well. If you live in a calm area, turbine vents may not provide consistent ventilation.
Tools And Materials Needed
Before you begin installing ventilation in your attic, gathering the right tools and materials is essential. Having everything ready not only speeds up the process but also ensures a safer and more effective installation. You might be surprised how much easier the job gets when you’re properly equipped.
Basic Tools Checklist
- Measuring Tape:Accurate measurements help you position vents correctly.
- Utility Knife:Useful for cutting roofing felt or insulation around vent areas.
- Drill and Drill Bits:Needed for creating pilot holes and securing vents.
- Screwdriver:Essential for fastening screws during installation.
- Hammer:Helps with nails and minor adjustments.
- Caulking Gun:To seal gaps and prevent moisture intrusion.
- Safety Gear:Gloves, safety glasses, and a dust mask to protect yourself.
I once underestimated the value of a quality drill; it slowed me down and made the process frustrating. Investing in good tools pays off in both time and effort.
Ventilation Materials
- Ridge Vents:Installed along the roof’s peak for continuous airflow.
- Soffit Vents:Positioned under the eaves to allow fresh air intake.
- Gable Vents:Mounted on the attic walls to enhance cross-ventilation.
- Vent Covers:Protect vents from rain, debris, and pests.
- Flashing:Ensures waterproof sealing around vent openings.
- Ventilation Baffles:Keep insulation away from vent openings, allowing air to flow freely.
Choosing the right combination of vents depends on your attic’s design and climate. Have you checked what type of vents your neighborhood homes use? That insight might guide your selection and boost performance.

Credit: www.youtube.com
Preparing The Attic For Installation
Preparing your attic before installing ventilation is crucial for ensuring the system works efficiently. Taking time to inspect, clean, and measure will save you from future headaches and improve air circulation. Let’s break down these essential steps to get your attic ready.
Inspecting Existing Ventilation
Start by checking what ventilation you already have. Look for soffit vents, ridge vents, gable vents, or any other openings. Are they blocked or damaged? Even small obstructions can reduce airflow and cause moisture buildup.
Pay attention to insulation around vents too. Sometimes insulation shifts and blocks airflow without you realizing it. Identifying these problems early helps you decide whether to repair or add new vents.
Cleaning The Area
Clear out dust, debris, and any cobwebs near the vents and attic floor. A clean area prevents contaminants from entering your home’s air and makes installation easier. You might be surprised how much dust accumulates up there.
Remove old insulation that’s blocking air paths but be careful not to disturb any areas that are intact. Use a vacuum designed for dusty spaces or a brush to clean thoroughly. Safety gear like masks and gloves is a must here.
Measuring Vent Locations
Measure carefully where you plan to place new vents. Accurate measurements ensure vents fit perfectly and provide the right airflow balance. Use a tape measure and mark spots clearly with a pencil or chalk.
Think about how air moves through your attic. Vents should be placed low and high for proper intake and exhaust. Ask yourself: Will these spots allow for easy installation and maintenance later on?
Step-by-step Installation Guide
Installing ventilation in your attic can significantly improve air circulation and prevent moisture buildup. This step-by-step guide will walk you through the essential components you need to add to ensure your attic breathes properly. Each section breaks down the process into manageable tasks that you can handle with basic tools and a bit of patience.
Installing Soffit Vents
Soffit vents allow fresh air to enter the attic from beneath the eaves. Start by locating the soffits and measuring the area where the vents will go. Use a drill and saw to create evenly spaced openings if your soffits don’t already have vents.
Attach the soffit vents securely using screws or nails, making sure they sit flush with the surface. These vents need to be unobstructed, so clear any insulation or debris that might block airflow. Think about how much fresh air you want coming in; too few vents can limit ventilation effectiveness.
Adding Ridge Vents
Ridge vents run along the peak of your roof and allow hot air to escape. To install them, you’ll need to cut a narrow slot along the roof ridge. Use a chalk line to ensure the cut is straight and even on both sides of the ridge.
Carefully remove roofing shingles along the slot to expose the wood. Position the ridge vent over the opening and secure it with roofing nails. Seal the edges with roofing cement to prevent leaks. Proper alignment here is key—misplaced vents can cause water damage.
Mounting Gable Or Turbine Vents
Gable and turbine vents offer alternative ways to ventilate the attic, especially when soffit or ridge vents aren’t an option. For gable vents, measure and mark the desired location on the attic wall, often near the peak.
Cut an opening that fits your vent size and secure the vent with screws. Turbine vents require a hole in the roof where the base is mounted and sealed. Both types should be checked regularly to ensure they spin freely or remain unobstructed.
Sealing And Insulating
After installing vents, sealing gaps around them is crucial to keep your attic energy efficient. Use expanding foam or caulk to fill any cracks or openings near the vents. This prevents unwanted air leaks that can increase your energy bills.
Next, inspect your attic insulation to ensure it doesn’t block the vents, especially soffit vents. You might need to add baffles or channels to keep insulation away and maintain clear airflow paths. Proper ventilation works best when combined with correct insulation practices—have you checked your attic lately?
Credit: www.gaf.com
Common Mistakes To Avoid
Installing ventilation in an attic is vital for home health and energy efficiency. Avoiding common mistakes ensures the system works well. These errors can reduce airflow, cause damage, or create safety hazards. Learn what to watch out for during installation.
Blocking Airflow Paths
Air must flow freely through vents for proper attic ventilation. Blocking airflow paths stops fresh air from entering or exiting. Common blocks include insulation pushed against vents or stored items near openings. Keep vents clear and maintain gaps around them. Check attic insulation placement to avoid covering vents.
Using Incorrect Vent Sizes
Vents too small or too large affect ventilation performance. Small vents limit airflow and cause heat buildup. Oversized vents can let in pests or moisture. Use vent sizes recommended for your attic space. Calculate the right amount of ventilation based on attic area and local climate. Proper sizing balances intake and exhaust vents.
Ignoring Safety Precautions
Attic work involves risks like falls, electrical wires, and sharp objects. Always wear protective gear such as gloves and masks. Turn off power to attic lighting before working near wiring. Use sturdy ladders and watch your step on joists. Follow safety rules to prevent accidents and injuries during installation.
Maintaining Attic Ventilation
Proper attic ventilation installation is vital. It ensures air circulation, preventing moisture buildup and prolonging roof life. Consider installing ridge vents and soffit vents for effective air flow.
Maintaining proper attic ventilation is crucial for a healthy home environment. It prevents moisture build-up and helps regulate temperature. A well-ventilated attic extends the lifespan of your roof. It also enhances energy efficiency, reducing utility bills. Here are some essential steps to maintain attic ventilation effectively.Regular Inspections
Conduct regular inspections at least twice a year. Look for blocked vents or unusual moisture. Check for signs of mold or mildew. Inspect for any signs of animal nests. Regular checks help identify issues early.Cleaning Vents
Keep vents free of dust and debris. Use a soft brush or vacuum for cleaning. Ensure all obstructions are removed. Clean vents improve airflow significantly. Regular cleaning prevents potential blockages.Repairing Damages
Address any damages to vents immediately. Check for broken or missing parts. Repair or replace damaged components. Prompt repairs prevent further ventilation issues. Ensure all repairs are done correctly.Frequently Asked Questions
What Tools Are Needed To Install Attic Ventilation?
Basic tools include a ladder, drill, saw, measuring tape, and safety gear. Ventilation materials like vents and fans are essential. Proper tools ensure safe, effective installation.
How Do I Choose The Best Attic Ventilation Type?
Select based on attic size, roof type, and climate. Common types are ridge vents, soffit vents, and gable vents. Effective ventilation prevents moisture buildup and regulates temperature.
How Much Does Attic Ventilation Installation Cost?
Costs vary by vent type and attic size. On average, expect $300 to $1,200 for materials and labor. Proper ventilation saves on energy bills and prevents damage.
How Often Should Attic Ventilation Be Inspected?
Inspect ventilation at least twice a year, ideally in spring and fall. Check for blockages, damage, or mold. Regular inspections maintain airflow and attic health.
Conclusion
Proper attic ventilation keeps your home cool and dry. It helps prevent mold and wood damage. Good airflow also lowers energy bills by reducing heat buildup. Installing vents is easier than many think. Follow the steps carefully for best results.
Regular checks keep the system working well. A well-ventilated attic means a healthier house overall. Start your project with confidence today.


