
Looking to add a cozy, stylish touch to your living space? Knitting a floor pouf with chunky yarn is easier than you think—and it’s a fun project you’ll actually enjoy.
Imagine sinking your feet into a soft, handmade pouf after a long day. You don’t need to be an expert knitter to create this trendy piece. In this guide, you’ll discover simple steps that make the process smooth and satisfying.
Ready to transform your home with your own hands? Keep reading, and let’s get started!

Credit: www3.designindaba.com
Choosing The Right Yarn And Tools
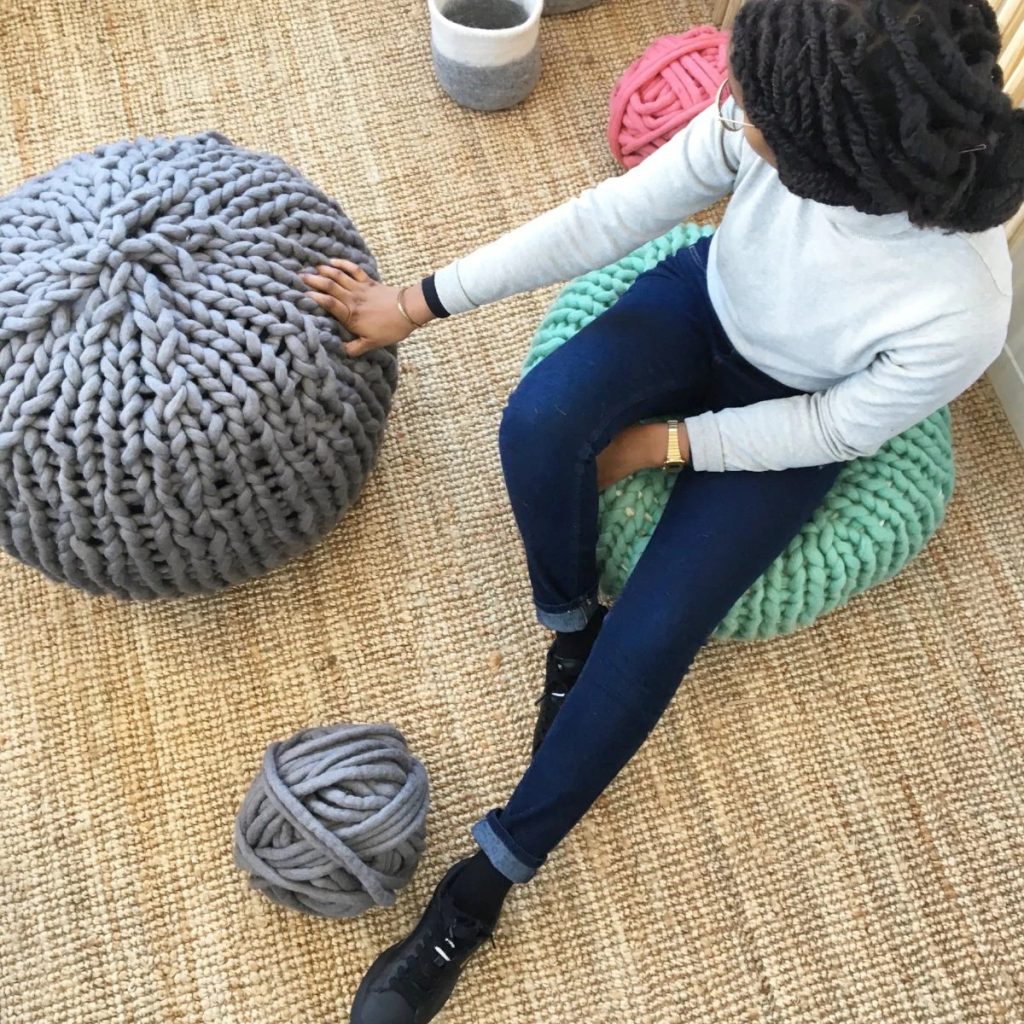
Choosing the right yarn and tools sets the foundation for knitting a floor pouf that looks great and lasts long. The materials you pick affect the texture, size, and durability of your pouf. Getting familiar with chunky yarn and the proper needles will save you time and make the process more enjoyable.
Benefits Of Chunky Yarn
Chunky yarn is thick, which means your pouf will knit up quickly. This is perfect if you want fast results without sacrificing quality. The bulk also gives your pouf a cozy, cushioned feel that’s hard to achieve with thinner yarns.
Another perk is the sturdy structure chunky yarn provides. It holds shape well, making your pouf comfortable to sit on. Plus, the texture adds a modern, stylish look to your home.
Selecting Needle Sizes
Using the right needle size is key to getting the perfect stitch tension and pouf size. Chunky yarn usually pairs well with large needles, like sizes 15mm or 20mm. These big needles help maintain a loose, flexible fabric ideal for a floor pouf.
If your stitches are too tight, the pouf could feel stiff and hard. Too loose, and it won’t hold its shape well. Try knitting a small swatch first to see how your yarn and needles work together.
Additional Materials Needed
Besides yarn and needles, you’ll need some extra materials to complete your floor pouf. A large tapestry needle is useful for sewing the knitted pieces together neatly. You’ll also need stuffing—polyester fiberfill or old pillows work well to fill out your pouf.
Don’t forget stitch markers to keep track of your rows and patterns. And having scissors nearby will make trimming yarn ends easier. These small tools make the knitting process smoother and help you create a polished final product.
Credit: diyjoy.com
Preparing Your Workspace
Clear a flat surface with good light to work comfortably. Gather all materials like chunky yarn, large needles, and scissors before starting. A cozy, quiet space helps keep focus and enjoy knitting.
Preparing your workspace is a crucial step in knitting a floor pouf with chunky yarn. A well-organized and comfortable area can make the difference between a frustrating experience and a joyful creation process. So, how can you set up the perfect knitting environment?Setting Up A Comfortable Area
First, find a space in your home that feels inviting and has good lighting. Natural light is ideal, but a bright lamp can work wonders when you’re knitting in the evening. Select a chair with good back support to prevent any discomfort during your knitting sessions. Consider the temperature of your workspace. A room that’s too hot or too cold can distract you from enjoying your knitting. Keep a cozy blanket nearby if you tend to get chilly, or have a fan ready if you might overheat.Organizing Supplies
Next, gather all the supplies you will need for your project. This includes your chunky yarn, knitting needles, a pair of scissors, and a measuring tape. Keep everything within arm’s reach to maintain your flow and reduce interruptions. Think about using small baskets or containers to keep your yarn and tools organized. This will help you easily find what you need and prevent your materials from getting tangled or misplaced. A tidy workspace can enhance your focus and creativity. Ask yourself: is there something else that could make this space more enjoyable? Perhaps a cup of tea, soothing music, or even an inspiring podcast can keep you company while you knit. Creating a pleasant atmosphere can enhance your knitting experience and make it something you look forward to.Basic Knitting Stitches For Poufs
Knitting a floor pouf with chunky yarn is fun and rewarding. Basic stitches form the foundation of your work. Learning these stitches helps create a neat, strong pouf. You will use a few simple steps to shape your pouf perfectly. These basic knitting stitches are easy to follow and great for beginners.
Casting On
Casting on starts your knitting project. It creates the first row of loops on the needle. Use a simple long-tail cast on for chunky yarn. Hold the yarn and needle firmly but gently. Make sure loops are even and not too tight. This step sets the width of your pouf.
Knit Stitch
The knit stitch is the most common stitch. Insert the needle into the front of the loop. Wrap the yarn around the needle from back to front. Pull the loop through and slide the old loop off. Repeat this stitch to create a smooth, flat surface. It forms the main body of your pouf.
Purl Stitch
The purl stitch looks like the opposite of the knit stitch. Insert the needle from front to back. Wrap the yarn over the needle from front to back. Pull the loop through and drop the old loop off. Use purl stitches to add texture or create patterns. It helps balance the fabric and adds softness.
Binding Off
Binding off finishes your knitting and secures stitches. Knit two stitches first, then lift the first over the second. Continue this process across the row. This step stops your work from unraveling. Cut the yarn and pull through the last loop. Your pouf piece is now ready to join and stuff.
Knitting The Pouf Sides
Knitting the pouf sides is a crucial part of making your floor pouf sturdy and stylish. This step shapes the structure and gives your pouf its unique look. Using chunky yarn makes the process quicker and the texture more appealing.
Focus on creating strong, even panels that fit together well. The base panel forms the bottom, while the side panels build up the walls. Pay attention to stitch tension and count to keep the pouf balanced.
Creating The Base Panel
Start by casting on enough stitches to match your desired pouf size. Use a simple stitch like garter or stockinette for a smooth finish. Knit back and forth until the panel is square or round, based on your design. Keep your stitches tight to support the pouf’s weight. Bind off carefully to keep the edges neat and even.
Knitting The Side Panels
Pick up stitches along the edge of the base panel to start the sides. Knit in the round or flat, depending on your pattern. The side panels need to be as tall as you want your pouf’s height. Maintain consistent stitch tension to avoid gaps or unevenness. Shape the corners if your pouf is square, or keep it smooth for a round pouf. Bind off the top edge securely to prepare for assembly.
Assembling The Pouf
Assembling your floor pouf is where all your knitting efforts come together. This step transforms flat pieces of chunky yarn into a cozy, functional piece of furniture. Paying close attention here ensures your pouf not only looks great but also holds up well with use.
Seaming Techniques
Choosing the right seaming technique affects both the look and durability of your pouf. A mattress stitch works well for chunky yarn because it creates an almost invisible seam that’s strong and stretchy. If you want a more decorative edge, whip stitching adds a nice touch but may be less flexible.
Try to keep your tension consistent while seaming to avoid puckering or gaps. Don’t rush this part—it’s tempting to finish quickly, but neat seams make your pouf feel professional. Have you experimented with different seams on previous projects? Your experience can guide you here.
Adding A Closure Or Zipper
Deciding how to close your pouf affects how easy it is to stuff and clean. A zipper gives you the flexibility to remove the filling when needed, which is great for washing the cover. Look for a heavy-duty zipper that matches the thickness of your yarn for smooth opening and closing.
If a zipper feels too complicated, consider using buttons or snaps for a simple closure. Another option is a fold-over flap, which hides the opening but might be less secure. Think about how often you’ll need to open your pouf and what closure style fits your lifestyle best.
Stuffing And Finishing Touches
Stuffing and finishing touches complete your knitted floor pouf. These steps add shape, comfort, and durability. Proper filling ensures the pouf stays cozy and firm. Finishing touches give it a neat, polished look.
Choosing Filling Materials
Pick filling that is soft but supportive. Common options include:
- Polyester fiberfill – lightweight and easy to shape
- Old pillows or cushions – eco-friendly and cost-saving
- Foam pieces – provides firm support
- Bean bag beads – moldable and comfy
Choose based on comfort, budget, and availability.
Ensuring Even Stuffing
Stuff the pouf evenly to avoid lumps. Start by adding small amounts of filling. Press and spread it gently with your hands. Fill corners and edges first, then the center. Check firmness often to keep balance. Avoid overstuffing, which can stretch the knit.
Final Adjustments
Close the opening with neat, secure stitches. Use a yarn needle and matching yarn. Tighten any loose stitches on the surface. Smooth the pouf with your hands for shape. Let the pouf rest to settle the filling before use.
Care And Maintenance Tips
Taking care of your chunky yarn floor pouf helps keep it looking fresh and cozy. Proper care extends its life and maintains its softness. Follow simple tips to clean and protect your pouf.
Cleaning Chunky Yarn Poufs
Use a gentle approach to clean your chunky yarn pouf. Avoid harsh chemicals or rough scrubbing. Spot clean stains with a mild detergent mixed with water. Dab the area gently using a soft cloth.
For dust and dirt, shake the pouf outdoors or use a vacuum with a brush attachment. Do not soak the pouf in water as it may damage the yarn and stuffing. Air dry completely if it gets damp to prevent mold.
Preventing Wear And Tear
Place your pouf in low-traffic areas to reduce friction. Rotate it regularly to distribute wear evenly. Avoid placing heavy objects on top that can flatten the yarn.
Keep pets’ claws away to stop snags or pulls. Store your pouf in a dry place when not in use to prevent moisture damage. Use a fabric protector spray designed for wool or yarn to add an extra layer of defense.

Credit: lo-rain.com
Frequently Asked Questions
What Type Of Yarn Is Best For Knitting A Floor Pouf?
Chunky or super bulky yarn works best for knitting a floor pouf. It creates a thick, sturdy texture that holds shape well. This yarn type also speeds up the knitting process, making the pouf durable and cozy.
How Much Chunky Yarn Do I Need For A Floor Pouf?
You typically need about 4 to 6 skeins of chunky yarn for a standard-sized floor pouf. The exact amount depends on your pouf’s size and stitch pattern. Always check your specific pattern for precise yarn requirements.
What Knitting Needles Are Ideal For Chunky Yarn Poufs?
Large-sized needles, usually US size 15 or bigger, are ideal for chunky yarn poufs. Bigger needles make it easier to work with thick yarn and create loose stitches, perfect for a soft, cushioned pouf.
How Do I Stuff A Knitted Floor Pouf?
Use firm stuffing like polyester fiberfill or foam inserts to stuff your knitted pouf. Fill evenly to maintain shape and comfort. Avoid overstuffing to keep the pouf soft yet supportive.
Conclusion
Knitting a floor pouf with chunky yarn is fun and simple. You create a cozy, soft seat for any room. The thick yarn works quickly, so you see progress fast. This project suits beginners and experienced knitters alike. Try different colors and sizes to match your style.
Enjoy the comfort and charm your handmade pouf adds. Keep practicing to improve your knitting skills. Soon, you’ll have more cozy items for your home. Start today and feel proud of your creation!


