
Your entryway is the first thing guests see when they step into your home. Imagine having a stylish console table there that not only adds charm but also keeps your space organized.
If you’ve ever thought about creating one yourself, you’re in the right place. This guide will show you simple steps to build a beautiful console table that fits your style and needs. Ready to transform your entryway and impress everyone who walks through your door?
Let’s get started!

Credit: 100things2do.ca
Choosing The Right Materials
Choosing the right materials is crucial for building a sturdy and attractive console table. The materials affect the table’s durability, look, and ease of assembly. Picking quality wood and the right hardware ensures the table will last and fit well in your entryway.
Consider the style of your home and the table’s function. Some woods work better for heavy use, while others offer a delicate look. The tools and hardware you select should match the wood and design, making the building process smooth and efficient.
Selecting Wood Types
Choose wood that fits your style and budget. Solid hardwoods like oak, maple, or walnut offer strength and a beautiful grain. Pine and poplar are softer woods, easier to work with and more affordable. Consider plywood or MDF for parts not visible, to save cost.
Think about the wood’s finish and color. Light woods brighten small spaces. Dark woods add warmth and richness. Check for smooth surfaces and minimal knots to avoid extra sanding or repairs.
Hardware And Tools Needed
Good hardware keeps your table strong and stable. Use screws, wood glue, and brackets for solid joints. Choose screws that fit the wood thickness and are rust-resistant.
Basic tools include a saw, drill, screwdriver, measuring tape, and level. Sandpaper or an electric sander helps smooth edges. Clamps hold pieces steady while glue dries. Having the right tools saves time and improves the final result.

Credit: 100things2do.ca
Planning Your Design
Planning your console table design is the key to creating a piece that fits perfectly in your entryway and meets your needs. Without a clear plan, you might end up with a table that’s too big, too small, or doesn’t work for your space. Taking time to measure and sketch helps you visualize the final product and avoid costly mistakes.
Measuring Your Entryway Space
Start by measuring the width, depth, and height of the space where you want your console table. Use a tape measure and write down each dimension carefully. Don’t forget to note nearby obstacles like door swings, light switches, or vents that could affect placement.
Think about how much walking space you want to keep clear. A good rule of thumb is to leave at least 30 inches of clearance in front of the table. This ensures your entryway remains functional and doesn’t feel cramped.
Sketching The Table Layout
Once you have your measurements, draw a simple sketch of your console table. Include key dimensions like length, width, and height. This visual guide will make it easier to plan materials and construction steps.
Consider what you want on or under the table. Will you add drawers, shelves, or just a flat surface? Sketching these elements helps you decide how much wood or hardware you’ll need.
Ask yourself: What will you use the table for daily? This question influences the design and functionality. A well-thought-out sketch saves time and frustration during the build process.
Cutting And Preparing Wood
Measure and mark wood pieces carefully to ensure accurate cuts for your console table. Use sharp tools and smooth edges to prepare wood for assembly.
Crafting a console table for your entryway can transform your space with a personal touch. It all starts with the essential step of cutting and preparing the wood. This process lays the foundation for your table’s strength and beauty.Marking Measurements
Precision is key when measuring your wood pieces. Use a reliable tape measure to mark your dimensions clearly. A small mistake here can lead to a wobbly table or mismatched pieces. Double-check each measurement before making any cuts.Safe Cutting Techniques
Safety should always be your top priority. Equip yourself with safety goggles and gloves. Use a saw that you’re comfortable with, whether it’s a handsaw or a power saw. Ensure your wood is securely clamped to prevent any movement during cutting. Take your time; rushing can lead to accidents or uneven cuts.Sanding For Smoothness
Sanding transforms rough edges into smooth surfaces. Begin with a coarse-grit sandpaper to remove any major imperfections. Gradually shift to finer grits for a polished finish. A smooth surface not only looks better but also helps the wood absorb stain or paint evenly. Have you ever run your hand over a perfectly sanded piece of wood? It’s satisfying! Taking the time to sand thoroughly will enhance the overall feel and look of your console table. Remember, each step is crucial in crafting a piece that you’ll be proud to display in your home.Assembling The Table Frame
Assembling the table frame is a crucial step in building a sturdy console table. This process involves connecting the legs and supports to form a solid base. A well-assembled frame ensures the table holds up well over time.
Take your time during this stage. Precise joining and strong connections make a big difference. A stable frame makes the rest of the build easier and safer.
Joining Legs And Supports
Start by lining up the legs with the supports. Use wood glue on the contact points for extra strength. Screws or nails will hold the pieces firmly together.
- Pre-drill holes to prevent wood from splitting.
- Clamp the legs and supports in place while fastening.
- Check that all legs are even before tightening screws.
Make sure each leg fits flush against the support. A tight fit avoids wobbling later on.
Ensuring Stability
Check the frame for any movement or gaps. Stability depends on solid connections and level legs. Use a carpenter’s square to confirm right angles.
- Adjust screws if any part feels loose.
- Add corner braces for extra support if needed.
- Test the frame by applying gentle pressure to each corner.
A strong frame holds the table top and items safely. Don’t rush this step to avoid a shaky console table.
Adding The Tabletop
Adding the tabletop to your console table is a pivotal step that transforms the frame into a functional piece. It’s where form meets function, giving you a surface to display your favorite items or catch essentials like keys and mail. Pay attention to how you attach and secure the tabletop to ensure it stays sturdy and safe for everyday use.
Attaching The Surface
Start by positioning the tabletop carefully on the base. Align it so all edges are flush with the frame to avoid uneven overhangs that can look sloppy or cause damage.
Use clamps or have a helper hold it steady while you check the fit. This prevents the tabletop from shifting during the next steps.
Think about the weight and thickness of your tabletop. A heavier surface may need extra support underneath, like brackets or additional cross beams.
Securing With Screws Or Nails
Choose screws for a stronger hold, especially if your table will carry heavier items. Nails work for lighter use but may loosen over time.
Pre-drill holes to prevent the wood from splitting, especially near edges. This small step saves you from frustrating cracks and damage.
Drive screws or nails evenly spaced along the frame—typically every 6 to 8 inches works well. Don’t forget to countersink screws so they sit flush or below the surface for a smooth finish.
Have you considered using wood glue along with screws? It adds extra strength and reduces creaking noises as the wood settles.
Finishing Touches
The finishing touches bring your console table to life. These final steps protect the wood and enhance its look. A well-finished table stands out and lasts longer in your entryway.
Applying Paint Or Stain
Choose paint or stain that matches your room style. Paint offers solid color and hides imperfections. Stain highlights wood grain and adds warmth. Use a brush or cloth for even coverage.
- Sand the surface lightly before applying.
- Apply thin, even coats to avoid drips.
- Let each coat dry fully before the next.
- Use a soft brush for paint or rag for stain.
Test color on a small area first. Adjust if needed to get the perfect shade.
Sealing For Durability
Seal your console table to protect against scratches and spills. Clear polyurethane or varnish works well. It creates a tough, transparent layer on top of paint or stain.
- Choose satin, semi-gloss, or gloss finish.
- Apply with a clean brush in long strokes.
- Sand lightly between coats for smoothness.
- Apply 2 to 3 coats for best protection.
Sealing keeps your table looking fresh and new. It also makes cleaning easier and prevents damage over time.
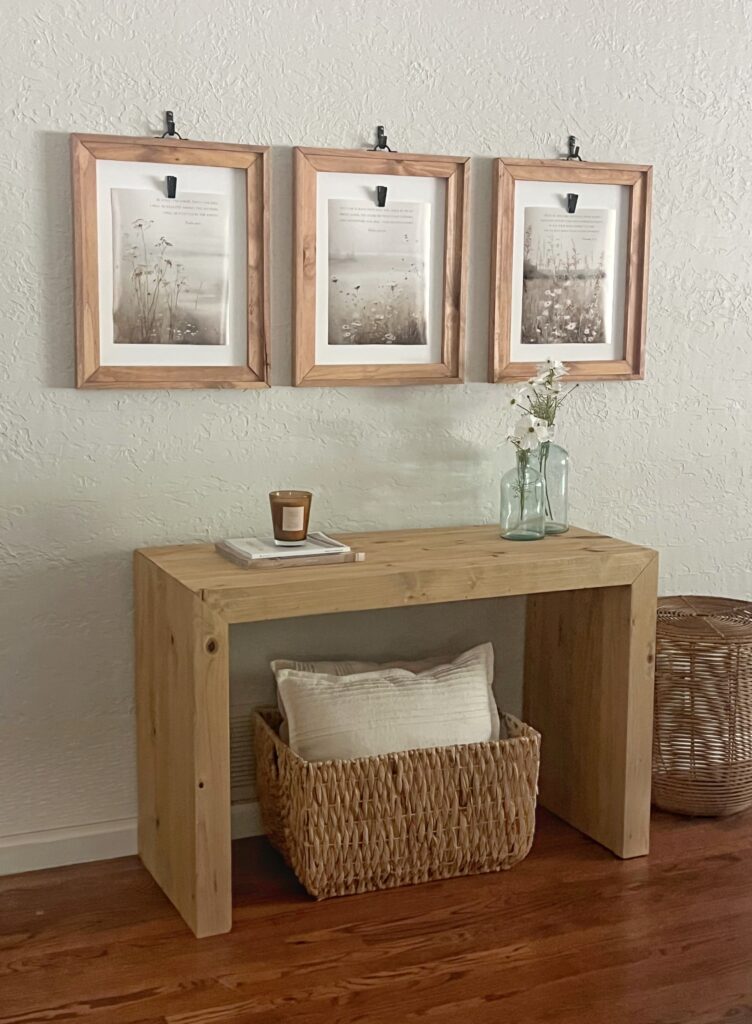
Decorating Your Console Table
Decorating your console table adds charm and personality to your entryway. It sets the tone for your home’s style. The right decor creates a warm and inviting space. Small touches can make a big impact. Focus on balance and simplicity for the best look.
Choosing Accessories
Select accessories that reflect your style and complement the table. Use a mix of items to create interest without clutter. Consider these ideas:
- A small stack of books for height and color
- Decorative bowls or trays to hold keys and mail
- Photo frames with personal pictures
- Unique sculptures or art pieces
- Mirrors or clocks for function and style
Keep the arrangement tidy and avoid overcrowding. Choose a color theme to unify the look.
Lighting And Greenery Ideas
Good lighting highlights your console table and adds warmth. Use table lamps or wall sconces for soft light. Candles also create a cozy glow.
Greenery brings life and freshness to the space. Pick low-maintenance plants like succulents or ferns. A vase with fresh flowers adds a natural touch. Group plants in different sizes for visual appeal.

Credit: www.digsdigs.com
Frequently Asked Questions
What Materials Are Best For Making An Entryway Console Table?
Wood is the most popular material for console tables due to its durability and aesthetic appeal. Pine, oak, and walnut offer strength and beauty. You can also use metal or glass for a modern look. Choose materials that match your entryway style and budget.
How Long Does It Take To Build A Console Table?
Building a console table typically takes 4 to 6 hours for beginners. This includes measuring, cutting, assembling, and finishing. Experienced DIYers might complete it faster. Proper preparation and having all tools ready speeds up the process significantly.
What Tools Are Needed To Make A Console Table?
You’ll need a saw, drill, measuring tape, screws, sandpaper, and wood glue. A level and clamps can improve precision. Optional tools include a sander and paintbrush for finishing. Having the right tools ensures a sturdy and polished table.
How Do I Customize My Console Table Design?
Customize by choosing unique finishes, stains, or paint colors. Add decorative elements like carved legs or metal accents. Adjust the table height and width to fit your entryway space perfectly. Personal touches make the table uniquely yours.
Conclusion
Creating a console table for your entryway adds style and function. This simple project fits any home and skill level. Choose the right materials and tools to start. Follow each step carefully for the best results. You will enjoy a neat space to place keys and decor.
A handmade table brings a personal touch to your home. Try this project to add charm and order at once. Ready to build? Your entryway will thank you.


