
Looking to add a personal touch to your workspace? Making a desk lamp at home is easier than you think, and it can save you money while letting your creativity shine.
Imagine having a lamp that fits your style perfectly and brightens your work or study area just the way you want. In this guide, you’ll discover simple steps and handy tips to create your own unique desk lamp. Ready to light up your space with something truly yours?
Let’s get started!
Materials Needed
Gathering the right materials is essential to build a desk lamp at home. Each part plays a role in making the lamp functional and safe. Choosing the correct tools and components ensures a smooth assembly process.
Safety is also important while working on electrical projects. Wearing the right gear protects you from potential hazards. Prepare all items before starting the project for better results.
Basic Tools
- Screwdriver (flathead and Phillips)
- Wire cutters and strippers
- Soldering iron (optional for stronger connections)
- Drill (for making holes in the lamp base)
- Measuring tape or ruler
- Pliers
- Multimeter (for testing electrical connections)
Lamp Components
- Light bulb (LED recommended for energy efficiency)
- Lamp socket (compatible with the bulb)
- Power cord with plug
- Switch (inline or base switch)
- Lamp base (wood, metal, or plastic)
- Lamp arm or stand (adjustable or fixed)
- Wire connectors or electrical tape
Safety Gear
- Insulated gloves
- Safety glasses
- Dust mask (if sanding or drilling wood)
- Fire extinguisher nearby
Choosing The Right Design
Choosing the right design for your DIY desk lamp is crucial. The style you pick will affect not only the lamp’s look but also its functionality and how well it fits into your space. Think about what suits your daily needs and personal taste before you start building.
Simple Styles
Simple designs often mean fewer materials and easier assembly. A basic lamp with a straight arm and a plain shade can be very effective and elegant. You might use materials like wood, metal pipes, or even recycled jars to keep the look clean and minimal.
Simple styles also allow you to focus on lighting quality. Have you noticed how a straightforward design can bring out the best light without distraction? Sometimes, less really is more when it comes to a desk lamp.
Creative Ideas
If you want your lamp to stand out, consider adding unique features. Think about using colorful wires, patterned lampshades, or unusual shapes. You could even repurpose everyday objects like old cameras or teapots to create a conversation piece.
Creative designs let you express your personality. What’s one object in your home you could turn into a lamp base? Bringing your own touch to the lamp makes the project more rewarding and the final product truly yours.
Space Considerations
Before you decide on a design, measure the area where your lamp will sit. A large, bulky lamp might overwhelm a small desk, while a tiny lamp could get lost on a wide surface. Think about how much room you have and what kind of light coverage you need.
Also, consider your workspace layout. Do you need a lamp that swivels or adjusts height? Is there easy access to a power outlet? Matching your lamp’s design to your space ensures it works well and looks right where it belongs.
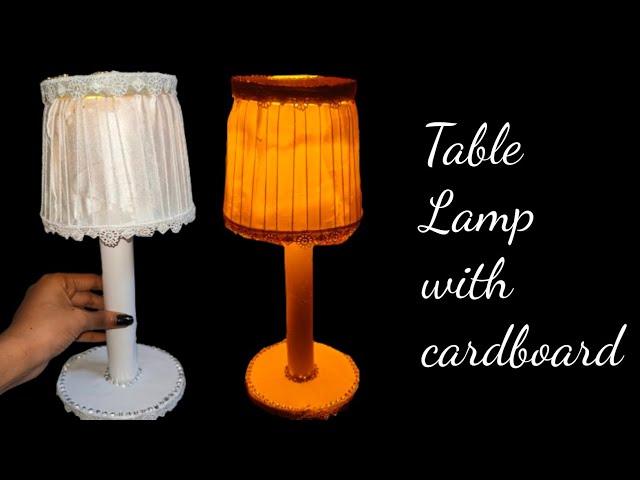
Step-by-step Assembly
Creating your own desk lamp at home is a rewarding project. You can craft a unique piece that suits your style. Let’s walk through the step-by-step assembly process. This guide covers preparing the base, wiring the lamp, and attaching the shade. Follow these steps to bring light and creativity to your workspace.
Preparing The Base
Choose a solid, stable base for your lamp. Wood, metal, or ceramic work well. Ensure the base has a flat bottom. Drill a hole through the center for the cord. Sand the base to remove any rough edges. Paint or varnish the base if desired, then let it dry completely.
Wiring The Lamp
Gather a lamp kit with a socket, cord, and plug. Thread the cord through the hole in the base. Connect the cord to the socket according to the kit instructions. Secure the socket on the top of the base. Test the connection by plugging it in and switching it on. Ensure the bulb lights up properly.
Attaching The Shade
Select a shade that complements your base. Check that the shade fits the socket size. Attach the shade by screwing it onto the socket. Make sure it is secure and level. Adjust the shade to direct light where needed. Enjoy your new homemade desk lamp!

Credit: www.youtube.com
Testing And Troubleshooting
Testing and troubleshooting are key to ensuring your desk lamp works safely and well. After assembly, checking the lamp helps find any wiring or connection problems early. Careful testing prevents damage and keeps the lamp functional for a long time.
Checking Connections
Start by examining every wire connection. Make sure wires are tightly twisted or firmly attached to terminals. Loose connections cause flickering or no light.
Look for exposed wires. Cover any bare spots with electrical tape or heat shrink tubing. This protects against shorts and shocks.
Use a multimeter to test continuity between wires. It shows if electricity flows correctly through your circuit. No flow means a break or bad contact somewhere.
Fixing Common Issues
If the lamp does not turn on, check the bulb first. Try a new bulb to rule out a burnt-out filament.
Test the power source by plugging another device into the same outlet. No power means an outlet or fuse problem.
Check the switch. Sometimes a faulty switch blocks current. Replace or repair the switch if needed.
Watch for overheating parts. Overheating wires or sockets can indicate wrong bulb wattage or bad wiring. Use the correct bulb and fix wiring issues promptly.
Customizing Your Lamp
Customizing your desk lamp is where your creativity truly shines. This step allows you to transform a simple light source into a unique piece that fits your style and needs perfectly. Whether you prefer a bold statement or subtle elegance, the options to personalize are endless.
Painting And Finishing
Choosing the right paint can change the entire look of your lamp. Matte finishes give a modern, understated vibe, while glossy paints add a sleek and polished feel. Spray paint works well for even coverage, but hand-painting lets you add patterns or textures.
Try experimenting with color combinations that match your room or workspace. Metallic paints like gold or copper can add a touch of sophistication. Don’t forget to seal your paint with a clear coat to protect it from scratches and dust.
Adding Features
Think about what extra features could make your lamp more functional. Adding a dimmer switch lets you control brightness depending on your mood or task. USB ports are handy for charging your devices without cluttering your desk.
Consider attaching a small shelf or clip to hold your phone or notes. You could even add a flexible arm for adjusting the light direction easily. What feature would make your desk work smoother and more enjoyable?
Personal Touches
Personal touches make your lamp truly yours. Attach small decorations like beads, stickers, or fabric to reflect your personality. You might use washi tape to create stripes or patterns that match your stationery.
Try engraving your initials or a favorite quote on the base for a subtle but meaningful detail. Adding a scent diffuser feature can create a calming atmosphere while you work. What small addition would make you smile every time you switch on your lamp?

Credit: www.youtube.com
Safety Tips
Safety should be a top priority when making a desk lamp at home. Working with electricity and tools can be risky without proper care. Following safety tips reduces chances of accidents and ensures a smooth project.
Electrical Precautions
- Always unplug wires before starting work.
- Use insulated wires and connectors for safety.
- Check that the lamp socket matches the bulb voltage.
- Avoid touching live wires with bare hands.
- Test the lamp with a circuit tester before plugging it in.
- Keep liquids away from electrical parts to prevent short circuits.
- Do not overload power outlets with multiple devices.
Handling Tools Safely
- Wear safety goggles to protect your eyes.
- Use gloves to avoid cuts or burns.
- Keep your work area clean and well-lit.
- Handle sharp tools like cutters and scissors carefully.
- Store tools properly after use to prevent accidents.
- Do not rush; take your time with each step.
- Follow instructions on tool labels and manuals closely.
Credit: diyprojects.com
Frequently Asked Questions
How Do I Choose Materials For A Diy Desk Lamp?
Select lightweight, durable materials like wood, metal, or plastic. Ensure materials are heat-resistant and safe for electrical components. Use household items to reduce costs and add a personal touch to your lamp design.
What Tools Are Needed To Make A Desk Lamp At Home?
Basic tools include a drill, screwdriver, wire stripper, and pliers. You may also need a soldering iron for electrical connections. Having a measuring tape and safety gloves is essential for accuracy and protection.
Can I Use Led Bulbs In Homemade Desk Lamps?
Yes, LED bulbs are energy-efficient and produce less heat. They are ideal for DIY lamps because they last longer and save electricity. Ensure the lamp’s socket matches the LED bulb base type.
How Do I Safely Wire A Homemade Desk Lamp?
Turn off the power before wiring. Follow a wiring diagram carefully to connect the socket, plug, and switch. Use insulated wires and secure all connections to prevent electrical hazards.
Conclusion
Making a desk lamp at home is simple and fun. You can use easy materials found around the house. This project saves money and lets you create a lamp you like. It also teaches basic skills like wiring and design.
Try different styles to fit your space and needs. Enjoy the light you made with your own hands. Keep experimenting and improving your lamp over time. This small project brings both light and pride to your room.


