
Are you looking for a fun and creative way to add charm to your doll’s play area? Making a doll ottoman pouf is easier than you think, and it’s a perfect project to personalize your doll’s space.
Imagine giving your doll a cozy spot that looks stylish and feels soft. In this guide, you’ll discover simple steps to create your own doll ottoman pouf, even if you’ve never sewn before. Ready to impress yourself with this delightful DIY?
Let’s get started!

Credit: www.youtube.com
Materials Needed
Gathering the right materials sets the foundation for a successful doll ottoman pouf project. Choosing fabrics, stuffing, and supplies carefully affects the look, feel, and durability of your finished piece. Let’s break down what you’ll need to bring your creative vision to life.
Fabric Choices
Select a fabric that suits the style and function of your pouf. Cotton and linen are easy to sew and come in many colors and patterns, perfect for beginners. For a more durable option, consider canvas or upholstery fabric, especially if your doll ottoman will get lots of playtime.
Do you want a soft, cozy feel or a sleek, modern look? Velvet or faux fur can add texture but may be trickier to work with. Think about how the fabric’s weight and stretchiness will affect stuffing and sewing.
Stuffing Options
Stuffing gives your pouf its shape and comfort. Polyfill is a popular choice because it’s lightweight, affordable, and easy to mold. You can find it at most craft stores in various sizes and densities.
If you want a firmer ottoman, try foam beads or shredded memory foam. These options provide support but may require a stronger fabric cover. Have you considered recycling old pillows or cushions? It’s a budget-friendly way to add bulk while being eco-conscious.
Additional Supplies
- Thread:Pick a strong, matching thread to keep your seams secure.
- Needles:Use sharp sewing needles suitable for your fabric choice, whether hand-sewing or machine-sewing.
- Scissors or rotary cutter:Clean cuts make sewing easier and more precise.
- Measuring tape or ruler:Accuracy here saves time and frustration later.
- Pins or clips:Keep fabric pieces aligned while you sew.
- Zipper or Velcro:Optional, but useful if you want a removable cover for washing.
What tools do you already have on hand? Sometimes using familiar supplies can speed up your project and reduce stress.
Preparing The Fabric
Preparing the fabric is a key part of making a doll ottoman pouf. It sets the base for a neat and sturdy finish. Choosing the right fabric can affect how the pouf looks and holds up over time. Cut and sew the fabric carefully to get the best results.
Measuring And Cutting
Start by measuring the dimensions of the pouf. Use a ruler or measuring tape for accuracy. Mark the fabric with tailor’s chalk or a fabric marker. Cut the fabric with sharp scissors to avoid frayed edges. Cut pieces slightly larger than the measurements. This allows space for sewing seams. Keep all pieces flat and smooth to maintain correct shapes.
Sewing Basics
Use simple stitches to join fabric pieces. A straight stitch works well for most pouf fabrics. Sew with a sewing machine or hand sew if needed. Keep stitches close and even for strength. Backstitch at the beginning and end to secure seams. Press seams open with an iron for a clean look. Check for any loose threads and trim them carefully.
Creating The Pouf Shape
Cut fabric pieces into a circle or square to form the pouf’s base and sides. Sew edges carefully, leaving space to fill stuffing. Shape the pouf by evenly distributing the stuffing before closing the opening securely.
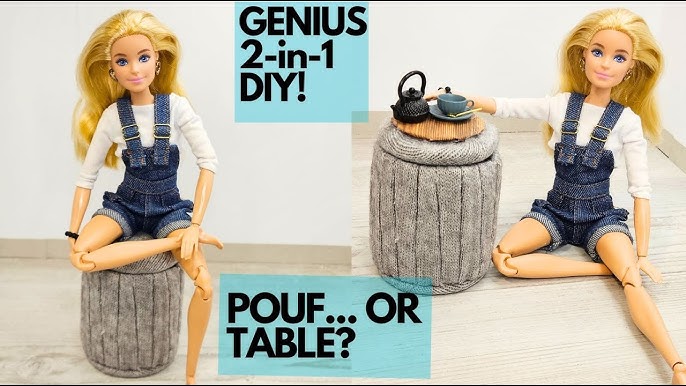
Creating the Pouf Shape Crafting a doll ottoman pouf brings a touch of creativity to playtime. The secret lies in shaping the pouf to make it both adorable and functional. With a little patience and some basic supplies, you can create a miniature masterpiece that will be the envy of all dollhouses.Assembling The Panels
Start by cutting fabric into equal-sized panels. Depending on the size of your pouf, you might need four to six panels. Ensure the edges are straight to make stitching easier. Use a sewing machine or needle and thread to stitch the panels together. Sew the sides, leaving the top and bottom open. This will form the cylindrical body of your pouf. Think about adding a unique touch with contrasting thread or decorative stitching. This can enhance the pouf’s appeal and make it stand out.Forming The Base And Top
Cut two circular pieces from your fabric for the base and top. Make sure they match the diameter of your pouf’s cylindrical body. Attach the base circle first by sewing it to the bottom of the cylinder. Ensure the stitching is secure to maintain the pouf’s shape. Before attaching the top, fill the pouf with stuffing. A soft filling will give it a plush look, while firm stuffing can add durability. Once filled, sew the top circle onto the cylinder. Secure the stitches well to keep the filling in place. Have you ever thought about using recycled materials for stuffing? Old fabric scraps or even worn-out socks can be an eco-friendly choice. This small step can make a big difference in reducing waste and adding a personal touch to your creation.
Credit: www.youtube.com
Stuffing And Shaping
Stuffing and shaping your doll ottoman pouf is where your project truly starts to take form. How you fill the pouf affects its comfort, durability, and overall look. Getting this step right ensures your ottoman isn’t just cute but functional too.
Filling Techniques
Choose stuffing that matches the size and weight you want for your pouf. Polyester fiberfill is light and fluffy, giving a soft feel, while foam pieces add firmness and structure.
Try mixing materials for a balanced texture. For example, start with a foam core for support, then surround it with fiberfill to soften edges. This combo helps the pouf keep its shape over time.
Don’t just stuff randomly—push the filling evenly to avoid lumps. Use your hands or a stick to reach corners and flatten out air pockets. How tight you pack the stuffing will decide if your pouf feels plush or firm.
Achieving A Smooth Finish
After stuffing, smooth out the surface by pressing and shaping the pouf gently. Use your palms to press from the center outward, which helps remove bumps and creates an even look.
If you notice wrinkles in the fabric, adjust the filling underneath rather than pulling on the fabric. Overstretching can distort the shape and wear out the material faster.
Consider adding a final layer of batting over the stuffing before closing the pouf. It acts like a buffer, softening edges and enhancing the smooth finish. Have you tried this trick? It can make a big difference in the final appearance.
Adding Decorative Details
Adding decorative details to your doll ottoman pouf transforms it from a simple piece into a charming accessory that complements your doll’s space. These details bring personality and flair, making your project truly unique. Let’s explore how tassels, buttons, and other embellishments can add that perfect finishing touch.
Tassels And Buttons
Tassels add a playful and tactile element that catches the eye instantly. You can make small tassels using yarn or purchase ready-made ones to sew onto the edges or corners of your pouf. Buttons offer a classic touch and can be used to create tufted patterns on the surface, giving your pouf a professional look.
Think about mixing button sizes and colors to match your doll’s style. Sewing buttons firmly ensures they stay put during playtime. Have you tried using contrasting thread to attach the buttons? It can highlight the design even more.
Embellishments For Coziness
Soft ribbons, lace trims, or tiny pom-poms can make your pouf feel inviting and cozy. Adding these along the seams or around the base creates a textured look that’s both decorative and comforting. Don’t hesitate to experiment with fabric paints or appliques to add patterns or motifs that resonate with your doll’s personality.
Consider layering different embellishments for depth—like pairing a lace trim with small fabric flowers. This approach adds warmth and makes the pouf a standout piece. What small detail could you add that reflects your doll’s unique character?
Final Touches
Finishing your doll ottoman pouf brings your project to life. The last details make it sturdy and neat. These final steps help your pouf last longer and look great.
Securing Seams
Check all seams carefully. Use a strong needle and thread to reinforce weak spots. Double-stitch areas that hold the most weight. This prevents the fabric from tearing. Trim any loose threads for a clean look. Press seams flat with a warm iron. It helps the pouf keep its shape.
Maintaining Your Pouf
Keep your pouf clean by dusting regularly. Spot clean stains gently using mild soap and water. Avoid soaking the fabric to prevent damage. Store the pouf in a dry place to stop mold. Fluff the pouf often to keep its softness. Repair small tears quickly to avoid bigger holes. These simple habits extend the life of your pouf.
Placement And Styling Ideas
Placing and styling your doll ottoman pouf can greatly improve the playroom’s look. Thoughtful placement helps the pouf fit perfectly with other doll furniture. Styling the pouf adds charm and ties the room’s theme together. Here are ideas to help you position and style the pouf with ease.
Integrating With Doll Furniture
Position the ottoman pouf near doll sofas or chairs. This creates a cozy seating group for dolls to gather. Use the pouf as a footrest or extra seat in doll living rooms. Place it beside doll beds to serve as a step or side table. Matching colors and fabrics with existing furniture helps blend the pouf smoothly.
- Pair pouf with doll couches for seating sets
- Use near doll beds as a step or table
- Coordinate colors with doll furniture pieces
- Arrange in corners to save space
Enhancing Room Decor
Choose pouf covers that match the room’s color scheme. Add small cushions or throws to the pouf for texture. Place a tiny doll blanket over it to create a cozy effect. Use the pouf as a display spot for doll accessories or toys. Group it with rugs or small plants to brighten the space.
- Match pouf fabric with room colors
- Add mini cushions or throws for texture
- Use pouf to display doll accessories
- Combine with rugs or plants for warmth
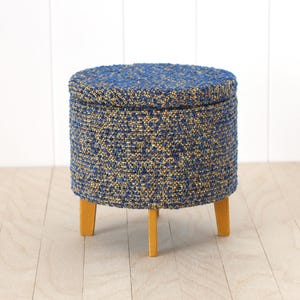
Credit: www.etsy.com
Frequently Asked Questions
What Materials Are Needed To Make A Doll Ottoman Pouf?
To make a doll ottoman pouf, you need fabric, stuffing, thread, and a sewing machine. Optional materials include buttons, zippers, and decorative trims for added style.
How Long Does It Take To Create A Doll Ottoman Pouf?
Creating a doll ottoman pouf typically takes 2 to 4 hours. Time varies based on skill level and design complexity. Beginners might need extra time for sewing and assembly.
Can I Customize The Size Of The Doll Ottoman Pouf?
Yes, you can customize the size easily. Adjust fabric measurements to fit your doll’s size. Make sure to keep proportions balanced for a neat finish.
What Sewing Skills Are Required For This Project?
Basic sewing skills are sufficient for this project. You should know how to cut fabric, sew straight seams, and stuff the pouf evenly. Beginners can follow detailed tutorials.
Conclusion
Creating a doll ottoman pouf is fun and simple. You only need a few materials and steps. This project helps improve your skills and creativity. Your doll will have a cozy, stylish seat to enjoy. Try different colors and fabrics to make it unique.
Handmade items add charm to any doll collection. Keep practicing to make even better poufs next time. Enjoy crafting and sharing your beautiful creations with friends.


