
Looking for a unique and stylish way to light up your workspace? A pipe desk lamp might be just what you need.
Not only does it add a cool, industrial vibe to your room, but making one yourself is easier than you think. Imagine having a lamp that’s built by your own hands, tailored perfectly to your style. In this guide, you’ll discover simple steps to create a pipe desk lamp that stands out and brightens your space.
Ready to turn ordinary materials into something amazing? Let’s get started!

Credit: www.youtube.com
Materials Needed
Gathering the right materials is the first step in making a pipe desk lamp. Choosing quality parts ensures your lamp will be sturdy and stylish. The materials include pipes, a light fixture, and other small supplies. Each part plays a key role in the lamp’s look and function.
Selecting The Right Pipes
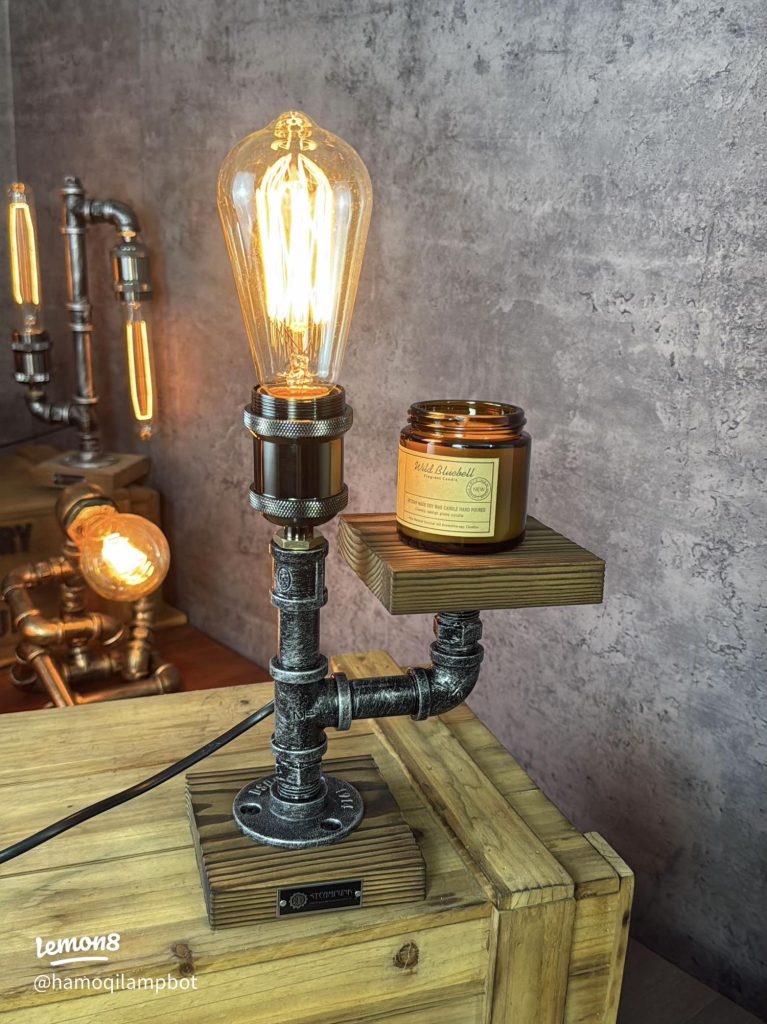
Pick pipes that suit your desk size and style. Black iron pipes offer a strong, industrial feel. Copper pipes give a warm, vintage look. Measure the length you need before buying. Include elbows, tees, and flanges for connections and stability.
Choosing The Light Fixture
Choose a light fixture that fits your lamp’s design. A simple socket works well for most pipe lamps. Decide between an LED bulb or an Edison bulb for style and brightness. Check the fixture’s voltage and wattage limits. Consider a switch that is easy to reach and use.
Additional Supplies
- Electrical wire to connect the light fixture
- Wire nuts and electrical tape for secure connections
- A lamp cord with a plug to power the lamp
- A drill and screws for attaching pipe flanges to the desk
- Sandpaper to smooth pipe edges
- A wrench or pliers to tighten pipe fittings

Credit: www.youtube.com
Tools Required
Before you start building your pipe desk lamp, gathering the right tools is essential. The tools you choose can make the difference between a smooth project and a frustrating one. Having everything ready helps you stay focused and efficient throughout the build.
Cutting Tools
Cutting metal pipes requires precision and the right equipment. A hacksaw or a pipe cutter works well for most DIY lamp projects. I once tried using a dull blade and ended up with uneven cuts that made assembly tricky—don’t make the same mistake.
- Hacksaw:Ideal for manual cutting with control.
- Pipe Cutter:Provides cleaner, straighter cuts quickly.
- Measuring Tape:Crucial for accurate pipe lengths.
- Marker or Pencil:For marking cut lines clearly.
Assembly Tools
Once your pipes are cut, you’ll need tools to put everything together. A wrench set is invaluable for tightening the pipe fittings securely. When I skipped tightening fully, the lamp wobbled—so don’t underestimate this step.
- Adjustable Wrench:Fits various pipe fitting sizes.
- Screwdriver:For attaching the lamp socket and base.
- Drill:Helps in making holes for screws or wiring.
- Pliers:Useful for gripping and twisting small parts.
Safety Equipment
Safety should be your priority during the build. Protect your hands and eyes to avoid injuries from sharp edges or flying debris. I’ve learned the hard way how quickly a small cut can slow down your project.
- Safety Glasses:Shield your eyes from metal shavings.
- Work Gloves:Protect your hands while cutting and assembling.
- Dust Mask:Prevents inhaling metal dust during cutting.
Designing Your Lamp
Crafting a pipe desk lamp adds a unique touch to any workspace. Gather pipes, a light bulb, and a base. Assemble the pieces, ensuring secure connections. Attach the bulb and enjoy your custom creation.
Designing your pipe desk lamp is where creativity truly shines. This is your chance to craft a unique piece that reflects your personal style while also serving a functional purpose. Every decision, from the overall shape to the smallest details, can transform a simple lamp into a statement piece for your workspace. Let’s dive into the exciting process of designing your lamp.Planning The Shape
Begin by envisioning the shape of your lamp. Are you drawn to classic lines, or do you prefer a more modern, industrial look? Consider the space where the lamp will reside and how its shape will complement the surroundings. Sketching a rough design can be incredibly helpful. This doesn’t require artistic skills—just a basic outline to guide your build. Think about the height, angles, and overall flow of the structure. Remember, this is your creation. Let your imagination lead the way. You might even find inspiration in unexpected places, like a piece of furniture or a photo you love.Measuring And Marking
Accurate measurements are essential for bringing your design to life. Make sure to measure twice before cutting to avoid mistakes. This simple practice can save time and materials. When marking your pipes, use a marker or chalk that’s easy to see. Clear markings ensure precise cuts and a smooth assembly process. Don’t be afraid to adjust as you go. Sometimes, the best ideas emerge when you’re willing to tweak your original plan.Customizing Style
Customization is where your lamp gains personality. Consider painting the pipes a bold color or leaving them with a natural metallic finish for an industrial vibe. You can also add decorative elements like vintage bulbs or unique switches. These details can elevate your lamp from functional to fabulous. Think about how the lamp will fit into your overall decor. Will it be a standout piece or blend seamlessly into the background? The choice is yours. By focusing on these design aspects, you’re not just building a lamp—you’re crafting a piece of art that illuminates your space with style and function. How will you make your lamp uniquely yours?Cutting And Preparing Pipes
Cutting and preparing pipes is a crucial part of building your pipe desk lamp. This process sets the foundation for a clean, professional-looking project. Taking your time here will save you from frustration later on.
Accurate Cutting Techniques
Accuracy in cutting pipes is key. Measure twice, cut once is a rule that truly matters here. Use a pipe cutter or a hacksaw designed for metal to get a clean cut.
Secure the pipe firmly in a vise to avoid any slipping. Take your time and cut slowly to prevent rough edges or deforming the pipe. Have you noticed how a slight miscut can throw off the entire design?
Smoothing Edges
After cutting, the pipe ends will be sharp and uneven. Use a metal file or sandpaper to smooth these edges carefully. This step is essential for safety and to ensure your lamp pieces fit together snugly.
Don’t rush here—rough edges can cause scratches or get in the way when assembling. I once skipped this step and ended up with a lamp that wobbled because the pipes didn’t fit right. Taking the time to smooth edges makes a huge difference.
Cleaning Components
Clean your pipes before assembly to remove any dirt, oil, or metal shavings. Use a cloth with rubbing alcohol or soapy water for this task. Clean pipes help paint or finishes adhere better, improving the final look.
Think about the last time you painted something without cleaning it first—it just didn’t look right. Your lamp deserves better. Make this a small but important habit in your workflow.
Assembling The Base And Frame
Assembling the base and frame is a key part of making your pipe desk lamp. This stage shapes the lamp’s structure and supports the light fixture. A strong, stable frame keeps the lamp safe and steady on your desk. Follow simple steps to connect pipes, ensure stability, and secure all joints firmly.
Connecting Pipe Sections
Start by gathering all pipe parts and fittings. Align the pipes according to your design plan. Fit each pipe section tightly into the connectors. Use a soft twist to join pipes without forcing. Make sure each piece fits flush to avoid gaps. This creates a smooth frame ready for the next steps.
Ensuring Stability
Check the base size; it must support the entire lamp weight. Use wider pipes or add extra fittings for balance. Place the lamp on a flat surface to test stability. Adjust pipe angles if the lamp wobbles or leans. Adding rubber pads under the base can prevent slipping. Stability keeps your lamp safe and functional every day.
Securing Joints
Apply pipe thread sealant or tape at each joint for a tight fit. Tighten all threaded connections by hand, then use a wrench for extra grip. Avoid over-tightening to prevent pipe damage. For non-threaded joints, use strong adhesive suitable for metal. Let the adhesive dry completely before moving the lamp. Firm joints make your lamp durable and long-lasting.

Credit: www.youtube.com
Installing The Wiring
Installing the wiring is a key part of building your pipe desk lamp. Proper wiring ensures the lamp works safely and lasts long. Take your time to follow each step carefully. Prepare all tools and materials before starting to avoid mistakes.
Threading The Cord
Start by choosing a durable electrical cord. Thread the cord through the pipes slowly. Avoid pulling too hard to prevent damage. Make sure the cord reaches from the power source to the socket area with enough length. Secure the cord inside the pipe using small clips if needed. This keeps the cord neat and prevents movement.
Attaching The Socket
Choose a socket that fits your bulb and pipe size. Connect the cord wires to the socket terminals carefully. Use a screwdriver to tighten the screws firmly. Check that no wire strands are loose or touching each other. Insert the socket into the pipe or mount it on the lamp frame. Ensure it is stable and aligned properly for the bulb to fit easily.
Safety Checks
Inspect all connections to confirm they are tight and secure. Look for any exposed wires or damaged insulation. Use electrical tape to cover any exposed areas. Test the lamp with a bulb and plug it in. If the lamp flickers or does not light, unplug and check wiring again. Always use a grounded plug and avoid overloading the socket.
Adding The Light Bulb And Shade
Adding the light bulb and shade is where your pipe desk lamp truly comes to life. This stage transforms raw materials into a functional and stylish light source. Focusing on the right bulb and shade ensures your lamp not only looks great but also provides the perfect lighting for your space.
Choosing The Right Bulb
Picking the right bulb affects both the lamp’s appearance and its functionality. Consider the bulb’s brightness, color temperature, and energy efficiency. For a cozy workspace, a warm white LED bulb around 2700K works well, giving off soft, inviting light without overheating.
Think about the lamp’s purpose: Do you want it for reading, ambient light, or a decorative accent? A bulb with adjustable brightness or a dimmable feature can give you more control over the mood. Also, check the bulb’s base type to make sure it fits your lamp socket perfectly.
Attaching The Shade
The shade adds style and controls how light spreads from your lamp. Secure the shade firmly to avoid wobbling, but don’t overtighten and risk damaging the pipe or fittings. Depending on your design, you might use screws, clamps, or a simple threaded ring to hold the shade in place.
Choose a shade size that complements your bulb and pipe structure. A shade too large can overwhelm the lamp, while one too small won’t diffuse light properly. Fabric, metal, or glass shades each create a different look—pick one that matches your room’s vibe and your personal taste.
Final Adjustments
Once the bulb and shade are in place, test your lamp by turning it on. Look at the light spread and check for any shadows or glare. Adjust the shade angle or bulb position to improve lighting quality and comfort.
Don’t forget to tighten all fittings and check cable safety before using your lamp daily. How does the lamp’s light feel during your work or relaxation time? Small tweaks here can make a big difference in how your new pipe desk lamp fits into your everyday life.
Finishing Touches
Finishing touches transform your pipe desk lamp from a simple project into a stylish and functional piece of art. This final stage lets you inject personality and ensure durability. How you finish your lamp can make all the difference in its look and longevity.
Painting Or Sealing
Decide if you want a sleek metallic look or a pop of color. Spray paint designed for metal works great and dries quickly, giving your lamp a smooth, even finish. Alternatively, sealing with a clear coat preserves the natural pipe texture and prevents rust.
Think about where your lamp will sit. If it’s near a window, a UV-resistant spray can help keep colors vibrant. I once skipped sealing a pipe lamp, and within months, it showed rust spots. Don’t let that happen to your creation.
Decorative Elements
Adding small decorative details can make your lamp uniquely yours. Try wrapping some leather strips around the base or adding vintage Edison bulbs for an industrial vibe. You can also use metal tags or decals to personalize it.
Ask yourself, what style fits your space? Minimalist? Rustic? This step is your chance to reflect your taste. Even simple changes like swapping a standard switch for a dimmer can elevate the lamp’s functionality and style.
Testing The Lamp
Before you call it done, plug in the lamp and test the wiring carefully. Make sure the switch works smoothly and the bulb lights up without flickering. Safety is crucial, so check that all electrical connections are secure and insulated.
If something feels off, don’t ignore it. Fixing issues now saves headaches later. Once everything works perfectly, you’ll have the satisfaction of lighting up your workspace with something you built yourself.
Tips For Maintenance
Keeping your pipe desk lamp in good shape helps it last longer and work better. Regular care prevents damage and keeps the lamp looking nice. Follow simple steps to maintain your lamp easily and safely.
Cleaning The Lamp
Dust the lamp often using a soft cloth. Avoid wetting the metal pipes too much. Use a dry or slightly damp cloth to wipe the pipes and base. Clean the bulb gently when it is cool. Do not use harsh chemicals as they can harm the finish.
Replacing Bulbs Safely
Turn off and unplug the lamp before changing the bulb. Let the bulb cool down completely. Use a bulb with the right size and wattage for your lamp. Hold the bulb by its base to avoid breaking it. Screw the new bulb in gently but firmly.
Troubleshooting Issues
Check the power source if the lamp does not turn on. Inspect the bulb for any visible damage or burn marks. Ensure all pipe connections are tight and secure. Replace faulty parts with compatible pieces. Test the lamp after each fix to confirm it works properly.
Frequently Asked Questions
What Materials Do I Need To Make A Pipe Desk Lamp?
You need metal pipes, pipe fittings, a lamp socket, wiring, a bulb, and a lamp shade. Also, basic tools like a drill and screwdriver are essential.
How Long Does It Take To Build A Pipe Desk Lamp?
Building a pipe desk lamp typically takes 2 to 4 hours. This depends on your skill level and the complexity of the design.
Can I Customize The Pipe Desk Lamp Design?
Yes, you can customize the design by choosing different pipe sizes, colors, and lamp shades. This adds a personal touch to your lamp.
Is Soldering Required For Pipe Desk Lamp Assembly?
Soldering is not always necessary. Most pipe desk lamps use threaded fittings for easy assembly without soldering.
Conclusion
Making a pipe desk lamp can be a fun and useful project. It adds a unique look to any room. You only need simple tools and materials to start. Follow the steps carefully to build your lamp safely. Personalize it by choosing your favorite pipe style or color.
This lamp can brighten your workspace and show your creativity. Try making one to enjoy the process and the final result. A pipe desk lamp brings both style and light to your desk.


