
Looking to add a warm, personal touch to your workspace? Making your own wooden desk lamp is easier than you might think—and it gives you a unique piece that’s both stylish and functional.
Imagine the satisfaction of lighting up your desk with a lamp you built yourself, crafted from natural wood that brings cozy vibes to your room. In this guide, you’ll find simple steps and clear tips that anyone can follow, even if you’re new to woodworking.
Ready to create something beautiful that’s truly yours? Let’s get started!
Materials And Tools Needed
Gathering the right materials and tools is the foundation of building a wooden desk lamp that not only looks great but functions well. Knowing exactly what you need saves time and prevents frustrating trips to the hardware store. Let’s break down what’s essential for your project, so you can focus on the creative part of crafting your lamp.
Wood Types For Desk Lamps
Choosing the right wood affects both the style and durability of your lamp. Hardwoods like oak, walnut, and maple offer strength and a beautiful grain that adds character. If you want a lighter or more budget-friendly option, consider softwoods such as pine or cedar—they’re easier to shape but may be less durable over time.
Think about your workspace style and how the wood’s color and texture will complement it. Have you considered mixing different wood types for contrast? This can create a unique look and highlight specific parts of your lamp.
Essential Tools List
- Measuring Tape and Pencil:Accurate measurements are key for all parts to fit perfectly.
- Saw (Hand saw or Jigsaw):Needed to cut your wood pieces to size and shape.
- Drill with Bits:For making holes to run wiring and attach parts securely.
- Sanding Paper or Electric Sander:Smooth edges and surfaces to avoid splinters and give a polished finish.
- Clamps:Hold pieces steady while you glue or screw them together.
- Screwdriver:Essential for assembling parts and securing electrical components.
Do you already have some of these tools at home? If so, you’re a step closer to starting your project right away.
Electrical Components
Safety and functionality depend heavily on choosing the right electrical parts. You’ll need a lamp socket that fits your bulb type, a power cord with an on/off switch, and a bulb that matches the socket’s wattage rating. A well-insulated wire is crucial to prevent any electrical hazards.
Consider LED bulbs—they last longer and generate less heat, which is safer for your wooden lamp. Have you checked local electrical codes or guidelines to make sure your setup meets safety standards? Taking a moment to verify this can save you trouble later.
Credit: medium.com
Designing Your Desk Lamp
Designing your wooden desk lamp sets the foundation for a project that is both functional and uniquely yours. This stage lets you decide how your lamp will look, fit your space, and serve your needs. Taking time here can save you from headaches later and make the building process smoother and more enjoyable.
Choosing The Style
Think about the vibe you want your desk lamp to give off. Are you drawn to a modern, minimalist look or something more rustic and traditional? Your choice will affect the shape, wood type, and even the lamp’s size.
Consider the space where the lamp will live. Does it need to blend in or stand out as a statement piece? Reflect on the other furniture around it—matching styles can create harmony, while contrast can add interest.
Measuring And Planning
Accurate measurements are key. Start by measuring your desk area so the lamp doesn’t overpower your workspace or feel too small. Think about the lamp’s height and how far the light should reach.
Plan for the lamp’s electrical components too. Will you use a standard bulb or an LED? Where will the cord go, and how can you keep it neat? These details affect both design and practicality.
Sketching The Design
Put your ideas on paper to see how they come together. Don’t worry about making a perfect drawing; rough sketches help you visualize proportions and shapes. Try different angles and details to find what feels right.
Use your sketch to note where screws, joints, and wiring will go. This step helps you avoid surprises during assembly. Have you ever started building without a clear plan? Sketching first can prevent that frustration.
Preparing The Wood
Choose smooth, dry wood for easy cutting and shaping. Sand edges to remove rough spots and create a clean surface. This prepares the wood for painting or staining later.
Preparing the wood is a crucial step in crafting your wooden desk lamp. This stage ensures that your lamp not only looks good but also functions well. Let’s dive into the key steps you need to follow.Cutting To Size
Start by measuring the wood pieces you’ll need. Use a ruler and pencil to mark the dimensions. Cut the wood with a saw, ensuring straight lines. Take your time for precise cuts. This ensures a perfect fit for your lamp.Sanding And Smoothing
After cutting, sand the wood pieces. Use medium-grit sandpaper first. This removes rough edges and splinters. Then, switch to fine-grit sandpaper. This step smooths the surface. A smooth finish makes your lamp look professional.Drilling Holes For Wiring
Mark where you’ll drill holes for the wiring. Use a drill bit that matches your wire’s size. Drill holes carefully to avoid splitting the wood. Make sure the holes are straight. This allows easy passage for the wiring. Proper drilling ensures your lamp is safe and functional.Assembling The Lamp Base
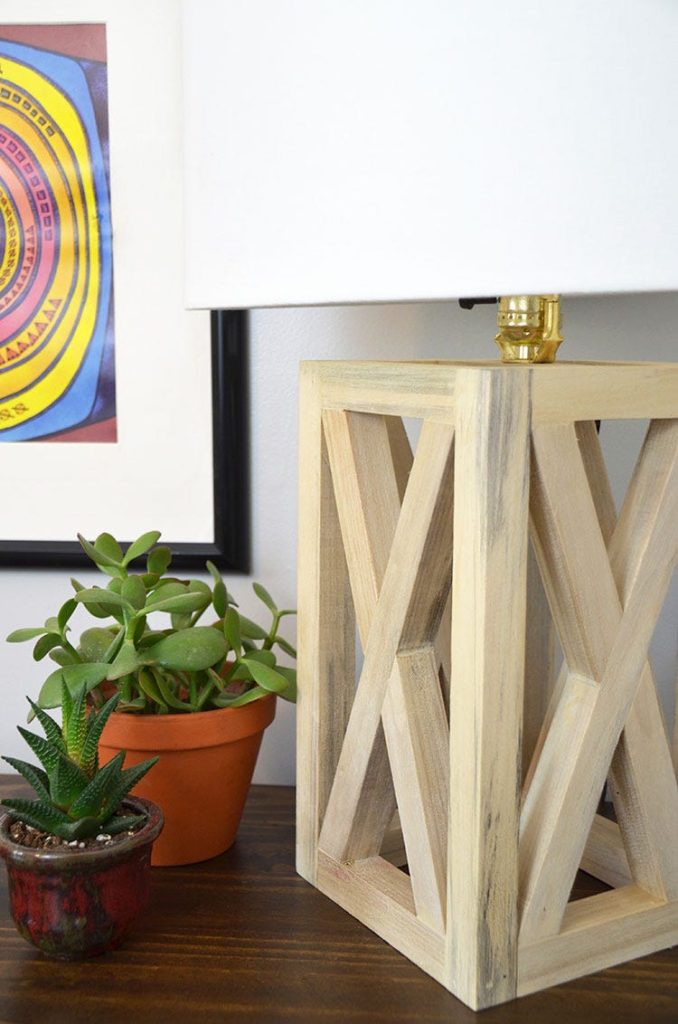
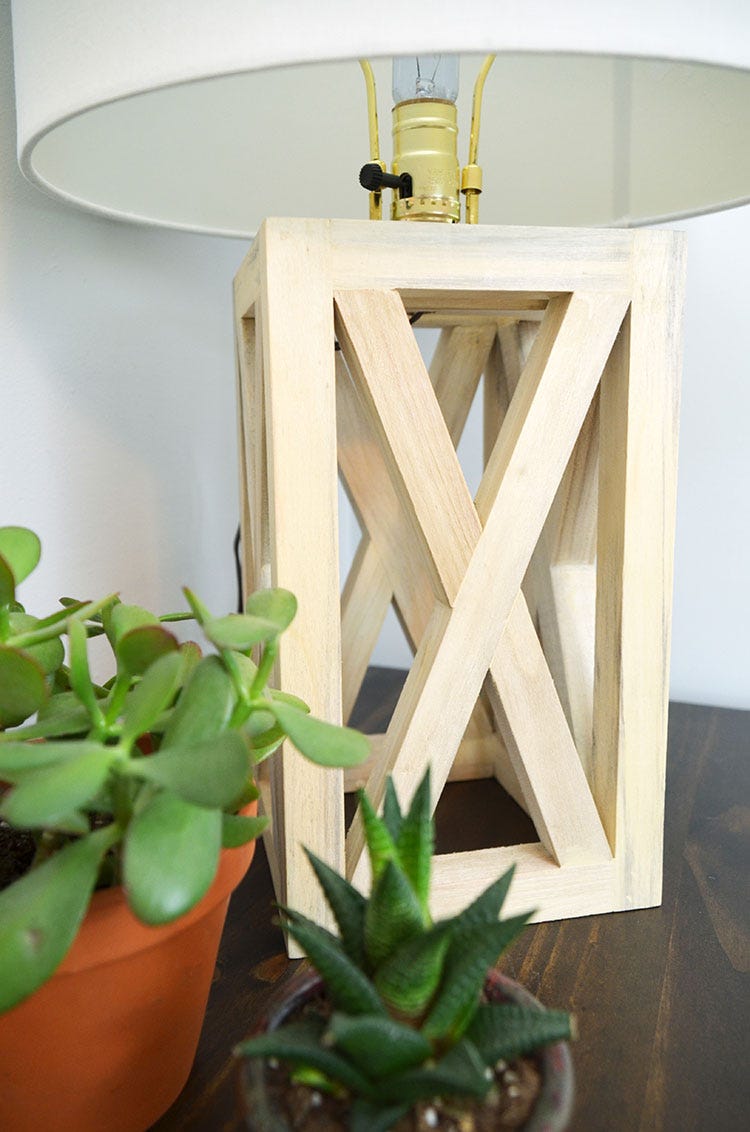
Assembling the lamp base is where your wooden desk lamp starts to take shape. This part is crucial because a sturdy base ensures your lamp stands firm and lasts long. Paying close attention to how the wood pieces come together will save you headaches later on.
Joining Wood Pieces
Start by aligning your wood pieces carefully. Make sure the edges meet perfectly without gaps, which helps the lamp look clean and professional. You can use clamps to hold the pieces in place while you work—this keeps everything steady and prevents slipping.
Think about how the pieces fit together. Are they flat panels, or do you have angled cuts? Matching the angles precisely makes a huge difference in the final stability. If you’ve ever tried to join uneven wood, you know how frustrating it can be to fix later.
Securing With Screws And Glue
Using both screws and glue is your best bet for a strong connection. Apply wood glue along the edges before pressing the pieces together. The glue fills tiny gaps and bonds the wood at a molecular level.
After gluing, screw the pieces together to hold them firmly while the glue dries. Pre-drill holes to prevent the wood from splitting. I learned this the hard way when my first lamp base cracked because I skipped pre-drilling!
Adding Stability Features
Think about how your lamp will stand on your desk. Adding small rubber pads or felt feet under the base can prevent slipping and protect your desk surface. These tiny additions make a surprising difference in everyday use.
If your base feels a bit wobbly, you might want to reinforce corners with small metal brackets hidden underneath. They don’t affect the look but add extra strength. Have you noticed how sometimes a tiny fix can save hours of frustration later?
Wiring The Lamp Safely
Wiring your wooden desk lamp safely is crucial for both functionality and your peace of mind. Electrical work can be intimidating, but with careful attention and the right steps, you can ensure your lamp works perfectly without any hazards. Let’s focus on how to connect the electrical parts, install the bulb socket, and test everything before you plug it in.
Connecting Electrical Parts
Start by gathering all your electrical components: the power cord, switch, and wires. Strip about half an inch of insulation off the ends of each wire using a wire stripper. This exposes the copper, which is necessary for a solid connection.
Attach the wires to the switch and power cord terminals securely. Remember, the live (usually brown or black) wire connects to the switch terminal, and the neutral (blue or white) wire connects directly to the socket. Use a screwdriver to tighten the screws firmly, ensuring no loose strands can cause shorts or sparks.
Have you checked if your wires are color-coded? Matching them correctly helps avoid confusion and potential accidents. Take your time with this step — a loose connection is the most common cause of lamp failure.
Installing The Bulb Socket
Once your wiring is ready, it’s time to install the bulb socket onto your wooden lamp base. Most sockets come with mounting screws or clips; secure the socket so it doesn’t move or wobble. If your lamp design requires drilling, be gentle to avoid cracking the wood.
Connect the wires coming from your switch and power cord to the socket terminals. Like before, make sure the live wire attaches to the brass-colored terminal and the neutral wire to the silver one. This ensures the electricity flows correctly through the lamp.
Double-check that no bare wires are exposed outside the terminals. Exposed wires can cause short circuits or electric shocks. Use electrical tape if needed to cover any exposed metal parts carefully.
Testing The Wiring
Before screwing everything shut, test your wiring. Plug the lamp into a power outlet and switch it on. If the bulb lights up, you’ve done a great job wiring it safely!
If the bulb doesn’t light, or you notice flickering, immediately unplug the lamp and recheck your connections. Sometimes wires can be swapped or not fully tightened. Don’t rush this step; safety is more important than speed.
Do you have a multimeter? It’s a handy tool to test continuity and voltage, helping you pinpoint wiring issues without guessing. Testing your lamp thoroughly before final assembly saves time and avoids future hazards.

Credit: v9immigration.ca
Finishing Touches
Finishing touches bring your wooden desk lamp to life. They protect the wood and add style. These final steps make your lamp durable and beautiful. Follow simple tips to get a smooth, polished look.
Applying Stain Or Paint
Choose a stain or paint that matches your room’s style. Stain highlights the wood’s natural patterns. Paint adds color and hides imperfections. Use a brush or cloth to apply evenly.
- Sand the wood lightly before applying.
- Apply thin, even coats to avoid drips.
- Let each coat dry fully before adding another.
- Test color on a scrap piece first.
Adding Protective Coating
A protective coat keeps your lamp safe from scratches and spills. Use clear varnish, polyurethane, or lacquer. These coatings enhance shine and strength.
- Choose a water-based option for easy cleanup.
- Apply two or three thin coats for best results.
- Sand lightly between coats for a smooth finish.
- Allow full drying time to avoid stickiness.
Attaching Lampshade
The lampshade completes the look and controls light. Pick a shade that fits your lamp base and bulb size. Secure it firmly for safety.
- Attach the shade holder or harp first.
- Place the lampshade carefully on the holder.
- Check that the shade is level and stable.
- Use screws or clips if needed for extra support.
Placement And Styling Tips
Choosing the right place for your wooden desk lamp makes a big difference. Good placement improves light and adds style to your space. Styling your lamp to match the room helps it stand out or blend in nicely. Caring for your lamp keeps it looking fresh and lasting longer.
Best Spots For Desk Lamps
Place your wooden lamp where you need light most. Near your computer or reading area is ideal. Avoid spots that block your view or create glare. Corners can brighten dark spaces. Keep lamps away from clutter to look neat. A desk near a window benefits from extra light during the day.
Complementing Your Decor
Match your wooden lamp with your room’s style. Light wood fits well with natural or rustic themes. Dark wood works great with modern or classic looks. Use lamp shades that fit your color scheme. Simple designs suit minimal spaces. Add small plants or books nearby for a cozy feel.
Maintaining Your Wooden Lamp
Dust your wooden lamp regularly with a soft cloth. Avoid water or harsh cleaners that can damage wood. Use wood polish occasionally to keep the finish shiny. Check the electrical parts to ensure safety. Tighten screws if the lamp feels loose. Proper care helps your lamp stay beautiful and safe for years.

Credit: m.youtube.com
Frequently Asked Questions
What Materials Are Needed To Make A Wooden Desk Lamp?
You need wood, a lamp kit, screws, sandpaper, wood glue, and a finish. Choose hardwood for durability. Safety gear is essential for protection during assembly.
How Do I Safely Wire A Wooden Desk Lamp?
Turn off power before wiring. Follow the lamp kit instructions carefully. Use insulated tools and ensure all connections are secure to prevent electrical hazards.
Can I Customize The Lamp’s Design And Size?
Yes, you can customize the design and size. Plan measurements before cutting wood. Personalize with different finishes, shapes, or decorative elements to match your style.
How Long Does It Take To Build A Wooden Desk Lamp?
Building typically takes 2 to 4 hours. Time depends on skill level and complexity. Allow extra time for drying finishes and safe wiring.
Conclusion
Making a wooden desk lamp is a fun and useful project. You can choose the wood and design that suits your style. The steps are simple and easy to follow. This lamp will add warmth and charm to your workspace.
With some patience and care, you will create a unique piece. Enjoy the glow of light from something you built yourself. Try this project to brighten your room and your day.


