
Are you looking for a fun and easy way to decorate your space without spending a lot of money? Making wall stickers with paper is a creative and affordable option you can try right at home.
Imagine turning plain walls into personalized art that reflects your style—all with simple materials you probably already have. In this guide, you’ll discover step-by-step how to create your own eye-catching wall stickers that are easy to apply and remove. Ready to transform your walls and impress everyone who visits?
Let’s get started!
Materials Needed
Gathering the right materials is key to making wall stickers with paper that look professional and last long. Knowing what to use can save you time and give you better results. Let’s break down the essential items you’ll need before starting your project.
Types Of Paper
Choosing the right paper affects your sticker’s durability and appearance. Thick cardstock provides sturdiness, while printable vinyl paper offers a glossy, smooth finish perfect for vibrant colors. If you want a textured look, watercolor paper can add a unique touch but may need extra sealing.
Adhesives Options
Picking the right adhesive makes your stickers stick well without damaging your walls. Spray adhesive is great for even coverage, but removable glue dots let you reposition the stickers easily. Double-sided tape works well for quick projects, but consider using repositionable adhesive sheets for more control.
Cutting Tools
Precise cutting shapes your stickers neatly. A sharp craft knife allows for detailed cuts, especially on intricate designs. Scissors are handy for simple shapes, but a cutting machine like a Cricut can save time if you plan to make many stickers.
Additional Supplies
Extras can improve your sticker-making experience and the final product. A cutting mat protects your surfaces and helps with clean cuts. Clear laminate sheets add durability and a waterproof layer. Don’t forget a ruler and pencil for measuring and sketching your design before cutting.

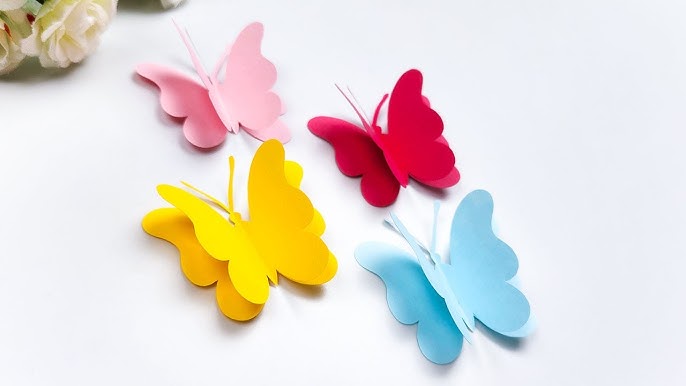
Credit: www.walmart.com
Design Ideas
Designing wall stickers with paper can be a fun and creative activity. Choosing the right design makes your stickers stand out. Simple designs work best for beginners. Unique patterns bring personality to any room. Using stencils helps create clean and precise shapes. Explore these ideas to create beautiful wall stickers easily.
Simple Shapes
Simple shapes like circles, stars, or hearts make great wall stickers. They are easy to cut out and look neat on walls. Use bright colors to make shapes pop. These shapes fit well in any room style. Try mixing sizes to create an interesting pattern.
Custom Patterns
Custom patterns add a unique touch to your wall stickers. Draw stripes, polka dots, or zigzags on paper before cutting. You can combine different colors for a vibrant look. Repeat patterns create a sense of rhythm and balance. Personalize patterns to match your room theme.
Using Stencils
Stencils help achieve clean and sharp sticker designs. Place stencil on paper and trace around it carefully. This method works well for complex shapes or letters. Use thick paper for better durability. Stencils also save time and reduce mistakes while cutting.
Preparing Your Design
Choose a simple design that fits your wall size and style. Draw or print the design clearly on paper before cutting it out. Make sure the paper is smooth and clean for best results.
Preparing your design is a crucial step in creating stunning wall stickers with paper. This stage is where your creativity takes flight, as you translate your ideas into tangible designs. Whether you’re aiming for something whimsical or elegant, getting your design right ensures that your final product will be something you’re proud to display on your walls. Let’s dive into the essentials of sketching, printing, and transferring your designs effectively.Sketching On Paper
Start by gathering your sketching supplies—pencil, eraser, and paper. A simple sketch can help you visualize your design and make necessary adjustments before committing to a final look. If you’re feeling stuck, think about what themes or motifs inspire you. Is it floral patterns or geometric shapes? Sketching is a chance to experiment freely. Don’t worry about perfection here; rough outlines are a great start. Use light pencil strokes so you can easily modify as you refine your design.Printing Designs
If you prefer digital designs, printing them is your next step. Use a computer and design software to create or modify your images. Make sure your printer settings are optimized for quality prints; use high-quality paper to ensure vibrant results. Consider the size of your wall stickers. Print a test page to check the colors and scale. This small step can save you from future disappointment by ensuring your design meets your expectations.Transferring Images
Now, it’s time to transfer your design onto the paper that will become your sticker. You can use carbon paper for a classic tracing method. Place the carbon paper between your printed design and sticker paper, then trace over the lines. Another option is using light boxes or windows to trace your design. Tape your printed design and sticker paper to a window, and let natural light help you see through the layers. Trace carefully, taking your time to get each detail right. How do you ensure your designs align with your vision? Consider creating a small prototype first. This will give you a clear idea of what adjustments are needed before you commit to the full design.Cutting The Stickers
Cutting your wall stickers with paper is a crucial step that determines how neat and professional your final design will look. Taking your time here ensures clean edges and a polished appearance. Whether you choose scissors or craft knives, the right technique can make your stickers stand out beautifully on any wall.
Using Scissors
Scissors are the easiest tool to start with, especially if your design has simple shapes and straight lines. Choose a pair with sharp, pointed tips for better control on detailed cuts. Keep your hand steady and cut slowly to avoid jagged edges.
Try holding the sticker with one hand and cutting with the other, moving the scissors in smooth, continuous motions. If your design has curves, take smaller, careful snips rather than large cuts. You’ll find this method less stressful than it sounds once you get the hang of it.
Using Craft Knives
Craft knives are perfect for intricate designs or when you want razor-sharp edges. Use a cutting mat underneath to protect your work surface and avoid slips. Position the knife perpendicular to the paper for clean, precise cuts.
Apply steady pressure and guide the blade slowly along the lines. It’s easy to get carried away, but patience here pays off. If the sticker has tiny details, you might want to rotate the paper instead of the knife to maintain control.
Tips For Precision
- Use light pencil marks:Sketch your design first and cut along the lines for accuracy.
- Keep tools sharp:Dull scissors or blades cause tearing and uneven edges.
- Cut in good light:Bright lighting helps you see all details clearly.
- Take breaks:Steady hands come from rested muscles—don’t rush your work.
- Practice on scrap paper:Before cutting your actual sticker, test your method to build confidence.
Have you noticed how much neater your stickers look after a few practice cuts? Precision cutting transforms your paper stickers from homemade to handmade art. Which cutting method fits your style and design best?
Applying Adhesive
Applying adhesive is a key step in making wall stickers with paper. The right adhesive ensures your sticker stays put without damaging the wall or the paper itself. Choosing the best adhesive for your surface and sticker type can make all the difference.
Glue Stick Method
Using a glue stick is simple and mess-free. It works best for small stickers or temporary decorations.
Apply the glue evenly on the back of your paper sticker. Avoid putting too much; a thin layer is enough to hold it in place without wrinkling the paper.
Have you noticed how a glue stick dries quickly? This helps you place the sticker and adjust it before the glue sets.
Spray Adhesive
Spray adhesive provides even coverage and strong hold, perfect for larger stickers. Use it in a well-ventilated area to avoid inhaling fumes.
Hold the spray can about 6-8 inches away from the paper surface. Spray a light, uniform coat, then wait a few seconds before sticking to your wall.
One trick I’ve learned: spray both the paper and the wall for an extra secure bond, especially on textured surfaces.
Double-sided Tape
Double-sided tape is clean, quick, and great for repositionable stickers. It lets you avoid drying time completely.
Cut small pieces of tape and place them on the corners and center of your paper sticker. Press firmly to make sure the tape sticks well.
Have you tried removing a sticker and repositioning it? Double-sided tape often allows this without tearing the paper or leaving residue.
Attaching Stickers To Walls
Attaching your homemade paper wall stickers is a crucial step to ensure they look great and last long. The right approach can make a big difference in how well the stickers stick and how smoothly they lay on your walls. Let’s look at how you can prepare your wall, choose the best spot, and finish the process for a flawless finish.
Surface Preparation
Before sticking anything, clean your wall thoroughly. Dust, grease, or moisture can stop your stickers from sticking properly. Use a damp cloth with mild soap to wipe the area and let it dry completely.
Check the texture of your wall. Smooth, flat surfaces work best. Avoid rough or heavily textured walls as they can cause the edges of your stickers to lift over time.
Placement Tips
Think about the design and how it fits the wall space. Use a pencil to lightly mark where each sticker will go. This helps avoid guesswork and keeps your arrangement balanced.
- Try placing the stickers on the floor first to visualize the layout.
- Consider the height—eye level usually works best for most designs.
- Keep your stickers away from high-traffic areas to prevent peeling.
Have you thought about using a level or ruler to keep everything straight? Small tools like these can save you from a crooked design that you’ll regret later.
Smoothing And Finishing
After sticking the paper sticker, smooth it out gently using a soft cloth or a plastic card. Work from the center outwards to push out any air bubbles.
If bubbles persist, prick them lightly with a pin and press again to flatten. Avoid pulling on the sticker as this can tear the paper or cause it to lift.
Finally, consider applying a clear, matte sealant spray to protect your stickers from moisture and fading. Just test a small area first to make sure it doesn’t cause the paper to wrinkle.
Maintaining Your Wall Stickers
Maintaining your wall stickers helps keep them looking fresh and vibrant. Proper care prevents peeling and fading over time. Simple habits and gentle cleaning extend their life on your walls.
Cleaning Techniques
Use a soft, dry cloth to dust wall stickers regularly. For dirt or stains, lightly dampen the cloth with water. Avoid harsh chemicals or scrubbing, which can damage the paper. Gently wipe the surface to keep colors bright.
Avoiding Damage
Keep wall stickers away from direct sunlight to prevent fading. Avoid placing them near heat sources or humid areas. Do not scratch or peel edges. Handle stickers with care to maintain their shape and adhesion.
Removing Stickers Safely
Peel stickers slowly from one corner to avoid tearing. Use a hairdryer on low heat to soften the adhesive if needed. Pull gently to reduce wall damage. Clean any leftover residue with mild soap and water.
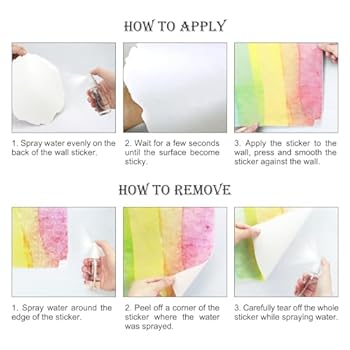
Credit: www.amazon.ie
Creative Variations
Creative variations make wall stickers unique and fun. They let you explore different looks and textures. Using simple paper, you can create stickers that stand out on any wall.
Layered Stickers
Layered stickers add depth to your designs. Cut shapes of different sizes and stack them. Use glue or double-sided tape to hold layers together. This creates a 3D effect that catches the eye. Try mixing colors or patterns for more interest.
Textured Paper Effects
Textured paper adds a tactile feel to stickers. Use papers like crepe, embossed, or handmade paper. These give stickers a rich, natural look. You can also crumple or fold paper before cutting. This adds extra texture and charm.
Combining With Paint
Paint can enhance paper stickers beautifully. Add simple brush strokes or dots on the paper before cutting. Use watercolors for soft, blended effects. Acrylic paint works well for bold, bright colors. Paint details can bring your designs to life.
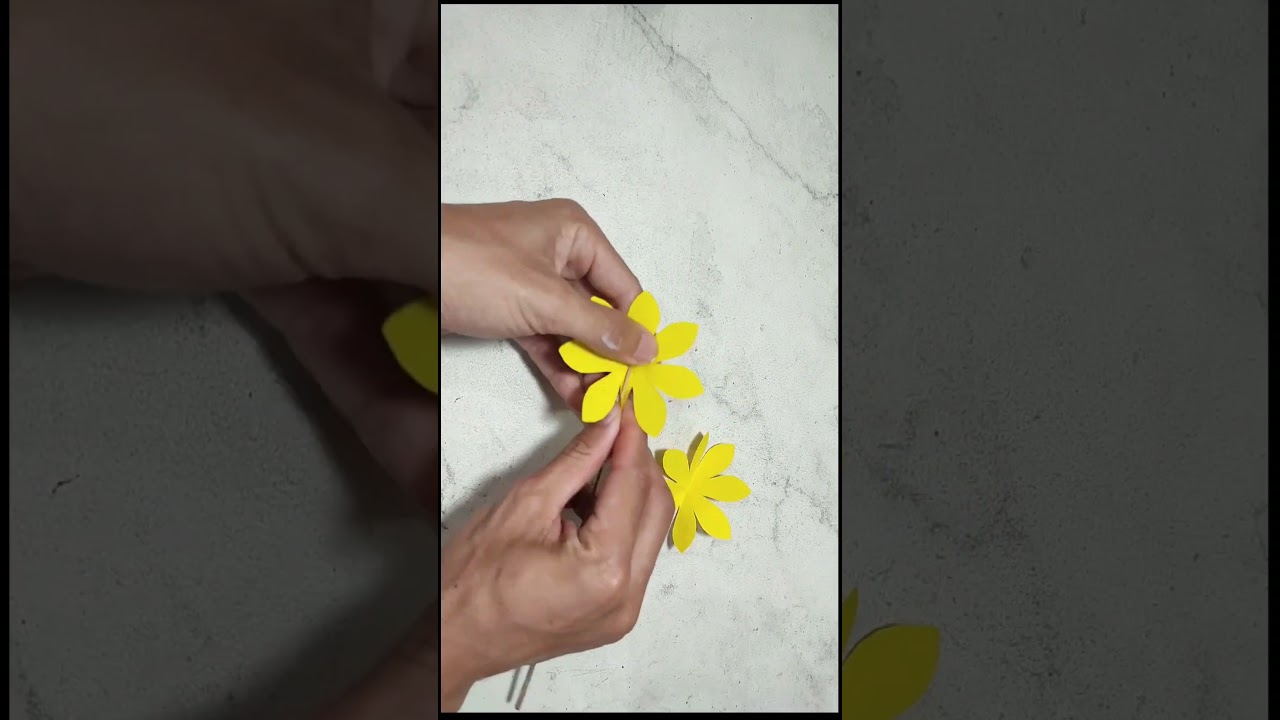
Credit: www.youtube.com
Frequently Asked Questions
How Do I Make Wall Stickers With Paper At Home?
To make wall stickers, cut your paper into desired shapes. Apply adhesive like double-sided tape or spray glue. Let it dry before sticking to walls. This method is simple, affordable, and customizable for unique designs.
What Types Of Paper Are Best For Wall Stickers?
Choose thick paper like cardstock or sticker paper for durability. Regular printer paper may tear easily. Sticker paper has adhesive backing, making application easier. Cardstock works well if you add glue or tape.
Can I Remove Paper Wall Stickers Without Damaging Walls?
Yes, gently peel stickers off slowly. Use warm soapy water or a hairdryer to loosen adhesive. Avoid harsh scraping to prevent wall damage. Paper stickers generally peel off cleanly if adhesive is mild.
How Long Do Paper Wall Stickers Last On Walls?
Paper stickers last a few weeks to months indoors. Their longevity depends on adhesive strength, wall texture, and humidity. For longer life, use quality adhesive and keep walls dry and clean before applying.
Conclusion
Making wall stickers with paper is simple and fun. You only need a few tools and some creativity. Cut your designs carefully and stick them on clean walls. You can change the look of any room without much cost. Try different shapes and colors to fit your style.
This DIY project lets you personalize your space easily. Give it a try and enjoy your new wall art. It’s a great way to add charm without buying expensive decorations.


