
Your entryway is the first thing guests see when they walk into your home. Imagine having a beautiful, custom table there that perfectly fits your style and needs.
Making your own entryway table might sound tough, but it’s easier than you think. In this guide, you’ll discover simple steps and clever tips to create a piece that not only looks great but also organizes your space. Ready to add a personal touch to your home and impress everyone who visits?
Keep reading to find out how you can make your own entryway table with confidence.
Choosing The Right Design
Choosing the right design for your entryway table sets the tone for your home’s first impression. This decision blends function with style. It ensures the table fits perfectly in your space and matches your home’s vibe.
Assessing Your Space
Measure the area where the table will go. Note door swings and traffic flow. Check for nearby furniture or fixtures. This helps avoid a crowded look. Leave enough room for easy movement. A well-placed table balances the space.
Selecting A Style
Choose a style that matches your home’s decor. Consider classic, modern, rustic, or minimalist looks. Think about the table’s purpose. Will it hold keys, mail, or decorative items? Pick a style that fits your daily needs and personal taste.
Picking Materials
Materials affect the table’s durability and appearance. Wood offers warmth and traditional charm. Metal adds a sleek, modern feel. Glass creates a light, airy look. Consider maintenance and how materials blend with your space. Choose what suits your lifestyle best.
Credit: www.rjliving.com.au
Gathering Tools And Supplies
Before you start building your own entryway table, gathering the right tools and supplies sets the foundation for success. Having everything ready saves you from interruptions and frustration. It also helps you work more efficiently and with confidence.
Essential Tools List
Make sure you have these tools on hand to build your table smoothly:
- Measuring tape– Accurate measurements are key to a balanced table.
- Power drill– For drilling holes and driving screws quickly.
- Screwdriver set– Manual control for delicate adjustments.
- Handsaw or circular saw– To cut wood pieces to size.
- Clamps– To hold pieces steady while assembling.
- Sander or sandpaper– Smooth out rough edges and surfaces.
- Wood glue– Adds extra strength to joints.
Do you feel prepared with these tools, or is there something you’d add based on your past projects?
Recommended Materials
Choosing the right materials affects both the look and durability of your entryway table.
- Wood:Pine is budget-friendly and easy to work with. Oak or maple offer a sturdier, more polished finish.
- Screws and nails:Pick sizes that fit your wood thickness for a secure hold.
- Wood filler:Useful for hiding screw holes or minor imperfections.
- Paint or stain:Adds color and protects the wood from wear.
- Protective finish:Polyurethane or wax to seal your work.
Think about the style you want—rustic, modern, or classic—and pick materials that match your vision.
Safety Gear
Protecting yourself while working is non-negotiable. Even simple tasks can cause injuries if you’re not careful.
- Safety glasses:Shield your eyes from dust and flying debris.
- Ear protection:Power tools can be loud and damage your hearing over time.
- Dust mask:Prevents inhaling sawdust, which can irritate your lungs.
- Work gloves:Protect your hands from splinters and sharp edges.
- Closed-toe shoes:Keep your feet safe from falling objects or tools.
Do you always prioritize safety gear when you work? It can make all the difference between a smooth project and a painful setback.
Measuring And Cutting Wood
Accurately measure wood pieces before cutting to ensure all parts fit perfectly. Use a saw to cut along marked lines carefully for clean edges. Proper measuring and cutting create a sturdy base for your entryway table.
Creating your own entryway table is a rewarding DIY project that not only showcases your creativity but also provides a functional piece of furniture for your home. One of the most crucial steps in this process is measuring and cutting the wood accurately. This step sets the foundation for a sturdy and beautiful table. Let’s dive into how to get it right.Taking Accurate Measurements
Precision in measurement is vital. Start by deciding on the dimensions of your entryway table, considering the space where it will be placed. Use a tape measure to take precise readings. Remember to double-check your numbers to avoid costly mistakes. Have a notebook handy to jot down each measurement. This habit keeps your project organized and reduces the chance of errors. Always account for the width of your saw blade, known as the kerf, when marking your cut lines.Cutting Techniques
Choosing the right saw is key. A miter saw is excellent for straight and angled cuts, while a jigsaw works well for more intricate shapes. Ensure your saw blade is sharp for clean cuts. This not only makes the process smoother but also prevents wood splintering. Always cut on the waste side of the line to ensure your pieces are the right size.Preparing Pieces For Assembly
After cutting, each piece needs to be prepped for assembly. Sand down the edges to remove splinters and create smooth surfaces. This step is crucial for a polished finish and easier assembly. Consider labeling each piece as you go. It might seem unnecessary, but it helps avoid confusion later. How do you ensure your pieces fit perfectly together? Proper preparation is key. By focusing on these initial stages, you set yourself up for a successful build.Assembling The Table Frame
Assembling the table frame is where your entryway table begins to take shape. This stage requires precision and care to ensure the structure is strong and balanced. Pay close attention to how each piece fits together; a solid frame sets the foundation for a durable and attractive table.
Joining Legs And Supports
Start by aligning the legs with the support beams. Make sure the angles match perfectly so the table will stand evenly. You might find it helpful to clamp the pieces temporarily to keep them steady while you work.
Think about the style of legs you prefer—straight, tapered, or turned—and how they fit with the supports. Properly joined legs and supports will prevent wobbling and add to the table’s overall aesthetic.
Securing With Screws And Glue
Use wood glue along the joints to reinforce the bond. Spread the glue evenly to avoid gaps that can weaken the frame. After that, secure the pieces with screws to hold them firmly in place.
Choose screws that are the right length—not too short to avoid weak holds, and not too long to prevent them from poking through. Pre-drill holes to stop the wood from splitting, especially if you’re working with hardwood.
Checking Stability
Once the frame is assembled, test its stability by gently pressing on different parts. Does it feel solid, or is there any movement? If you notice wobbling, check the joints again and tighten any loose screws.
Try placing the frame on an uneven surface to see if all legs touch the ground. This simple check helps avoid frustration later when you add the tabletop. What’s your go-to method for ensuring your furniture is perfectly level?
Adding The Tabletop
Adding the tabletop is a key part of making your entryway table. It transforms the frame into a functional piece. The choice of tabletop affects the style and durability. Proper attachment ensures stability. Finishing touches like sanding create a smooth, safe surface.
Choosing The Right Top
Pick a tabletop material that fits your style and needs. Wood offers warmth and natural beauty. Plywood is budget-friendly and easy to work with. Glass tops add a modern, sleek look but need careful handling. Consider size and thickness for strength and proportion. A thicker top feels sturdy and looks high-quality.
Attaching The Surface
Secure the tabletop firmly to the base. Use screws or brackets designed for furniture. Drill pilot holes to avoid wood splitting. Check that the top aligns evenly with the frame edges. Tighten fasteners without overdoing it, which can damage the wood. Double-check stability before moving on.
Sanding For Smoothness
Sanding removes rough spots and sharp edges. Start with medium-grit sandpaper to smooth the surface. Follow with fine-grit sandpaper for a soft finish. Sand edges carefully to prevent splinters. Wipe the dust away with a damp cloth after sanding. A smooth tabletop feels good and looks polished.

Credit: www.ana-white.com
Finishing Touches
Finishing touches transform your entryway table from a simple piece of furniture into a statement that reflects your style and personality. These final steps protect your work and enhance its beauty, making your table both functional and eye-catching. Paying attention to details now saves you from future wear and tear while giving you a chance to get creative.
Painting And Staining Options
Choosing the right paint or stain sets the mood for your entryway. You might prefer a bold color to make your table stand out or a natural wood stain to highlight the grain and warmth of the wood.
Think about the room’s existing colors and the style you want to achieve. Glossy paint offers a modern look and is easy to clean, while matte finishes create a softer, more rustic vibe.
Stains come in a variety of shades, from light oak to dark walnut. They soak into the wood, protecting it while enhancing its natural beauty. Have you considered mixing two stains to create a unique tone?
Applying Sealant
Sealant shields your table from spills, scratches, and everyday wear. It’s a crucial step, especially if your table will hold keys, drinks, or plants.
Clear polyurethane is a popular choice for durability and easy maintenance. Water-based sealants dry faster and emit less odor but may require more coats.
Apply thin, even layers with a high-quality brush and let each coat dry completely. Sand lightly between coats to keep the surface smooth. What’s your plan for keeping the table looking fresh over time?
Decorative Details
Adding decorative touches personalizes your entryway table and makes it uniquely yours. Consider attaching vintage drawer pulls, stenciling patterns, or adding a small shelf underneath for extra storage.
Hardware can change the entire look—from sleek modern knobs to rustic iron handles. Even a simple trim or molding along the edges can add character.
Don’t forget about functional decorations like hooks for hanging bags or keys. How can you blend style and practicality in your design?
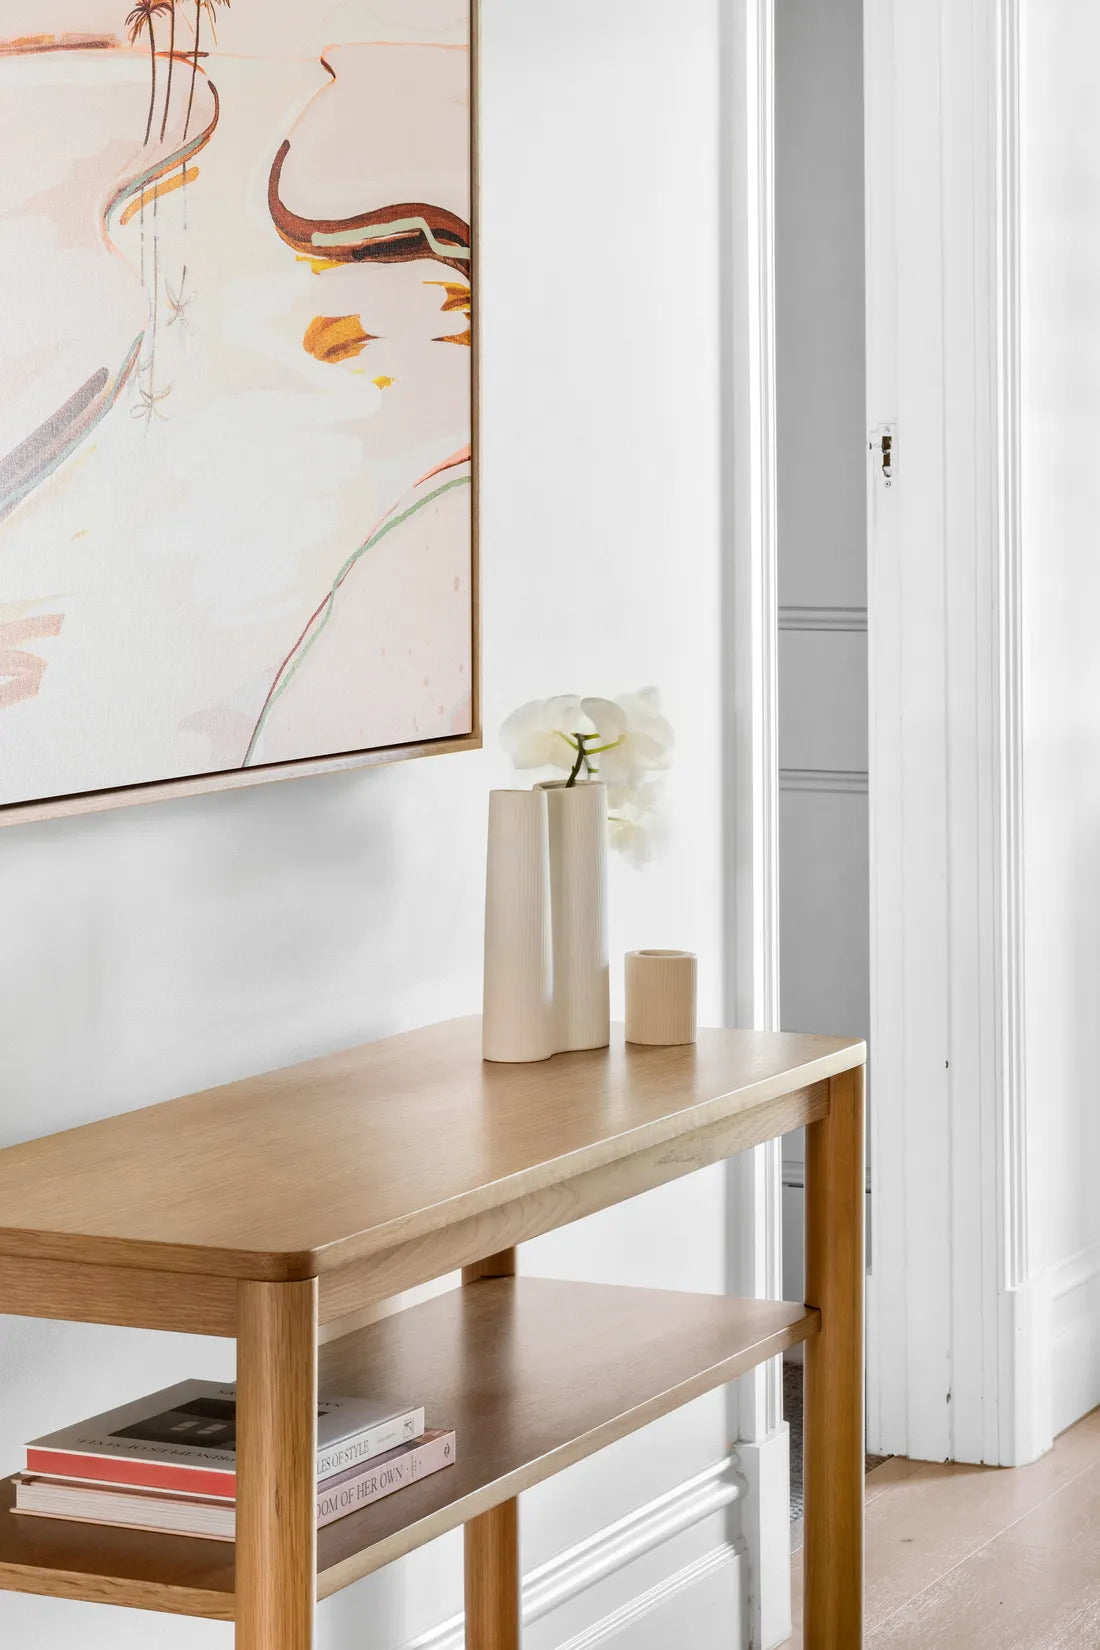
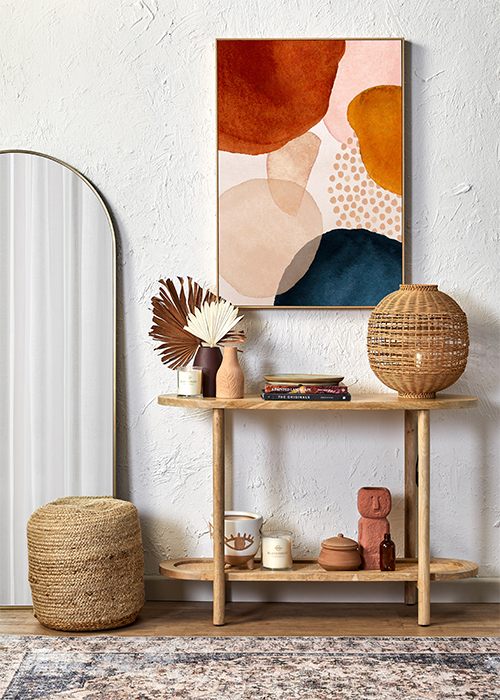
Placing And Styling Your Table
Placing and styling your entryway table shapes the first impression of your home. The right spot makes it both useful and welcoming. Styling adds personality and warmth to the space.
Optimal Placement Tips
- Choose a spot near the door for easy access.
- Allow enough space around the table for smooth movement.
- Place the table against a wall to save room.
- Consider natural light to brighten the area.
- Keep it visible but not blocking pathways.
Decor Ideas
- Use a small vase with fresh flowers for color.
- Add a tray to hold keys and mail neatly.
- Place a decorative bowl for loose change.
- Hang a mirror above to open the space.
- Include a small lamp for soft lighting.
- Show personal items like photos or souvenirs.
Maintenance Advice
- Dust the table regularly to keep it clean.
- Wipe spills immediately to avoid stains.
- Use coasters under drinks to protect the surface.
- Polish wooden tables monthly to maintain shine.
- Check for loose screws or parts often.
- Rotate decor items occasionally for a fresh look.
Credit: www.templeandwebster.com.au
Frequently Asked Questions
What Materials Do I Need To Build An Entryway Table?
You need wood, screws, sandpaper, wood glue, paint or stain, and tools like a saw and drill. Choose materials based on your design and durability preferences.
How Long Does It Take To Make An Entryway Table?
Building an entryway table usually takes 3 to 6 hours. Time varies with your skill level and the table’s complexity.
Can I Customize The Size Of My Entryway Table?
Yes, you can customize the size to fit your space. Measure your entryway carefully before cutting materials.
What Finish Is Best For An Entryway Table?
Use paint, stain, or clear varnish. Choose a finish that protects the wood and matches your décor.
Conclusion
Building your own entryway table brings pride and style to your home. You control the design, size, and finish. It fits perfectly in your space and matches your taste. Plus, it saves money compared to store-bought options. The process is fun and rewarding too.
Take your time, follow the steps carefully, and enjoy creating something unique. Your entryway will feel welcoming and organized. Start your project today and see the difference a handmade table makes. Simple, useful, and beautiful—your perfect entryway table awaits.


