
Have you ever wanted to turn your favorite photo into a beautiful piece of art? Putting a picture on a canvas can transform your memories into something you can proudly display on your walls.
It’s easier than you might think, and you don’t need to be an artist or have expensive equipment. In this guide, you’ll discover simple steps to create your own canvas print that looks professional and personal. Ready to bring your pictures to life and add a unique touch to your space?
Let’s get started!
Choosing The Right Canvas
Choosing a canvas with the right texture and size improves your picture’s look. Cotton canvases are common and work well for most images. Consider the finish to match the style you want for your artwork.
Choosing the right canvas can make all the difference in transforming your photograph into a stunning piece of art. The canvas you choose affects the overall look, feel, and durability of your artwork. Before diving into the creative process, let’s explore some key considerations in selecting the ideal canvas for your picture.Types Of Canvas Materials
Understanding the different types of canvas materials is crucial. Cotton and linen are the most common options, each offering unique benefits. Cotton canvas is cost-effective and provides a smooth surface that’s perfect for detailed images, whereas linen offers a more textured surface and is known for its durability. Polyester canvas is another alternative that stands out for its resistance to environmental changes. This makes it a popular choice for those living in areas with high humidity. Think about what qualities are most important to you in a canvas, and let that guide your decision.Selecting The Perfect Size
Size matters significantly when you’re planning to display your picture on a canvas. A larger canvas can make a bold statement and is ideal for showcasing landscapes or group photos. On the other hand, smaller canvases are perfect for more intimate settings or to complement a gallery wall. Consider the space where you’ll hang the canvas. Measure the wall area to ensure it fits well with the room’s design. It’s always a good idea to visualize how the canvas size will interact with your surroundings before making a final decision. Choosing the right canvas might seem daunting, but with these insights, you’re well on your way to creating a masterpiece that truly resonates. Which type and size of canvas do you think would best capture the essence of your picture?
Credit: www.youtube.com
Preparing Your Image
Preparing your image is a crucial step before transferring it onto a canvas. This phase ensures your picture looks sharp, well-sized, and visually appealing once printed. Taking the time to carefully edit and choose the right printing method will save you frustration and give your final piece a professional touch.
Editing And Resizing
Start by checking the resolution of your image. A picture with at least 300 DPI (dots per inch) works best for canvas printing to maintain clarity and detail.
Crop any unwanted parts and adjust brightness, contrast, or colors to enhance your image. Simple edits can make a huge difference in how vibrant your photo appears on canvas.
Resizing is also essential. Canvas sizes vary, so resize your image to match the exact dimensions of your canvas. Avoid stretching the image as it can distort the picture and reduce quality.
Printing Options
Decide whether you want to print at home, use a local print shop, or order online. Each option has pros and cons depending on your budget and convenience.
- Home printing:Offers control but requires high-quality photo paper and a good printer.
- Local print shops:Provide expert advice and often use professional-grade equipment.
- Online services:Offer easy uploads and wide format options, but check reviews to ensure quality.
Consider the type of ink and canvas material used. Some inks last longer and resist fading better, which matters if you want your picture to look great for years.
What printing choice fits your timeline and budget? Think about where your canvas will hang and how long you want it to last before making a decision.
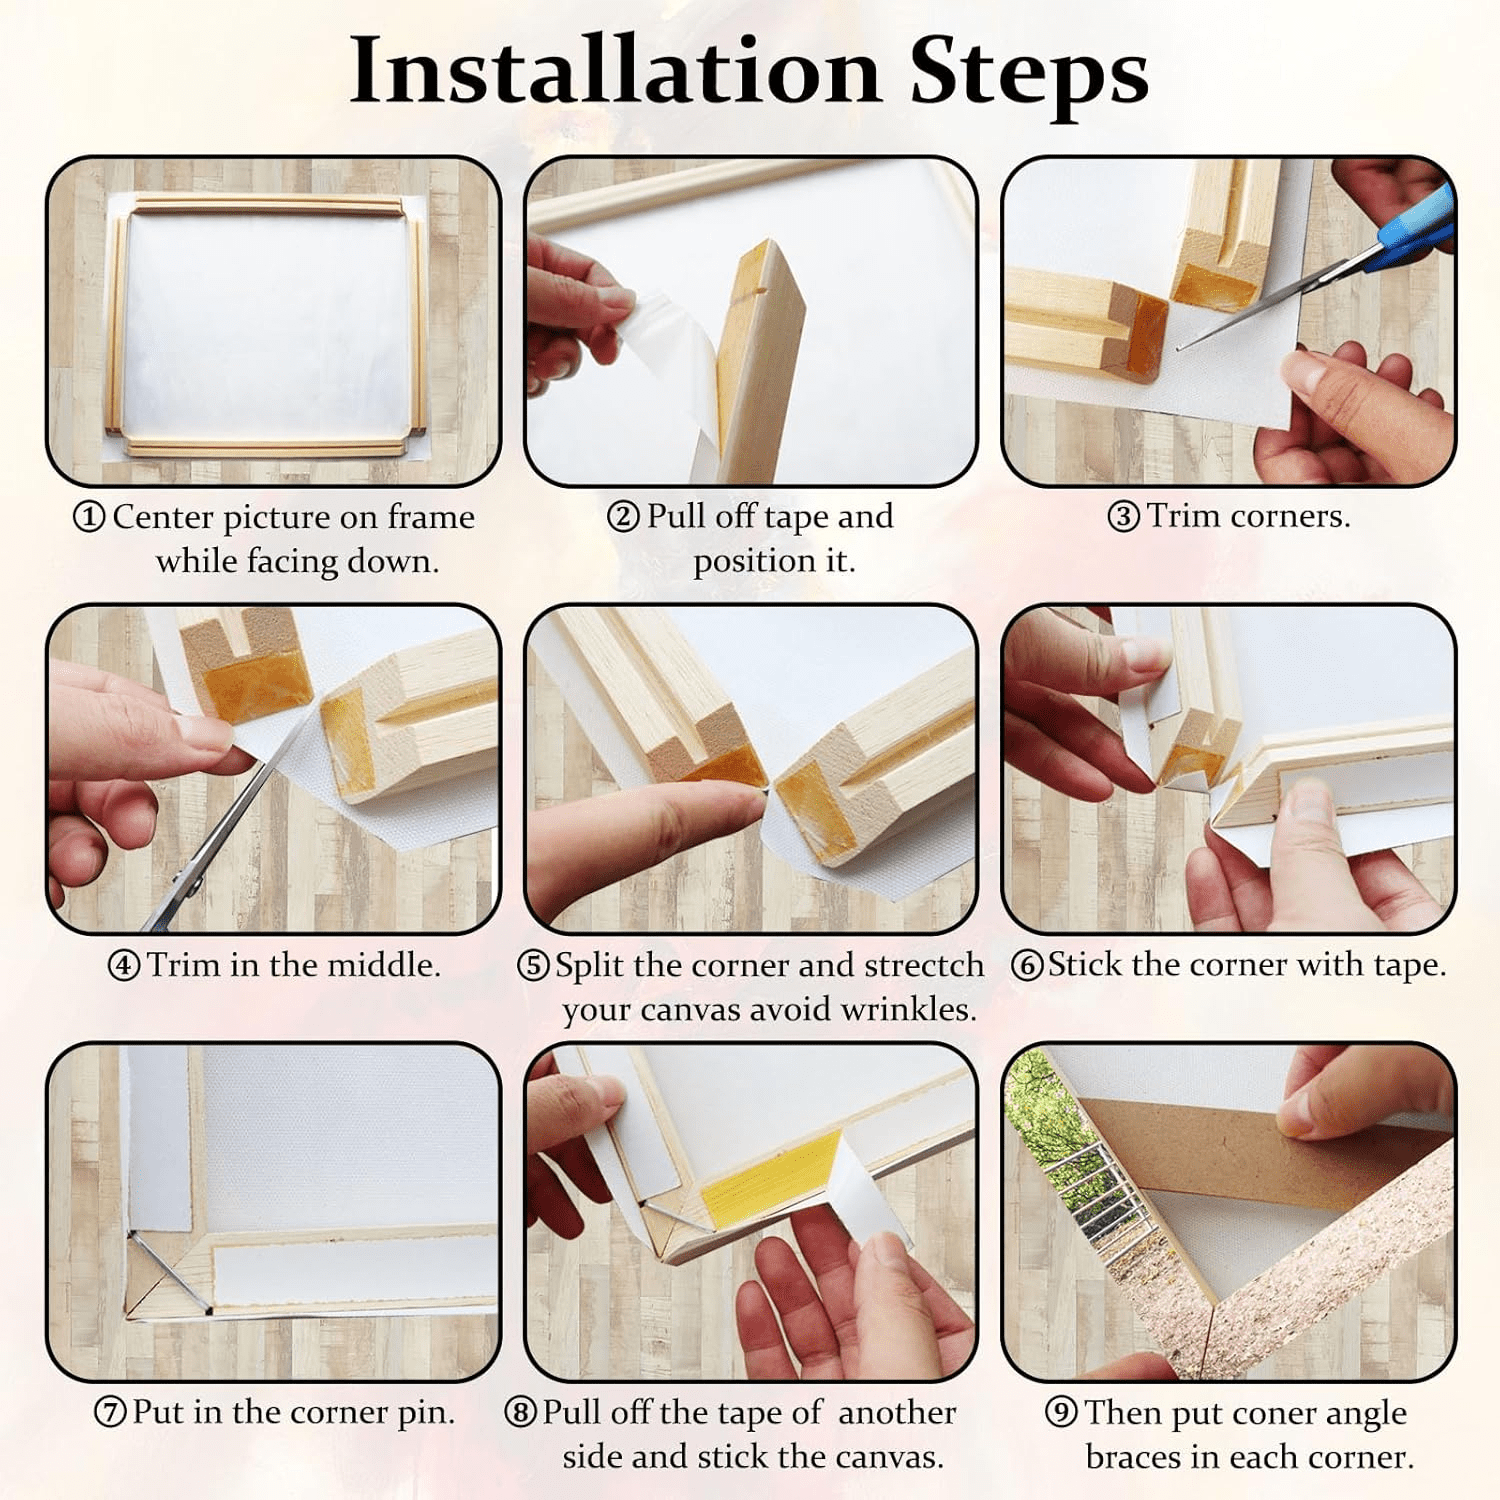
Transferring The Image
Transferring your chosen image onto canvas is a crucial step that sets the foundation for a stunning final piece. It requires a steady hand and the right materials to make sure the image appears clear and well-defined. Whether you prefer a hands-on or a more adhesive approach, there are effective techniques to fit your style and tools.
Using Transfer Paper
Transfer paper makes tracing your image onto canvas straightforward. You simply place the transfer paper between your image and canvas, then trace over the picture with a pencil or stylus. This leaves a light outline on the canvas that you can paint over later.
Make sure to secure both the image and transfer paper with tape to prevent shifting. I once tried tracing without taping, and the lines blurred, ruining the precision. Using transfer paper is perfect if you want to maintain control and add personal touches during painting.
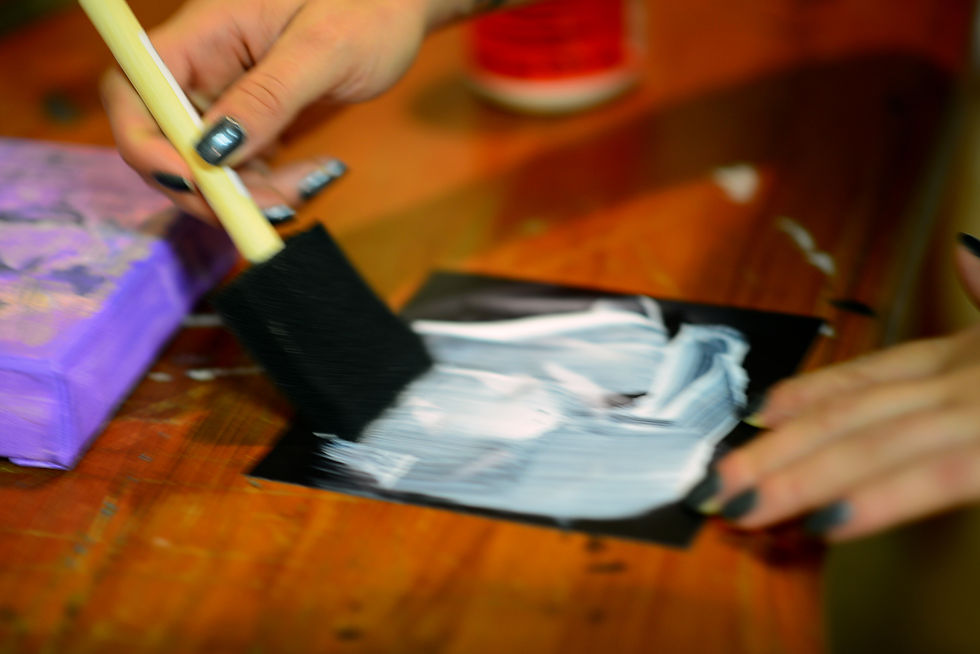
Applying Mod Podge Or Gel Medium
Another way to transfer an image is by using Mod Podge or gel medium as a glue and sealer. First, print your image on regular paper, then apply a thin, even layer of Mod Podge or gel medium on the canvas.
Next, place the image face down on the canvas and smooth out any bubbles or wrinkles. After it dries completely, dampen the paper and gently rub it off, leaving the image embedded in the medium on the canvas.
This technique offers a unique texture and a slightly faded, vintage look. If you like experimenting with layers and mixed media, this method might spark your creativity. Have you tried peeling paper off after applying medium? It feels almost like uncovering a hidden picture.
Finishing Touches
Finishing touches can make all the difference in how your picture on canvas looks and lasts. They protect your work and add a professional feel. Paying attention to these final steps ensures your canvas artwork stands out and stays vibrant for years.
Sealing The Artwork
Sealing your canvas is essential to protect the image from dust, moisture, and fading. You can use a clear acrylic spray or a brush-on varnish, depending on the finish you want. Matte varnishes keep things subtle, while glossy ones make colors pop.
Make sure to apply thin, even layers to avoid streaks or bubbles. Let each layer dry completely before adding another. Have you tried using a UV-protective varnish? It’s a great way to keep your colors from dulling over time.
Adding Texture Or Details
Adding texture can give your canvas a unique, tactile quality that draws the eye. You might use modeling paste or gel mediums to build up certain areas. This works especially well if your picture has elements that benefit from a 3D feel, like flowers or architectural details.
Small brush strokes or highlights can also bring out details in your image. Try painting over parts of the photo with transparent acrylic colors to enhance shadows or light spots. Have you ever noticed how a little texture can make a flat image suddenly look alive?
Displaying Your Canvas Art
Displaying your canvas art is where your creativity meets your living space. How you present your canvas can completely change its impact and the vibe of your room. It’s about more than just putting it on a wall—it’s about making it part of your story and style.
Framing Ideas
Frames can either highlight your canvas or distract from it. Consider a simple wooden frame for a natural, warm look that draws attention to the art itself. If you want a modern feel, try a sleek metal frame that adds a subtle edge without overpowering the image.
Floating frames are a great choice if you want your canvas to appear as if it’s hovering on the wall. They create depth and make the artwork stand out more. You might also skip the frame altogether and just use a gallery wrap, where the image extends around the edges for a clean, minimalist finish.
Hanging Tips
Placement is key. Think about eye level—generally, the center of your canvas should be about 57-60 inches from the floor. This positioning feels natural and allows the art to engage viewers immediately.
Use sturdy hooks or wall anchors that match your canvas weight to avoid accidents. For a dynamic display, try grouping canvases in a grid or salon style. This can turn a blank wall into an art feature that sparks conversation.
Have you ever noticed how lighting changes the look of a painting? Adding a directional spotlight or natural light can enhance colors and details. Experiment with angles until your canvas looks its best from where you usually sit or walk by.
Credit: www.walmart.com

Credit: fixthephoto.com
Frequently Asked Questions
How Do I Transfer A Photo Onto Canvas?
You can transfer photos using gel medium or photo transfer paper. Print your image on regular paper, apply gel medium on the canvas, place the image face down, and let it dry. Then, gently rub off the paper backing to reveal the image on the canvas.
What Materials Are Needed To Put A Picture On Canvas?
You need a canvas, printed photo or image, gel medium or photo transfer paper, a brush or sponge, and a sealant. These materials help in transferring and protecting the image on the canvas for a lasting effect.
Can I Use Any Photo Printer For Canvas Transfers?
Inkjet printers are best for photo transfers onto canvas. Laser printers may not work well with gel mediums. Ensure your printer produces clear, high-quality images for the best transfer results.
How Do I Seal A Picture On Canvas After Transferring?
Use a clear acrylic sealer or varnish spray to protect the transferred image. Apply thin, even coats and let each layer dry fully. This preserves the picture and prevents damage or fading over time.
Conclusion
Putting a picture on a canvas can brighten any room. It adds a personal and creative touch to your space. The process is simple and fun to try at home. Choose your favorite photo and follow the steps carefully. You will enjoy seeing your image come to life on canvas.
This project also makes a great gift for friends and family. Start your canvas art today and enjoy a new way to display memories.


