
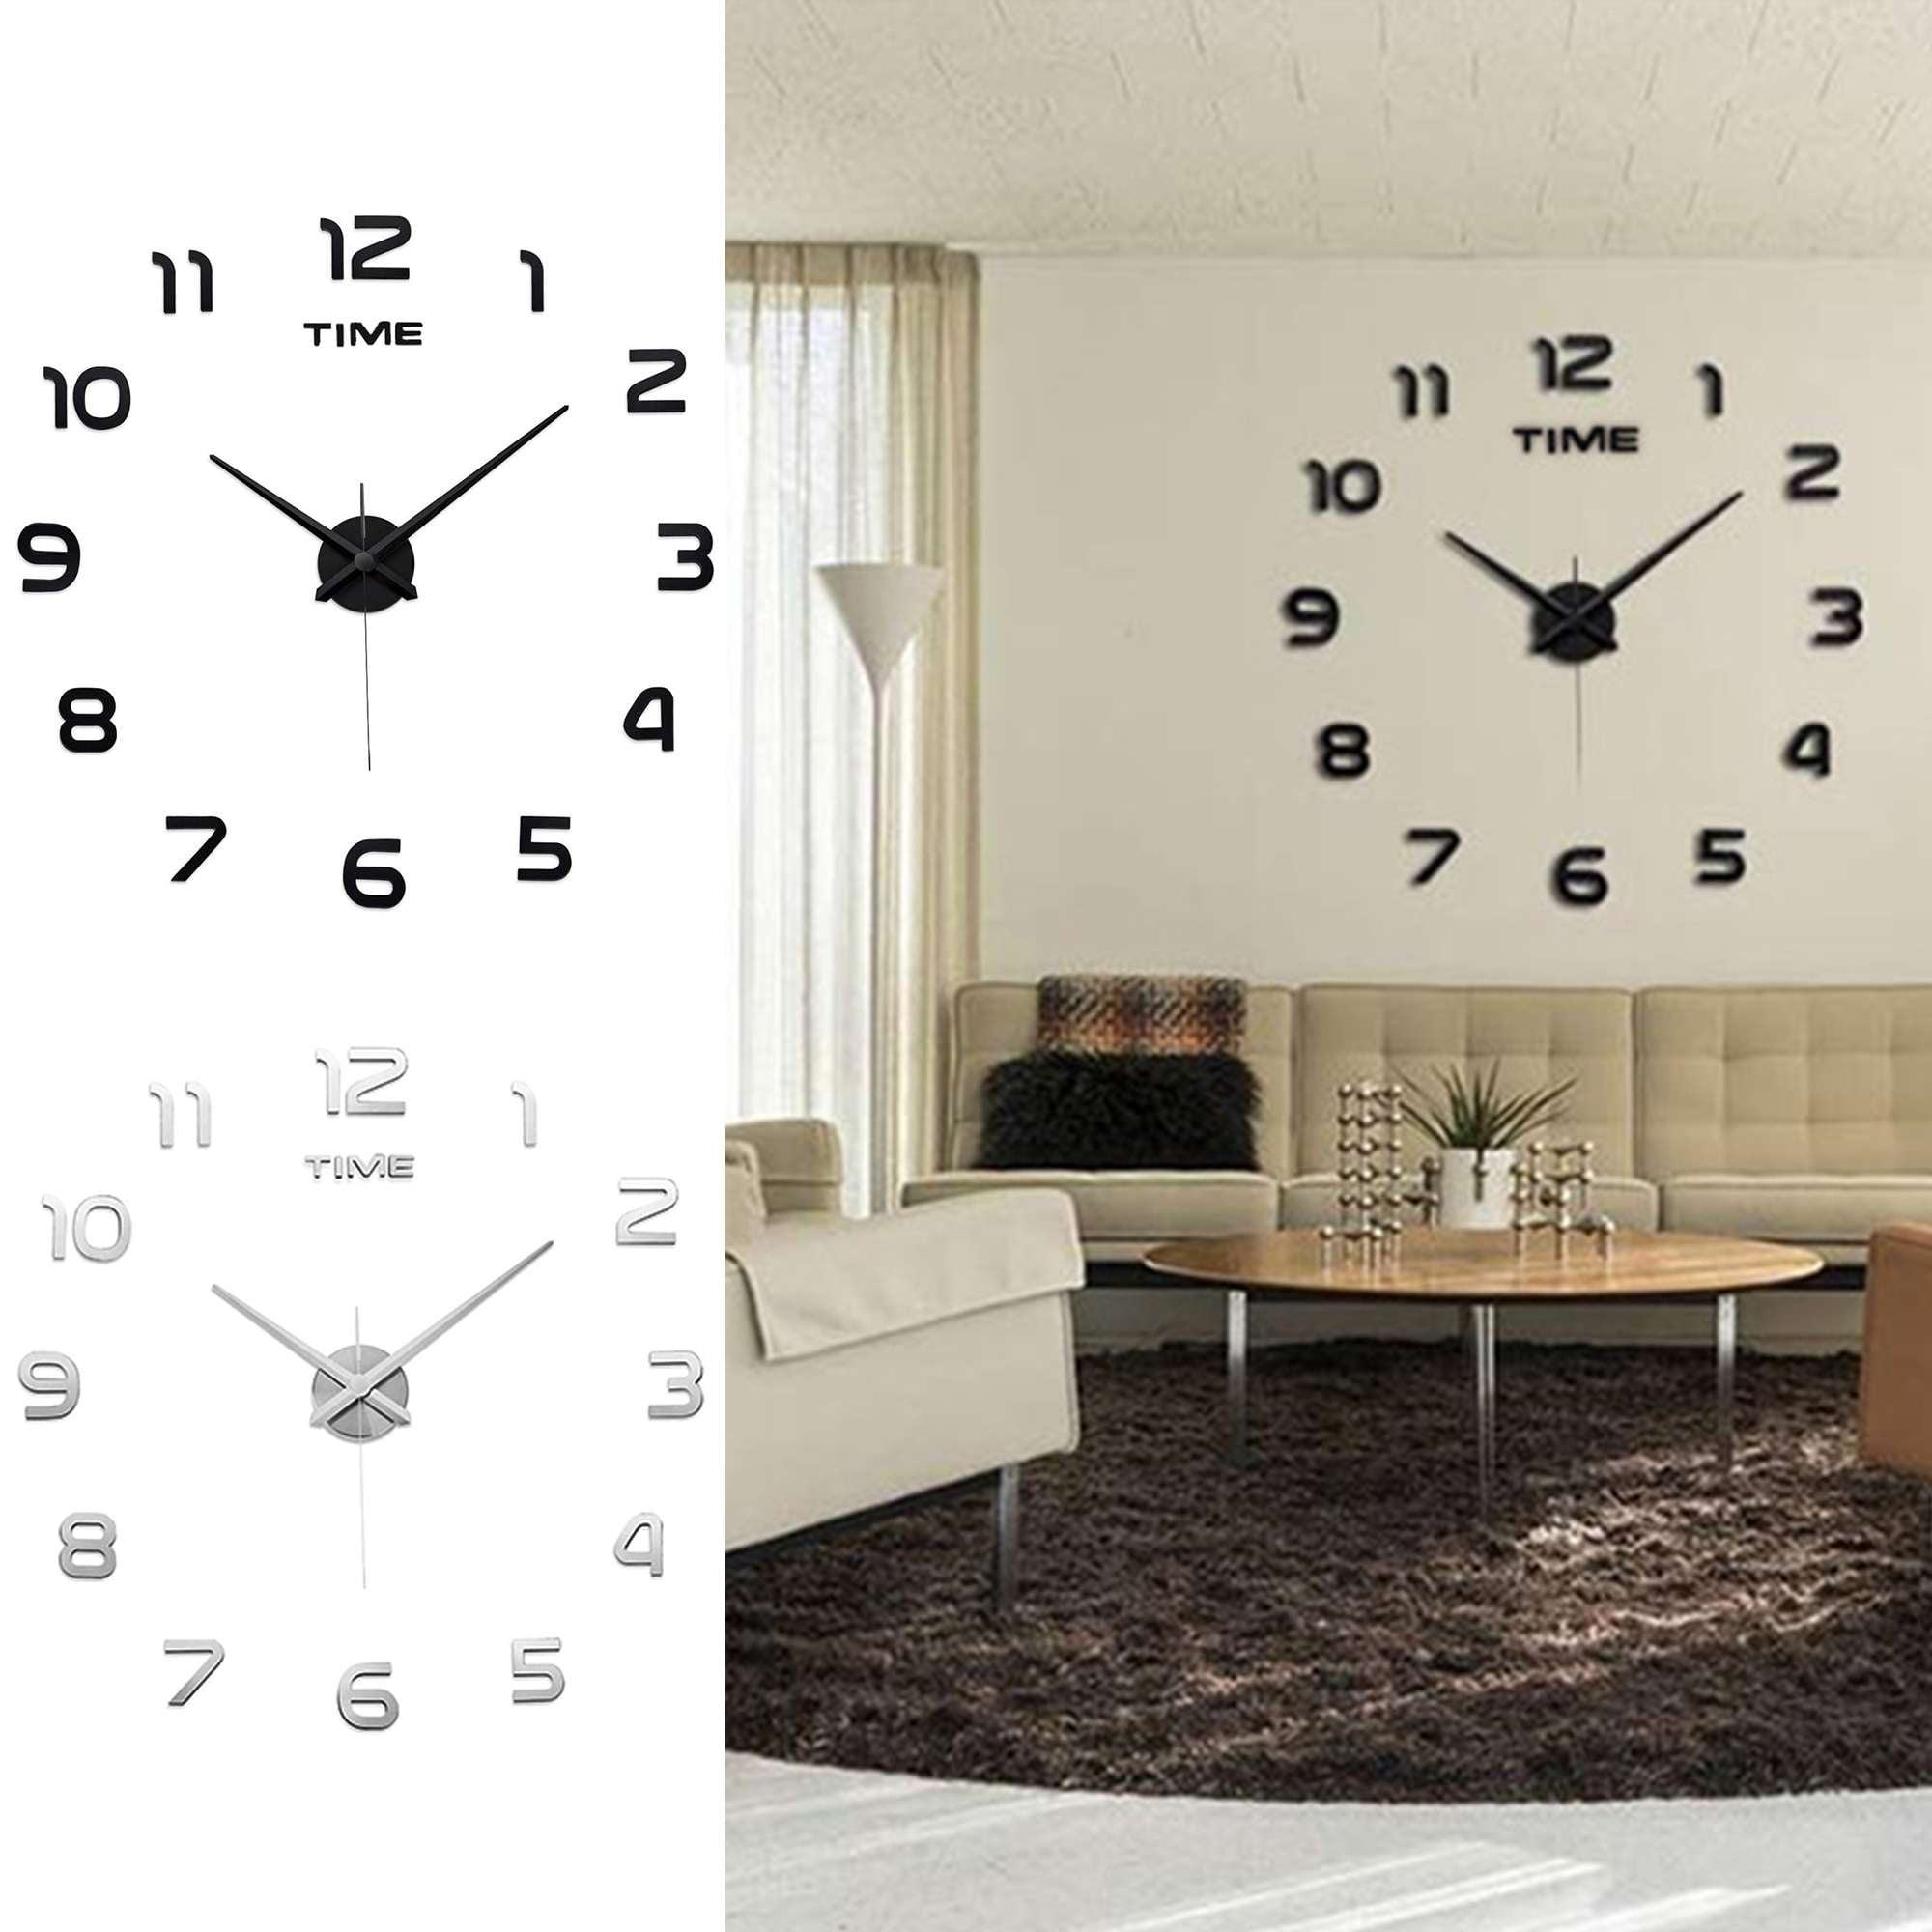
Are you looking for a simple way to transform your room instantly? Putting up 3D wall clock mirror stickers can do just that.
These stylish stickers add depth, shine, and a modern touch to any space without the hassle of heavy tools or paint. But how do you make sure they look perfect and stay in place? In this guide, you’ll discover easy, step-by-step tips to help you install your 3D wall clock mirror stickers quickly and confidently.
Keep reading, and turn your walls into a stunning focal point that everyone will notice.

Credit: www.amazon.com
Materials Needed
Gathering the right materials is essential before starting your 3D wall clock mirror sticker project. Proper tools and sticker types help create a neat, stylish look. Knowing what you need makes the process smoother and faster.
Types Of 3d Wall Clock Mirror Stickers
- Self-adhesive acrylic stickers – lightweight and easy to install
- Mirror-finish vinyl stickers – reflective with a smooth surface
- Foam-backed mirror stickers – add depth and 3D effect
- Clock mechanism kits – include clock hands and motor
Tools Required
- Measuring tape – to align and space stickers evenly
- Level tool – ensures the clock is straight on the wall
- Masking tape – to hold stickers temporarily in place
- Scissors or craft knife – for trimming edges if needed
- Soft cloth – to clean the wall before sticking
- Adhesive remover – for fixing any mistakes
- Batteries – for powering the clock mechanism
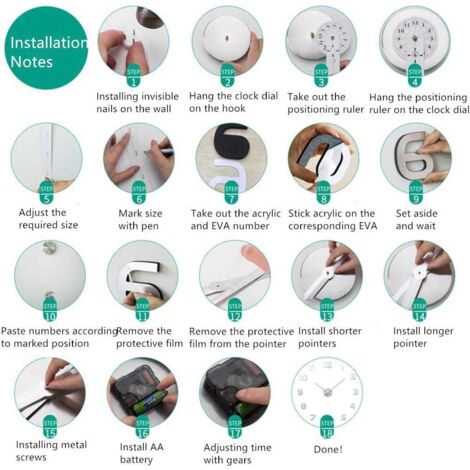
Preparing The Wall
Preparing the wall is a crucial step before you start putting up 3D wall clock mirror stickers. A well-prepared surface ensures the stickers stick properly and look flawless. Taking time to prepare can save you from peeling edges and misalignment later on.
Choosing The Right Spot
Pick a wall area that is smooth and flat. Avoid textured or uneven surfaces because they make the stickers hard to apply evenly. Think about where the clock will be most visible and complement your room’s layout.
Consider lighting too. A spot with good natural or artificial light will make the mirror stickers shine beautifully. Have you noticed how a well-lit wall can change the entire vibe of a room?
Also, check the wall’s height and size. Make sure there’s enough space for the clock and its stickers without crowding other decorations. Planning this ahead helps you avoid awkward placement.
Cleaning The Surface
Clean the wall thoroughly to remove dust, dirt, and grease. Use a mild detergent mixed with water or rubbing alcohol on a soft cloth. This step is often overlooked but it’s key to strong adhesion.
After cleaning, let the wall dry completely. Moisture can ruin the stickiness of the adhesive. If you skip drying, the stickers might peel off within days.
Test the surface by pressing a small piece of tape to see if dust or dirt sticks to it. If it does, clean again. A perfectly clean wall means your 3D clock mirror stickers will stay put and look amazing for a long time.
Design Planning
Design planning is crucial for a stunning 3D wall clock with mirror stickers. It ensures an appealing layout that complements your space. A well-thought-out design enhances both aesthetics and functionality.
Layout Options
Consider different layout options for your clock. Choose a symmetrical design for a balanced look. Alternatively, opt for an asymmetrical arrangement for a modern vibe. Explore circular or square configurations for varied visual interest. Experiment with different patterns before finalizing your choice.
Measuring And Marking
Accurate measuring and marking are essential for perfect placement. Use a tape measure to determine the wall’s dimensions. Mark the center point where you want the clock’s center to be. Ensure the measurements are precise to avoid misalignment. Use a level tool for straight lines and even placement. This step guarantees your clock will look professional and organized.

Credit: www.amazon.com
Applying The Stickers
Applying 3D wall clock mirror stickers requires a steady hand and a clear plan. This stage is where your wall transforms into a statement piece. You’ll want to take your time to avoid mistakes that can be tricky to fix later.
Peeling And Positioning
Start by carefully peeling the backing off each sticker. Avoid touching the adhesive side too much to keep it sticky and clean.
Before sticking anything permanently, try positioning the pieces on the wall using painter’s tape as temporary holders. This lets you visualize the layout and adjust spacing easily.
Ask yourself: does the arrangement feel balanced? Step back and check from different angles to make sure the clock will look great from all viewpoints.
Fixing The Numbers And Hands
Once you’re happy with the layout, begin fixing the numbers first. Press each sticker firmly against the wall for at least 10 seconds to ensure good adhesion.
Use a soft cloth to smooth out any air bubbles. This prevents peeling later and keeps the mirror surface shiny.
When it’s time to attach the clock hands, handle them gently. Align them precisely at the center point, then secure according to the clock mechanism instructions.
Double-check the hands can move freely without catching on the numbers or wall. This step is key to keeping your clock functional as well as stylish.
Installing The Clock Mechanism
Installing the clock mechanism is a key part of putting up 3D wall clock mirror stickers. This step brings your clock to life and ensures it keeps accurate time. The process involves attaching the clock motor to the wall and setting the correct time. Follow these clear instructions for a smooth installation.
Attaching The Clock Motor
Start by locating the center point of your clock design on the wall. This spot will hold the clock motor securely. Use the adhesive pad or screws provided with your clock kit to fix the motor in place. Press firmly to ensure it sticks well. Make sure the motor is straight and stable before moving on.
Setting The Time
Once the motor is attached, gently place the clock hands onto the motor shaft. Begin with the hour hand, then the minute hand, and finally the second hand if there is one. Adjust the hands carefully to avoid bending them. Use the small dial on the back of the motor to set the exact time. Turn the dial slowly until the clock shows the correct time.
Credit: www.walmart.com
Final Adjustments
Final adjustments are essential to ensure your 3D wall clock mirror stickers look perfect and stay in place. This stage focuses on securing edges and enhancing the shine. Careful attention here improves durability and appearance.
Securing Loose Edges
Check all edges of the stickers for any lifting or gaps. Press down gently but firmly to stick them well. Use a soft cloth or your fingers for even pressure. If edges still lift, apply a small amount of clear adhesive designed for mirrors. Avoid excess glue to prevent marks. Let it dry completely before touching the surface again.
Cleaning And Polishing
Remove dust and fingerprints using a clean, dry microfiber cloth. For stubborn spots, slightly dampen the cloth with water. Wipe gently in circular motions to avoid scratches. Avoid harsh chemicals that can damage the mirror surface. Polishing brings back the shine and makes the stickers look new. Keep the area around the clock clean to maintain its beauty longer.
Maintenance Tips
Keeping your 3D wall clock mirror stickers looking sharp and functioning well requires a little care. Simple maintenance can extend their life and keep your wall art shining bright. Here are some practical tips to help you maintain both the mirrors and the clock mechanism.
Cleaning The Mirror Stickers
Dust and fingerprints can dull the shine of your mirror stickers. Use a soft, lint-free cloth to gently wipe the surface. Avoid abrasive materials that can scratch the mirrors.
If you notice stubborn smudges, dampen the cloth slightly with water or a mild glass cleaner. Spray the cleaner on the cloth, not directly on the mirror, to prevent damage to the adhesive behind the sticker.
Regular light cleaning is better than occasional deep scrubbing. Have you ever tried cleaning with a microfiber cloth? It works wonders without leaving streaks.
Battery Replacement
Your 3D wall clock needs fresh batteries to keep perfect time. Check the battery compartment every few months to avoid leakage or corrosion. A battery that dies suddenly can disrupt your wall clock’s charm.
Use high-quality alkaline batteries for longer life. When replacing, note the correct polarity and handle the clock hands carefully to avoid misalignment.
Have you noticed your clock slowing down? It might be time for a battery swap before the clock stops completely.
Frequently Asked Questions
How Do I Prepare The Wall For 3d Clock Mirror Stickers?
Clean the wall surface thoroughly with a dry cloth. Ensure it is smooth, dry, and free from dust or grease before application.
What Tools Are Needed To Install 3d Wall Clock Stickers?
You need a measuring tape, pencil, level, and adhesive or double-sided tape included with the stickers for accurate placement.
Can I Reposition 3d Mirror Stickers After Sticking?
Yes, carefully peel and reposition them within the first few minutes to avoid damaging the adhesive or the wall surface.
How To Align The Clock Hands Correctly On Mirror Stickers?
Attach the clock mechanism first. Then fix the hands at 12 o’clock for accurate time setting and balanced appearance.
Conclusion
Putting up 3D wall clock mirror stickers is simple and fun. Start by cleaning the wall for better stickiness. Arrange the pieces carefully to create a perfect look. Take your time to measure and place each part. Enjoy how your room changes with this easy decoration.
These stickers add style without much effort or cost. Try this project to brighten your space quickly and neatly. You will love the fresh and modern feel it brings. Give your walls a new life today.


