
Are you tired of your plain can lights and ready for a fresh, stylish look? Replacing can lights with pendant lights can instantly transform your space, adding warmth and personality.
But maybe you’re wondering if it’s too complicated or costly. Don’t worry—you can do this yourself, and it’s easier than you think. You’ll discover simple steps to swap out those old fixtures and bring new life to your rooms. Keep reading to learn how to make your lighting both beautiful and functional.
Tools And Materials Needed
Replacing can lights with pendant lights can transform your space’s ambiance and style. However, before you begin, it’s crucial to gather the right tools and materials. Having everything ready ensures a smoother installation and keeps your project safe and efficient.
List Of Essential Tools
You’ll need a mix of basic electrical tools and some handy household items. Make sure you have these on hand before starting:
- Voltage tester:Check if the power is off and avoid shocks.
- Screwdrivers:Both flathead and Phillips for removing and securing fixtures.
- Wire strippers:To strip insulation from electrical wires cleanly.
- Drill and drill bits:For mounting new hardware if needed.
- Wire nuts/connectors:To safely connect wires.
- Electrical tape:For extra insulation on wire connections.
- Ladder:To reach ceiling fixtures safely.
- Measuring tape:To position your pendant lights accurately.
Missing just one tool can slow you down or compromise safety. Have you ever started a project only to realize you forgot a key tool? Avoid that frustration by double-checking your list.
Choosing The Right Pendant Lights
Not all pendant lights will work as a direct replacement for can lights. Consider the size and weight of the fixture to ensure your ceiling can support it. A heavy pendant may require extra support or mounting hardware.
Think about the style and lighting needs of your room. Do you want a single statement pendant or a cluster of smaller ones? Also, check the bulb type and wattage to match your desired brightness.
Remember, pendant lights hang lower than can lights. Are you okay with the new height, or do you need an adjustable chain or rod? Selecting the right fixture upfront saves time and hassle during installation.

Credit: www.amazon.com
Preparing The Workspace
Preparing the workspace is essential before replacing can lights with pendant lights. This step ensures safety and efficiency. It helps avoid accidents and makes the installation process smoother.
Turning Off The Power
Start by switching off the power to the room at the circuit breaker. This prevents electrical shocks during work. Use a voltage tester to double-check the power is off. Safety first. Never assume the power is off without testing.
Clearing The Area Safely
Remove furniture and objects near the lights to create space. Cover floors and surfaces with drop cloths to catch debris. Keep tools organized and within reach. Clear space helps prevent accidents and protects your belongings during the project.
Removing Can Lights
Thinking of swapping your can lights for pendant lights? It’s a fantastic way to add style. Before you install the pendants, you must first remove the old can lights. This process is straightforward, with the right guidance.
Detaching The Trim And Bulb
Start by removing the trim around the can light. Gently pull it down with your hands. Some trims might have springs, so be cautious. Once the trim is off, unscrew the bulb. Ensure the light switch is off to avoid any accidents.
Disconnecting The Wiring
Locate the junction box above the can light. Open it to access the wires. You’ll find wire nuts connecting the wires. Carefully unscrew the nuts to separate the wires. Remember to note the wire colors for later.
After disconnecting, remove the can housing. This step completes the removal process. Now, you’re ready to install your new pendant lights!

Credit: www.mstarrdesign.com
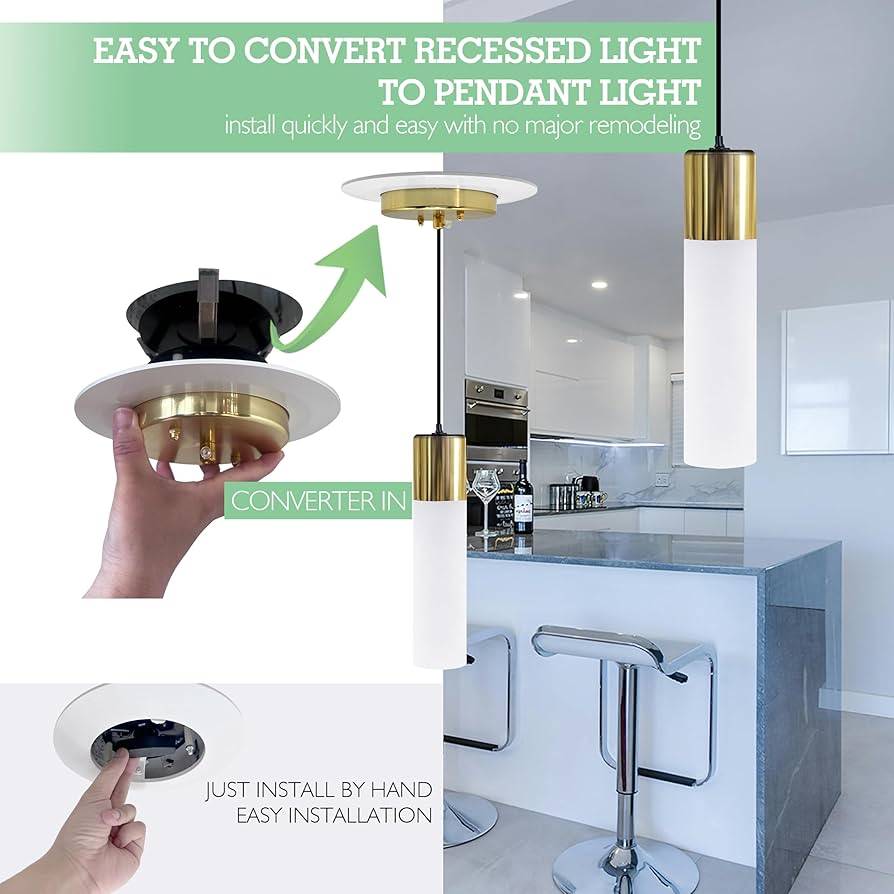
Installing The Pendant Light Fixture
Installing the pendant light fixture is the key step after removing the can lights. This process requires careful handling to ensure safety and proper function. Follow clear steps for a smooth installation and a beautiful new look.
Mounting The Bracket
Start by attaching the mounting bracket to the electrical box. Use screws that fit the box securely. Ensure the bracket is level and tight. This will support the weight of the pendant light. Check for any loose parts before proceeding.
Connecting The Wires
Turn off the power at the circuit breaker first. Match the wires from the ceiling with the pendant wires by color. Usually, black or red is live, white is neutral, and green or bare copper is ground. Twist wire connectors onto the wire ends. Make sure connections are tight and neat. Wrap electrical tape around the connectors for extra safety.
Securing The Fixture
Lift the pendant light and align it with the bracket. Use the screws provided to secure the fixture to the bracket. Double-check the fixture is stable and does not wobble. Adjust the pendant length if needed before tightening all screws. Restore power and test the light to confirm proper installation.
Adjusting Pendant Height
Adjusting the height of your pendant lights is key to both the look and function of your new lighting setup. Getting the right length can change the entire mood of a room, whether you want focused task lighting or a softer, ambient glow. Let’s break down how to measure and modify your pendant light cord to fit perfectly above your space.
Measuring The Desired Length
Start by determining the ideal hanging height for your pendant light. A good rule of thumb is to position the light 28 to 34 inches above a kitchen island or dining table. If it’s in an open area, aim for 6 to 7 feet from the floor to the bottom of the pendant.
Use a tape measure to mark this length on the cord before installation. Remember to consider the height of anyone who will be walking under or near the light. Do you want the pendant to be a statement piece or just subtle illumination?
Shortening Or Lengthening The Cord
Once you’ve measured, you can adjust the cord length to match your mark. If the cord is too long, carefully cut it, but only after disconnecting the power. Make sure to strip the wire ends properly to avoid loose connections.
If the cord is too short, you can extend it by using an extension kit or wiring additional cord, but this requires some electrical know-how. Always check that the wiring and connectors are compatible and safe for your fixture. Have you thought about how this adjustment might affect the balance or stability of the pendant?
Testing And Final Touches
After installing your new pendant lights, the final phase is all about testing and adding those finishing touches that bring the whole look together. This step ensures your lights work perfectly and your space feels inviting and polished. Taking the time to carefully restore power, check the lighting, and tidy up will make your effort truly shine.
Restoring Power And Testing Lights
Before you flip the switch, double-check that all wiring connections are secure and insulated. Safety first—never rush this part. Once confident, restore power at the breaker and turn on your new pendant lights.
Watch for any flickering or unusual behavior. If a light doesn’t turn on, recheck your wiring or bulb placement. Pay attention to the brightness and angle of the pendants to ensure they illuminate the space as you imagined.
Ask yourself: Does the lighting highlight the room’s best features? Adjust the height or position if needed to create the right atmosphere.
Cleaning And Styling Tips
Dust and fingerprints can dull your new fixtures’ appearance. Use a microfiber cloth and a gentle cleaner to wipe down the pendant lights. Avoid abrasive materials that could scratch the finish.
Consider how your new lights complement the room’s décor. Adding coordinating accents like a matching lampshade or a reflective surface underneath can enhance their impact.
Think about your daily routine—do the lights make the space more functional? Sometimes, small tweaks like swapping a bulb for a warmer tone or adding a dimmer switch can dramatically improve comfort and style.
Safety Tips And Common Mistakes
Replacing can lights with pendant lights can dramatically change the look of your space, but safety should always be your top priority. Ignoring key safety tips or making common mistakes can lead to electrical hazards or a frustrating installation process. Understanding what to watch out for will save you time, money, and potential danger.
Avoiding Electrical Hazards
Before you start, always turn off the power at the circuit breaker. It’s easy to forget this step, but working on live wiring is extremely dangerous. Use a voltage tester to double-check that the power is off before touching any wires.
Make sure you understand the wiring setup of your existing can lights. Sometimes wires are connected differently than expected, especially in older homes. Miswiring can cause shorts, flickering lights, or even fires.
Use wire nuts and electrical tape to secure all connections tightly. Loose connections are a common cause of electrical issues and can be avoided with proper securing. If you’re unsure about handling electrical wiring, consult a professional electrician.
Troubleshooting Installation Issues
One common mistake is not checking the weight and size of your new pendant light. Can light fixtures are usually lighter and smaller, so your ceiling box must be rated to support the heavier pendant. If it isn’t, you might need to install a support brace or a different ceiling box.
Sometimes the pendant light hangs too low or too high. Measure carefully before installation to achieve the perfect height for your room. A good rule of thumb is to hang pendants 30-36 inches above surfaces like kitchen islands.
If your pendant light flickers or doesn’t turn on after installation, don’t panic. Double-check all wire connections and ensure the bulb is compatible with the fixture. Problems like this often come down to a simple connection issue or a mismatched bulb.
Credit: www.amazon.com
Frequently Asked Questions
How Do I Remove Existing Can Lights Safely?
Turn off the power at the breaker. Use a voltage tester to confirm no electricity flows. Carefully detach the trim and bulb. Disconnect the wiring connectors before removing the housing from the ceiling.
What Tools Are Needed To Install Pendant Lights?
You will need a voltage tester, wire strippers, screwdrivers, a drill, and mounting brackets. Also, have wire nuts and electrical tape ready. These tools help ensure safe and secure installation of pendant lights.
Can I Use The Same Wiring For Pendant Lights?
Yes, you can use the existing wiring if it meets current electrical codes. Inspect wires for damage and compatibility. Ensure the circuit can handle the new light’s wattage and type before connecting pendant lights.
How Do I Choose The Right Pendant Light Size?
Consider ceiling height and room size. Pendant lights should hang about 28-34 inches above surfaces. Larger rooms and higher ceilings require bigger or multiple pendants for balanced lighting and aesthetic appeal.
Conclusion
Replacing can lights with pendant lights adds style and warmth to any room. The process is simple when you follow the right steps carefully. Always turn off the power before starting to stay safe. Choose pendant lights that match your space and taste.
Take your time connecting wires and securing fixtures firmly. This upgrade can change the look of your home easily. Enjoy the new ambiance and light your space beautifully. Small changes can make a big difference in your home’s feel.


