
Have you ever looked at your favorite table lamp and noticed it flickering or not turning on at all? Before you rush to buy a new one, there’s a simple fix you can do yourself: rewiring your lamp.
You might think it’s complicated or dangerous, but with the right steps, you can bring your lamp back to life quickly and safely. Imagine saving money and feeling proud of fixing something on your own. Keep reading, and you’ll learn exactly how to rewire a table lamp without any hassle.
Your next cozy evening with perfect lighting is just a few easy steps away.

Credit: www.amazon.com
Tools And Materials Needed
Before you begin rewiring your table lamp, gathering the right tools and materials is crucial. Having everything on hand prevents interruptions and keeps your workflow smooth. Plus, using the correct items ensures safety and a professional finish.
Essential Tools
- Screwdrivers: Both flathead and Phillips are necessary for removing the lamp base and socket.
- Wire Strippers: These help you remove the insulation cleanly without damaging the copper wire inside.
- Needle-Nose Pliers: Useful for bending wires and holding small parts securely.
- Multimeter: This tool tests the electrical connections to confirm everything is safe before plugging in.
- Utility Knife: Handy for cutting the old cord or trimming wires if needed.
Replacement Parts
- New Lamp Cord: Choose a cord with the correct gauge and length for your lamp’s wattage and placement.
- Replacement Socket: Pick one compatible with your bulb type and lamp design, often found at hardware stores.
- Plug: If your cord doesn’t come with a plug, you’ll need a new one to ensure a safe connection to your power source.
- Wire Connectors or Electrical Tape: These secure wire joints and prevent shorts.
Safety Gear
- Insulated Gloves: Protect your hands from accidental shocks and sharp edges.
- Safety Glasses: Prevent dust or wire fragments from getting into your eyes while stripping or cutting wires.
- Work Surface Cover: A non-slip mat or cloth keeps small parts from rolling away and protects your table.
Have you ever started a project halfway and realized a key tool was missing? It’s frustrating and can lead to mistakes. Preparing these tools and materials upfront saves time and keeps your rewiring task safe and efficient.
Preparing The Workspace
Preparing the workspace is a key part of rewiring a table lamp. A clean, organized area helps keep tools and parts in reach. It also reduces mistakes and accidents. Taking time to set up right makes the job easier and faster.
Choosing A Safe Area
Select a flat, stable surface to work on. A sturdy table or bench works well. Make sure the spot has good lighting. Avoid places near water or moisture. Keep pets and children away from the workspace.
Unplugging The Lamp
Always unplug the lamp before starting any work. This stops electrical shocks or short circuits. Double-check the plug is out of the socket. Never work on a lamp while it is plugged in.
Gathering Supplies
Collect all tools and materials before beginning. Common items include:
- Screwdrivers (flathead and Phillips)
- Wire strippers
- Electrical tape
- Replacement cord or wires
- Wire nuts or connectors
- Utility knife or scissors
- Multimeter (optional, for testing)
Having everything ready saves time and frustration.
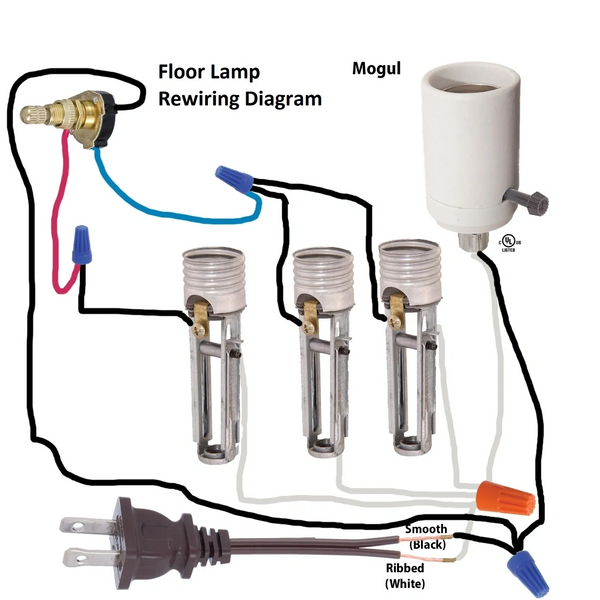
Removing The Old Wiring
Begin by unplugging the lamp and removing the socket to access the wires. Carefully detach the old wiring from the lamp base and socket. Dispose of worn or damaged wires safely before installing new ones.
Removing the old wiring from a table lamp is crucial. This step ensures safety and paves the way for new installations. Removing old wiring might seem daunting, but it’s manageable with the right guidance. Let’s dive into the process.Disassembling The Lamp
First, unplug the lamp. This is important for safety reasons. Next, remove the lampshade. Set it aside carefully. Unscrew the bulb and place it in a safe spot. Now, you can focus on the lamp base. Look for screws or clips holding the base together. Use a screwdriver to open the base. Be gentle to avoid damaging the lamp.Detaching The Socket
Locate the socket inside the lamp. The socket holds the bulb in place. Unscrew or unclip the socket from the base. Some sockets twist off easily, while others need a screwdriver. Once detached, inspect the socket. Notice how the wires connect to it. This will help when you install new wiring.Extracting The Cord
Find where the cord enters the lamp base. Gently pull the cord out through the base. If it resists, check for knots or ties inside the lamp. Cut these if needed. Carefully remove the entire cord from the lamp. Make sure all old wires are out before proceeding. Now, the lamp is ready for new wiring.
Credit: www.amazon.com
Installing The New Cord
Installing the new cord is an essential part of rewiring a table lamp. This process ensures the lamp receives power safely and works properly. Careful handling and correct steps help avoid electrical hazards. Focus on measuring, connecting, and securing the cord for a neat and functional finish.
Measuring And Cutting
Start by measuring the length of the new cord. Make sure it is long enough to reach the power outlet comfortably. Leave some extra length for flexibility. Use sharp scissors or wire cutters to cut the cord cleanly. Avoid fraying the wire ends.
Connecting Wires To Socket
Strip about half an inch of insulation from each wire inside the cord. Identify the live and neutral wires by their colors, usually black or brown for live, white or blue for neutral. Attach each wire to the correct terminal on the lamp socket. Tighten the screws securely to hold the wires in place. Check that no bare wire is exposed outside the terminals.
Securing The Cord
Use the cord grip or clamp inside the lamp base to hold the cord firmly. This prevents the wires from pulling loose. Tighten the grip so the cord does not move. Arrange the cord neatly along the lamp’s inner structure. Close the lamp base carefully, making sure no wires get pinched or damaged.
Reassembling The Lamp
Reassembling the lamp is where all your careful work comes together. This phase requires patience and attention to detail to ensure the lamp functions safely and looks great. Taking your time now prevents electrical hazards and extends the life of your lamp.
Putting Parts Back Together
Start by carefully placing the socket and harp back into the lamp base. Make sure each piece fits snugly without forcing anything, as forcing parts can damage the lamp or wiring. If your lamp has a shade, attach it last to avoid interference during assembly.
Remember how you took the lamp apart? Use that memory or take photos before disassembling next time—they’re helpful guides now. This approach saves you from guessing where pieces belong and reduces frustration.
Checking Wire Placement
Double-check that the wires run through the lamp body as they did originally. Incorrect wire placement can cause shorts or create a fire hazard. The wires should be neatly tucked away, avoiding any pinch points or sharp edges.
- Ensure the hot (usually black) and neutral (usually white) wires connect correctly to the socket terminals.
- Confirm the grounding wire is attached if your lamp has one.
- Look for any exposed copper wire—this could cause a short and must be fixed before powering the lamp.
Have you noticed any frayed or damaged wire insulation during this step? If so, replace the wire before proceeding to keep your lamp safe.
Tightening Components
Secure all screws, nuts, and threaded parts firmly but avoid over-tightening, which could crack the lamp base or strip threads. Use a screwdriver or pliers to make sure everything is held in place and won’t loosen over time.
Check that the socket is stable and does not wobble when you gently shake the lamp. Loose components can cause wiring to loosen, leading to malfunction or safety hazards.
Think about how often you use this lamp. If it’s in a high-traffic area, extra tightening and reinforcement can prevent future repairs. A little effort now saves you time and frustration later.
Credit: dengarden.com
Testing The Rewired Lamp
Once you’ve rewired your table lamp, testing it carefully is essential to ensure everything works properly and safely. Skipping this step can lead to electrical hazards or a lamp that just won’t turn on. Testing helps you catch any issues early and gives you peace of mind before regular use.
Plugging In Safely
Before you plug in your rewired lamp, double-check that your hands are dry and the lamp is resting on a non-conductive surface like wood or plastic. Avoid plugging it in near water sources or on metal tables. Use a grounded outlet if your lamp has a three-prong plug to reduce the risk of electrical shock.
Have you ever felt a slight shock from a lamp? That’s a clear sign of faulty wiring or grounding. Taking these safety measures seriously helps prevent those uncomfortable and dangerous surprises.
Switch Operation Check
After plugging in, test the lamp’s switch multiple times. Turn it on and off slowly to listen for any unusual sounds like buzzing or crackling. The switch should feel smooth and responsive without sticking or resistance.
If the lamp flickers or doesn’t light up consistently, it might indicate loose connections inside the switch or socket. This is your chance to fix those problems before they become bigger issues.
Inspecting For Issues
Look closely at the lamp’s cord and socket for any visible signs of damage such as frayed wires or burn marks. Smell the lamp area; a burnt smell is a warning sign of overheating or short circuits. Make sure the bulb fits snugly and is the correct wattage for your lamp.
Sometimes, even small mistakes like using a bulb with too high wattage can cause damage over time. Would you rather catch these problems now or after a costly repair? Careful inspection helps you avoid accidents and extends your lamp’s lifespan.
Tips For Safe Diy Electrical Work
Working on your table lamp can be a rewarding DIY project, but it’s important to prioritize safety at every step. Electrical work, even on small devices, carries risks if done incorrectly. Let’s look at some practical tips that help you avoid accidents and ensure your lamp works flawlessly after rewiring.
Avoiding Common Mistakes
One of the biggest mistakes people make is not unplugging the lamp before starting any work. Always disconnect the power source to prevent shocks.
Another frequent error is mixing up the wiring connections. The hot wire should connect to the brass screw, and the neutral wire to the silver screw. Swapping these can cause the lamp to malfunction or create a fire hazard.
Using the wrong type of wire or damaged cords is also risky. Check that your replacement cord matches the lamp’s power requirements and is in good condition. Have you ever thought about how a simple oversight like this could cause serious damage?
When To Consult A Professional
If your lamp has a complicated wiring setup or if you notice signs of damage beyond the cord—like burnt sockets or loose internal connections—it’s wise to call an electrician. Some issues require expertise to fix safely.
Feeling unsure about your skills? That’s a clear sign to seek professional help. Electrical problems can escalate quickly, and a qualified expert will save you time and potential hazards.
Maintaining Your Lamp
After rewiring, keep your lamp in good shape by regularly checking the cord for frays or cracks. Replace it immediately if you spot any damage to avoid electrical shorts.
Clean the lamp socket gently with a dry cloth to remove dust, which can interfere with electrical contacts. Also, avoid over-tightening bulbs to prevent socket damage.
Have you noticed how a little maintenance extends the life of your lamp and keeps it safe? Small habits make a big difference in electrical safety and performance.
Frequently Asked Questions
How Do I Safely Rewire A Table Lamp?
First, unplug the lamp and remove the old wiring. Use wire cutters and strippers carefully. Connect new wires to the socket and plug. Secure all connections and test before use.
What Tools Are Needed To Rewire A Table Lamp?
You need wire cutters, wire strippers, a screwdriver, new lamp wire, and a replacement socket. These tools help ensure a safe and efficient rewiring process.
Can I Use Any Wire For Rewiring A Table Lamp?
No, use lamp cord rated for your lamp’s voltage. Typically, 16 or 18-gauge wire is suitable. Using proper wire ensures safety and prevents electrical hazards.
How Long Does It Take To Rewire A Table Lamp?
Rewiring usually takes 30 to 60 minutes. Time varies by lamp complexity and your experience level. Take your time to ensure safety and proper connections.
Conclusion
Rewiring a table lamp can save money and extend its life. Take your time and follow each step carefully. Always keep safety in mind while working with electricity. Using the right tools makes the job easier and faster. After rewiring, test the lamp to ensure it works well.
Small projects like this build confidence and skills. Enjoy your refreshed lamp, bright and ready to use. A little effort brings great results. Why not try it yourself today?


