
Is your old desk lamp flickering or not working at all? Instead of tossing it out, you can bring it back to life by rewiring it yourself.
Rewiring an old desk lamp might sound tricky, but with the right steps, you’ll find it easier than you think. Imagine saving money, reducing waste, and enjoying a lamp that’s as good as new—right on your desk. In this guide, you’ll learn simple, clear instructions to get your lamp glowing again safely and quickly.
Ready to take control and revive your favorite lamp? Let’s get started!
Credit: www.vendimialighting.co.uk
Tools And Materials Needed
Rewiring an old desk lamp is a rewarding project that can bring new life to a piece you already love. Before you start, gathering the right tools and materials is crucial. Having everything ready keeps the process smooth and safe.
Essential Tools For Rewiring
- Screwdriver:A flathead and a Phillips screwdriver will help you open the lamp base and remove any screws holding parts together.
- Wire Strippers:These allow you to remove the insulation from the wires without damaging the metal inside.
- Needle-Nose Pliers:Useful for bending wires and making precise connections inside the lamp.
- Multimeter:This tool checks for electrical continuity and ensures your rewiring is correct and safe before plugging in the lamp.
- Utility Knife:Handy for cutting wires or trimming insulation carefully if needed.
Materials You’ll Need
- Replacement Cord:Choose a cord with the correct voltage rating and length to fit your lamp’s design.
- New Plug:A replacement plug that matches your socket type and safety standards.
- Wire Connectors or Electrical Tape:To secure wire connections safely inside the lamp.
- Socket Replacement (Optional):If the old socket is damaged or unsafe, swapping it out is a good idea.
- Heat Shrink Tubing:Provides extra insulation and protection for your wire joints.
Safety Gear To Consider
- Insulated Gloves:Wearing these can protect you from accidental shocks.
- Safety Glasses:Keep your eyes safe from wire fragments or debris while working.
Once you have these tools and materials ready, you can focus on rewiring confidently. Do you have all these items, or will you need to make a quick trip to the hardware store? Proper preparation sets the stage for a successful and safe repair.

Credit: makely.shop
Safety Precautions
Safety should be your top priority when rewiring an old desk lamp. Handling electrical components without proper precautions can lead to shocks, short circuits, or even fires. Taking time to prepare and protect yourself ensures the task goes smoothly and your lamp works safely.
Wear Protective Gear
Always wear insulated gloves to guard against accidental electric shocks. Safety glasses protect your eyes from tiny wire fragments or sparks that might occur. These simple items can prevent injuries that might otherwise ruin your project or your day.
Disconnect Power Completely
Make sure the lamp is unplugged from the power source before you begin. Double-check by testing the cord with a voltage tester if you have one. It’s easy to forget this step, but even a small current can cause harm.
Use The Right Tools
Using tools designed for electrical work, like wire strippers and insulated screwdrivers, makes the job safer and easier. Avoid using makeshift tools that can slip or damage wires. Investing in proper tools pays off in safety and quality.
Work In A Well-lit, Dry Area
Good lighting helps you see small wires and connections clearly, reducing mistakes. Moisture increases the risk of electric shock, so keep your workspace dry. A tidy area also prevents accidents, like knocking over parts or tools.
Check Wire Condition Thoroughly
Inspect old wires for cracks, brittleness, or exposed copper before starting. Damaged wires should be replaced entirely to avoid future hazards. You might think a wire looks fine, but close inspection can save you trouble later.
Test Your Work Before Use
After rewiring, test the lamp with a low-watt bulb or a multimeter to ensure proper connections. Don’t rush to plug in high-wattage bulbs until you confirm everything is safe. This step helps catch errors before they cause damage or injury.
Have you ever skipped a safety step and regretted it later? Taking precautions might seem tedious, but it’s the difference between a successful project and a costly mistake. Your safety and peace of mind are worth every extra minute spent preparing.
Removing The Old Wiring
Removing the old wiring from an old desk lamp is an important step before installing new wires. It ensures safety and prepares the lamp for rewiring. Take your time and work carefully to avoid damage.
Detaching The Lampshade And Bulb
Start by gently unscrewing the light bulb from the socket. Set the bulb aside in a safe place. Next, remove the lampshade. This usually involves loosening screws or clips that hold it in place. Handle the lampshade carefully to avoid breaking it.
Accessing The Wiring Compartment
Locate the base or the part of the lamp where the wires connect. This area often has a cover or small screws. Use a screwdriver to remove any screws or panels. Keep these screws safe for reassembly. Once open, you will see the wires inside the lamp.
Disconnecting The Old Wires
Look for wire nuts or connectors that join the lamp wires to the power cord. Unscrew or pull these connectors apart gently. If wires are twisted together, carefully untwist them. Make sure the lamp is unplugged before touching any wires. Remove the old wiring completely from the lamp’s interior.
Inspecting Lamp Components
Check all lamp parts carefully for damage or wear before rewiring. Focus on the cord, plug, socket, and switch to ensure safety. Clean connections help the lamp work properly and last longer.
Inspecting Lamp Components Rewiring an old desk lamp can feel like breathing new life into a cherished piece. Before you dive into the technical aspects, it’s crucial to thoroughly inspect the components of the lamp. Understanding the condition of each part will guide you in deciding whether to repair or replace them. This inspection ensures safety and functionality while preserving your lamp’s vintage charm.Checking The Socket
Begin by examining the lamp socket, where the bulb sits. Look for any signs of corrosion or wear around the edges. If the socket feels loose, it might not hold the bulb securely, leading to flickering or even short circuits. A quick test is to insert a bulb and see if it sits snugly. A socket that looks burnt or smells odd should be replaced. Always prioritize safety over nostalgia.Examining The Cord And Plug
The cord and plug are the lifeline of your lamp, supplying power from the outlet. Check for frays or exposed wires, as these can be potential hazards. I once ignored a slight crack in a lamp cord, only to have it spark unexpectedly. Feel the length of the cord for any stiffness or brittleness, which might indicate the need for replacement. Inspect the plug for any bent prongs or signs of overheating. Replacing a damaged plug is a simple but crucial step in ensuring your lamp is safe to use.Assessing The Lamp Frame
Finally, give the lamp frame a thorough look-over. Even if the wiring is sound, a wobbly frame can be a nuisance. Check for any loose screws or joints that need tightening. Consider the aesthetics too. Does the frame have scratches or rust that might need a touch-up? A stable and visually pleasing frame complements the rewiring effort and enhances the overall appeal of your lamp.Choosing Replacement Parts
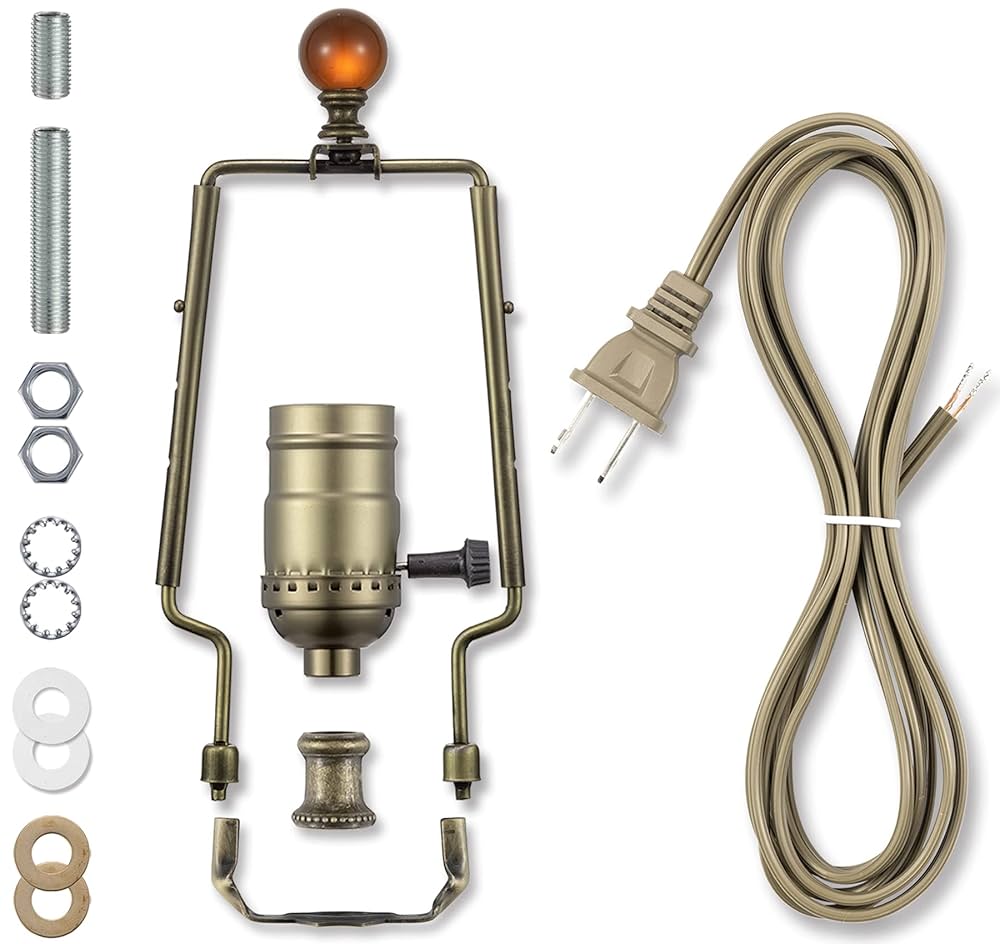
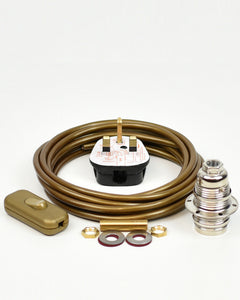
Choosing the right replacement parts is key to safely rewiring an old desk lamp. The parts must fit well and work with the lamp’s design. Using proper components ensures the lamp will function correctly and last longer. Focus on three main parts: the cord, socket, and plug. Each must match the lamp’s electrical needs and style.
Selecting The Right Cord
The cord carries electricity from the outlet to the lamp. Choose a cord with the correct wire gauge. Thicker wires handle more current and reduce overheating risk. Check the lamp’s voltage and wattage to pick the right cord. Look for cords with good insulation for safety. The cord length should fit your workspace without excess slack.
Picking A Compatible Socket
The socket holds the bulb and connects it to power. Make sure the socket matches the bulb type and size. Common socket types include E26 and E12. The socket should support the bulb’s wattage to avoid damage. Look for sockets made from heat-resistant materials. Easy installation sockets save time and avoid rewiring errors.
Finding A Suitable Plug
The plug connects the lamp to the power source. Match the plug type to your local electrical standards. Check if the plug has a grounding pin for safety. Choose a plug with strong prongs to avoid loose connections. A plug with a built-in fuse adds extra protection. Make sure the plug fits securely into wall outlets.

Credit: www.amazon.ca
Wiring The Lamp
Wiring an old desk lamp requires careful attention to safety and detail. This part focuses on connecting the electrical components properly. Clear wiring ensures the lamp works safely and lasts a long time.
Stripping The Wire Ends
Start by cutting the wire to the needed length. Use wire strippers to remove about half an inch of insulation. Be gentle to avoid damaging the copper wire inside. Twisting the exposed wire strands helps keep them together. This step prepares the wires for a solid connection.
Connecting Wires To The Socket
Identify the socket terminals. Usually, one is for the hot wire and the other for the neutral. Attach the stripped wire ends to the correct terminals. Wrap the wire clockwise around the screw terminal for a secure fit. Tighten the screws firmly but avoid overtightening. Check that no bare wire is exposed outside the terminal.
Securing The Wiring Inside The Lamp
Arrange the wires neatly inside the lamp base or arm. Use electrical tape or wire nuts to cover exposed connections. Ensure the wires do not touch any metal parts that could cause a short circuit. Fasten the wiring with cable ties or clamps if needed. Proper securing prevents loose wires and improves safety.
Testing The Rewired Lamp
Testing the rewired lamp is a crucial step before you fully put it back into use. It helps confirm that your hard work has paid off and that the lamp is safe to operate. Taking the time to test carefully can save you from electrical hazards and ensure your lamp shines bright.
Plugging In Safely
Before plugging in your rewired desk lamp, inspect the cord and plug for any visible damage. Make sure your hands are dry and the lamp is on a non-conductive surface like wood or plastic. Use a grounded outlet if your lamp’s plug has a grounding pin, which adds an extra layer of safety.
Have a fire extinguisher or a bucket of water nearby just in case something unexpected happens. It’s better to be cautious than sorry, especially with electrical projects. Are you ready to power it up with care?
Checking For Proper Function
Once plugged in, switch on the lamp and observe its behavior. The bulb should light up steadily without flickering or dimming. Feel the cord and socket area for any unusual warmth; a slight heat is normal, but excessive heat signals a problem.
Listen closely for buzzing or crackling sounds, which can indicate loose wiring or a poor connection. If the lamp uses a dimmer switch, test the dimming range to ensure it adjusts smoothly. Does your lamp perform like a brand-new piece?
Troubleshooting Common Issues
If the lamp doesn’t turn on, double-check the bulb—it might be burnt out or not screwed in properly. Ensure the wiring connections inside the lamp are tight and correctly matched to the terminals. Sometimes, simply swapping the bulb or repositioning wires fixes the issue.
In case of flickering, verify that the bulb type is compatible with the lamp and the rewiring you did. Loose plugs or damaged cords can also cause intermittent power. If you notice a persistent burning smell or sparks, unplug immediately and reassess your wiring—safety must come first.
Final Assembly
The final assembly stage brings all parts of your rewired desk lamp together. It ensures the lamp is safe, functional, and visually appealing. Taking time here helps your lamp look like new and work well.
Reattaching The Lampshade
Start by placing the lampshade back onto the lamp frame. Align it carefully with the harp or holder. Secure the lampshade using the screws or clips that came with your lamp. Make sure it sits straight and firm. Avoid forcing the shade to prevent damage.
Securing All Components
Check all screws, nuts, and bolts to confirm they are tight. Tighten any loose parts to stop wobbling or movement. Ensure the socket and wiring are firmly attached to the base. Use a screwdriver or wrench as needed. Double-check the switch and plug for secure fitting.
Cleaning And Polishing
Remove dust and dirt from the lamp surface with a soft cloth. Use a mild cleaner for metal or painted parts. Avoid harsh chemicals that might damage finishes. Polish wooden or brass components to restore shine. This step improves your lamp’s look and preserves its materials.
Frequently Asked Questions
What Tools Are Needed To Rewire An Old Desk Lamp?
To rewire an old desk lamp, you need a screwdriver, wire strippers, electrical tape, a replacement cord, and a new plug. Safety gloves and a voltage tester are helpful for added protection during the process.
How Do I Safely Disconnect The Old Wiring?
Unplug the lamp first and ensure no power runs through it. Use a screwdriver to open the lamp base and gently detach the old wires from terminals.
What Type Of Wire Should I Use For Rewiring?
Use a UL-listed, 18-gauge electrical wire suitable for lamps. It should have two conductors, typically black (hot) and white (neutral), for safe and compliant wiring.
How Do I Connect New Wires To The Lamp Socket?
Strip about half an inch of insulation from each wire end. Connect the black wire to the brass terminal and white wire to the silver terminal on the socket.
Conclusion
Rewiring an old desk lamp can bring new life to a favorite item. It saves money and reduces waste. You only need basic tools and some care. Follow safety steps to avoid accidents. Take your time and check each connection.
Soon, your lamp will shine bright again. Enjoy the satisfaction of fixing something yourself. This simple project makes your space feel fresh. Try it and see how easy it can be.


