
Are you ready to transform your sleep experience with a Sleep Number bed? Setting it up might seem tricky at first, but you’re about to discover just how simple and rewarding it can be.
Imagine waking up every morning feeling refreshed because your bed is perfectly adjusted to your comfort. In this guide, you’ll learn step-by-step how to set up your Sleep Number bed quickly and easily. By the end, you’ll know exactly how to customize your sleep settings to suit your unique needs.
Keep reading to unlock the secret to better rest and start enjoying nights tailored just for you.
Choosing The Right Sleep Number Bed
Choosing the right Sleep Number bed sets the foundation for a great night’s rest. The perfect bed matches your comfort needs and space. It balances support and softness for restful sleep. Understanding the options helps you make a confident choice.
Types Of Sleep Number Beds
Sleep Number offers different bed types for various preferences. The classic models focus on adjustable firmness. The smart beds add temperature control and sleep tracking. Hybrid beds combine air with memory foam for extra comfort. Each type provides unique benefits to suit your style.
Key Features To Consider
Focus on features that improve your sleep quality. Adjustable firmness lets you change the bed’s feel anytime. Some beds include dual air chambers for personalized comfort. Temperature control helps keep you cool or warm. Sleep tracking monitors your movements and patterns. Choose features that match your lifestyle and needs.
Sizing Your Bed
Size matters for comfort and bedroom space. Sleep Number beds come in Twin, Full, Queen, King, and California King. Measure your room before picking a size. Consider who will sleep in the bed and their space needs. A larger bed offers more room to move. Smaller rooms might need a compact size.
Credit: support.sleepnumber.com
Preparing Your Space
Preparing your space is a crucial step before setting up your Sleep Number bed. It ensures a smooth assembly process and helps you avoid unnecessary hassle. Taking time to get your room ready can save you frustration and make the experience more enjoyable.
Measuring Your Room
Start by measuring the dimensions of your bedroom. Make sure there is enough space to fit the bed frame and allow room to move around comfortably. Don’t forget to check doorways and hallways to confirm the bed parts will fit through them during delivery and setup.
Consider the placement of other furniture. Will your nightstands or dressers need to be moved? Knowing these details helps you plan the best spot for your new bed without overcrowding the room.
Clearing The Area
Clear the space where you plan to set up your Sleep Number bed. Remove rugs, shoes, or any clutter that might get in the way. This creates a safe and open work area, reducing the risk of accidents or damage.
Think about pets and kids during this process. Keeping them out of the setup zone can prevent interruptions and keep everyone safe. You might be surprised how much easier it is to focus when distractions are minimized.
Gathering Necessary Tools
Before you begin assembly, gather all the tools you’ll need. Most Sleep Number beds come with basic tools, but having a screwdriver, a wrench, and a flashlight handy can speed things up. Check the instruction manual for any specific tools required.
Having everything ready avoids multiple trips to the toolbox or hardware store. Plus, it keeps your momentum going—you’ll thank yourself when the bed is ready to use sooner than expected.
Unboxing And Inspecting Parts
Open the box carefully and check all parts against the list in the manual. Inspect pieces for any damage before starting assembly. Proper inspection helps avoid problems later.
Unboxing a Sleep Number bed is an exciting moment. This is the first step to a better night’s sleep. Begin by carefully opening the box. Ensure you have enough space around you. Take your time to avoid damage. Follow these steps to make the process smooth and efficient.Checking Components
Start by laying out all the components. You should find the mattress, air chambers, and remote control. Look for the mattress cover and the base. Make sure all parts are present. Use the checklist provided in the box. This will help you track all items.Identifying Damages
Inspect each part carefully. Look for tears or scratches on the mattress. Check the air chambers for leaks. Inspect the remote for any cracks. Examine the base for structural issues. Report any damages immediately. Contact customer support if needed.Organizing Pieces
Arrange the parts in the order of assembly. Place the mattress near the bed frame. Keep the air chambers close by. Position the remote within reach. Arrange the base parts logically. This will speed up the setup process. Keep the instruction manual handy for guidance.
Credit: www.sleepnumber.com
Assembling The Frame
Assembling the frame of your Sleep Number bed is the foundation of a comfortable and supportive sleep setup. This part requires careful attention to detail to ensure stability and proper function of the bed’s adjustable features. Taking your time here will save you frustration later and help you enjoy your new bed without any hiccups.
Step-by-step Frame Setup
Start by unpacking all the frame components and laying them out where you plan to assemble the bed. Check the parts against the instruction list to make sure nothing is missing. You’ll typically find side rails, end rails, and a center rail that will form the rectangular base.
Begin connecting the side rails to the end rails. They usually snap or screw together—make sure the connections are tight but avoid forcing them to prevent damage. Align the frame so it sits flat and even on the floor before moving on to the next step.
Securing The Base
The base needs to be solid because it supports the entire mattress and your weight. Use the provided bolts or screws to secure each corner where the rails meet. If your frame includes crossbars or additional support beams, attach those now to add stability.
It’s easy to overlook small gaps or loose fittings here. Ask yourself: does the frame feel sturdy when you gently shake it? If not, tighten all connections again. A secure base will prevent unwanted noise and movement while you sleep.
Attaching Support Legs
Support legs are crucial for keeping the frame elevated and bearing the mattress weight evenly. Locate the attachment points on the frame, often marked or pre-drilled for easy identification. Screw in each leg firmly—these usually twist or bolt into place.
Be mindful of leg height and placement to ensure your bed sits level. Uneven legs can cause discomfort and damage over time. Test the frame with the legs attached by pressing down in various spots to confirm balance and strength.
Installing The Mattress And Air Chambers
Installing the mattress and air chambers of your Sleep Number bed is a key step that sets the foundation for a comfortable night’s rest. It might seem tricky at first, but breaking down the process makes it manageable and even enjoyable. Pay close attention to how each component fits together to ensure your bed works perfectly.
Positioning Air Chambers
The air chambers are the heart of the Sleep Number mattress, providing adjustable firmness. Start by laying each air chamber flat on the bed frame in the correct spot, usually marked or indicated in the manual. Make sure the chambers don’t overlap or twist, as this could affect air flow and comfort.
Think about how the chambers align with your body—proper positioning helps maintain support exactly where you need it. If you’re sharing the bed, ensure both chambers are easily accessible for individual adjustments.
Connecting Air Hoses
Once the air chambers are in place, connect the air hoses carefully. These hoses link the chambers to the air pump that inflates and deflates them. Check that each hose fits snugly into its valve to prevent leaks or disconnections.
Secure the hoses along the frame to avoid pinching or kinking, which can reduce airflow. Ask yourself, have you checked both ends of the hoses? A loose connection can compromise your bed’s performance, so take your time here.
Placing The Mattress Layers
After the air chambers and hoses are set, it’s time to add the mattress layers. These typically include foam and fabric covers that protect the chambers and provide a soft surface. Lay each layer evenly, smoothing out wrinkles or folds to avoid lumps.
Press down gently but firmly to settle the layers in place. Your mattress should feel uniform and ready for use once everything is aligned properly. How much difference do you think a smooth mattress surface makes in your sleep quality?
Setting Up The Control System
Setting up the control system of your Sleep Number bed is essential to enjoy personalized comfort at the touch of a button. The control system lets you adjust firmness, save preferences, and even sync with your smartphone for a seamless experience. Let’s dive into the key steps to get your control system up and running quickly.
Connecting The Power Supply
Start by locating the power adapter that came with your Sleep Number bed. Plug it securely into the bed’s control unit, then connect the other end to a nearby electrical outlet.
Make sure the outlet is easily accessible so you can unplug if needed. Once powered, you should see indicator lights on the control unit signaling it’s ready. If nothing lights up, try another outlet or check the adapter for damage.
Syncing The Remote Or App
Your Sleep Number bed usually comes with a remote control or the option to use a smartphone app. To sync the remote, press and hold the pairing button on the control unit while following the remote’s instructions.
If you prefer the app, download the Sleep Number app from your device’s store. Open the app and follow the prompts to connect via Bluetooth or Wi-Fi. This connection lets you adjust your bed wirelessly and save multiple sleep profiles.
Calibrating The Bed
Calibration ensures the bed knows its exact position and firmness settings. Use the remote or app to initiate the calibration process, which typically involves the bed moving through its full range of motion.
This step is crucial because it helps the system accurately measure and adjust the firmness you select. Don’t skip calibration—without it, your bed might not respond correctly to your settings, leading to a less comfortable sleep experience.
Adjusting Your Sleep Number
Adjusting your Sleep Number bed is the key to unlocking personalized comfort tailored exactly to your needs. It lets you control how soft or firm your mattress feels, helping you wake up refreshed rather than stiff. Understanding how to fine-tune these settings can transform your sleep experience.
Finding Your Ideal Firmness
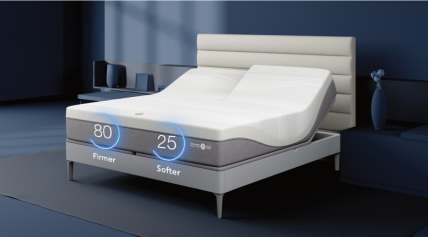
Start by testing different firmness levels on your Sleep Number bed. Use the remote or app to slowly increase or decrease the number until the mattress feels just right under your body.
Pay close attention to how your back and hips feel. Does the mattress support your spine evenly? If you wake up with aches, try adjusting the firmness slightly until you find a balance between support and softness.
Using Dual Settings
If you share the bed, dual settings allow each side to have its own firmness level. This feature is perfect when you and your partner have different preferences.
Try setting your side firmer if you prefer more support, while your partner can enjoy a softer feel. Having control over individual sides prevents compromise and keeps both of you comfortable all night.
Tips For Comfort Optimization
- Adjust firmness gradually over several nights. Your body may need time to adapt.
- Combine firmness adjustment with the right pillow height and sleep position for better alignment.
- Use the SleepIQ app to track your sleep quality and see how changes in firmness impact your rest.
- Consider seasonal changes—sometimes a softer setting feels better in winter, firmer in summer.
Have you noticed how small changes in your mattress firmness can affect your sleep quality? Experiment with your Sleep Number settings and discover what truly works for your body.
Maintenance And Troubleshooting
Keeping your Sleep Number bed in top shape ensures you enjoy the perfect sleep experience night after night. Maintenance and troubleshooting are key to preventing small issues from turning into big frustrations. Let’s look at simple ways to care for your bed and what to do if you hit a snag.
Regular Cleaning Tips
Dust and allergens can build up on your Sleep Number bed’s surface, affecting comfort and air quality. Use a vacuum with a soft brush attachment to clean the mattress and base regularly. Wipe down the remote and base with a damp cloth to remove dirt and oils from frequent handling.
Don’t forget to wash your mattress cover as recommended, usually every few months. This keeps the fabric fresh and helps extend the life of your bed. Avoid harsh chemicals—mild soap and water work best to maintain the material without damage.
Common Issues And Fixes
If your bed isn’t adjusting properly, check the air hoses for kinks or disconnections. Sometimes, a simple reconnection solves the problem quickly. Low air pressure can also cause discomfort; try running the pump to inflate the air chambers fully.
Remote control troubles often come down to dead batteries or signal interference. Replace batteries and remove any objects blocking the remote’s path to the bed. If your bed feels uneven, inspect the air chambers for leaks or damage—these might need professional repair.
When To Contact Support
Have you tried basic fixes but still face issues? It’s time to reach out to Sleep Number support if the bed won’t inflate, the remote doesn’t respond after changing batteries, or you notice persistent leaks in the air chambers. Delaying professional help can worsen problems or void your warranty.
Keep your purchase information handy for quicker assistance. Support teams often guide you through advanced troubleshooting or arrange repairs or replacements if needed. Don’t hesitate—getting expert help ensures your Sleep Number bed continues to deliver the comfort you expect.

Credit: www.sleepnumber.com
Frequently Asked Questions
How Do I Assemble A Sleep Number Bed Frame?
To assemble the Sleep Number bed frame, unpack all parts first. Follow the included manual step-by-step. Securely connect side rails, footboard, and headboard. Use the provided tools to tighten bolts and screws. Ensure the frame is stable before adding the mattress.
How To Connect The Sleep Number Mattress To Power?
Plug the power cord into the air chamber’s pump. Connect the pump to a nearby electrical outlet. Use the control unit to power on the mattress. Ensure all connections are secure to avoid power interruptions.
How Do I Calibrate My Sleep Number Bed?
Turn on the Sleep Number bed using the control unit. Adjust the firmness setting to your preferred comfort level. Let the bed inflate and deflate completely once. This helps calibrate air chambers for accurate firmness control.
Can I Adjust Firmness On Both Sides Separately?
Yes, Sleep Number beds allow independent firmness adjustment. Each side has its own air chamber and controls. Use the remote or app to set different firmness levels. This feature enhances personalized comfort for couples.
Conclusion
Setting up your Sleep Number bed is simple and quick. Follow each step carefully for the best comfort. Adjust the bed to fit your needs easily. Enjoy better sleep and wake up refreshed. A good night’s rest starts with the right setup.
Take your time and make small changes. Your body will thank you for the support. Sweet dreams are just a few steps away.


