
Are you struggling to get your vinyl stickers to stick perfectly to your wall? You’re not alone.
Applying vinyl stickers might seem simple, but without the right approach, they can peel, bubble, or fall off quickly. Imagine transforming your space effortlessly with clean, smooth designs that stay put for the long haul. In this guide, you’ll discover easy, step-by-step tips that ensure your stickers look professional and last longer.
Keep reading to learn how to make your walls pop with style and confidence!

Credit: www.walmart.com
Choosing The Right Vinyl Stickers
Choosing the right vinyl stickers is key to making your wall decoration last and look great. Not all vinyl stickers are created equal, and knowing which type suits your wall best can save you from peeling edges and fading colors. Let’s break down what you need to consider before sticking anything to your wall.
Types Of Vinyl Stickers
Vinyl stickers come in various types, each designed for specific uses and surfaces. Some common types include:
- Permanent Vinyl:This type has strong adhesive and is ideal for long-term projects. It sticks well to smooth walls but can be tough to remove.
- Removable Vinyl:Perfect if you want flexibility. It holds well but peels off cleanly without damaging the paint.
- Clear Vinyl:These stickers are transparent, letting your wall color show through. Great for subtle designs or layering effects.
- Matte and Glossy Finishes:Matte stickers reduce glare and give a soft look, while glossy ones make colors pop and add shine.
Picking the right type depends on how long you want the sticker to stay and the look you aim for. Have you thought about whether you want a temporary design or a permanent feature?
Surface Compatibility
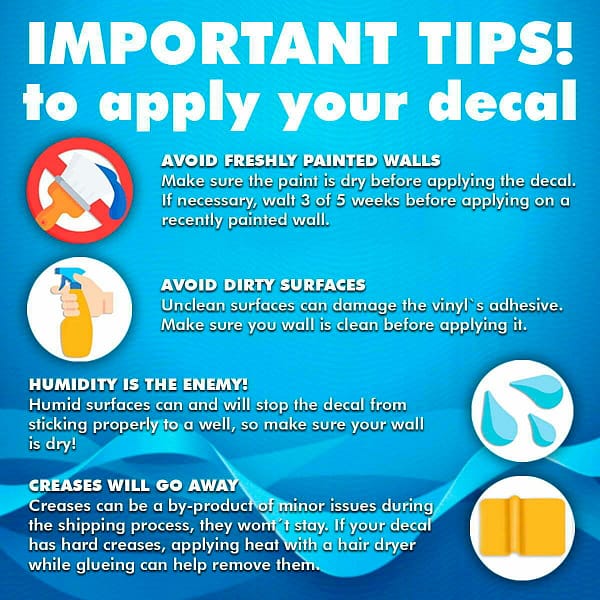
Not every wall surface welcomes vinyl stickers equally. Smooth, non-porous surfaces like painted drywall, glass, or metal allow stickers to adhere best. Textured or rough walls, such as brick or stucco, can cause stickers to lift or bubble.
Consider the paint finish too. Satin or semi-gloss paints hold stickers better than flat or matte paints, which might not provide enough grip. If your wall is freshly painted, wait at least two weeks before applying stickers to ensure the paint is fully cured.
Have you checked the texture and condition of your wall before picking your stickers? A quick test with a small sticker can save you from disappointment later.

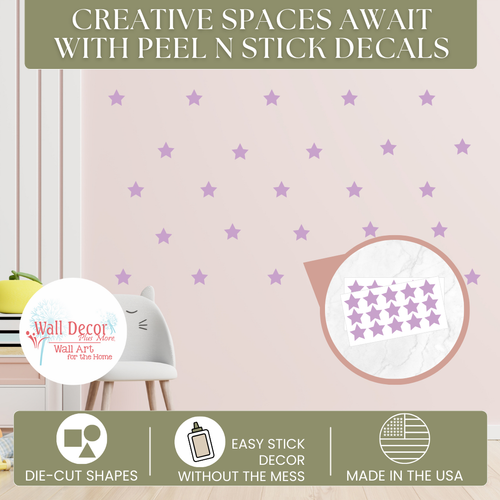
Credit: www.walldecorplusmore.com
Preparing The Wall Surface
Getting your vinyl stickers to stick perfectly starts with how well you prepare the wall surface. Skipping this crucial step can lead to peeling, bubbling, or uneven placement. Taking a little extra time here ensures your stickers stay vibrant and secure for a long time.
Cleaning The Wall
Before you even think about peeling off the backing, make sure the wall is spotless. Dust, dirt, and grease create barriers that prevent stickers from adhering properly. Use a mild soap and water solution or a gentle cleaner, then wipe the surface with a clean cloth.
Pay special attention to areas where previous stickers or tape were applied. Residue left behind can cause bubbles or peeling later. Have you ever tried sticking a new sticker on a wall with old glue patches? The results are usually disappointing.
Ensuring Dryness And Smoothness
Once the wall is clean, it needs to be completely dry. Moisture traps air underneath the sticker, causing bubbles and reducing stickiness. Use a dry cloth or let the wall air dry thoroughly before applying your vinyl sticker.
Check the surface for bumps, cracks, or peeling paint. These imperfections can make the sticker lift or wrinkle. If your wall isn’t smooth, consider sanding lightly or applying a primer to create an even base. Would you want your sticker to follow every bump and crack? Probably not, so smoothness matters.
Gathering Necessary Tools
Gather tools like a clean cloth, a squeegee or credit card, and a spray bottle with water. These items help prepare the wall and smooth the vinyl sticker for a strong hold.
Gathering the necessary tools is crucial for a smooth vinyl sticker application. This step ensures a hassle-free and efficient process. With the right tools, you achieve a professional finish on your wall. Prepare these tools in advance for an enjoyable experience.Common Tools For Application
Start with basic tools that make the application easier:- Measuring Tape:Ensures accurate placement on the wall.
- Pencil:Marks guidelines for precise sticker positioning.
- Scissors:Trims excess material or cuts stickers to size.
- Squeegee or Credit Card:Smooths out air bubbles for a flat finish.
- Level:Keeps your sticker straight and aligned.
Optional Accessories
Consider these optional tools to enhance the application process:- Masking Tape:Temporarily holds stickers in place during positioning.
- Cleaning Cloth:Removes dust and dirt for better adhesion.
- Hairdryer:Helps with sticker flexibility on curved surfaces.
Positioning The Sticker
Positioning the sticker correctly on the wall is essential for a neat look. It prevents crooked or uneven placement. Taking time here saves you from peeling and reapplying later.
Measuring And Marking
Start by measuring the wall space where the sticker will go. Use a ruler or tape measure to find the center or desired spot. Mark light dots with a pencil as guides. These marks help keep the sticker straight and balanced.
- Measure twice to avoid mistakes.
- Mark the top and bottom edges lightly.
- Use a level to check horizontal alignment.
Using Tape For Alignment
Tape helps hold the sticker in place before sticking it down. Use painter’s tape or masking tape for easy removal. Attach tape strips along the edges of the sticker to create a hinge. This lets you flip the sticker up, adjust if needed, and press it down smoothly.
- Place tape on the top edge first.
- Flip the sticker up to peel backing slowly.
- Press from the center out to avoid bubbles.
Applying The Sticker
Applying a vinyl sticker to your wall might seem simple, but it demands careful attention to detail to get a smooth, long-lasting finish. The way you handle the sticker during application can make a huge difference in how it looks and sticks over time. Let’s break down the key points to focus on when you’re ready to apply your vinyl sticker.
Peeling The Backing
Start by gently lifting one corner of the sticker to peel off the backing paper. Avoid pulling too fast or forcefully, as this can stretch or tear the vinyl.
If the sticker is large, peel the backing a little at a time instead of removing it all at once. This helps keep the adhesive clean and prevents it from sticking to unwanted surfaces.
Have you noticed how a slow, steady peel feels more controlled? That’s because it reduces the chance of accidentally folding or creasing the sticker before it’s on the wall.
Smoothing Techniques
Once the sticker touches the wall, use a flat tool like a squeegee or a credit card to smooth it down.
Start from the center and push outward to the edges. This technique helps the sticker adhere evenly and avoids wrinkles.
Try applying gentle, consistent pressure rather than pressing too hard in one spot. It’s surprising how a gentle hand can create a better finish!
Avoiding Air Bubbles
Air bubbles are the most common problem when applying vinyl stickers. They can ruin the look and reduce adhesion.
If you spot small bubbles, use a pin to carefully puncture the bubble and then press the air out with your smoothing tool.
For larger bubbles, try lifting the sticker slightly and reapplying it slowly while smoothing out the air as you go. It’s a bit like ironing out wrinkles, but with more patience.
Ask yourself: would you want a perfectly smooth wall sticker or one with bumps that catch your eye every day? Taking the time to avoid bubbles pays off in the long run.
Finishing Touches
Finishing touches are essential to make vinyl stickers look perfect on your wall. This stage ensures the sticker stays flat and sticks well. Small actions here prevent peeling and bubbles later. Take your time to complete these final steps carefully.
Removing Transfer Tape
Start by peeling the transfer tape slowly. Pull it back at a sharp angle, close to the wall surface. This helps avoid lifting the sticker. If the sticker lifts, press it down gently and try again. Remove the tape smoothly to keep the sticker intact.
Pressing Edges Firmly
Use your fingers or a soft cloth to press the edges firmly. Focus on corners and sides where peeling starts. Pressing helps the adhesive bond with the wall surface. Apply even pressure without stretching the sticker. This step secures the sticker and improves its appearance.
Troubleshooting Common Issues
Applying vinyl stickers to a wall can sometimes come with unexpected challenges. You might notice wrinkles, bubbles, or even peeling after you think you’ve done everything right. These common issues can be frustrating, but with the right approach, you can easily fix them and achieve a smooth, lasting application.
Fixing Wrinkles And Bubbles
Wrinkles and bubbles often appear if the sticker wasn’t applied smoothly or if dust got trapped underneath. To fix this, gently lift the edge of the sticker closest to the wrinkle or bubble. Slowly reapply it while smoothing out the surface with a flat tool like a credit card or a squeegee.
If small bubbles remain, try using a pin to prick the bubble and then press the air out. This technique works well to avoid tearing the sticker. Remember, patience during application prevents wrinkles and bubbles from forming in the first place—are you taking the time to smooth as you go?
Dealing With Peeling
Peeling usually happens because the surface wasn’t clean or dry before application. Make sure your wall is free from dust, grease, or moisture. If you notice peeling after a few days, press the sticker back down firmly with your hand or a flat tool.
For stubborn peeling edges, applying a small amount of clear-drying glue or double-sided tape underneath can reinforce adhesion. Always test on a small, hidden area to avoid damage. What’s your wall made of, and could its texture be making the vinyl struggle to stick?
Credit: kraftmatics.com
Maintaining Vinyl Stickers
Maintaining vinyl stickers on your wall is key to preserving their look and extending their lifespan. The right care keeps colors vibrant and edges firmly attached. Without proper upkeep, even the best stickers can peel or fade quickly.
Cleaning Tips
Keep your vinyl stickers clean by gently wiping them with a soft, damp cloth. Avoid harsh chemicals or abrasive materials that can scratch or damage the surface. If you notice dust or dirt buildup, a mild soap diluted in water works well.
Try to clean stickers regularly, especially in kitchens or bathrooms where grease and moisture accumulate. Patience is important—quick, gentle strokes prevent lifting edges or smudging designs. Have you ever noticed how a little dirt dulls the sticker’s shine? Regular care prevents that.
Avoiding Damage
Protect your vinyl stickers from direct sunlight to prevent fading. If your wall gets a lot of sun, consider repositioning stickers or using UV-protective sprays made for vinyl. Sharp objects and rough handling are also major threats—keep pets and kids from scratching or peeling them.
Think about the environment around your sticker. High humidity or frequent temperature changes can weaken the adhesive. If your stickers start to peel, pressing them down firmly with a flat tool can help, but don’t use excessive force to avoid tearing.
Frequently Asked Questions
How Do I Prepare The Wall For Vinyl Stickers?
Clean the wall with mild soap and water. Ensure it’s dry and smooth. Remove any dust or grease before applying stickers. This helps stickers adhere better and last longer.
Can Vinyl Stickers Stick To Textured Walls?
Vinyl stickers adhere best on smooth surfaces. Textured walls may cause peeling or bubbles. For textured walls, consider using a primer or choosing removable adhesives.
How Long Do Vinyl Stickers Last On Walls?
Vinyl stickers typically last 3 to 5 years indoors. Longevity depends on wall texture, humidity, and sunlight exposure. Proper wall preparation can extend their lifespan.
What Is The Best Way To Remove Vinyl Stickers?
Peel stickers slowly from one corner. Use heat, like a hairdryer, to soften adhesive if needed. Clean residue with rubbing alcohol or adhesive remover gently.
Conclusion
Applying vinyl stickers to walls is simple with the right steps. Clean the surface well and let it dry completely. Peel the backing slowly and press the sticker firmly. Smooth out air bubbles using a flat tool or your hand.
Take your time for the best results. Stickers can brighten any room quickly and easily. Try these tips and enjoy your new wall art today!


