
Want to transform your outdoor space into a magical retreat? Stringing lights in a tree is one of the easiest and most beautiful ways to do just that.
But if you’re not sure where to start or how to get that perfect glow, you’re in the right place. This guide will show you simple steps to light up your tree safely and stylishly. Keep reading, and you’ll discover tips that make your space feel warm, inviting, and truly special.
Your next cozy evening under twinkling lights is just a few steps away!
Choosing The Right Lights
Choosing the right lights is crucial for making your tree look magical and ensuring the setup lasts. You want lights that match your style, fit the size of your tree, and stand up to the weather. Picking the right string lights can save you time, energy, and frustration during installation and beyond.
Types Of String Lights
There are several types of string lights available, each with its own look and function. LED lights are energy-efficient and last longer, while incandescent bulbs give off a warm, cozy glow. You might also find solar-powered options, which charge during the day and light up at night without needing an outlet.
Think about what atmosphere you want. Are you aiming for a bright, festive vibe or a soft, romantic feel? Your choice of light type will set the tone for your outdoor space.
Assessing Light Length And Power
Measure your tree’s height and width before buying lights. Too short, and you’ll have bare spots. Too long, and you might waste energy or create tangled messes.
Also, check the power source. Do you have outdoor outlets nearby? If not, solar or battery-operated lights could be better. Remember, using lights with the right wattage helps avoid blown fuses or tripped breakers.
Weatherproof Options
Your lights will face rain, wind, and maybe snow. Choose lights labeled as weatherproof or waterproof to avoid damage. Look for an IP rating on the packaging; IP65 or higher usually means good protection against water and dust.
It’s tempting to buy cheaper lights, but investing in weatherproof ones means fewer replacements and safer installations. Have you ever had lights fail mid-season? Weatherproofing prevents that hassle.

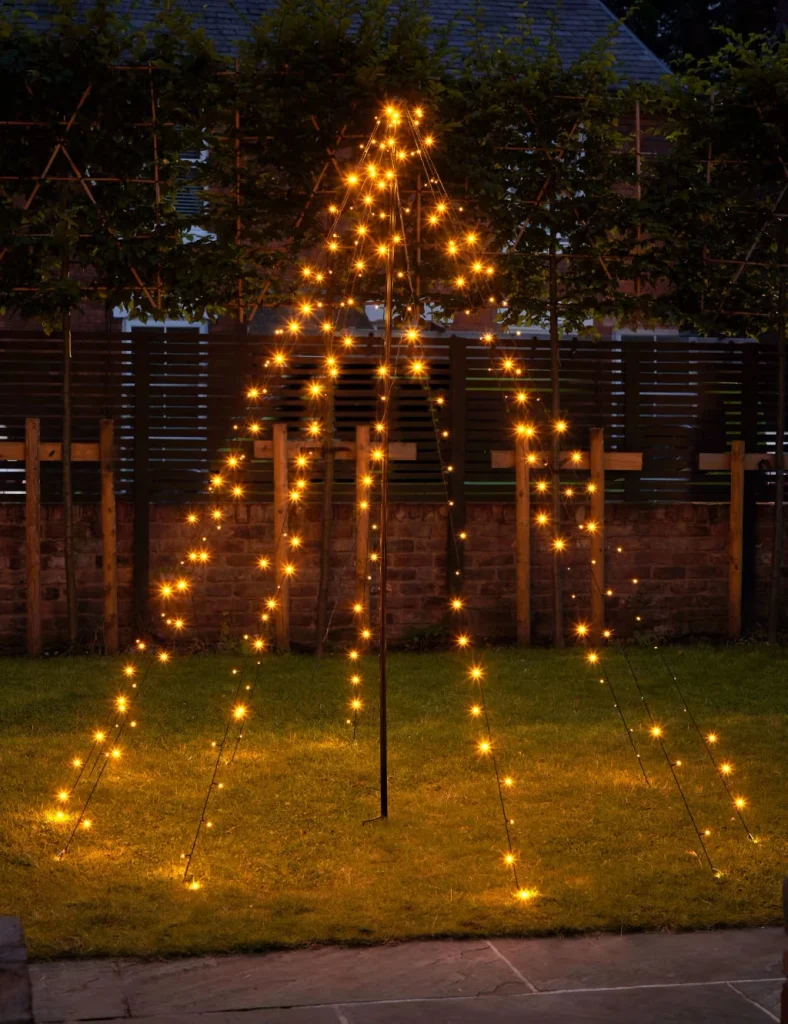
Credit: us.govee.com
Preparing The Tree
Preparing the tree is the first key to a beautiful lighting display. A well-prepared tree makes stringing lights easier and safer. It also helps the lights look neat and last longer. Take time to get the tree ready before hanging any lights.
Selecting The Tree
Choose a tree that fits your space and style. Look for healthy branches and a strong trunk. Avoid trees with many dead or broken branches. The size should match the length of your light strands. A sturdy tree can support the weight of the lights without damage.
Clearing Branches And Debris
Remove any dead leaves, broken twigs, and spider webs. Clear branches that block easy access around the tree. Trim small branches if they get in the way. Cleaning the tree helps the lights shine brighter and prevents tangling. It also reduces fire risks from dry debris.
Safety Precautions
Wear gloves and long sleeves to protect your hands. Use a stable ladder or step stool for high branches. Check the lights for broken bulbs or frayed wires before use. Avoid overloading outlets with too many light strands. Keep cords away from water and sharp edges. Safety first keeps the tree and you safe during decoration.
Tools And Materials Needed
Stringing lights in a tree needs string lights, extension cords, and clips or zip ties. A ladder and gloves help for safety and ease. Choose weatherproof lights for outdoor use.
When planning to string lights in a tree, having the right tools and materials ensures a smooth process. This guide highlights everything you need for a dazzling display. From essential tools to helpful accessories, each element plays a crucial role in making your tree shine bright.Essential Tools
- Extension Cord:A long cord helps reach distant power sources.
- Ladder:A sturdy ladder provides safe access to high branches.
- Gloves:Protect your hands while handling lights and branches.
- Light Clips:Securely attach lights to branches with ease.
Additional Accessories
- Zip Ties:Keep lights in place and organized.
- Timer:Automate your lights to turn on and off at set times.
- Weatherproof Box:Protect plugs and connections from moisture.
- Spare Bulbs:Quickly replace any burnt-out lights.
Planning The Layout
Planning the layout is the foundation of stringing lights in a tree. It helps you visualize the final look and avoid unnecessary mistakes. A well-thought-out plan saves time, energy, and ensures even light distribution.
Mapping The Light Path
Start by examining your tree from all angles. Look for key branches where lights will naturally wrap or hang.
Sketch a rough outline on paper or use a digital tool to mark the path your lights will follow. This makes it easier to see how much string you’ll need and where to begin.
Think about the effect you want. Do you want lights spiraling up the trunk or draping from branch to branch? Your choice affects the complexity of your path.
Estimating Light Coverage
Measure the height and width of your tree to estimate how many lights it will take. Remember, lights spaced too far apart can look sparse.
A good rule of thumb is 100 lights for every 3 feet of tree height. Adjust this if you prefer a denser glow or a subtle twinkle.
Consider the depth of the branches, too. Lights tucked deep inside can create a magical shimmer, but you’ll need extra length to reach those spots.
Choosing A Power Source
Identify where your nearest outdoor outlet is located before buying lights. Extension cords can work, but they must be rated for outdoor use.
Battery-operated or solar-powered lights offer flexibility but check their runtime and brightness to make sure they meet your needs.
Ask yourself: Will you want the lights on a timer? Smart plugs and timers can save you hassle and energy.
Step-by-step Stringing Process
Stringing lights in a tree transforms any outdoor space into a magical retreat. The key is to follow a clear, organized process that ensures your lights look great and stay secure. Let’s break down the steps so you can achieve a stunning result without frustration.
Starting Point Setup
Begin by selecting a plug-in source near the tree. This saves you from running extension cords across your yard, which can be a tripping hazard. If the outlet is far, consider using outdoor-rated extension cords designed for weather resistance.
Next, test your lights before hanging them. This simple step helps you avoid surprises, like broken bulbs or dead sections, once the lights are up. Place the string loosely around the base of the tree to gauge how much coverage you’ll get.
Wrapping Techniques
Wrap the lights around branches, starting from the trunk and moving outward. Wrapping tightly around thicker branches creates a strong anchor point and prevents lights from sagging.
For a full, even look, weave the strands in a spiral pattern going up the tree. Avoid bunching lights in one area—space them evenly to highlight the tree’s shape. Have you tried wrapping both the top and bottom of branches? It adds depth to the glow.
Securing The Lights
Use zip ties or twist ties to fasten lights to branches without damaging the tree. Secure points every 12 to 18 inches, especially on windy nights, to keep the lights stable.
For extra protection, cover the plug and connections with waterproof tape to prevent moisture damage. This simple act can extend your lights’ lifespan significantly. Have you checked your lights’ safety ratings? Choosing outdoor-rated lights ensures durability and safety.
Troubleshooting Common Issues
Troubleshooting common issues while stringing lights in a tree helps keep your display bright and beautiful. Problems like loose lights, power failures, and damaged bulbs can disrupt the glow. Knowing how to fix these quickly saves time and frustration. This guide covers simple fixes to keep your lights shining perfectly.
Fixing Loose Lights
Loose lights can cause flickering or dark spots on your string. Check each bulb to see if it fits tightly in its socket. Gently push bulbs back into place without forcing them. Secure the string around branches to prevent movement from wind or touching. Use small zip ties or twist ties to hold lights firmly.
Dealing With Power Failures
Power failures often result from broken wires or blown fuses. Start by unplugging the lights. Inspect the entire cord for cuts or damage. Replace any damaged sections immediately. Check the fuse in the plug; open it carefully and swap with a new fuse of the same rating. Test the outlet with another device to ensure it works properly.
Replacing Damaged Bulbs
Damaged bulbs can cause the whole string to stop working. Identify the broken bulb by looking for dark or cracked glass. Use replacement bulbs designed for your light set. Turn off power before swapping bulbs to avoid shocks. Insert the new bulb firmly and test the lights. Keep spare bulbs handy for quick fixes.
Enhancing The Display
Enhancing the display of your string lights in a tree transforms a simple setup into a captivating visual experience. It’s about adding layers of interest and personality that catch the eye and create atmosphere. Here’s how you can make your tree lighting truly stand out.
Adding Color And Effects
Experiment with different colored lights to create moods or highlight specific parts of the tree. Mixing warm white with soft blues or vibrant reds can give your display depth and charm.
Consider using lights that change colors or have built-in effects like fading, flashing, or chasing patterns. These effects add movement and keep your display dynamic, avoiding a static look that might feel dull after a while.
Think about your setting—do you want a calm, cozy vibe or an energetic, festive feel? Choosing the right colors and effects helps you set the tone perfectly.
Incorporating Decorations
Adding ornaments or natural elements like pine cones, ribbons, or small lanterns around your lights can enhance the overall look. These decorations add texture and create points of interest beyond the glow of the lights themselves.
Try wrapping garlands or hanging lightweight decorations strategically where the lights are brightest. This draws attention and creates a layered visual effect that feels intentional and artistic.
Have you thought about the story your decorations tell? Personal touches make your display unique and memorable.
Using Timers And Controllers
Timers let you automate when your lights turn on and off, saving energy and ensuring your display is ready when you want it. Imagine waking up to a beautifully lit tree without lifting a finger.
Controllers take this further by allowing you to change colors and effects remotely or on a schedule. This flexibility can keep your display fresh throughout the season without needing to redo the setup.
Have you tried syncing your lights to music or adjusting brightness based on the time of day? These small adjustments can elevate your display from ordinary to extraordinary.
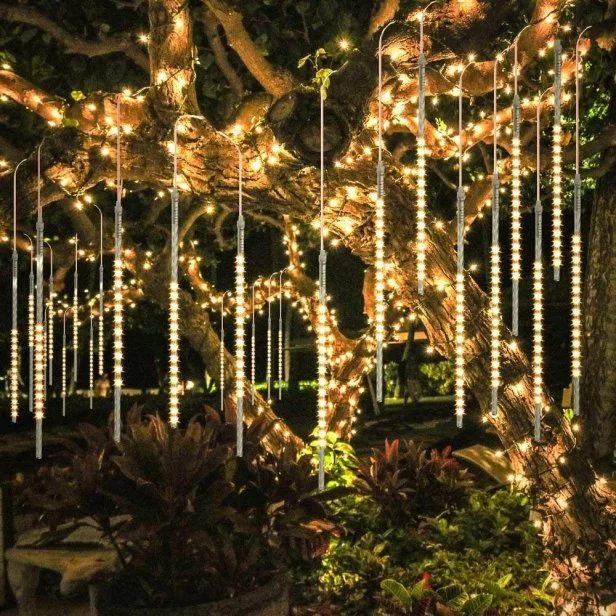
Credit: www.hgtv.com
Maintaining Lights After Installation
Keeping your string lights shining brightly in a tree doesn’t end once they’re hung. Proper maintenance ensures they last longer, stay safe, and continue to create that magical glow season after season. Regular care can save you from frustrating outages and costly replacements.
Regular Inspections
Check your lights frequently for any signs of damage, such as frayed wires, loose bulbs, or corrosion on connectors. Early detection helps you fix small issues before they become major problems. Don’t forget to inspect after storms or heavy winds, as these can loosen or damage the setup.
Ask yourself: Are all bulbs still glowing evenly? If some are dim or out, replace them promptly to keep the entire string working. Also, verify that the power source and extension cords are dry and intact to prevent electrical hazards.
Cleaning Tips
Dirt, dust, and moisture can dull your lights and cause electrical shorts. Gently wipe bulbs and wires with a soft cloth dampened with a mild soap solution. Avoid harsh chemicals or soaking the lights, which can damage the wiring.
Try cleaning your lights twice a season—once before you set them up and once after the display period ends. This routine prevents buildup and keeps your lights sparkling. Have you noticed how a clean bulb shines far brighter than a dusty one?
Proper Storage
After the lights come down, store them carefully to avoid tangling and damage. Wrap the strings around a sturdy spool or a piece of cardboard to keep them neat. Avoid stuffing them loosely into a box where they can get crushed or knotted.
Keep your lights in a cool, dry place away from direct sunlight and moisture. Label your storage container clearly, so next time you’re decorating, you can find your lights without the hassle of untangling or testing dead bulbs. How much time could you save with an organized storage system?
Credit: serwalloutdoor.com
Frequently Asked Questions
How Do I Start Stringing Lights In A Tree?
Begin at the tree’s base near a power source. Secure the plug end, then wrap lights around branches evenly. This ensures easy access and balanced lighting coverage throughout the tree.
What Type Of Lights Are Best For Trees?
LED string lights are ideal due to energy efficiency and durability. Choose weatherproof, outdoor-rated lights for safety and long-lasting use in all weather conditions.
How Many Lights Do I Need For A Tree?
Use about 100 lights per vertical foot of the tree. Adjust quantity based on tree size and desired brightness for the best effect.
Can I Use Extension Cords Safely Outdoors?
Yes, but use outdoor-rated, waterproof extension cords. Ensure connections are off the ground and protected from moisture to prevent electrical hazards.
Conclusion
Stringing lights in a tree adds charm to any space. Start with a plan to wrap branches evenly. Use sturdy clips or ties to secure lights. Check all lights work before hanging them. Take your time for a neat and safe setup.
Enjoy the warm glow that brightens your yard. Simple steps create a cozy, magical atmosphere at night. Bright trees invite smiles and good memories. Try it yourself and see the difference light makes.


