

Have you ever looked at a blank wall and wished you had a simple, sturdy shelf to hold your favorite books, plants, or keepsakes? Making your own shelf might seem tricky, but it’s easier than you think.
With just a few tools and some basic steps, you can create a shelf that fits perfectly in your space and matches your style. Keep reading, and you’ll discover how to turn simple materials into something useful and beautiful — all by yourself.
Your home deserves it, and so do you.
Credit: habitatbyresene.co.nz
Choosing The Right Materials
Choosing the right materials is the foundation of building a strong and attractive shelf. Your choice affects not just the look but also the durability and ease of construction. Think about where your shelf will go and what it needs to hold before picking materials.
Types Of Wood
Wood comes in many varieties, each with its own strengths. Pine is affordable and easy to work with, making it great for beginners. Oak and maple are harder woods that provide more durability and a refined finish but require sharper tools and more effort.
If your shelf will hold heavy items, hardwoods like walnut or cherry can offer extra strength. For a rustic look, reclaimed wood adds character but may need more preparation. Ask yourself: do you want a smooth modern shelf or a warm, natural feel?
Necessary Tools
Having the right tools makes the process smoother and safer. At minimum, you’ll need a saw to cut your wood to size, a drill for screws, and sandpaper to smooth edges. A level helps ensure your shelf hangs straight, avoiding frustrating tilts.
Consider investing in a power drill if you plan to make shelves regularly; it saves time and effort. Clamps keep wood pieces steady while you work, reducing mistakes. Do you have the tools that match your skill level and project size?
Additional Supplies
Beyond wood and tools, some extra supplies are key to a polished shelf. Screws and brackets secure your shelf to the wall, while wood glue adds strength between joints. Don’t forget paint, stain, or sealant to protect and beautify your shelf.
Choosing the right finish depends on the shelf’s use—water-resistant sealant for a bathroom shelf or a clear varnish to show off wood grain. Small details like filler putty can hide screw holes and give your shelf a cleaner look. What final touches will make your shelf both sturdy and stylish?
Credit: www.christeneholderhome.com
Planning Your Shelf Design
Planning your shelf design is the first step toward a successful project. It sets the foundation for how your shelf will look and fit in your space. Thoughtful planning saves time and materials. It also ensures the shelf meets your needs and style.
Measuring The Space
Start by measuring the area where the shelf will go. Measure width, height, and depth accurately. Write down the numbers to avoid mistakes. Consider any obstacles like light switches or vents. Think about how much space you want between shelves for your items.
Selecting The Style
Choose a style that matches your room and taste. Options include floating shelves, corner shelves, or traditional brackets. Think about the shelf’s purpose: display, storage, or both. Pick materials that suit the style, such as wood, metal, or glass. Simple designs often work best for beginners.
Sketching Your Design
Draw a rough sketch of your shelf design. Include measurements and details like brackets or supports. Use simple lines to show shelf placement and size. This helps visualize the final product. Make changes on paper before buying materials or cutting wood.
Preparing The Wood
Preparing the wood is a key part of making a shelf. It sets the stage for a strong and smooth finished product. Proper preparation helps the shelf look good and last longer. This stage involves cutting, sanding, and finishing the wood carefully.
Cutting To Size
Start by measuring the wood pieces for your shelf. Use a saw to cut the wood to the correct length and width. Make clean, straight cuts for a neat fit. Double-check measurements before cutting to avoid mistakes. Cutting wood accurately ensures the shelf will fit well in your space.
Sanding The Surfaces
Sanding smooths rough edges and removes splinters from the wood. Use medium-grit sandpaper first, then fine-grit for a soft finish. Sand along the wood grain to avoid scratches. Clean off dust with a cloth after sanding. Smooth surfaces make the shelf safe and ready for finishing.
Applying Finishes
Finish protects the wood and enhances its look. Choose from paint, stain, or clear varnish. Apply thin, even coats with a brush or cloth. Let each coat dry fully before applying the next. Finishing adds durability and style to your shelf, making it last longer.
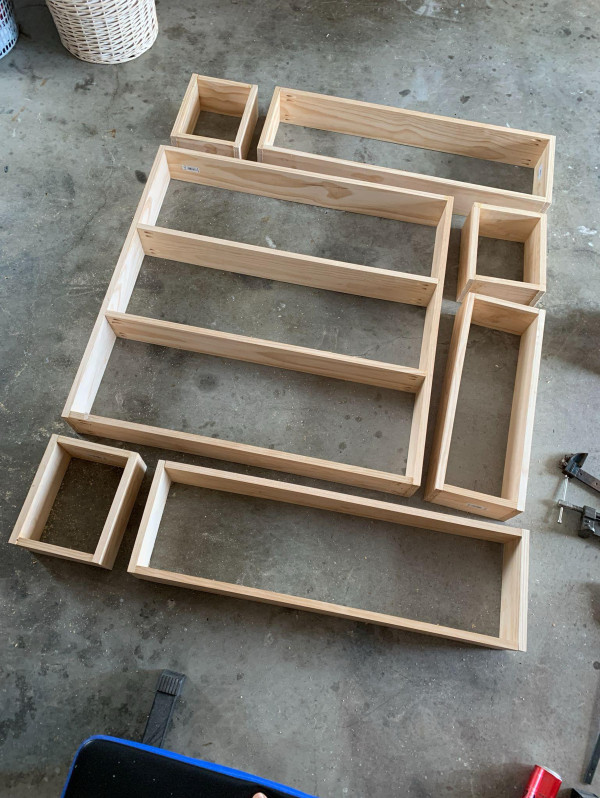
Assembling The Shelf
Gather all shelf parts and tools before starting. Attach the side panels to the base securely. Fix the shelves evenly, ensuring they are level and stable.
Assembling a shelf is a straightforward process. With the right tools and techniques, anyone can do it. This guide will help you understand how to put your shelf together. Follow these simple steps to ensure a sturdy and secure shelf.Joining Techniques
Start by connecting the pieces. Different techniques can be used for joining.- Use screws for a strong hold.
- Wood glue can add extra stability.
- Dowel joints offer a neat finish.
Securing The Pieces
Once joined, secure each piece. Use a drill to insert screws tightly. Check that each screw is flush with the surface. This will prevent any snagging. Clamps can help hold parts in place while securing. Make sure everything feels tight and firm. Loose parts can weaken the shelf.Checking Stability
After assembly, test the shelf’s stability. Gently push on different parts. The shelf should not wobble or tilt. Adjust any loose connections if needed. Add extra support if the shelf feels unstable. This can be done with brackets. Stability is key for safety and function. An unstable shelf can lead to accidents.Installing The Shelf
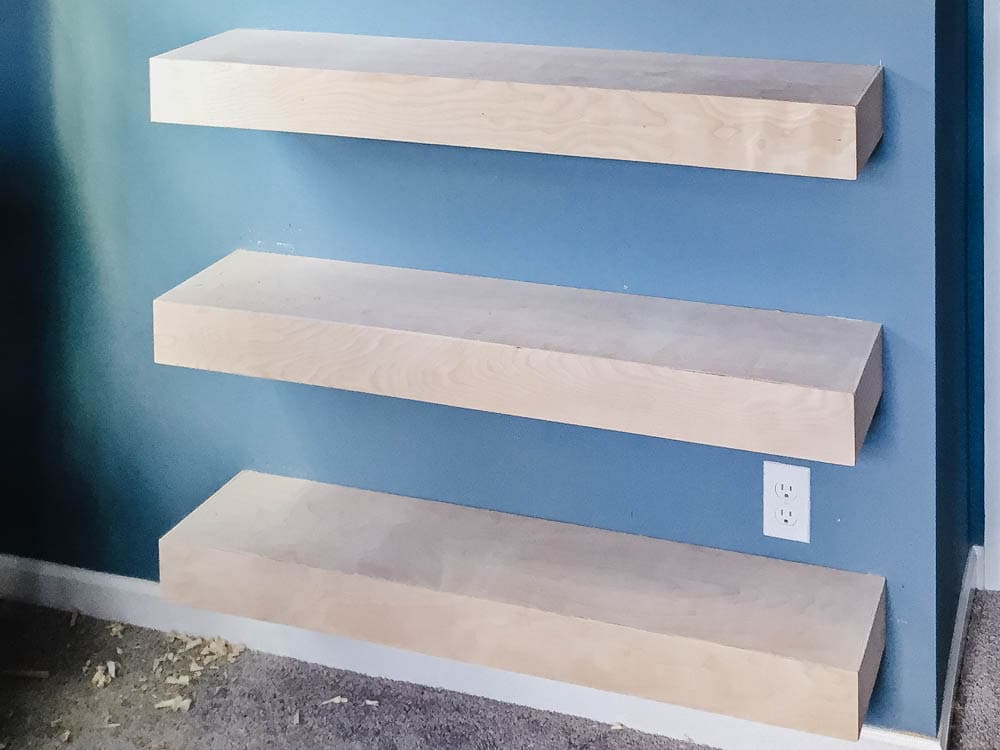
Installing the shelf is a critical phase where precision meets practicality. Getting this right means your shelf will hold steady and look great for years to come. Let’s walk through the essential parts of making sure your shelf is securely and beautifully mounted.
Locating Wall Studs
Finding wall studs is the first step to a strong installation. Studs are the vertical wooden beams behind your drywall, and they provide the support your shelf needs.
You can use a stud finder or gently knock along the wall to listen for solid sounds. Mark these spots clearly with a pencil—mounting your shelf brackets here will prevent them from pulling out of the wall under weight.
Mounting Brackets
Choosing and attaching the right brackets matters more than you might think. Pick brackets that match the size and style of your shelf and can bear the weight of what you plan to put on it.
Hold the bracket against the wall over the stud marks and mark the screw holes. Drill pilot holes to avoid splitting the wood, then secure the brackets tightly with screws. This keeps everything firm and steady.
Leveling And Securing
Nothing looks worse than a crooked shelf, and it can also cause items to slide off. Use a level to make sure your shelf is perfectly horizontal before you secure it in place.
Once the shelf is on the brackets, double-check the alignment. Tighten all screws firmly to prevent any wobbling. Ask yourself: have I tested the shelf’s stability by applying gentle pressure? If it feels solid, you’ve done it right.

Credit: www.rjliving.com.au
Styling And Decorating
Styling and decorating a shelf transforms it from a simple storage space into a feature of your room. Proper styling adds personality and warmth to your space. It balances function and beauty, making your shelf both useful and attractive.
Adding Decorative Elements
Choose items that reflect your style and fit the room’s theme. Use a mix of objects such as small plants, framed photos, or art pieces. Vary the shapes and sizes to create visual interest. Incorporate colors that complement your wall and furniture. Keep some empty space to avoid clutter and let each piece stand out.
Organizing Items
Group similar items together for a tidy look. Use baskets or boxes to hide small or loose items. Place heavier items on lower shelves for stability. Arrange books by size or color to create order. Rotate decorations seasonally to keep the shelf fresh and inviting.
Maintenance Tips
Dust your shelf regularly to keep it clean and bright. Check for loose screws or brackets to ensure safety. Avoid placing items that can damage the surface, like wet plants without trays. Use gentle cleaners to preserve the finish. Refresh the layout every few months to maintain a stylish look.
Frequently Asked Questions
How Do You Start Making A Simple Shelf?
Begin by choosing the right materials like wood planks and brackets. Measure your space, cut wood to size, and assemble with screws and a drill.
What Tools Are Needed To Make A Shelf?
Essential tools include a saw, drill, measuring tape, level, screws, and brackets. These help ensure precise cuts and secure assembly.
How Do You Ensure A Shelf Is Level?
Use a spirit level during installation. Place it on the shelf, adjust until the bubble centers, then secure the shelf tightly.
What Type Of Wood Is Best For Shelves?
Pine, oak, and plywood are popular. Choose durable, sturdy wood that matches your décor and shelf purpose.
Conclusion
Making a shelf is easier than it seems. Choose your materials and tools carefully. Measure twice, cut once to avoid mistakes. Assemble the parts step by step. Take your time and stay safe. A homemade shelf adds space and style to any room.
Try it yourself and enjoy the satisfaction of building something useful. Small projects like this build skills and confidence. Start simple, and you can improve with each shelf you make.


