

Are you looking to add extra storage or style to your space? Building a shelf is a simple way to do both, even if you’ve never picked up a hammer before.
Imagine having a sturdy shelf that fits perfectly in your room, holding your favorite books, plants, or decorations exactly where you want them. This guide will walk you through easy steps to build your own shelf, saving you money and giving you a satisfying DIY project.
Ready to transform your space with something you made yourself? Let’s get started!
Choosing The Right Shelf Design
Choosing the right shelf design is important for both function and style. A good shelf fits your space and holds your items safely. It also matches your room’s look. Taking time to pick the best design saves effort and money later.
Types Of Shelves
Shelves come in many shapes and styles. Floating shelves have no visible supports. They look clean and modern. Wall-mounted shelves use brackets for strong support. Corner shelves fit well in small spaces. Ladder shelves lean against the wall for easy setup. Built-in shelves offer a permanent storage solution. Pick a type that fits your room’s needs and style.
Selecting Materials
Material choice affects shelf strength and appearance. Wood is classic, warm, and sturdy. Plywood is budget-friendly and easy to work with. Metal shelves offer a sleek, industrial look. Glass shelves create an airy feel but need careful handling. Choose materials that hold your items and match your room décor.
Measuring Your Space
Measure the wall or area where the shelf will go. Check height, width, and depth to avoid fitting problems. Keep in mind any nearby doors, windows, or furniture. Accurate measurements help create a shelf that fits perfectly. Use a tape measure and mark your space clearly before building.
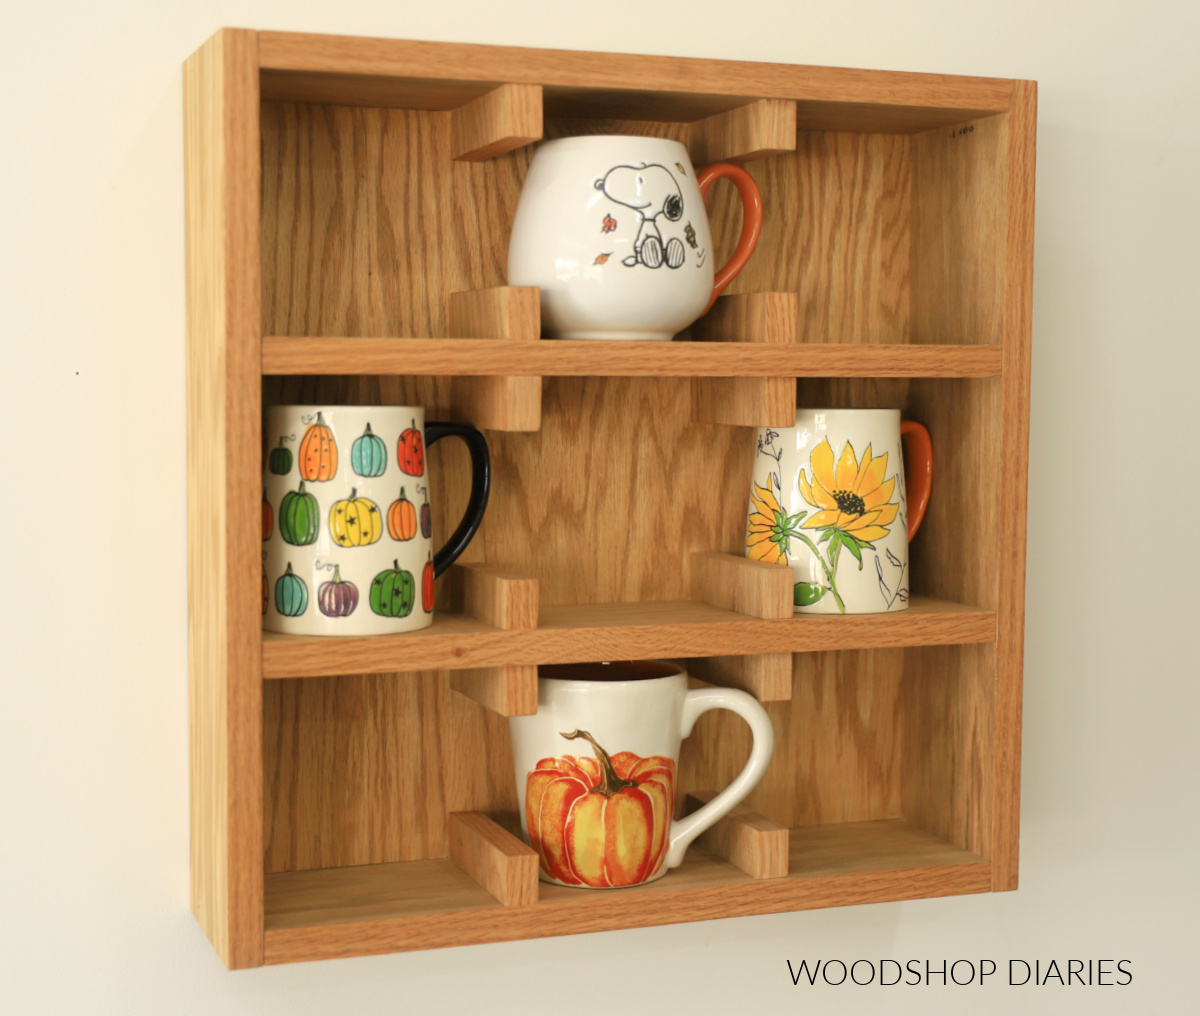
Credit: www.woodshopdiaries.com
Gathering Tools And Supplies
Gathering the right tools and supplies is the first step to building a strong shelf. Having everything ready saves time and makes the process smoother. It also helps avoid mistakes or missing parts during assembly. Below are the key items needed to start your project.
Essential Tools
- Measuring tape for accurate dimensions
- Electric drill to make holes and drive screws
- Screwdriver for tightening screws
- Level to ensure the shelf is straight
- Handsaw or power saw for cutting wood
- Sandpaper to smooth rough edges
- Pencil for marking measurements
Materials Checklist
- Wood boards cut to shelf size
- Wall brackets or shelf supports
- Screws suited for wood and wall type
- Wood glue for extra strength
- Paint or wood finish to protect the shelf
Safety Gear
- Safety goggles to protect your eyes
- Work gloves to avoid splinters
- Dust mask to prevent inhaling sawdust
- Ear protection if using loud power tools
Preparing The Workspace
Clear your work area from clutter and ensure good lighting for better visibility. Gather all necessary tools and materials before starting to keep the process smooth and safe.
Creating a sturdy and stylish shelf begins with preparing your workspace. A well-organized and efficient area can make a significant difference in the ease and success of your project. Whether you’re a novice or a seasoned DIY enthusiast, ensuring that your workspace is ready can help you avoid unnecessary stress and mishaps.Clearing The Area
Before you dive into building your shelf, take a few moments to clear your workspace. Remove any clutter or items that might obstruct your movement or cause accidents. A clean area not only ensures safety but also gives you the mental clarity to focus on the task at hand. Think about the space you have. Is it enough for the materials and tools you’ll need? If not, consider relocating to a more spacious area or rearranging the current one. A well-prepared space sets a positive tone for your project.Setting Up Workbench
Once your area is cleared, it’s time to set up your workbench. Ensure that it is stable and positioned in a well-lit area. A shaky workbench can lead to mistakes, so double-check its steadiness. Consider the height of your workbench. Is it comfortable for you to work on for extended periods? If not, adjust its height or add a stool to ensure you’re working in a comfortable position. Ergonomics can significantly impact your efficiency and enjoyment.Organizing Tools
Having your tools organized and within reach is crucial for a smooth workflow. Arrange your tools in a way that makes sense to you, perhaps grouping similar items together. This will save you time and frustration when you need to switch tools. Labeling can also be a game-changer. Consider using a pegboard or tool chest with labeled sections for each tool. It ensures that everything has its place, and you can easily spot if something is missing. Are there tools you haven’t used in a while? Check their condition before starting your project. A quick inspection can prevent unexpected breakdowns and interruptions. Remember, a well-prepared workspace is the first step towards building a successful shelf.
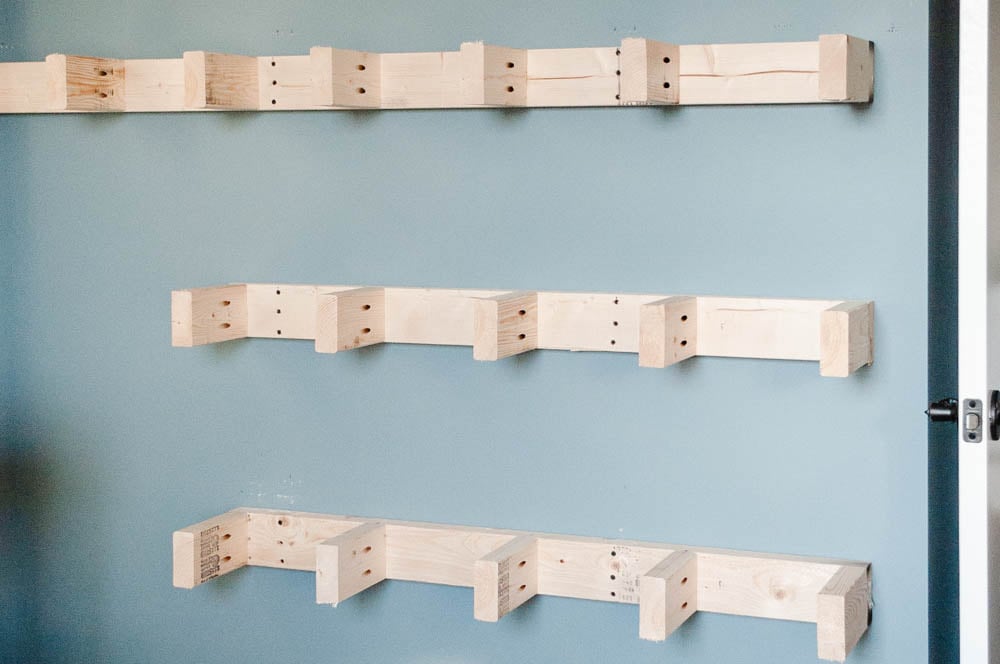
Credit: www.youtube.com
Cutting And Sanding Wood
Cutting and sanding wood are fundamental steps in building a sturdy and attractive shelf. Getting these right ensures your shelf fits perfectly and looks professional. Paying attention to detail during these stages saves you time and effort later on.
Measuring And Marking
Accurate measurements are the foundation of any woodworking project. Use a reliable tape measure and mark your wood with a sharp pencil to ensure clear, thin lines. Double-check your measurements—ask yourself, have you accounted for the thickness of the saw blade?
Mark both sides of the wood to guide your cuts precisely. Using a square tool helps keep your lines straight and angles correct. Mistakes here can lead to uneven shelves that wobble or don’t fit.
Making Precise Cuts
Choose the right saw for your wood type and cut style—whether a handsaw, circular saw, or miter saw. Steady your wood on a flat surface and clamp it down to avoid any movement while cutting. Have you ever noticed how a shaky hand can turn a clean cut into a jagged edge?
Follow your marked lines slowly and carefully. It’s better to cut slightly outside the line and sand down to size than to cut too short. Keeping your saw blade sharp and using smooth, even strokes will give you cleaner cuts.
Smoothing Edges
After cutting, rough edges and splinters can ruin the look and feel of your shelf. Use sandpaper starting with a coarser grit like 80, then move to finer grits like 120 or 220 for a smooth finish. Have you noticed how a smooth edge feels more professional and safer to handle?
Sand along the grain of the wood to avoid scratches. Don’t rush this step—patience here makes assembly easier and the final product more appealing. You can even use a sanding block or an electric sander for better control and speed.
Assembling The Shelf
Assembling the shelf is where your project starts to take shape. This phase involves bringing together all the pieces you’ve cut and prepared. Careful assembly ensures your shelf will be both functional and durable.
Joining Pieces
Align your shelf pieces carefully before joining them. Use clamps to hold parts steady, which helps avoid gaps or misalignment. If you’ve pre-drilled holes, matching them up accurately will make the process smoother and prevent wood from splitting.
Think about the type of joints you want to use. Butt joints are simple but less strong, while dado or rabbet joints offer more surface area for glue and better hold. Have you tried mixing joint types to balance ease and strength?
Using Fasteners
Fasteners like screws, nails, or dowels secure the pieces together. Screws are generally the best choice because they hold tightly and can be removed if needed. Pick the right size—too long and they may poke through, too short and they won’t hold well.
Use wood glue along with fasteners for extra strength. Apply glue evenly and wipe away any excess before it dries. This combo keeps your shelf sturdy for years, even under heavy loads.
Ensuring Stability
Stability is crucial to prevent wobbling or sagging. Check your shelf on a flat surface and adjust if any corners lift. Adding corner braces or a back panel can dramatically improve stability.
Consider the weight your shelf will carry. Would adding more support brackets or reinforcing the joints improve safety? Testing the assembled shelf by applying pressure before mounting can save you from future accidents.
Credit: www.christeneholderhome.com
Finishing Touches
Finishing touches give your shelf a polished and complete look. These steps protect the wood and enhance its appearance. Proper finishing also increases the shelf’s durability and lifespan. Focus on smooth, clean results for a professional feel.
Applying Paint Or Stain
Choose paint for a bold, colorful finish or stain for a natural wood look. Prepare the surface by sanding it lightly. Use a brush or cloth to apply paint or stain evenly. Allow each coat to dry fully before adding another. Light sanding between coats can improve smoothness.
Sealing The Surface
Sealing protects your shelf from moisture and scratches. Select a clear sealant like polyurethane or varnish. Apply thin, even coats with a brush. Let each coat dry completely before applying the next. This step extends the life of your shelf and keeps it looking new.
Adding Decorative Elements
Decorative touches add personality to your shelf. Consider adding:
- Decorative brackets for style and extra support
- Trim or molding around edges for a refined look
- Stencils or decals for creative patterns
- Hardware like hooks for hanging items
Choose decorations that match your room’s style and shelf purpose.
Mounting The Shelf
Mounting the shelf is a crucial part of building it. It holds the shelf firmly and keeps it safe. Proper mounting prevents the shelf from falling or tilting. Follow these simple steps to mount your shelf correctly and securely.
Finding Wall Studs
Wall studs are the wooden beams behind your wall. They provide strong support for heavy shelves. Use a stud finder tool to locate these studs easily. Move the finder across the wall until it beeps or lights up. Mark the spots with a pencil. Avoid drilling into drywall alone, as it may not hold the shelf’s weight.
Using Proper Anchors
Anchors give extra strength when studs are unavailable. Choose anchors based on the wall type and shelf weight. Plastic anchors suit light loads on drywall. Metal or toggle anchors work best for medium to heavy loads. Insert anchors into pre-drilled holes before screwing in. This ensures the shelf stays steady and safe.
Leveling And Securing
Level the shelf before securing it to the wall. Use a spirit level to check the horizontal position. Adjust the shelf brackets until the bubble is centered. Tighten screws firmly but do not over-tighten. Over-tightening can damage the wall or shelf. Double-check the shelf is stable and holds weight evenly.
Maintenance Tips
Maintaining your shelf ensures it stays strong and looks good for years. Simple care routines keep shelves safe and clean. Regular attention prevents damage and extends shelf life.
Cleaning Methods
Use a soft cloth to wipe dust regularly. Avoid harsh chemicals that can damage wood or paint. Mild soap and water work well for most materials. Dry the shelf after cleaning to stop moisture buildup.
Avoiding Damage
Do not overload the shelf with heavy items. Distribute weight evenly to keep balance. Keep sharp objects away to prevent scratches. Place the shelf away from direct sunlight and moisture.
Periodic Checks
Inspect screws and brackets every few months. Tighten loose parts to keep the shelf steady. Check for signs of wear or damage. Fix small problems early to avoid bigger repairs.
Frequently Asked Questions
How Do I Choose The Right Wood For Building A Shelf?
Select wood based on strength, appearance, and budget. Pine is affordable and easy to work with. Oak offers durability and a classic look. Choose plywood for a smooth finish and stability. Always consider the shelf’s intended weight and style.
What Tools Are Essential For Building A Shelf?
Basic tools include a saw, drill, screwdriver, level, measuring tape, and clamps. A sander helps smooth edges. These tools ensure precise cuts and secure assembly. Having the right tools makes the process faster and safer.
How Do I Ensure My Shelf Is Level And Sturdy?
Use a level to check horizontal alignment before securing. Attach brackets or supports firmly to wall studs for strength. Use appropriate screws and anchors. Double-check measurements and tighten all fittings to prevent wobbling or sagging.
Can I Build A Shelf Without Professional Carpentry Skills?
Yes, simple shelves can be built by beginners. Follow step-by-step guides and use pre-cut wood if needed. Start with basic designs and gradually try complex ones. Patience and careful measuring will lead to success.
Conclusion
Building a shelf is simpler than it seems. Gather your tools and follow steps carefully. Measure twice to avoid mistakes later. Choose strong materials for lasting support. Take your time and work steadily. Enjoy the satisfaction of your own creation.
Shelves add space and style to any room. Start your project today and see the results.


