
Are you tired of clutter taking over your space? Imagine having sleek, sturdy shelves built right into your wall—saving room and adding style at the same time.
Building shelves into a wall might sound complicated, but with the right steps, you can do it yourself and transform your home. This guide will show you exactly how to create built-in shelves that fit your space perfectly. Keep reading, and by the end, you’ll have the confidence to tackle this project and enjoy a cleaner, more organized room.
Choosing The Right Wall
Choosing the right wall is a crucial first step before you start building shelves into a wall. Not every wall can support the weight of shelves and the items you’ll place on them. Understanding the wall’s structure and strength ensures your shelves stay secure and safe over time.
Assessing Wall Material
Walls come in different materials such as drywall, plaster, brick, or concrete. Each type requires different tools and techniques for shelf installation. For example, drywall alone can’t hold heavy shelves without anchors or support from studs.
Check if the wall surface is smooth or uneven. Brick and concrete walls need masonry drills and anchors, while drywall allows for easier screw insertion but demands careful stud placement. Have you ever tried hanging something heavy on drywall without support? The result is often a mess.
Locating Studs And Supports
Studs are vertical wooden or metal beams behind drywall that provide the real strength for your shelves. Use a stud finder to locate them accurately. Marking stud locations before drilling is essential to avoid weak spots.
If you don’t have access to a stud finder, try tapping the wall and listening for a solid sound versus a hollow one. Electrical outlets and light switches usually attach to studs, so they can be good reference points. Can you imagine your shelves collapsing just because you missed the studs?
Gathering Tools And Materials
Before you start building shelves into your wall, gathering the right tools and materials is crucial. Having everything on hand saves time and frustration during the project. Plus, it ensures your shelves are sturdy and look professional.
Essential Tools List
You’ll need a few key tools to make the job easier and safer. A reliable stud finder helps you locate the best spots for attaching shelves. A level is essential to keep your shelves straight, avoiding that annoying tilt.
Other must-haves include a drill, screwdriver, measuring tape, and a saw if you’re cutting shelves yourself. Don’t forget safety gear like goggles and gloves to protect yourself. Missing even one of these can slow you down or cause mistakes.
Selecting Shelf Materials
Choosing the right materials affects both the look and durability of your shelves. Solid wood is strong and offers a classic finish, but it can be heavier and more expensive. MDF or plywood are budget-friendly and easier to cut, but might need extra sealing to avoid moisture damage.
Think about what you’ll place on the shelves. Heavy books need sturdier wood, while decorative items allow for lighter materials. Have you considered how the shelf material will match your wall and room style? This small detail can make a big difference in the final appearance.
Planning Your Shelf Design
Planning your shelf design is the foundation of a successful built-in shelving project. Taking the time to carefully map out your space and visualize the layout will save you headaches later. It also helps you create shelves that perfectly fit your needs and the room’s style.
Measuring Space Accurately
Start by measuring the wall space where you want to build your shelves. Use a tape measure to get the height, width, and depth. Double-check your numbers to avoid costly mistakes.
Consider any obstacles like electrical outlets, light switches, or vents that might affect shelf placement. Also, think about how much weight the shelves will need to hold. This influences how deep and sturdy your shelves should be.
Deciding Shelf Size And Layout
Think about what you plan to put on your shelves. Books require deeper, sturdier shelves, while decorative items can fit on shallower ones. You can mix different shelf heights and widths to create visual interest and functionality.
Sketch your ideas on paper or use a simple online tool. Experiment with various layouts: symmetrical rows, staggered heights, or a combination of open and closed shelving. Ask yourself how accessible each shelf will be and if the design complements the rest of the room.
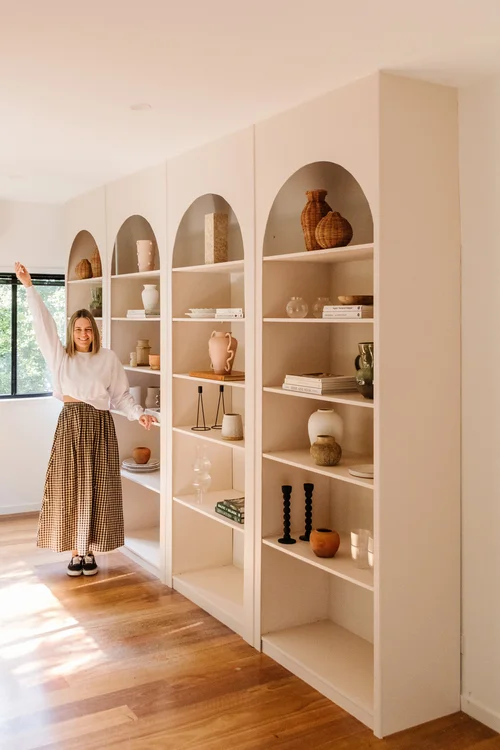
Credit: www.smorhome.com
Preparing The Wall
Preparing the wall is a crucial step before building shelves into it. Taking the time to measure and mark your space accurately ensures a smooth installation process. It also helps avoid costly mistakes that could damage your wall or ruin the look of your shelves.
Marking The Placement
Start by deciding exactly where you want your shelves to go. Use a pencil and a level to draw straight, clear lines on the wall. These marks serve as guides for cutting and mounting, so precision matters.
Think about how much weight your shelves will hold and mark stud locations with a stud finder. Attaching shelves to studs will give them the strength they need. If you skip this step, your shelves might sag or fall over time.
Don’t forget to check for hidden wiring or pipes behind the wall. You don’t want to accidentally cut into them. A wall scanner can help you avoid surprises and keep your project safe.
Cutting Into Drywall Safely
Once your marks are set, it’s time to cut. Use a drywall saw or a utility knife with a steady hand. Score along your pencil lines gently to avoid cracking or damaging the surrounding drywall.
Wear safety goggles and a dust mask to protect yourself from drywall dust and debris. Cutting can create a lot of mess, so cover the floor with a drop cloth for easy cleanup. Also, make sure to turn off power if you suspect electrical wires behind the wall.
Take your time with the cutting. Rushing can lead to uneven edges or bigger holes than planned. Remember, neat cuts will make installing shelves easier and give your project a professional finish.
Building The Shelf Frame
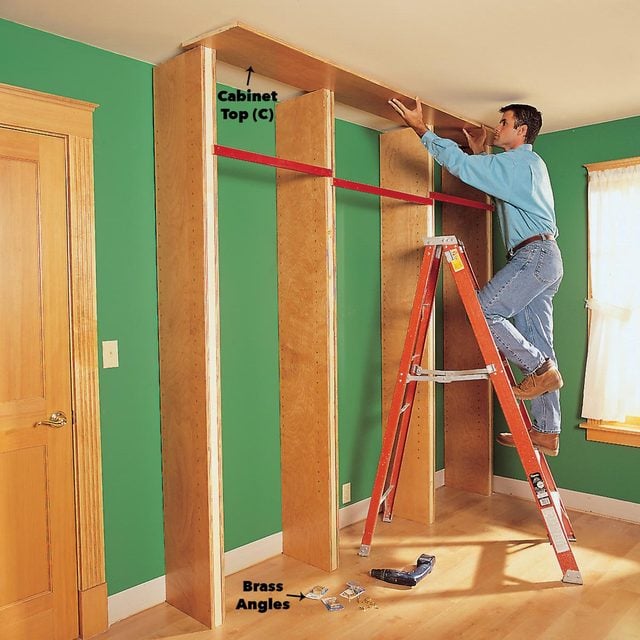
Begin by measuring the space and cutting wood to fit the wall cavity. Secure the frame tightly between studs for strong support. Use a level to keep the frame straight before attaching it firmly.
Building the shelf frame is a crucial step in creating stunning wall shelves that seamlessly blend with your home decor. This part of the process ensures your shelves are not only sturdy but also aesthetically pleasing. If you’ve ever looked at a well-integrated wall shelf and wondered how it stays so perfectly secure, the secret lies in the frame.Installing Support Brackets
Support brackets are the backbone of your shelf frame. Start by selecting robust brackets that can bear the weight of the items you plan to display. It’s often surprising how much weight a well-chosen bracket can support, so don’t hesitate to consult with a hardware expert if you’re unsure. After picking the right brackets, measure and mark their positions on the wall with precision. Use a level to ensure they’re perfectly aligned—this step can make or break the visual impact of your finished shelves. Once everything is marked, drill holes and secure the brackets firmly to the wall.Securing The Frame To Studs
Connecting your frame to wall studs is a fundamental step that guarantees stability. Locate the studs using a stud finder; this small tool can save you from potential mishaps. Mark the stud locations clearly, so you don’t miss them during installation. Align the shelf frame with these marks and use long screws to secure it directly to the studs. This connection offers a solid foundation, especially if you’re planning to store heavy items. Have you ever had a shelf collapse unexpectedly? Securing to studs is the best way to prevent such accidents. Building the frame might seem daunting, but it’s a rewarding experience. As you proceed, imagine the transformation of your space and the compliments you’ll receive. Are you ready to turn your wall into a masterpiece of functionality and style?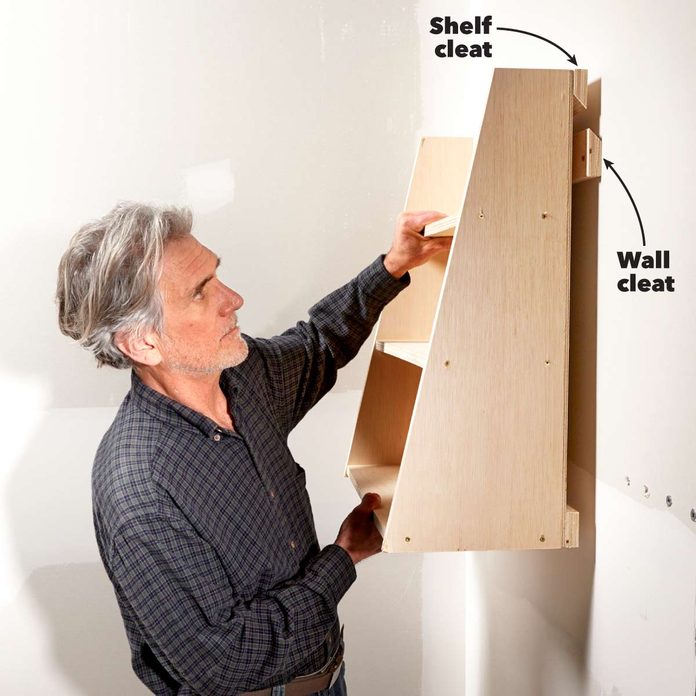
Credit: www.familyhandyman.com
Adding Shelf Surfaces
Adding shelf surfaces is where your built-in shelves truly start to take shape. This step transforms the frame into functional storage or display space. It’s important to focus on precision and stability to ensure your shelves hold up well over time.
Cutting Shelf Boards
Measure the inside width of the shelf frame carefully before cutting your boards. Always double-check your measurements to avoid costly mistakes. Use a circular saw or handsaw to cut the boards straight and clean.
Choosing the right wood thickness depends on what you plan to store. For heavier items, thicker boards provide better support. Sand the edges after cutting to prevent splinters and give your shelves a polished look.
Attaching Shelves To The Frame
Secure the shelves firmly to the frame to prevent sagging or movement. Use wood screws or brackets, depending on your frame design. Pre-drill holes to avoid splitting the wood and make screwing easier.
Check that each shelf is level before fully tightening the screws. This simple step saves you from crooked shelves and frustrated adjustments later. Think about adding a thin bead of wood glue for extra hold if your shelves will carry heavy loads.
Finishing Touches
Finishing touches can make or break the overall look of your built-in shelves. This stage is where your project shifts from functional to fantastic. Paying attention to the small details will ensure your shelves blend seamlessly with the rest of your room.
Sanding And Painting
Sanding smooths out rough edges and prepares the surface for paint, giving your shelves a polished look. Use fine-grit sandpaper and sand in the direction of the wood grain to avoid scratches. Don’t rush—taking time here prevents paint from peeling later.
Choose paint that matches or complements your room’s decor. I once painted built-in shelves with a semi-gloss finish that was easy to clean and stood out beautifully against a matte wall. Think about durability too—especially if your shelves will hold heavy or frequently used items.
Adding Decorative Trim
Decorative trim can add character and depth to your shelves, making them look custom-made. Crown molding or simple edge trim can elevate basic shelves into elegant storage solutions. You can even add a picture frame molding around the edges for a classic, built-in look.
Consider the style of your room when choosing trim—modern, rustic, or traditional. Don’t overlook caulking gaps between the trim and the wall; it creates a seamless finish that looks professionally done. Have you thought about how small design choices like trim affect the overall feel of your space?
Credit: www.familyhandyman.com
Maintaining Your Shelves
Maintaining your built-in shelves keeps them looking good and working well for years. Simple care and regular checks prevent damage and ensure safety. Clean shelves make your space fresh and inviting. Stability checks stop accidents and protect your wall and belongings.
Cleaning Tips
Dust shelves often with a soft cloth or duster. Use a damp cloth to wipe away stains gently. Avoid harsh chemicals that can damage the finish. Clean corners and edges carefully to prevent dirt buildup. Dry shelves well after cleaning to avoid moisture damage.
Checking Stability Regularly
Look over your shelves every few months to spot loose screws or nails. Gently shake shelves to check firmness. Tighten any loose fittings immediately to keep shelves secure. Check the wall anchors for any signs of wear or damage. Fix problems early to avoid bigger repairs later.
Frequently Asked Questions
What Tools Are Needed To Build Shelves Into A Wall?
You need a stud finder, drill, level, saw, screws, and brackets. These tools ensure precise cutting and secure installation of wall shelves.
How Do I Find Studs For Built-in Shelves?
Use a stud finder to locate studs behind the drywall. Mark stud positions to anchor the shelves securely for stability and safety.
What Materials Work Best For Built-in Wall Shelves?
Solid wood or plywood works best for durability and strength. Choose moisture-resistant materials if installing shelves in humid areas like bathrooms.
How Much Weight Can Built-in Wall Shelves Hold?
Weight capacity depends on stud spacing, shelf material, and brackets. Properly anchored shelves can typically hold 30 to 50 pounds safely.
Conclusion
Building shelves into a wall adds space and style to any room. It takes some planning, but anyone can do it with care. Use the right tools and measure twice before cutting. Strong shelves hold books, decorations, or kitchen items safely.
Enjoy your new shelves and the neat look they bring. Keep practicing to improve your skills for future projects. Simple steps lead to great results. Try it yourself and see the difference.


