
Are you ready to add sturdy, stylish shelves to your space but not sure where to start? Putting up brackets for shelves might seem tricky, but with the right steps, you can do it yourself—and get great results.
Imagine having strong shelves that hold your favorite books, plants, or decor perfectly. In this guide, you’ll discover simple tips and clear instructions that make the whole process easy and even enjoyable. Keep reading, and by the end, you’ll have the confidence to hang your shelves just the way you want.
Choosing The Right Brackets
Choosing the right brackets is crucial for sturdy and attractive shelves. The brackets must hold the weight and fit the style of your shelves. Picking the wrong type can lead to weak support or a mismatched look.
Consider the shelf’s purpose and location. Heavy items need stronger brackets. Decorative shelves require brackets that match the design. This balance ensures your shelves stay safe and look good.
Types Of Shelf Brackets
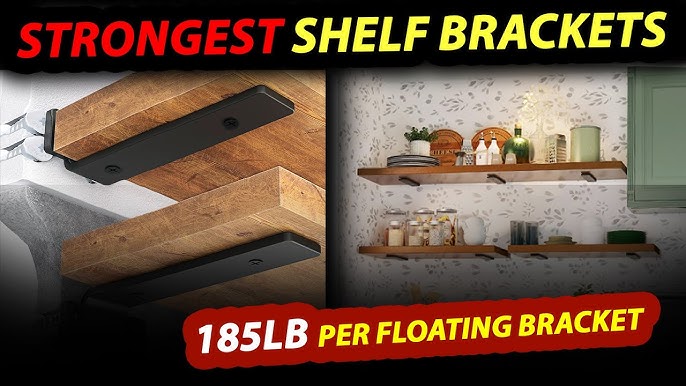
- L-shaped brackets: Simple and common, good for most shelves.
- Floating brackets: Hidden support for a clean, modern look.
- Decorative brackets: Stylish, come in various patterns and shapes.
- Adjustable brackets: Flexible, ideal for changing shelf heights.
Material And Weight Capacity
Brackets come in metal, wood, and plastic. Metal brackets are the strongest and hold heavy loads well.
Wood brackets suit light to medium weight and add a warm look.
Plastic brackets work for very light shelves only. Check the weight rating on the package. Choose brackets that support more than your shelf will hold.
Matching Brackets To Shelf Style
Match the bracket style to your shelf’s design. Modern shelves look best with sleek, minimal brackets.
Rustic or wooden shelves pair well with wooden or wrought iron brackets.
For glass shelves, choose brackets designed specifically for glass to avoid damage.
Tools And Materials Needed
Before you start putting up brackets for shelves, gathering the right tools and materials is crucial. Having everything ready helps you work efficiently and avoid frustrating interruptions. It also ensures your shelves will be sturdy and safe.
Essential Tools
You will need a few basic tools to get the job done right. A drill is important for making holes in the wall quickly and precisely. A level ensures your brackets and shelves sit perfectly straight—nothing looks worse than a crooked shelf.
Other handy tools include a tape measure to get accurate distances and a pencil for marking spots on the wall. Don’t forget a screwdriver or a drill bit for driving screws into the wall. A stud finder can also save you time by locating the strongest support points behind your wall.
Selecting Screws And Anchors
The type of screws and anchors you pick depends on your wall material. Drywall usually needs plastic or metal anchors that expand to hold weight securely. For brick or concrete walls, masonry anchors and screws are necessary.
Think about the weight your shelf will carry. Heavy items require longer, thicker screws and strong anchors to prevent accidents. Have you checked the package weight limits? Choosing the right hardware can make all the difference in safety and durability.
Safety Equipment
Safety often gets overlooked but it’s essential when drilling into walls. Protect your eyes with safety goggles to keep dust and debris away. Gloves can help protect your hands from sharp edges and splinters.
Consider wearing a dust mask if you’re drilling into old paint or drywall to avoid inhaling particles. Lastly, make sure your workspace is well-lit and free of trip hazards. Working safely ensures your project finishes without any unwanted injuries.
Preparing The Wall
Start by cleaning the wall surface to remove dust and dirt. Use a level to mark where the brackets will go for even placement. Ensure the wall is strong enough to hold the shelves safely.
Preparing the wall is a crucial step in ensuring your shelves are sturdy and secure. Before you start drilling holes, you need to make sure the wall can support the weight of the shelf and the items you’ll place on it. Taking the time to get this right can save you from potential mishaps and ensure a professional-looking result.Locating Studs
Finding the studs in your wall is essential for mounting shelves that will hold weight. Use a stud finder to locate the studs behind your drywall. If you don’t have a stud finder, gently tap the wall and listen for a solid sound, which usually indicates a stud. Did you know that studs are typically 16 to 24 inches apart? Knowing this can help you predict where the next one might be. Once located, mark the stud positions with a pencil.Marking Bracket Positions
With the studs found, it’s time to determine where your brackets will go. Decide the height at which you want your shelf and mark it lightly on the wall. Use a measuring tape to ensure the distance between brackets is even. This helps in distributing the weight evenly across the shelf. Consider what items you’ll place on the shelf to decide on the spacing.Checking For Level And Alignment
Ensuring your shelf is level is non-negotiable if you want it to look good and function well. Use a spirit level to check the alignment of your marks. Make adjustments as necessary before drilling. Aligning the brackets correctly not only makes your shelves look professional but also prevents items from sliding off. A quick double-check can make all the difference in the final outcome. Are you ready to see your wall transformed into a functional space? Taking these preparatory steps seriously will set you up for success.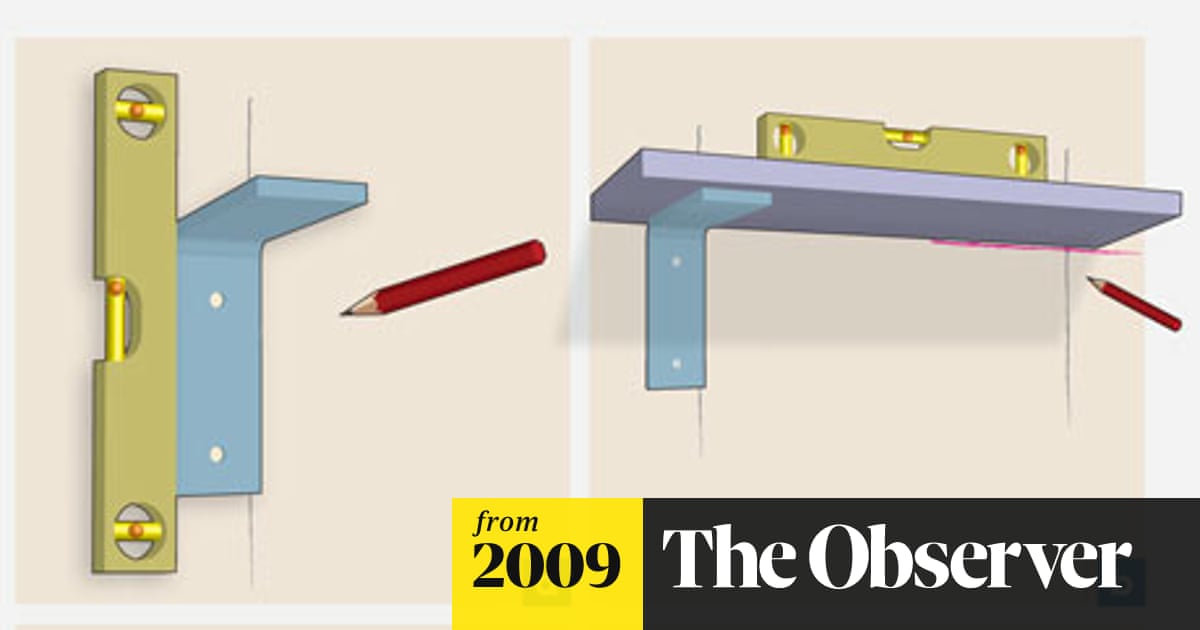
Credit: www.theguardian.com
Mounting Brackets Securely
Mounting brackets securely is the key to ensuring your shelves stay sturdy and safe over time. If brackets are loosely attached, your shelf could sag or even fall, risking damage to your items and walls. Taking a little extra care with the mounting process prevents future headaches and gives you confidence that your shelves can hold the weight you intend.
Drilling Pilot Holes
Drilling pilot holes before inserting screws makes the installation smoother and reduces the risk of splitting the wall or bracket material. Choose a drill bit slightly smaller than your screw’s diameter to create a snug fit. This small step helps your screws grip better, providing a firm hold for the bracket.
Think about how a loose screw can cause a bracket to wobble. Have you ever tightened a screw only to find the wood cracks? Pilot holes avoid that problem by guiding the screw gently into place.
Using Anchors On Drywall
Drywall alone won’t support heavy shelves because it’s too soft for screws to hold firmly. That’s where anchors come in—these expand behind the wall to give your screws something solid to grip. Choose the right type of anchor based on your shelf’s weight and use the proper size drill bit to fit the anchor snugly.
Plastic anchors work well for light loads, but for heavier items, metal or toggle anchors provide extra strength. Don’t skip anchors if you’re not drilling into a stud; your shelf’s stability depends on it.
Securing Brackets To Studs
Studs are the strongest points in your wall for mounting brackets. Use a stud finder to locate them accurately, then mark the spots for drilling. Screwing directly into studs ensures your shelf can hold more weight safely.
Sometimes, studs aren’t where you want your shelf, so you must balance placement with strength. Have you checked your wall for studs yet? If you haven’t, now’s the time to get that stud finder out for the best results.
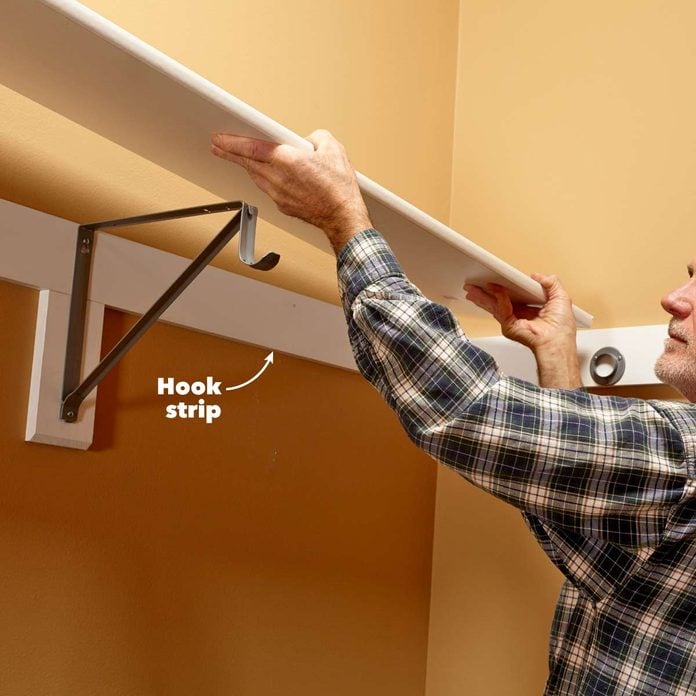
Installing The Shelves
Installing the shelves is a crucial step that transforms your brackets from empty supports into a functional storage solution. This phase requires attention to detail and a steady hand to ensure your shelves are secure and level. Taking your time here will make a big difference in how sturdy and professional your shelving looks and feels.
Placing The Shelf On Brackets
Begin by carefully setting the shelf onto the brackets. Make sure the shelf sits flush against the wall and is centered on each bracket arm. If the shelf feels uneven or wobbly, it might be worth adjusting the bracket positions before moving forward.
Try gently pressing down on different parts of the shelf to check for any movement. You want the shelf to feel solid and stable without rocking or tipping. If you notice any imbalance, it’s better to fix it now rather than after securing the shelf.
Fixing Shelves To Brackets
Once the shelf is in place and stable, secure it to the brackets using screws. Most brackets have pre-drilled holes for this purpose—make sure to use the right size screws for both the bracket and the shelf material.
Before drilling, consider if your shelf material requires pilot holes to prevent splitting. Wood shelves often do, and taking this extra step can save you from costly mistakes. Tighten the screws gradually, checking frequently to keep the shelf aligned.
Final Level Check
After fixing the shelves, always perform a final level check. Use a spirit level to ensure the shelf is perfectly horizontal. Even a slight tilt can affect both the look and the function of your shelf.
If the shelf isn’t level, adjust the screws or reposition the brackets slightly. It might feel tedious, but a perfectly level shelf is worth the extra effort. Have you ever placed something on a tilted shelf only to watch it slide off? Avoid that frustration by double-checking now.

Credit: www.create-enjoy.com
Troubleshooting Common Issues
Troubleshooting common issues when putting up brackets for shelves helps ensure a strong, stable setup. Problems often arise from uneven walls, weak brackets, or shelf wobbling. Identifying these challenges early saves time and effort. The following tips guide fixing typical problems for a secure shelf installation.
Dealing With Uneven Walls
Uneven walls cause brackets to sit at odd angles. Use a spirit level to check the wall surface first. Shim behind brackets with thin pieces of wood or cardboard. This creates a flat surface for the bracket to rest on. Avoid forcing brackets against bumps or dips. Use a flexible bracket or adjust shelf positioning to match wall curves.
Brackets Not Holding Weight
Brackets may fail under heavy loads due to weak anchors or poor wall material. Use wall plugs or anchors designed for your wall type. Drywall needs special anchors to hold weight securely. Check screws for tightness and replace any that are stripped or short. Choose brackets with higher weight ratings for heavier shelves.
Shelf Stability Problems
Wobbly shelves result from loose brackets or uneven screw placement. Tighten all screws firmly but avoid over-tightening, which can strip holes. Ensure brackets are level and aligned on both sides. Use longer screws for deeper anchoring. Add a third bracket in the middle for extra support on long shelves.
Maintenance And Safety Tips
Keeping your shelf brackets in good shape is key to ensuring they hold up over time and stay safe to use. Regular maintenance not only extends their life but also prevents accidents caused by unexpected failures. Let’s look at some practical tips that help you maintain and secure your shelves effectively.
Regular Inspections
Check your brackets and shelves at least once a month. Look for signs of rust, loose screws, or cracks in the bracket or wall. If you spot any damage early, you can fix it before the shelf collapses and causes damage or injury.
Have you ever noticed a shelf wobble but ignored it? That wobble can quickly turn into a fall. Tightening screws and replacing worn parts keeps your shelves steady and reliable.
Avoiding Overloading
Every bracket has a weight limit. Exceeding this limit risks bending or breaking the bracket and damaging your wall. Be honest about what you place on your shelves—heavy books, plants, or electronics can add up fast.
Think about the heaviest item you want to store and check the bracket’s weight capacity before installation. If you’re unsure, choose brackets designed for heavier loads to give yourself peace of mind.
Cleaning And Care
Dust and dirt can hide damage and cause wear over time. Wipe your brackets regularly with a damp cloth to remove buildup. Avoid harsh chemicals that might erode paint or metal finishes.
Keeping your brackets clean also helps you spot any developing issues sooner. Plus, a clean shelf setup looks better and invites you to keep it organized.
Credit: www.familyhandyman.com
Frequently Asked Questions
How Do I Choose The Right Brackets For Shelves?
Select brackets based on shelf size, weight, and style. Use heavy-duty brackets for thick or heavy shelves. Match bracket design to room décor for a cohesive look.
What Tools Are Needed To Put Up Shelf Brackets?
You need a drill, screws, wall anchors, a level, a tape measure, and a pencil. These tools ensure precise and secure bracket installation.
How Do I Find Studs For Bracket Placement?
Use a stud finder to locate studs behind the wall. Mark the stud positions with a pencil for secure bracket mounting.
Can I Install Shelf Brackets On Drywall Only?
Drywall alone may not support heavy shelves. Use wall anchors or mount brackets directly into studs for better stability.
Conclusion
Putting up brackets for shelves is simple with the right steps. Measure and mark carefully before drilling holes. Use a level to keep shelves straight. Secure brackets tightly to hold weight well. Choose the right tools for a smooth job.
Taking time to plan makes the work easier. Shelves add space and style to any room. Try it yourself and enjoy a neat, organized space.


