
Looking to add a stylish touch to your home without spending a fortune? Making your own wooden floating shelf is easier than you think.
Imagine having a sleek, modern shelf that holds your favorite books, plants, or decor – all made by your own hands. In this guide, you’ll discover simple steps to build a sturdy, beautiful floating shelf that fits perfectly in your space.
Ready to transform your walls and impress your guests? Keep reading, and let’s get started!

Credit: www.rjliving.com.au
Choosing The Right Wood
Choosing the right wood is key to making a strong and beautiful floating shelf. The type of wood affects how the shelf looks and how long it lasts. Picking wood that matches your style and needs helps you create a shelf that fits perfectly in your space.
Types Of Wood For Shelves
Different woods bring different colors and textures. Here are some common types:
- Pine:Light and soft, easy to work with, budget-friendly.
- Oak:Strong and durable, with a rich grain pattern.
- Maple:Hard and smooth, great for a modern look.
- Walnut:Dark and elegant, adds a luxurious feel.
- Cherry:Warm color that deepens with age.
Wood Quality And Durability
Good wood should be sturdy and free of cracks or knots. Check for smooth surfaces and consistent color. Hardwoods last longer and hold weight better than softwoods. Avoid wood that feels weak or has many defects. Proper quality ensures your shelf stays safe and looks good over time.
Sourcing Wood Materials
Find wood from local suppliers or lumber yards for the best quality. Buying locally reduces cost and supports small businesses. Some stores sell pre-cut boards, which saves time. Online shops offer a wide variety but check shipping times. Always ask about the wood’s origin and treatment to avoid surprises.
Tools And Materials Needed
Getting your tools and materials ready is the first step to building a wooden floating shelf that looks professional and lasts long. Having everything on hand saves you from frustrating interruptions in the middle of your project. It also helps you stay organized and focused on creating something you’ll be proud to display.
Essential Tools List
- Measuring tape:Accuracy matters, so use a reliable tape to measure wood and wall space precisely.
- Level:This ensures your shelf sits perfectly horizontal—no one wants a crooked shelf.
- Power drill:A drill makes drilling holes and driving screws quick and easy.
- Screwdriver set:Handy for tightening screws, especially in tight spots.
- Stud finder:Find wall studs to securely anchor your shelf and avoid drywall damage.
- Sandpaper or electric sander:Smooth edges and surfaces for a polished finish.
- Clamps:Keep wood pieces steady while you work on them.
Additional Supplies
- Wood boards:Choose quality wood like pine, oak, or walnut, depending on your style and budget.
- Floating shelf brackets:These hidden supports hold your shelf securely without visible hardware.
- Wood screws:Pick screws that match the bracket size and wood thickness.
- Wood filler:Fill any holes or gaps for a smooth, seamless look.
- Wood stain or paint:Customize your shelf color to match your room.
- Paintbrush or cloth:For applying stain or paint evenly.
Safety Equipment
- Safety goggles:Protect your eyes from dust and wood splinters.
- Dust mask:Wood dust can irritate your lungs, so wear a mask when sanding or cutting.
- Ear protection:Drills and sanders can be loud; ear plugs or earmuffs help prevent hearing damage.
- Work gloves:Shield your hands from splinters and sharp tools.
Have you ever started a project only to realize you’re missing a key tool halfway through? Preparing your workspace with these tools and supplies makes your build smoother and safer. What’s your must-have tool for woodworking projects?
Measuring And Planning
Creating a wooden floating shelf starts with proper measuring and planning. This crucial step ensures your shelf fits perfectly and serves its purpose. Accurate measurements and a well-thought-out design prevent future mishaps. Let’s dive into the essentials of measuring and planning.
Determining Shelf Size
Decide on the length and depth of your shelf. Consider the items you plan to place on it. Heavier items need a wider and sturdier shelf. Measure the space where you want the shelf. Ensure it complements the room’s design and size.
Marking Measurements
Use a tape measure to note dimensions. Double-check each measurement to avoid errors. Mark these measurements on your chosen wood piece. Clearly marked lines ensure accurate cuts and assembly.
Designing Shelf Layout
Visualize how the shelf will appear in the room. Sketch a simple layout on paper. Consider spacing, alignment, and overall balance. Think about how it will blend with existing furniture. A harmonious design enhances the room’s aesthetic appeal.

Credit: www.youtube.com
Cutting And Preparing Wood
Cutting and preparing wood is a key part of making a wooden floating shelf. Accurate cuts and smooth surfaces ensure the shelf looks neat and fits well. Taking time in this stage helps the shelf last longer and hold weight safely.
Choose wood that matches the shelf size and style. Mark the wood carefully before cutting. Use the right tools and safety gear to work cleanly and safely.
Cutting Techniques
Use a saw that fits the type of wood and cut style you need. A circular saw works well for straight cuts. A jigsaw is good for curves or detailed cuts. Hold the wood firmly to avoid mistakes. Cut slowly and follow your markings. Check measurements twice before cutting to prevent waste.
Sanding For Smoothness
Sand the wood edges and surfaces to remove splinters and rough spots. Start with coarse sandpaper to even out rough areas. Move to finer sandpaper for a smooth finish. Sand along the wood grain to avoid scratches. Clean off dust with a dry cloth after sanding.
Prepping Wood For Assembly
Check all pieces for size and smoothness. Apply wood conditioner or primer if you plan to paint or stain. Drill pilot holes for screws to prevent wood from splitting. Arrange the pieces in order before assembling. This makes the building process faster and easier.
Assembling The Shelf
Assembling your wooden floating shelf is where the project starts to take shape. This part requires careful attention to detail to ensure the shelf not only looks great but also holds up well over time. Let’s break down the key steps to put your shelf together effectively.
Joining Wood Pieces
Begin by aligning the wooden boards carefully. Use wood glue along the edges for a strong bond before fastening them with screws or nails. Clamping the pieces together while the glue dries helps prevent gaps and keeps everything flush.
Think about the grain direction when joining pieces—it affects both strength and appearance. If your shelf has multiple layers, stagger the joints to increase durability. Have you noticed how a well-joined shelf feels sturdier even before mounting?
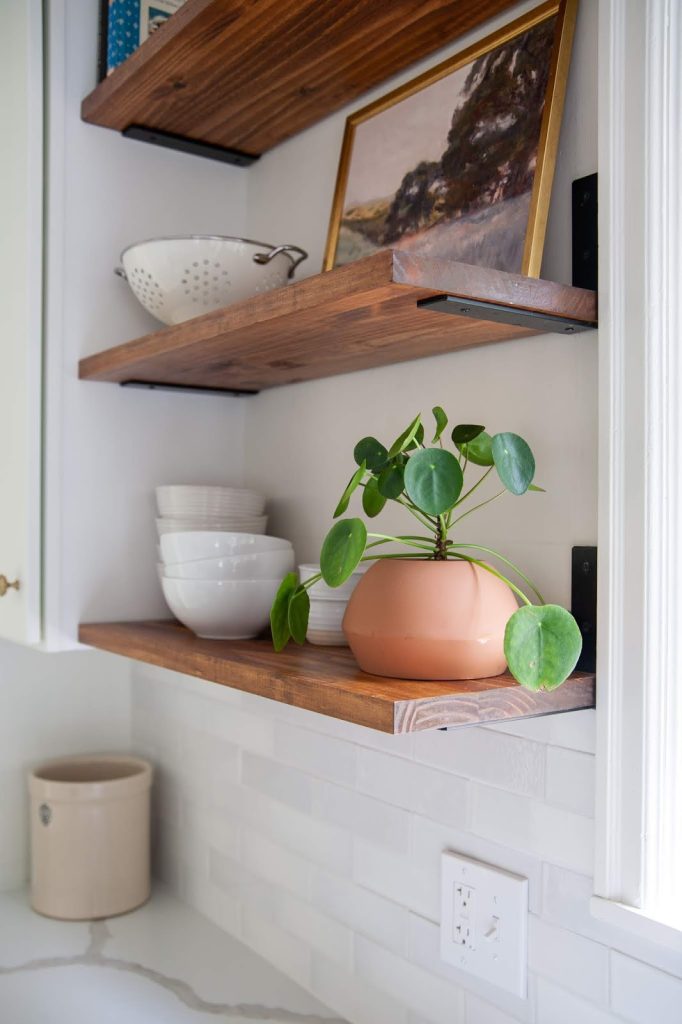
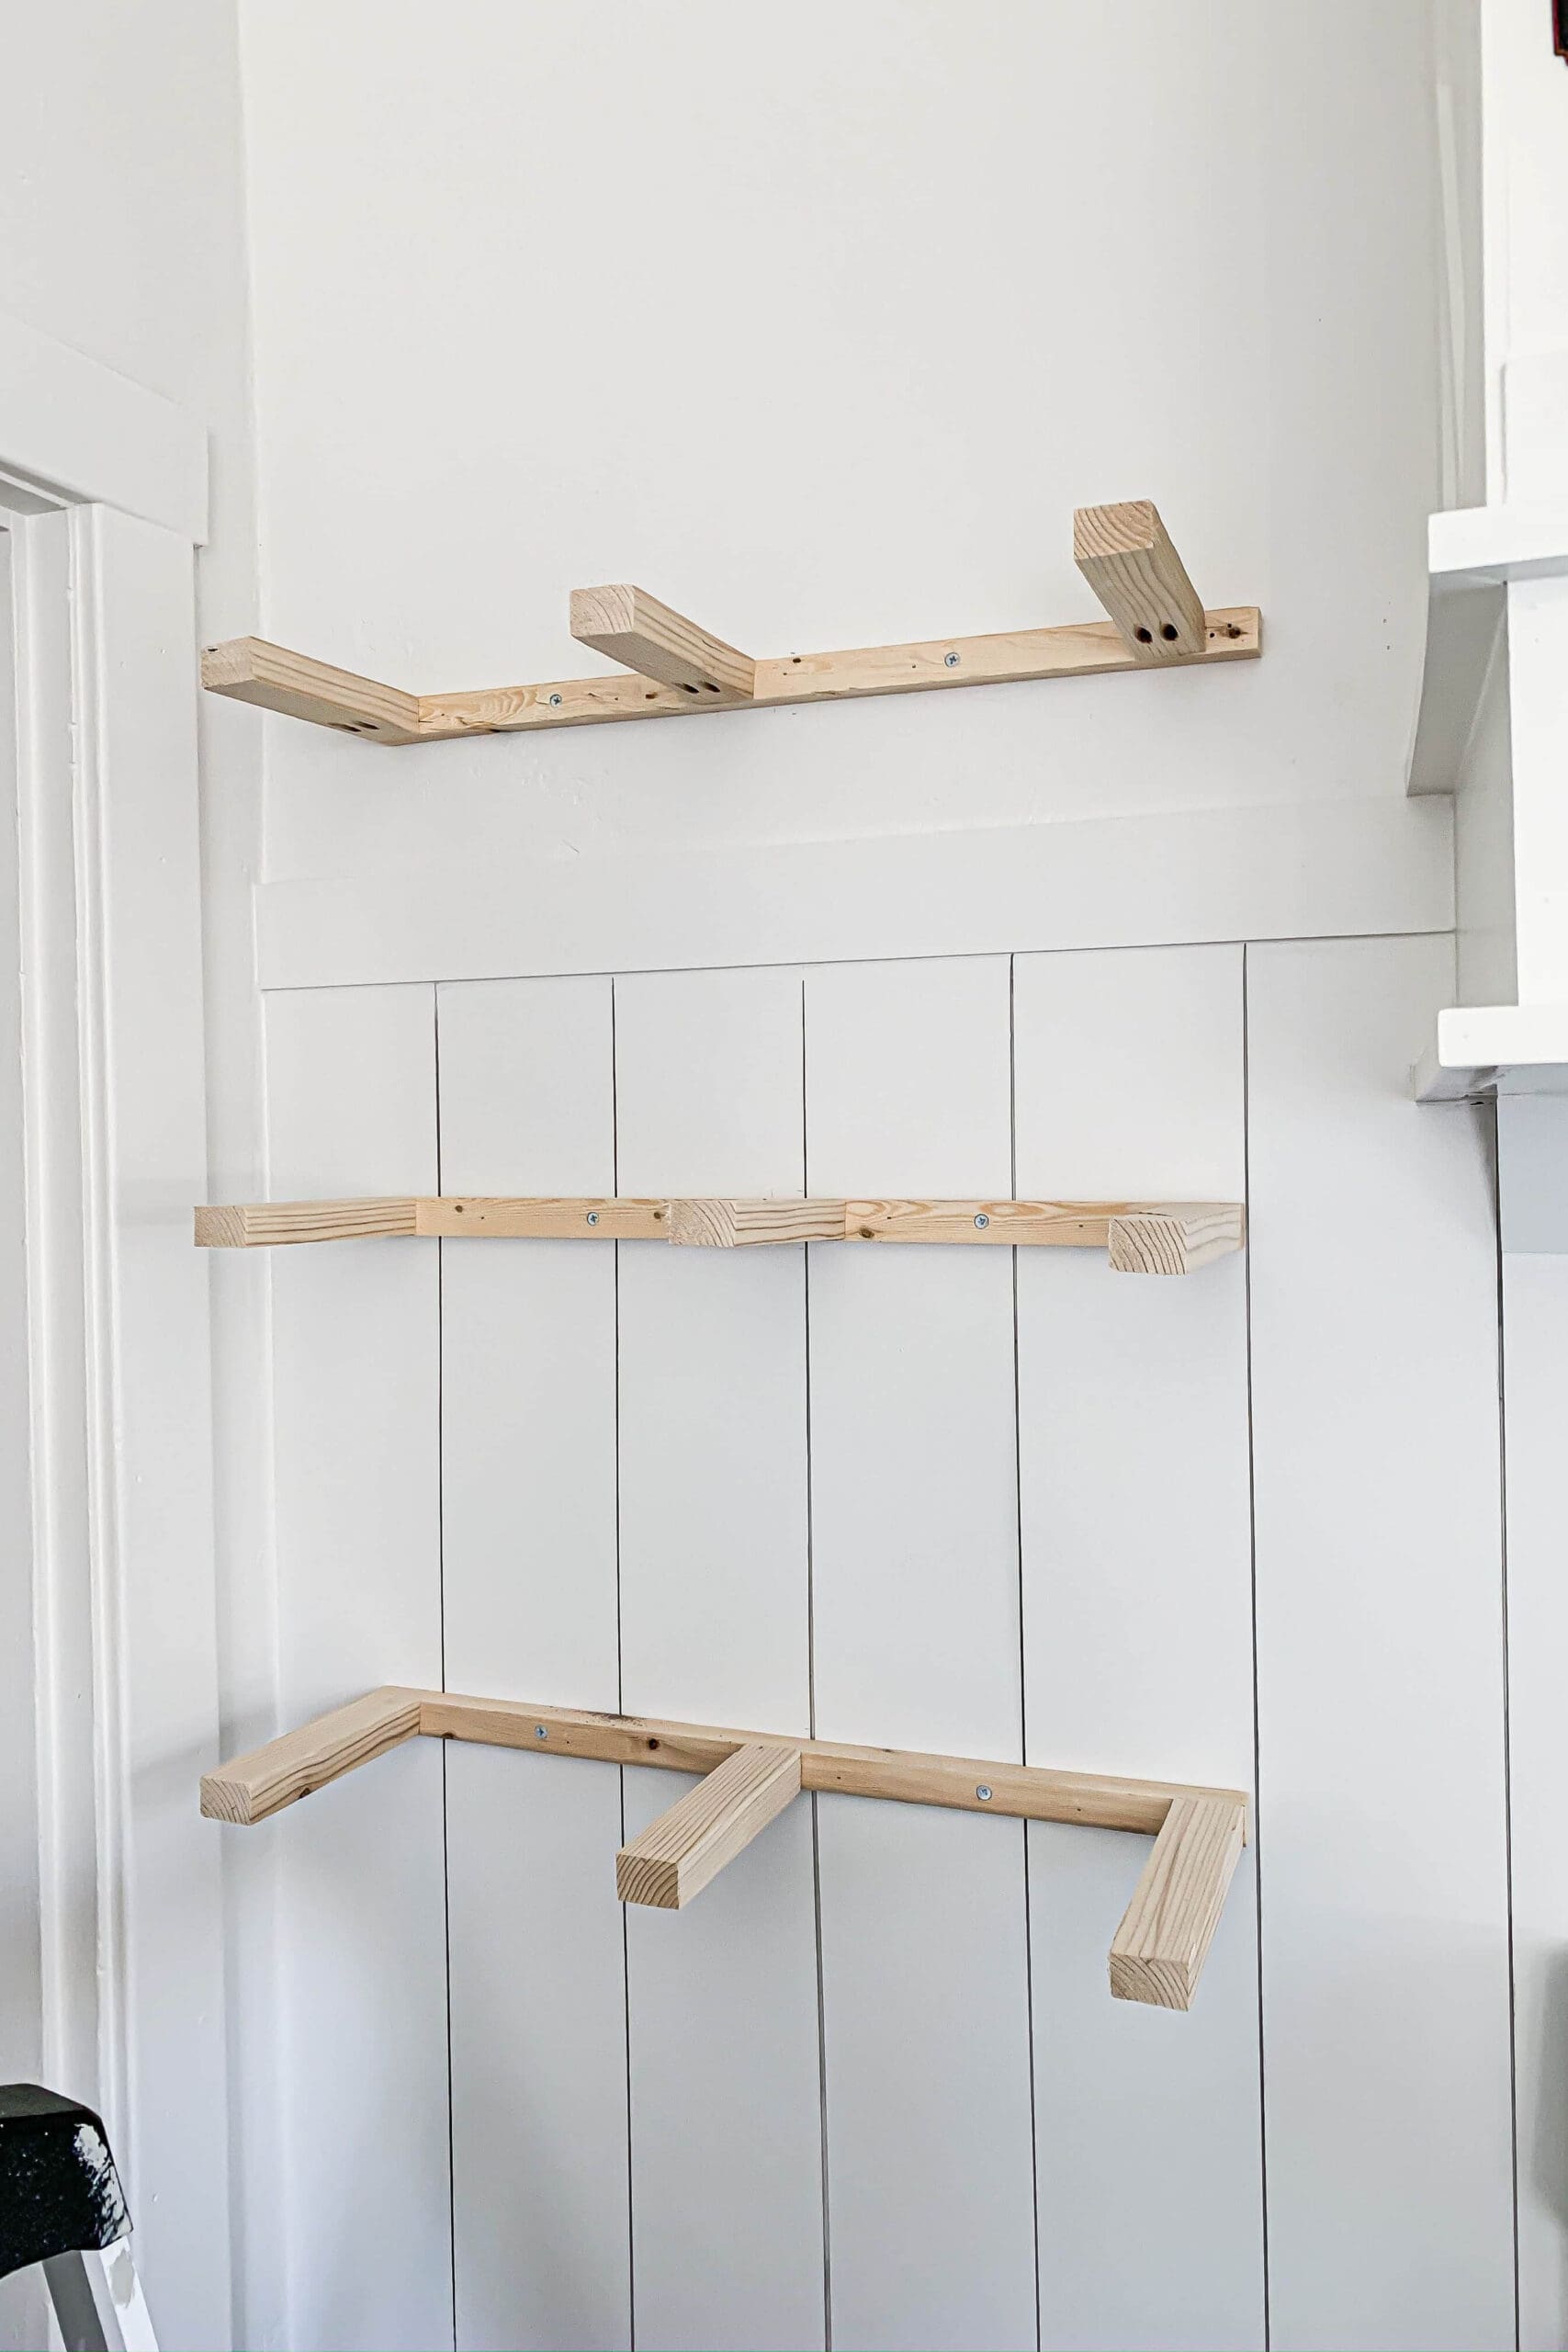
Installing Hidden Brackets
Hidden brackets give floating shelves their clean, modern look. Choose brackets that fit snugly inside your shelf depth and can support the weight you expect. Drill precise holes in the back panel to slide the brackets into place without visible screws on the front.
Double-check bracket placement against the wall studs for maximum support. It’s worth measuring twice here—incorrect alignment can cause frustrating rework. Would you rather have visible hardware or a sleek, invisible mounting?
Ensuring Stability
Stability is key to a shelf that lasts. After securing the shelf to the wall, test its firmness by applying gentle pressure. If it wobbles, tighten screws or add extra support brackets.
Use a level to confirm your shelf sits perfectly horizontal—an uneven shelf can cause items to slide off. Remember, a stable shelf isn’t just safer; it also looks more professional and enhances your space.
Credit: crystelmontenegrohome.com
Finishing Touches
Finishing touches are what transform your wooden floating shelf from a simple project into a piece of art. These final steps protect your work and enhance its beauty. Paying attention here ensures your shelf not only looks great but also lasts longer.
Staining And Painting Options
Choosing the right color or stain can highlight the natural grain of your wood or give it a bold new look. If you want a rustic feel, consider a dark walnut stain; for a modern vibe, white or pastel paints work well. Always test your stain or paint on a scrap piece to see how it changes the wood’s tone before applying it to your shelf.
Remember, staining enhances wood texture, while painting covers it. Which effect do you prefer for your space?
Applying Protective Coatings
After staining or painting, a protective coat seals your shelf against moisture, scratches, and everyday wear. Polyurethane is a popular choice because it’s durable and easy to apply with a brush or spray. For a natural finish, consider tung oil or beeswax—they add protection without a glossy look.
Apply thin, even layers and let each one dry before adding the next. This careful approach prevents drips and ensures a smooth finish. What level of sheen fits your style—matte, satin, or glossy?
Drying And Curing Time
Patience during drying and curing is crucial. Even if your shelf looks dry to the touch, the protective layers need time to harden fully. Depending on the product, this can take from 24 hours up to several days.
Don’t rush to mount or load your shelf too soon. Have you ever noticed how a rushed finish leads to peeling or sticky surfaces? Give your shelf the time it deserves to cure properly, so it stays beautiful and sturdy for years.
Mounting The Floating Shelf
Mounting the floating shelf securely is key for safety and style. This process involves finding the best spots on your wall and attaching the shelf so it holds weight without falling. Follow these steps carefully to ensure a strong, level installation that looks great.
Locating Wall Studs
Start by finding the wall studs. These wooden beams support your wall and provide the strongest anchor points.
- Use a stud finder to scan the wall surface.
- Mark the stud locations with a pencil.
- Check for studs at regular intervals, usually 16 or 24 inches apart.
- A small tap can also help locate studs by sound difference.
Drilling And Securing Brackets
Attach the brackets firmly into the studs for maximum strength.
- Hold the bracket against the wall at your marked stud location.
- Mark the screw holes on the wall with a pencil.
- Drill pilot holes to make screwing easier and prevent wood splitting.
- Secure the bracket using heavy-duty screws designed for wood.
- Double-check the bracket’s tightness to avoid future wobbling.
Leveling The Shelf
Ensuring your shelf is level gives a clean, professional look.
- Place the shelf on the brackets carefully.
- Use a spirit level on the shelf surface to check alignment.
- Adjust the shelf or brackets slightly if needed.
- Tighten all screws once the shelf is perfectly level.
Maintenance Tips
Maintaining a wooden floating shelf keeps it looking fresh and sturdy. Regular care prevents damage and extends its life. Simple steps help preserve both beauty and function. Follow these easy tips to keep your shelf in great shape.
Cleaning The Shelf
Dust the shelf regularly with a soft cloth. Use a damp cloth for sticky spots, then dry immediately. Avoid harsh chemicals that can damage wood finishes. Mild soap and water work best for gentle cleaning. Keep liquids away to prevent warping or stains.
Checking For Wear
Inspect the shelf often for cracks or loose screws. Look under the shelf and around brackets for signs of stress. Tighten screws to keep the shelf secure and stable. Repair small cracks early to stop them from growing. Regular checks avoid accidents and costly repairs.
Reapplying Finishes
Reapply finish every year or when the wood looks dull. Lightly sand the surface before applying a new coat. Use the same finish type to maintain color and protection. Apply with a brush or cloth in thin, even layers. Allow each coat to dry fully before use.
Frequently Asked Questions
What Materials Are Needed For A Wooden Floating Shelf?
You need wood planks, brackets, screws, a drill, level, sandpaper, and wood finish. Choose quality wood for durability. Brackets should support the shelf’s weight. Proper tools ensure a smooth build and installation.
How Do You Attach A Floating Shelf To The Wall?
Use wall studs to securely fix brackets. Mark the stud positions, drill pilot holes, and use screws to attach brackets. Slide the shelf onto brackets, ensuring it fits tightly. This method provides strong support and prevents sagging.
Can I Customize The Size Of My Floating Shelf?
Yes, customize by cutting wood to desired length and width. Ensure brackets fit the wood size. Adjust thickness for weight capacity. Tailoring size helps fit different spaces and design preferences perfectly.
How Do I Finish A Wooden Floating Shelf?
Sand the wood smooth, remove dust, and apply stain or paint. Use a clear sealant for protection against moisture and wear. Finishing enhances appearance and longevity, giving your shelf a polished look.
Conclusion
Building a wooden floating shelf is simple and fun. You only need a few tools and wood pieces. Follow the steps carefully to get strong support. This shelf adds style and saves space in any room. Try customizing the size and color to fit your home.
Enjoy the pride of making something useful yourself. Start your project today and see the difference it makes.


