
Are you tired of clutter taking over your space? Adding a shelf to your wall can instantly organize your room and showcase your favorite items.
But how do you make sure it’s secure and looks great? You’re just a few simple steps away from mastering the skill of attaching a shelf to the wall. Keep reading, and you’ll discover easy tips that save you time, prevent mistakes, and give you the confidence to tackle this project like a pro.
Your perfect shelf is waiting—let’s get started!
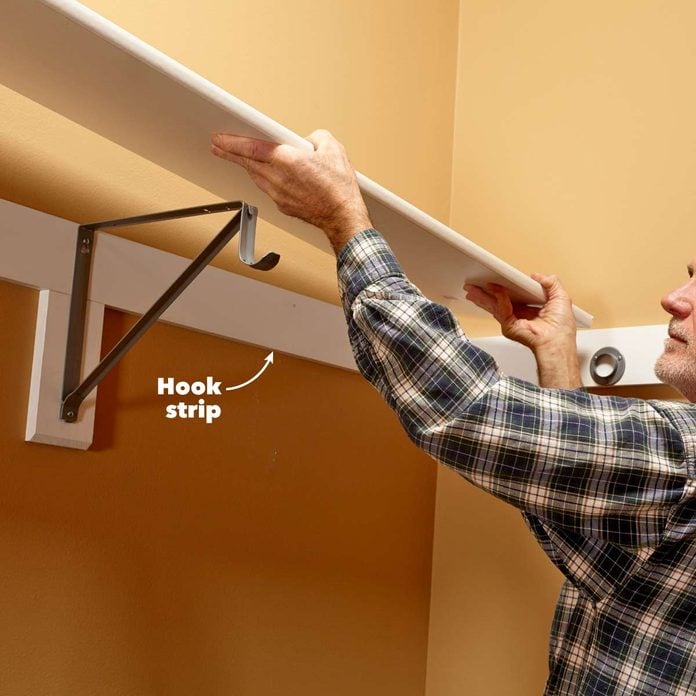
Credit: www.familyhandyman.com
Choosing The Right Shelf
Choosing the right shelf is key to creating a functional and stylish wall setup. It’s not just about looks; you need a shelf that fits your space, holds your items securely, and matches your room’s vibe. Think about what you want to store and how much weight the shelf needs to support before making a decision.
Types Of Shelves
There are several types of shelves to consider, each serving different purposes:
- Floating Shelves:These offer a clean, modern look with no visible brackets. They’re great for light to medium loads like books or decor.
- Bracket Shelves:Traditional and sturdy, these use metal or wooden brackets to support heavier items.
- Corner Shelves:Perfect for making use of unused corners, ideal for plants or small accessories.
- Built-in Shelves:These are custom-made and integrated into the wall, offering maximum strength and style but requiring more effort to install.
What kind of shelf fits your style and storage needs best?
Material Considerations
The material of your shelf affects both its appearance and durability. Wood shelves bring warmth and can support heavy items, but they may need regular maintenance to prevent warping.
Metal shelves are strong and sleek, perfect for industrial or modern interiors. Glass shelves look elegant but are better for light items due to fragility.
Think about the room’s moisture levels too. For example, avoid wood in bathrooms unless it’s properly sealed.
Weight Capacity
Knowing the weight capacity of your shelf is crucial. Shelves that can’t hold what you place on them risk falling and damaging your wall or belongings.
Check the manufacturer’s weight limits and consider the type of wall you have. Drywall, for example, may need special anchors or additional support for heavy loads.
Have you measured the heaviest item you want to place on your shelf? Always aim for a shelf that can handle more than your maximum load to be safe.
Gathering Tools And Materials
Attaching a shelf to the wall needs preparation. Gathering the right tools and materials makes the job easier and safer. This step helps avoid delays and ensures a strong hold for your shelf.
Essential Tools
- Drill with drill bits
- Level to check straightness
- Screwdriver or power driver
- Measuring tape
- Pencil for marking spots
- Stud finder to locate wall studs
- Hammer for anchors or nails
Fasteners And Anchors
Choosing the right fasteners depends on your wall type. Drywall needs anchors to hold weight properly. Wood walls require wood screws or lag bolts.
- Wall anchors for drywall
- Screws matching shelf brackets
- Toggle bolts for heavy loads
- Plastic or metal anchors
Safety Gear
Protect yourself during installation. Safety gear reduces injury risks and improves comfort.
- Safety goggles to protect eyes
- Work gloves for hand protection
- Dust mask if drilling old walls
- Ear protection if using loud tools
Preparing The Wall
Attaching a shelf to the wall begins with preparing the wall. This step is crucial for ensuring stability and safety. Proper preparation prevents damage and ensures a strong hold. Follow these simple steps to get started.
Locating Studs
Locate the wall studs for support. Use a stud finder to detect them. Slowly move the device along the wall. Listen for a beep or light indication. Mark the stud locations with a pencil. This step ensures your shelf has a sturdy foundation.
Checking Wall Material
Identify your wall material. Common types include drywall, plaster, and concrete. Each type requires different tools and anchors. Drywall is soft and needs special anchors. Concrete walls require masonry bits and screws. Knowing the material helps in choosing the right tools.
Marking Mounting Points
Decide on the shelf’s position. Hold the shelf against the wall. Use a level to ensure it is straight. Mark the mounting points with a pencil. Make small, visible marks for accuracy. Double-check the alignment before proceeding.
Installing Wall Anchors
Installing wall anchors is a crucial step when attaching a shelf to your wall, especially if you want it to hold weight safely. Anchors provide extra support by gripping the wall material firmly, preventing the shelf from pulling out. Understanding when and how to use them can save you from the frustration of a falling shelf.
When To Use Anchors
You need anchors when you’re attaching shelves to drywall, plaster, or hollow walls where no studs are available. These walls can’t hold screws by themselves under heavy weight.
If your shelf will hold heavy items like books or kitchenware, anchors add the necessary strength. Even lightweight shelves benefit from anchors if you want a secure, long-lasting fixture.
Types Of Anchors
There are several types of wall anchors, each designed for specific situations. Choosing the right one depends on your wall material and the weight your shelf will carry.
- Plastic expansion anchors:Best for light loads in drywall; they expand as the screw is driven in.
- Toggle bolts:Ideal for heavy loads; they have wings that open behind the wall for extra grip.
- Molly bolts:Metal anchors that expand inside the wall, providing strong support in drywall.
- Self-drilling anchors:Easy to install in drywall without pre-drilling; good for medium loads.
Proper Installation Techniques
Start by drilling a hole that matches the anchor size precisely. Too big a hole and the anchor won’t hold; too small and it might break or be hard to insert.
Push the anchor flush with the wall surface. For toggle bolts, insert folded wings through the hole and let them open behind the wall.
Insert the screw carefully into the anchor. Tighten until secure, but avoid over-tightening as it can damage the wall or the anchor itself.
Have you ever installed a shelf that came crashing down? Chances are, the anchors weren’t right or properly installed. Taking the time to choose and place anchors correctly will ensure your shelf stays put and supports your items safely.
Mounting The Shelf Brackets
Mounting the shelf brackets correctly is crucial for a sturdy and safe shelf. If brackets aren’t aligned or secured well, your shelf could wobble or even fall. Let’s focus on how to position, drill, and attach your brackets with confidence.
Aligning Brackets
Start by holding the brackets against the wall where you want your shelf. Use a level to make sure they are perfectly horizontal—this step prevents your shelf from tilting.
Mark the screw holes lightly with a pencil. Double-check the spacing between brackets matches the length of your shelf to ensure proper support.
Have you noticed how even a small misalignment can throw off the entire look? Taking extra time here saves you from frustration later.
Drilling Pilot Holes
Drill small pilot holes where you made your pencil marks. These holes guide the screws and reduce the risk of splitting the wall or bracket material.
Choose a drill bit slightly smaller than your screws. This ensures a snug fit and stronger hold.
Remember, drilling pilot holes is like giving your screws a clear path—it makes the whole process smoother and prevents damage.
Securing Brackets To Wall
Attach the brackets by driving screws into the pilot holes. Use a screwdriver or drill with the appropriate bit to avoid stripping the screws.
For drywall, use wall anchors to keep the brackets firmly in place. If you hit a stud, screw directly into it for maximum strength.
Once tightened, give the brackets a gentle shake to test their stability. If they move, reassess your anchor or screw placement before adding the shelf.
Attaching The Shelf
Attaching the shelf to your wall is the moment your project starts to take shape. This step requires focus and precision to ensure your shelf is both secure and visually balanced. Let’s break down how to position the shelf correctly, attach it firmly to the brackets, and make sure it sits perfectly level.
Positioning The Shelf
Start by placing the shelf onto the brackets gently. Make sure the shelf fits snugly without forcing it into place. Take a moment to step back and check if the shelf aligns with your room’s layout and other furniture.
Ask yourself: Does the shelf allow enough space above and below? Is it easy to reach? These small considerations can impact how useful and attractive your shelf will be.
Securing Shelf To Brackets
Once you’re happy with the position, it’s time to secure the shelf. Use screws that fit the bracket holes and are appropriate for your shelf material. Tighten them evenly to avoid any wobbling or shifting.
Don’t rush this part—loose screws can cause the shelf to tilt or even fall. If your brackets have pre-drilled holes, match your screws to those for a strong hold. Remember, the right screw length is key; too long can damage the wall, too short won’t hold well.
Ensuring Level Placement
Even a well-secured shelf looks off if it’s not level. Use a spirit level or a smartphone app to check the horizontal alignment. Place the level on top of the shelf and adjust until the bubble centers perfectly.
If you notice the shelf tilting, loosen the screws slightly and reposition it. Double-check after tightening to make sure it hasn’t shifted. A perfectly level shelf not only looks professional but also prevents items from sliding off.
Final Checks And Maintenance
After installing your shelf, final checks and routine maintenance keep it safe and strong. These steps help avoid accidents and extend the shelf’s life. Regular care ensures your shelf stays level and holds weight well.
Testing Stability
Gently press on the shelf to check for movement. It should feel firm and not wobble. Place a few items on it to test weight support. If it shifts or feels loose, tighten screws or brackets immediately. This simple test prevents future damage.
Regular Inspection
Look at the shelf every few weeks for signs of wear. Check screws, brackets, and wall anchors for rust or loosening. Watch for cracks or bending in the shelf board. Early spotting of problems helps fix them fast. Keep the shelf clean from dust and debris to avoid damage.
Tips For Longevity
- Use wall anchors suitable for your wall type.
- Don’t overload the shelf beyond its weight limit.
- Distribute weight evenly across the shelf surface.
- Keep moisture away to prevent wood warping or rust.
- Tighten hardware periodically to maintain firmness.

Credit: www.wikihow.com

Credit: shelfology.com
Frequently Asked Questions
How Do I Find Studs To Attach A Shelf?
Use a stud finder tool to locate studs behind the wall. Mark their positions lightly with a pencil. Attaching shelves to studs ensures maximum strength and stability.
What Type Of Wall Anchors Should I Use?
Choose wall anchors based on wall material and shelf weight. Plastic anchors work for light loads; metal or toggle anchors support heavier shelves securely.
Can I Attach A Shelf To Drywall Without Studs?
Yes, use strong drywall anchors like toggle bolts for support. Avoid heavy loads without stud support to prevent shelf damage or wall injury.
How High Should I Mount A Shelf On The Wall?
Mount shelves at eye level or slightly above for convenience. Adjust height depending on shelf use and room layout for best accessibility.
Conclusion
Attaching a shelf to the wall can be simple and safe. Follow each step with care and use the right tools. Check the wall type before drilling or nailing. Secure the shelf tightly to avoid accidents. A well-attached shelf holds your items firmly.
Take your time and do it right. Enjoy your new storage space once finished. Small efforts make big differences in home projects. Now, you can hang shelves with confidence and ease.


