
Are you ready to transform your walls from plain to stunning without hiring a pro? Putting up 3D wall panels is easier than you might think—and it can completely change the look and feel of your space.
Whether you want a modern vibe or a cozy touch, these panels add depth and style that catch the eye instantly. In this guide, you’ll discover simple, step-by-step tips to install 3D wall panels yourself, even if you’ve never done a home project like this before.
Keep reading, and by the end, you’ll have the confidence and know-how to create a wall that stands out and makes your room truly yours.
Credit: www.vevor.ca
Choosing The Right 3d Panels
Choosing the right 3D wall panels can completely change the vibe of your space. It’s not just about picking something that looks good; it’s about matching the panels to your room’s purpose, style, and size. Before you buy, think about what material fits your lifestyle, which design will hold your interest, and how much wall space you actually have to cover.
Material Options
3D wall panels come in a variety of materials, each with its own benefits. PVC panels are lightweight, waterproof, and easy to clean, making them perfect for kitchens or bathrooms. If you want a more natural feel, wood panels add warmth but need more care to avoid damage from moisture.
For a modern, sleek look, MDF or gypsum panels offer smooth surfaces and can be painted any color. Remember, some materials are easier to install than others—PVC and foam panels usually cut and fix quickly, while heavier stone or wood may require extra tools or help.
Design Styles
What style do you want your wall to express? Geometric patterns add energy and movement, ideal for lively spaces like living rooms or offices. Organic shapes with curves and waves can create a calming atmosphere, perfect for bedrooms or meditation corners.
Don’t shy away from mixing textures or layering panels for a more dramatic effect. You might even consider panels with built-in lighting or metallic finishes if you want to add a futuristic touch. Ask yourself: will this style feel fresh in a year, or could it become tiresome quickly?
Measuring Your Wall
Accurate measurements are crucial to avoid waste and extra costs. Start by measuring the height and width of your wall, then calculate the total square footage you’ll need to cover. Remember to subtract areas taken up by windows and doors.
It’s a good idea to buy a little extra material—usually 10% more—to account for cutting errors or future repairs. Think about how the panels will fit together; some designs require precise alignment, so knowing your wall’s exact dimensions helps ensure a clean finish.

Credit: dundeedeco.com
Preparing The Wall Surface
Preparing the wall surface is the foundation of a successful 3D wall panel installation. If your wall isn’t ready, the panels might not stick properly or look their best. Paying close attention to cleaning, repairing, and priming will save you time and effort later.
Cleaning The Wall
Start by removing all dust, dirt, and grease from the wall. Use a mild detergent mixed with water and a sponge or cloth to wipe down the surface thoroughly. If you skip this step, the adhesive might not bond well, causing panels to peel off sooner than expected.
Don’t forget to check for any loose paint or wallpaper residue and scrape it away gently. A clean wall means a stronger hold and a smoother finish.
Repairing Imperfections
Look closely for cracks, holes, or dents on your wall. These imperfections can cause uneven panel placement or visible bumps through your 3D design. Fill small holes and cracks with spackling compound or wall filler, then sand it down once dry.
If you have larger damaged areas, consider patching them with drywall patches before proceeding. Imagine installing beautiful panels only to have a rough patch ruin the effect—taking time to fix your wall first prevents that disappointment.
Priming For Adhesion
Applying a primer is often overlooked but critical, especially on new drywall or painted walls with glossy finishes. Primer creates a surface that grips the adhesive better, increasing the lifespan of your installation. Use a high-quality primer suited for your wall type and let it dry completely before adding panels.
Have you noticed how some walls feel slick or smooth? Without priming, adhesives struggle to stick to those surfaces. A quick coat of primer can make all the difference between panels that stay put and those that don’t.
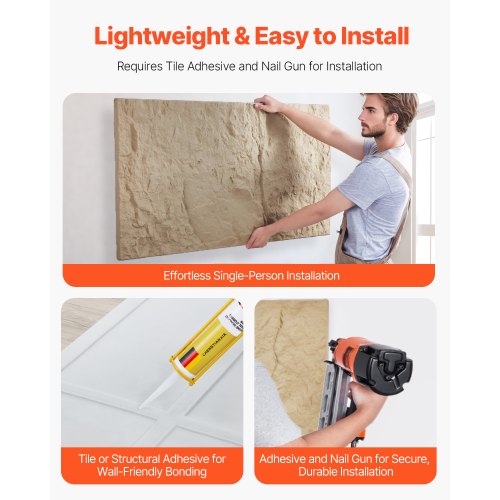
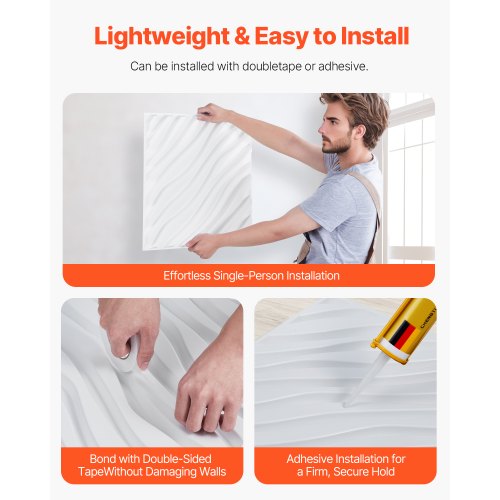
Gathering Tools And Materials
Gather all necessary tools like a measuring tape, adhesive, and a level for smooth installation. Prepare materials such as 3D wall panels and a cutting tool before starting. This helps keep the process organized and efficient.
Gathering Tools and Materials Embarking on a 3D wall panel project can be an exciting venture, but success starts with assembling the right tools and materials. A well-prepared toolkit not only streamlines the process but also ensures that the panels are installed securely and look professional. Let’s dive into the essentials you’ll need to turn your vision into reality.Essential Tools
– Measuring Tape: Accuracy matters. A good measuring tape ensures panels fit perfectly. – Level: Keep your panels aligned. A level is crucial for a polished finish. – Utility Knife: For precise cuts and adjustments. Make sure it’s sharp for clean edges. – Straight Edge or Ruler: Helps guide your cuts. Essential for uniformity. – Pencil or Chalk: Marking reference points keeps your work organized.Adhesives And Fasteners
Choosing the right adhesive can make or break your project. Consider these options: – Construction Adhesive: Offers strong bonding, perfect for heavier panels. – Double-Sided Tape: Ideal for lighter materials. Easy to apply and adjust. – Screws and Anchors: For a more permanent fixture. Ensure compatibility with your wall type.Safety Gear
Your safety is paramount. Equip yourself with: – Safety Glasses: Protect your eyes from dust and debris. – Gloves: Shield your hands while cutting and handling panels. – Dust Mask: Prevent inhalation of particles during installation. By gathering these tools and materials, you’re laying the groundwork for a successful installation. What tools do you find most indispensable for home projects? Share your thoughts in the comments!Planning The Panel Layout
Planning the panel layout is the first step to a smooth installation. It helps avoid mistakes and saves time. A good plan ensures panels fit well and look balanced on your wall.
Start by measuring your wall carefully. Note any outlets, switches, or obstacles. This information guides panel placement and cutting.
Marking Guidelines
Use a pencil and a level to draw straight horizontal lines on the wall. These lines act as guides for panel alignment. Start from the floor or ceiling, depending on your preference.
Mark vertical lines at panel width intervals. This helps position each panel precisely. Double-check measurements to avoid uneven gaps or overlaps.
Dry Fitting Panels
Place panels against the wall without attaching them. This step shows how panels fit together. Check for alignment and any awkward gaps.
Adjust the layout if needed. Dry fitting saves effort later by catching problems early. It also helps visualize the final look.
Cutting Panels To Size
Measure panel sections that need trimming. Use a straight edge and pencil to mark cut lines. Cut panels with a utility knife or saw, depending on material.
Wear safety gear like gloves and goggles during cutting. Smooth edges with sandpaper for a clean finish. Proper cutting ensures panels fit snugly around corners and fixtures.
Installing The Panels
Installing 3D wall panels can transform a room, giving it depth and style quickly. The key to a flawless finish lies in careful handling and precise placement of each panel. Let’s dive into the crucial stages of applying adhesive, positioning the panels, and securing the edges and seams to ensure your wall looks professional and lasts long.
Applying Adhesive
Choose an adhesive that is strong but easy to work with, such as a heavy-duty construction glue. Apply it evenly on the back of the panel in a zigzag or dot pattern to cover enough surface without wasting glue.
Be careful not to apply too much, as excess adhesive can squeeze out and create a mess. If you’ve ever dealt with stubborn glue stains, you’ll know how hard they are to clean, so less is more here.
Positioning Panels
Start from the bottom corner of the wall and work your way up and across. Align the first panel carefully because it sets the tone for the rest.
Press the panel firmly against the wall, holding it in place for a few seconds to ensure the adhesive bonds well. Ask yourself, how straight is your first panel? Use a level to avoid crooked lines that can ruin the look.
Securing Edges And Seams
Once the panels are in place, check the seams for any gaps. Use a flexible caulk or paintable sealant to fill in tiny spaces and create a seamless appearance.
If the edges feel loose, gently tap them with a rubber mallet or apply extra adhesive behind the edges. This little extra effort prevents panels from peeling away over time, keeping your wall flawless.
Finishing Touches
Finishing touches are what turn your 3D wall panels from a simple installation into a striking design feature. These final steps ensure a seamless, polished look that lasts. Paying attention to small details can make a big difference in how professional your walls appear.
Filling Gaps And Seams
Even with careful installation, tiny gaps and seams might appear between panels. Use a flexible caulk or a matching filler to close these spaces. This prevents dust buildup and gives your wall a smooth, continuous surface.
Apply the filler carefully with a putty knife, then wipe away excess before it dries. Let it cure fully to avoid cracking later. Have you noticed how a few small gaps can distract from an otherwise perfect wall?
Painting Or Sealing
Depending on the material of your 3D panels, painting or sealing can enhance durability and appearance. If your panels are unpainted, consider using a primer first to ensure even coverage.
Choose a paint type suitable for your panels—latex for most plastics and wood panels, or specialized sealers for materials like MDF. Adding a clear sealant afterward can protect against moisture and make cleaning easier.
Cleaning Up
After finishing the installation and touch-ups, clean the surface gently to remove dust and smudges. Use a soft cloth or sponge with mild soap and water to avoid damaging the finish.
Dispose of any leftover materials properly and organize your tools for future projects. How much does a clean workspace improve your satisfaction with a home project?
Maintenance Tips
Keeping your 3D wall panels looking fresh and new doesn’t have to be a chore. With the right care, these panels can maintain their striking appearance for years. Let’s look at some practical maintenance tips that you can easily apply to protect your investment.
Regular Cleaning
Dust and dirt can quickly dull the texture and depth of your 3D wall panels. Use a soft cloth or a microfiber duster to gently wipe the surface at least once a week. Avoid harsh chemicals; instead, opt for a mild soap solution if you need a deeper clean.
Have you noticed how a quick dusting instantly brightens your space? That’s the power of regular care. Just remember to dry the panels completely to prevent moisture buildup.
Repairing Damage
Small scratches or dents can happen, but repairing them promptly keeps your wall panels looking flawless. Use a matching filler or putty for minor dings and sand it smooth once dry. Touch up with paint or finish that matches your panel’s color.
If a panel cracks or breaks, consider replacing that section rather than risking a patchy fix. Keeping extra panels from your original purchase can save you time and money when repairs are needed.
Longevity Tips
Think about the environment your panels live in. Excessive moisture or direct sunlight can shorten their lifespan. Place them in spots where they are protected from water splashes and UV rays to keep colors vibrant and materials intact.
- Use a dehumidifier in humid rooms to control moisture levels.
- Install curtains or blinds to block harsh sunlight during peak hours.
- Check the panels periodically for loose edges and secure them quickly.
What small habit can you add today to extend the life of your beautiful wall panels? Often, it’s the consistent little actions that make the biggest difference.
Credit: www.vevor.ca
Frequently Asked Questions
What Tools Are Needed To Install 3d Wall Panels?
You need a measuring tape, adhesive, a level, a utility knife, and a saw. These tools help ensure precise cutting and secure installation.
How Do You Prepare Walls For 3d Panel Installation?
Clean the wall surface thoroughly and repair any holes or cracks. A smooth, dry wall ensures better adhesion and a flawless finish.
Can 3d Wall Panels Be Painted After Installation?
Yes, most 3D wall panels can be painted using acrylic or latex paint. Painting allows customization to match your interior design.
How Long Does It Take To Install 3d Wall Panels?
Installation time varies by wall size but generally takes 2-4 hours for an average room. Preparation and drying time may add extra hours.
Conclusion
Putting up 3D wall panels is simple and fun. Measure your wall carefully before starting. Use the right glue or nails to keep panels strong. Take your time to align each piece well. Clean the surface for better sticking power.
Enjoy the fresh look these panels bring. They add style and texture to any room. Try this project to change your space easily. You will be proud of your new wall.


