
Are you ready to transform your space with stunning 3D wall panels but worried about how to cut them perfectly at home? You’re not alone.
Cutting these panels can seem tricky, but with the right steps, tools, and tips, you can achieve clean, precise cuts without hassle. In this guide, you’ll discover easy-to-follow methods that save you time and prevent costly mistakes. Keep reading to learn how to handle your 3D wall panels like a pro and bring your walls to life with confidence.

Credit: loneoakdesignco.com
Tools Needed
Cutting 3D wall panels at home requires the right tools to ensure clean, precise cuts without damaging the panels. Having the correct equipment not only makes the job easier but also saves you time and frustration. Before you start, check that you have everything ready to avoid interruptions.
Essential Cutting Tools
You will need sharp, reliable tools designed for cutting the material your 3D wall panels are made from, whether it’s PVC, MDF, or foam.
- Utility Knife:Perfect for scoring and snapping thinner panels. Choose one with replaceable blades for sharpness.
- Jigsaw:Ideal for curved or detailed cuts. Use a fine-toothed blade to avoid rough edges.
- Hand Saw:A good option for straight cuts on thicker panels. Look for a saw with a comfortable grip.
- Measuring Tape and Straightedge:Accurate measurements are crucial. Use a metal ruler or a straightedge to guide your cuts.
- Clamps:Hold panels steady during cutting to improve accuracy and safety.
Choosing the right tool depends on your panel’s thickness and design. What kind of shapes do you plan to cut? This will help you pick the best cutting method.
Safety Equipment
Safety should never be an afterthought. Cutting tools can be dangerous without proper protection.
- Safety Glasses:Protect your eyes from dust and debris generated during cutting.
- Dust Mask:Especially important if your panels create fine dust, such as MDF or foam.
- Gloves:Use cut-resistant gloves to protect your hands while handling sharp tools and panels.
- Ear Protection:If you use power tools like a jigsaw, earplugs or earmuffs can prevent hearing damage.
Have you ever underestimated the importance of safety gear and ended up with a minor injury? It’s a reminder that protection pays off every time.
Preparing The Workspace
Preparing your workspace is essential before cutting 3D wall panels. A clean and organized area helps you work safely and accurately. It also makes the process smoother and faster.
Setting up the right environment reduces mistakes and keeps your tools in good condition. Take time to prepare well. This step sets the tone for a successful project.
Clearing The Area
Remove all objects that might get in your way. Clear furniture, decorations, and loose items from the workspace. This prevents accidents and gives you enough room to move freely.
Check the floor for any tripping hazards. Sweep or vacuum dust and debris for a clean surface. A tidy area helps you focus on cutting precisely.
Setting Up A Cutting Surface
Choose a flat and stable surface to cut your panels. A sturdy table or workbench works best. Avoid unstable or uneven surfaces that can cause slips.
Cover the surface with a protective layer. Use plywood or a thick cutting mat to protect your tools and table. This also prevents damage to the panels.
Make sure the surface is large enough to support the panel fully. This helps keep the panel steady during cutting and improves accuracy.
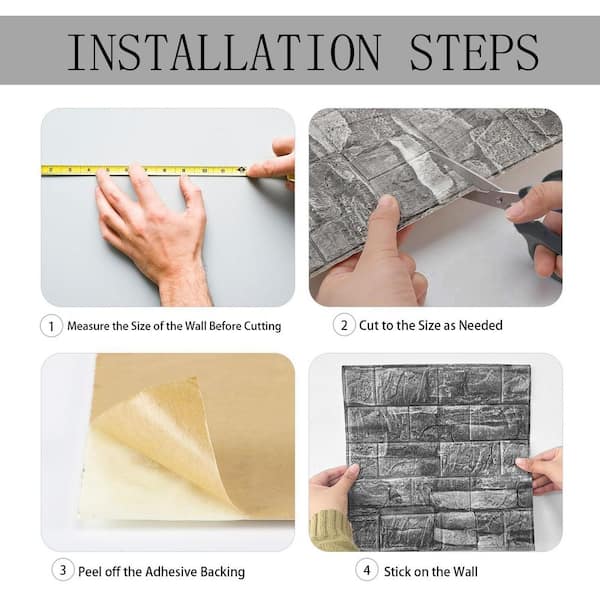
Measuring And Marking
Measure the wall panel carefully to ensure a perfect fit. Mark cutting lines clearly with a pencil for accuracy before starting. Accurate measuring and marking save time and reduce mistakes.
Measuring and marking are crucial steps in the process of cutting 3D wall panels at home. These steps lay the foundation for achieving a professional-looking finish. Whether you’re an experienced DIY enthusiast or a first-timer, precision in these initial stages will ensure your panels fit seamlessly.Accurate Measurements
Start by measuring the area where you intend to install the 3D wall panels. Use a reliable tape measure to capture exact dimensions. Remember, accuracy now will save you from headaches later. Take note of any irregularities in the wall surface. Is there a socket or switch you need to work around? These small details can make a big difference. Consider creating a simple sketch of your wall. This visual aid can help you keep track of measurements and visualize the final layout.Marking Cut Lines
With measurements in hand, it’s time to transfer these onto your panels. Use a pencil to mark cut lines clearly. A straight edge or ruler will help keep your lines precise. Double-check your marks. A second look can catch errors you might have missed. This step is about ensuring your panels fit perfectly. Do you have a favorite tool for marking? Some prefer pencils, while others find fine-tip markers more visible. Choose what works best for you.
Credit: www.homedepot.com
Cutting Techniques
Cutting 3D wall panels requires the right technique to maintain clean edges and preserve the design’s depth. The way you cut depends largely on the panel’s thickness and material. Choosing the proper tool ensures precision and saves you time, especially if you want your installation to look professional.
Using A Utility Knife
For thinner 3D wall panels, a sharp utility knife is your best friend. Score the panel gently along a straightedge multiple times instead of trying to cut through in one go. This approach prevents cracking and keeps the edges sharp.
Make sure your blade is fresh—dull blades cause ragged cuts and frustration. If you’re working with foam or PVC panels, this method gives you the control needed for detailed cuts around outlets or corners. Have you noticed how a slow, steady hand can make a huge difference in the finish?
Using A Saw For Thicker Panels
Thicker panels demand a saw for clean, efficient cutting. A fine-toothed handsaw or a jigsaw with a fine blade works well for these materials. Keep the saw steady and let the tool do the work to avoid splintering.
Using a saw also allows you to tackle intricate shapes if you need to cut curves or notches. Remember to secure the panel firmly on a workbench to prevent movement. Have you experienced how a stable workspace can transform a tricky cut into a smooth one?
Handling Curved Or Irregular Cuts
Cutting 3D wall panels to fit curved or irregular spaces can feel tricky. These shapes don’t follow straight lines, so simple cuts won’t work well. Handling these cuts carefully ensures your panels fit perfectly and look professional on your walls.
Scoring And Snapping
Scoring is a great way to make controlled cuts on 3D panels. Use a utility knife to lightly score along the curve or irregular line you need. The goal is to weaken the panel just enough so you can snap it cleanly along the score.
Try using a straight edge or flexible ruler to guide your scoring on gentle curves. For sharper curves, score in smaller sections. This approach prevents cracking or uneven breaks.
Have you ever tried snapping a panel without scoring first? It usually leads to jagged edges and wasted material. Scoring gives you control and saves you from costly mistakes.
Using Templates
Templates are your best friend when dealing with complex shapes. Create a paper or cardboard template matching the curve or irregular area you need to fill. Trace this shape onto your 3D panel before cutting.
Templates let you test fit multiple times without damaging your panels. You can adjust the shape on paper until it fits perfectly, then transfer it confidently to the panel.
Consider using painter’s tape to temporarily hold the template on the wall. This helps you check alignment and make any last-minute tweaks. Have you used templates for other projects? They reduce guesswork and improve accuracy dramatically.
Credit: www.homedepot.com
Finishing Edges
Finishing the edges of your 3D wall panels is crucial for a polished and professional look. Sharp or uneven edges can distract from the overall design and may even cause damage over time. Taking the time to properly finish these edges ensures your panels blend seamlessly with your walls and stand the test of time.
Sanding Rough Edges
After cutting your panels, you’ll often find rough or uneven edges that need smoothing. Use fine-grit sandpaper to gently sand down any bumps or splinters. Move in a circular motion and check frequently to avoid over-sanding.
Sanding not only improves the look but also prevents future chipping or peeling. If you feel any sharpness, keep sanding until the edge feels smooth to the touch. Have you noticed how a small amount of sanding can transform the entire panel’s appearance?
Sealing And Painting Tips
Sealing your panel edges protects them from moisture and wear. Choose a clear sealant that suits your panel material—water-based sealants work well for most foam or composite panels. Apply the sealant with a small brush, focusing on the edges and corners.
Once sealed, you can paint your panels to match your room’s style. Use a primer first to ensure even coverage and better paint adhesion. Then, apply thin coats of paint, letting each coat dry fully before adding the next.
Consider using flexible paint if your panels have any slight movement. This helps avoid cracking over time. What colors or finishes would best complement your space and highlight your 3D design?
Common Mistakes To Avoid
Caring for your 3D wall panels during cutting is key to a neat finish. Avoiding common mistakes saves time and materials. Focus on precision and tool choice for better results.
Misaligned Cuts
Cutting panels off-line causes gaps and uneven edges. Measure twice, cut once. Mark the cutting line clearly with a pencil or masking tape. Keep the panel steady while cutting to prevent slips. Align the cutting tool carefully along the marked line. Avoid rushing the cut to maintain accuracy.
Improper Tool Use
Using wrong tools can damage the panels or create rough edges. Choose a sharp utility knife or fine-tooth saw designed for panel materials. Dull blades cause tearing and uneven cuts. Hold tools firmly and cut slowly for control. Always wear safety gear like gloves and goggles. Avoid forcing tools through the material to keep cuts clean.
Maintaining Tools
Maintaining your tools is key to cutting 3D wall panels effectively and safely. Sharp, clean blades make precise cuts and reduce the chance of damaging the panels. Neglecting your tools can lead to frustration and poor results, even if you follow all cutting instructions.
Cleaning Blades
After each use, remove any dust, glue, or debris stuck on the blade. This buildup can dull the blade quickly and cause uneven cuts. Use a soft brush or cloth with a bit of rubbing alcohol to wipe the blade clean.
Have you noticed how a clean blade cuts smoother and feels easier to push? That’s because debris adds friction. Don’t rush this step—it saves time and headache in the long run.
Proper Storage
Store your blades and cutting tools in a dry, organized space to prevent rust and damage. Avoid tossing them into a drawer with other tools where they can get nicked or bent.
Consider a tool case or a magnetic strip on the wall to keep blades separated and protected. When tools are easy to find and ready to use, you’ll work faster and more confidently.
Frequently Asked Questions
How Do You Safely Cut 3d Wall Panels At Home?
Use a sharp utility knife or fine-tooth saw for clean cuts. Always wear safety gloves and goggles to protect yourself. Measure twice, cut once, and work on a flat surface for accuracy. Proper tools and caution ensure safe, precise cutting.
What Tools Are Best For Cutting 3d Wall Panels?
A utility knife, fine-tooth saw, or jigsaw work best. Choose tools based on panel material, like foam or wood. Sharp blades ensure smooth edges and reduce panel damage. Always use safety gear while cutting.
Can I Cut 3d Wall Panels Without Damaging Them?
Yes, by using sharp tools and gentle pressure. Score the panel lightly before cutting fully. Avoid forcing the blade to prevent cracks or chips. Taking your time guarantees a clean, damage-free cut.
How To Measure 3d Wall Panels Before Cutting?
Measure the wall area precisely using a tape measure. Mark panels with a pencil or chalk for accuracy. Double-check measurements before cutting to avoid mistakes. Accurate measuring prevents wasted materials and ensures a perfect fit.
Conclusion
Cutting 3D wall panels at home is simple with the right tools. Measure carefully and mark your cuts clearly. Use a sharp utility knife or saw for clean edges. Take your time to avoid mistakes and ensure safety. Practice on a small piece before cutting the main panel.
Following these steps helps you achieve a neat, professional look. Enjoy your new wall design and the satisfaction of doing it yourself.


