
Your entryway is the first thing guests see when they step into your home. Imagine having a beautiful, custom-made table that perfectly fits your style and space.
Making your own entryway table is easier than you think, and it gives you full control over the design and materials. In this guide, you’ll discover simple steps to create a stunning table that welcomes everyone with warmth and charm.
Ready to transform your entryway into a space you’ll love? Let’s get started!

Credit: www.youtube.com
Choosing The Right Design
Choosing the right design for your entryway table is key to making a functional and stylish piece. It sets the tone for your home’s first impression. Focus on style, size, and materials to create a table that fits your space and taste.
Selecting A Style
Pick a style that matches your home’s decor. Modern, rustic, or traditional designs each bring a different feel. Think about the shapes and lines you like. Simpler styles often work well in small spaces.
Measuring Your Space
Measure the area where you want the table. Note width, height, and depth. Leave enough room for walking and other furniture. Accurate measurements help avoid buying or building a table that is too big or small.
Picking Materials
Choose materials based on durability and look. Wood is warm and classic. Metal offers a sleek, modern touch. Consider how much wear the table will get. Materials should be easy to clean and maintain.
Gathering Tools And Supplies
Gather tools like a saw, drill, screws, and measuring tape before starting. Gather wood, paint, and sandpaper to prepare materials. Having everything ready makes building easier and faster.
Gathering the right tools and supplies ensures a smooth table-making process. Having everything prepared saves time and reduces frustration. Here’s what you need to get started on crafting your own entryway table.Essential Tools
A few basic tools are necessary for building your table. These tools help in cutting, assembling, and finishing the wood.- Saw: A handsaw or circular saw for cutting wood.
- Drill: For making holes and driving screws.
- Measuring tape: To ensure accurate dimensions.
- Level: Keeps your table balanced and straight.
- Hammer: For nailing and securing pieces together.
- Screwdriver: Useful for tightening screws.
- Sandpaper: Smooths out rough edges.
Recommended Materials
Choose materials that suit your style and budget. Wood is the most common choice, but other materials can add flair.- Wood planks: Choose a type that fits your décor.
- Wood glue: Ensures strong bonds between pieces.
- Nails and screws: Securely join your table parts.
- Paint or stain: Provides a finished look.
- Varnish: Protects the wood surface.
Safety Gear
Safety is crucial during the building process. Protect yourself with the right gear.- Safety glasses: Shield your eyes from debris.
- Gloves: Protect your hands from splinters.
- Dust mask: Prevents inhalation of sawdust.
- Ear protection: Reduces noise from power tools.
Preparing The Workspace
Preparing your workspace is an important first step to making your own entryway table. A clean and organized area helps you focus and work faster. It also keeps your tools and materials easy to reach. A good setup reduces mistakes and improves safety. Taking time to prepare will make the building process smoother and more enjoyable.
Setting Up Your Area
Choose a space with enough room to move around. The area should have good lighting to see details clearly. A flat, sturdy surface is best for assembling and measuring. Clear the floor to avoid tripping hazards. Keep the workspace free from clutter and distractions. Make sure there is good ventilation if you use paints or stains.
Organizing Materials
Gather all the wood, screws, nails, and other materials before starting. Sort the tools you will need, such as a saw, drill, and measuring tape. Arrange materials by size or type for easy access. Use containers or trays to hold small items like screws and nails. Double-check your list to ensure nothing is missing. This saves time and avoids interruptions during work.
Ensuring Safety
Wear protective gear such as gloves, goggles, and a dust mask. Keep a first aid kit nearby in case of minor injuries. Ensure power tools are in good condition and have safety guards. Avoid loose clothing and tie back long hair. Keep children and pets away from your workspace. Follow safety instructions for all tools and materials used.

Credit: www.youtube.com
Cutting And Assembling Parts
Cutting and assembling parts is the heart of building your own entryway table. Precise measurements and clean cuts ensure your table fits perfectly and looks great. Careful joining of parts creates a strong, stable piece of furniture. Each step requires focus and simple tools.
Measuring And Marking
Start by measuring each piece of wood carefully. Use a tape measure for accuracy. Mark the cutting lines clearly with a pencil. Double-check your marks before cutting. Clear marks help avoid mistakes and wasted material. Take time to measure twice and cut once.
Cutting Techniques
Choose the right saw for your wood type and thickness. A circular saw works well for straight cuts. Use a fine-toothed blade for smooth edges. Cut slowly along the marked lines to keep accuracy. Sand the edges lightly after cutting for a neat finish.
Joining Components
Arrange the cut pieces to check the fit. Use wood glue on edges for a strong bond. Clamp the parts together while the glue dries. For extra strength, add screws or nails. Drill pilot holes to prevent wood from splitting. Keep the joints tight and flush for a clean look.
Sanding And Finishing
Sanding and finishing give your entryway table a smooth and polished look. This process protects the wood and highlights its natural beauty. Proper sanding removes rough spots and prepares the surface for paint or stain. Finishing adds color and seals the wood for long-lasting durability.
Sanding Tips
Start with coarse sandpaper to remove rough areas quickly. Use 80-grit sandpaper for the first pass. Next, switch to medium grit like 120 to smooth the surface. Finish with fine sandpaper, 220 grit, for a silky feel.
Sand in the direction of the wood grain to avoid scratches. Use a sanding block for flat surfaces and sandpaper sheets for edges. Clean dust with a tack cloth before painting or staining.
Applying Paint Or Stain
Choose paint or stain based on your style. Stain brings out the wood’s natural patterns. Paint offers more color options and covers imperfections.
- Apply stain with a clean cloth or brush in long strokes.
- Wipe off excess stain to avoid blotches.
- Use a foam roller or brush for even paint coverage.
- Apply thin coats and let each layer dry fully before the next.
Sealing For Durability
Seal your table to protect it from scratches and spills. Use polyurethane, varnish, or a clear wax finish. These create a hard surface that lasts.
- Choose a water-based sealer for quick drying and low odor.
- Apply thin, even coats with a synthetic brush.
- Lightly sand between coats with fine sandpaper for smoothness.
- Apply at least two to three coats for strong protection.
Adding Final Touches
Adding final touches to your entryway table gives it character and charm. These details make your project look polished and complete. Small choices can have a big impact on the overall style.
Attaching Hardware
Choose hardware that fits your table’s style. Simple knobs bring a clean look. Ornate handles add a vintage feel. Use a drill for secure attachment. Make sure screws are tight but not too tight. Test drawers or doors to ensure smooth movement.
Decorative Elements
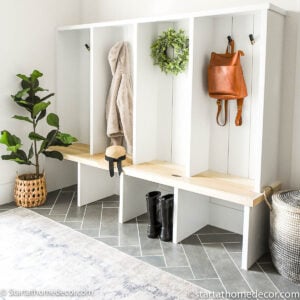
Decorate your table with items that reflect your taste. A small vase with fresh flowers brightens the space. Place a tray for keys and mail. Add a framed photo or artwork for a personal touch. Keep decorations balanced to avoid clutter.
Placement Ideas
Position your table near the front door for convenience. Leave enough space around it to move freely. Consider placing a mirror above the table to open the space. Use a small rug underneath for warmth and style. Make sure the table is stable on the floor.
Common Mistakes To Avoid
Building your own entryway table is rewarding but can be tricky. Avoiding common mistakes saves time and frustration. This section covers key errors to watch for during the process. Keep these tips in mind to create a sturdy and attractive table.
Measurement Errors
Incorrect measurements lead to poor fit and imbalance. Always double-check dimensions before cutting materials. Measure the space where the table will go. Consider doorways and hallways for easy movement. Mark measurements clearly on your wood or materials. Use a reliable tape measure and level for accuracy.
Material Selection Issues
Choosing the wrong materials affects durability and appearance. Avoid soft woods that easily dent or scratch. Select wood or materials suited for furniture, like oak or plywood. Consider the finish and color to match your home style. Check for moisture damage or warping before buying. Quality materials make the table last longer and look better.
Assembly Problems
Improper assembly causes wobbling and weak joints. Use the right screws and tools for your materials. Follow instructions or plans step-by-step without rushing. Pre-drill holes to prevent wood from splitting. Tighten screws evenly to keep the table stable. Test the table for sturdiness before finishing it.
Credit: startathomedecor.com
Frequently Asked Questions
What Materials Do I Need For An Entryway Table?
You need wood, screws, sandpaper, paint or stain, and a drill. Choose quality wood for durability and finish for style.
How Do I Choose The Right Size For My Table?
Measure your entryway space carefully. Pick a table width that fits without crowding or blocking walkways.
Can I Customize The Design Of My Entryway Table?
Yes, you can choose styles, colors, and storage options. Personalize it to match your home decor perfectly.
How Long Does It Take To Build An Entryway Table?
Building usually takes a few hours to a day. Time depends on your skill level and table complexity.
Conclusion
Making your own entryway table is a fun and rewarding project. You can choose the style and size that fits your space. Using simple tools and materials saves money. Each step helps build your skills and confidence. A handmade table adds a personal touch to your home.
Try adding a fresh coat of paint or stain for a unique look. Enjoy the process and the finished piece every day. Start today, and create a table you will love.


