
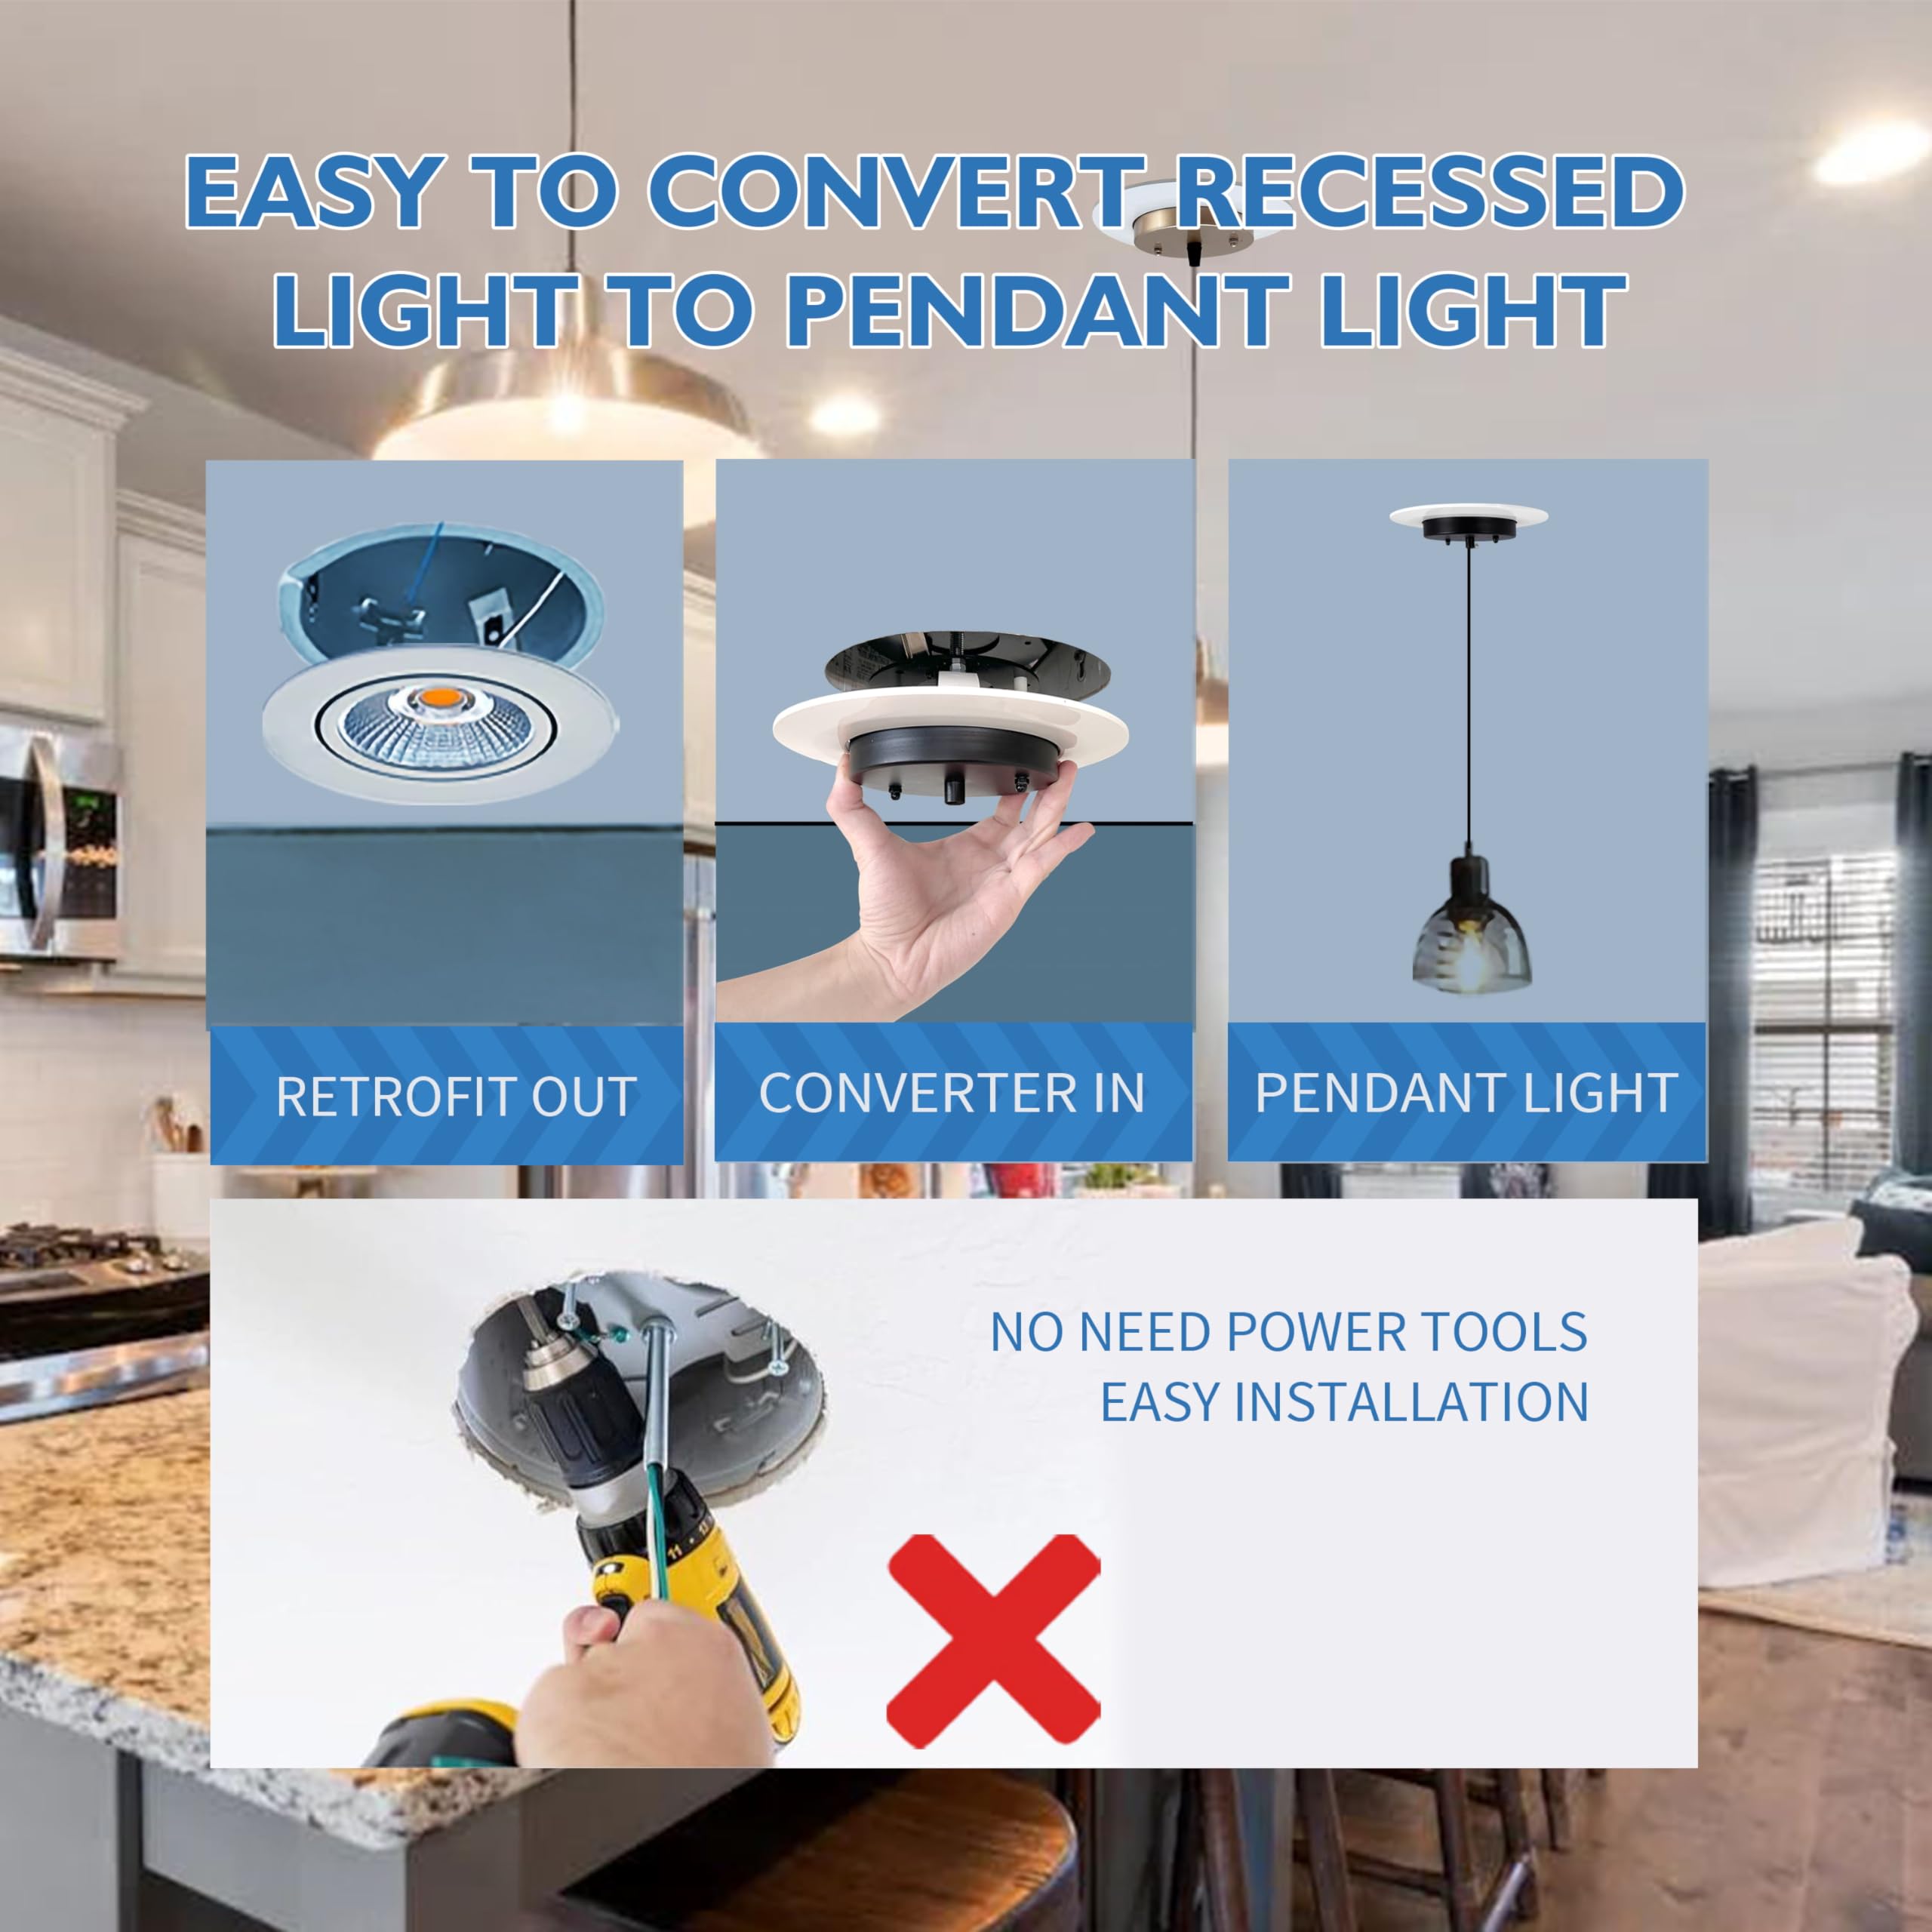
Are you tired of your plain can lights and ready for a stylish change? Swapping out a can light for a pendant light can instantly transform the look and feel of your space.
It’s easier than you might think, even if you’re not a lighting expert. In this guide, you’ll discover simple, step-by-step instructions to make the switch safely and beautifully. Imagine the cozy glow and unique style a pendant light can bring to your room—let’s make that vision a reality together.
Keep reading, and you’ll have your new lighting shining in no time.
Tools And Materials Needed
Replacing a can light with a pendant light requires specific tools and materials. Having everything ready makes the process smooth and safe. This section covers all essentials to prepare before starting your project.
Essential Tools
- Screwdriver (both flathead and Phillips)
- Wire stripper and cutter
- Voltage tester
- Drill with bits
- Measuring tape
- Wire nuts
- Step ladder
- Pencil for marking
- Safety glasses
- Work gloves
Necessary Materials
- Pendant light fixture
- Mounting bracket (usually included with pendant)
- Electrical box (if replacing or upgrading)
- Electrical tape
- Light bulbs compatible with the pendant fixture
- Wall anchors and screws (if needed for mounting)
Safety Equipment
- Non-contact voltage tester to ensure power is off
- Gloves to protect hands from sharp edges
- Safety glasses to shield eyes during drilling
Safety Precautions
Turn off the power at the circuit breaker before starting any electrical work. Use a voltage tester to confirm no electricity flows to the light fixture. Wear safety glasses and gloves to protect against debris and sharp edges.
Swapping out a can light for a pendant light can revamp a room, giving it a more modern and personalized look. However, before you grab your tools, it’s crucial to prioritize safety. Ignoring safety precautions can lead to accidents, electric shocks, or even fire hazards. Here’s a guide to ensure you’re fully protected while adding that touch of elegance to your space.Turn Off The Power
First and foremost, ensure your safety by turning off the power to the light fixture at the circuit breaker. Don’t just rely on the light switch, as electricity may still flow through the wires. Use a voltage tester to confirm there’s no power before proceeding.Wear Safety Gear
Wearing appropriate safety gear can protect you from unexpected incidents. Equip yourself with goggles to shield your eyes from dust and debris, and wear gloves to prevent cuts or scratches. A sturdy ladder can ensure stability and prevent falls.Use The Right Tools
Having the right tools not only makes the job easier but also safer. Make sure you have a reliable screwdriver, wire strippers, and a voltage tester. Using improper tools can cause damage to the fixture or, worse, result in injury.Secure The Work Area
Clear the area around your workspace to avoid tripping hazards. Remove any fragile items and ensure pets and children are kept at a safe distance. This will help you focus on the task without unnecessary distractions.Check The Fixture Weight
Ensure the ceiling can support the weight of the new pendant light. Overloading the ceiling can lead to structural damage or accidents. Consult the fixture’s manual for weight specifications and consider reinforcing the ceiling if necessary.Connect Wires Properly
Correct wiring is crucial to prevent electrical issues. Follow the manufacturer’s instructions to match wire colors and secure connections with wire nuts. A secure connection prevents short circuits and ensures the light functions properly.Test The Installation
Before finalizing the installation, test the fixture to ensure it’s working correctly. Restore power at the circuit breaker and use the switch to turn on the light. This step ensures everything is correctly installed and safe to use. By considering these precautions, you not only protect yourself but also ensure the longevity of your new pendant light. Have you ever experienced a DIY mishap due to ignored safety steps? Share your story and what you learned in the comments below.Turning Off Power
Before you start swapping out your can light for a stylish pendant, the first and most important thing is to turn off the power. This step protects you from electric shocks, which can be dangerous or even deadly. It might feel tempting to skip this part if you think you’re just doing a quick swap, but trust me, it’s worth the extra caution.
Locate Your Circuit Breaker
Head straight to your home’s circuit breaker panel. You’ll usually find it in a basement, garage, or utility room. Open the panel door and look for the switch that controls the lighting circuit where your can light is installed.
If you’re unsure which breaker controls the light, flip the main breaker off to cut power to the entire house. This is your safest bet before starting any electrical work.
Use A Voltage Tester
After switching off the breaker, don’t just assume the power is off. Grab a voltage tester or a non-contact voltage detector to check the wires in the ceiling box. This tool will tell you if any electricity is still flowing.
I once skipped this step and was shocked when the tester showed live wires. That moment reminded me to always double-check, no matter how sure I am about the breaker.
Inform Others And Post A Reminder
If you live with family or roommates, let them know you’re working on the lights and that the power is off. This helps avoid someone accidentally flipping the breaker back on while you’re working.
Stick a note on the circuit breaker panel as a clear reminder. This small action can prevent an unexpected power surge that could harm you or damage your new pendant light.
Removing The Can Light
Removing the can light is the first important step in installing a pendant light. This process involves safely detaching the visible parts and carefully handling the electrical connections. Taking your time ensures a smooth transition from the old fixture to the new one.
Detaching The Trim And Bulb
Start by removing the trim, the outer ring that holds the bulb in place. Most trims either snap off or twist counterclockwise. Gently pull the bulb out of the socket. Use a cloth if the bulb is hot to avoid burns.
Disconnecting The Wiring
Turn off the power at the circuit breaker to prevent shocks. Use a voltage tester to confirm the power is off. Unscrew the wire nuts connecting the can light wires. Carefully separate the black, white, and ground wires.
Taking Out The Housing
The housing is the metal box inside the ceiling. Release any clips or screws holding it in place. Some housings require bending tabs to free them. Slowly pull the housing out through the ceiling hole.
Preparing The Ceiling
Preparing the ceiling is a key part of replacing a can light with a pendant light. This process ensures the new fixture fits well and looks polished. Begin by examining the current setup carefully. Check the hole size and condition before making changes. A clean, smooth opening helps the pendant light install securely and safely.
Assessing The Existing Hole
Start by measuring the diameter of the can light hole. Use a tape measure or ruler for accuracy. Look for any damage around the edges. Cracks or rough spots might need repair before proceeding. Also, check the ceiling material type—drywall, plaster, or something else. This affects how to handle the hole and mounting.
Adjusting The Opening For Pendant
Pendant lights often need a larger or differently shaped opening. Mark the new size with a pencil around the existing hole. Use a drywall saw or keyhole saw to cut carefully. Smooth the edges with sandpaper to avoid rough spots. Make sure the opening fits the pendant’s mounting bracket snugly. A proper fit prevents wobbling and ensures safety.
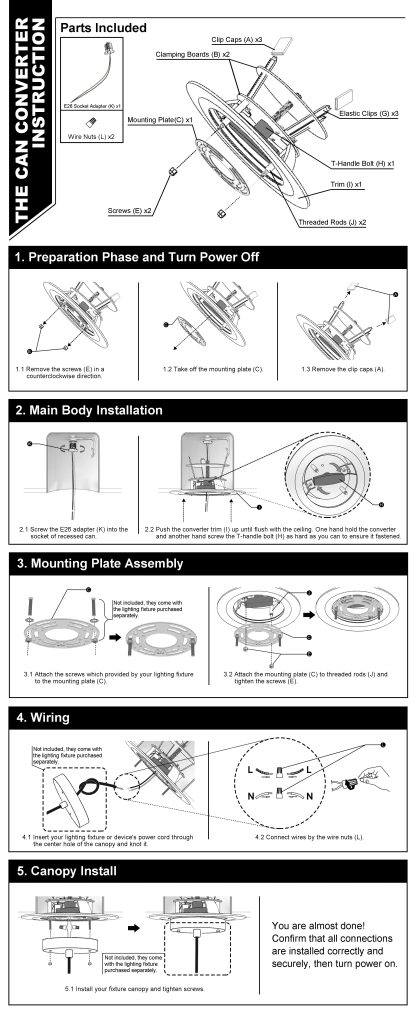
Installing The Mounting Bracket
Installing the mounting bracket is a key step in replacing a can light with a pendant light. This bracket holds the new light fixture securely to the ceiling. It must be attached properly for safety and stability.
The bracket usually comes with the pendant light kit. It fits around the electrical box left by the can light. Tightening it correctly ensures the pendant will hang straight and steady.
Gathering Necessary Tools And Materials
Prepare the tools before starting. You will need:
- A screwdriver (usually Phillips or flathead)
- Wire strippers
- Voltage tester
- Electrical tape
- The mounting bracket and screws from the pendant light kit
Ensuring Power Is Turned Off
Safety first. Switch off the circuit breaker for the room. Use a voltage tester to confirm no electricity flows to the wires.
Attaching The Bracket To The Electrical Box
Place the mounting bracket over the electrical box. Align the screw holes. Use screws to secure the bracket tightly. It should not wobble or shift.
Checking For Stability And Proper Fit
Give the bracket a gentle shake. It should stay firm. The pendant light’s weight will rest on this bracket. A solid fit prevents future problems.
Wiring The Pendant Light
Wiring the pendant light is a crucial step in replacing a can light. It involves connecting the wires properly to ensure safety and functionality. Taking time to wire the pendant light correctly can prevent electrical problems.
Matching Wires Correctly
Identify the wires from the ceiling and the pendant light. Usually, black or red wires are hot, white wires are neutral, and green or bare wires are ground. Match each wire from the pendant light to the same color wire in the ceiling.
Use wire strippers to remove about half an inch of insulation from the wire ends. This allows a clean connection. Avoid mixing wire colors. Wrong connections can cause shorts or shocks.
Securing Wire Connections
Twist the matching wires together clockwise. Use wire nuts to cover the twisted wires securely. Make sure no bare wire is exposed outside the wire nut.
Give each wire nut a gentle tug to check for a tight fit. Wrap electrical tape around the wire nuts for extra safety. Properly secured connections keep the pendant light stable and safe.
Credit: www.amazon.com
Attaching The Pendant Fixture
Attaching the pendant fixture is a crucial step that transforms your ceiling from plain to stylish. It requires careful handling to ensure safety and a polished look. Let’s break down the process so you can confidently install your new pendant light.
Preparing The Ceiling Box And Mounting Bracket
Start by inspecting the ceiling box to make sure it’s secure and can support the weight of your pendant light. If the box moves or feels loose, tighten the screws or replace it with a sturdier one designed for heavier fixtures.
Next, attach the mounting bracket that came with your pendant light to the ceiling box. This bracket holds the fixture firmly in place. Check that it’s aligned correctly and fasten it tightly to avoid any wobbling later.
Connecting The Electrical Wires
Turn off the power at your circuit breaker before touching any wires. Match the wires from your pendant light to the wires in the ceiling box by color—usually black to black (hot), white to white (neutral), and green or copper to ground.
Use wire nuts to securely join the wires, and wrap each connection with electrical tape for extra safety. Ask yourself: Are these connections tight enough to avoid flickering or shorts? Double-checking now saves headaches later.
Securing The Pendant Fixture To The Mounting Bracket
Lift the pendant light and align it with the mounting bracket. Most fixtures use screws or decorative nuts to hold the canopy flush against the ceiling.
Take your time here. If the canopy isn’t snug, it can look unfinished or even fall. Tighten the screws evenly to keep the fixture stable and level.
Adjusting The Pendant Height
Many pendant lights let you change the hanging length. Before fully tightening everything, adjust the cord or chain to your preferred height.
Think about the room’s purpose: Do you want the light closer for task lighting or higher for ambient glow? Adjusting the height now avoids awkward repositioning later.
Final Safety Check And Power Restoration
After securing the fixture, inspect all connections and mounting points one last time. Give the fixture a gentle shake to test stability.
Once confident, restore power at the breaker and test the light switch. Does your new pendant light brighten the room just as you imagined? If yes, you’ve nailed the installation!
Testing The New Light
Testing the new pendant light is a crucial step after installation. It ensures the wiring is correct and the fixture works as expected. This process helps avoid electrical issues and guarantees safety. Follow these simple checks to confirm your new light is ready to use.
Turn On The Power
Restore power at the circuit breaker. Use the light switch to turn on the pendant. Watch carefully to see if the light illuminates without flickering or dimming.
Check The Light Fixture
- Confirm the bulb is properly screwed in.
- Look for any loose parts or wires.
- Ensure the pendant hangs securely and straight.
Test The Switch Operation
Flip the switch on and off several times. The light should respond immediately each time. No delays or buzzing sounds should occur.
Inspect For Safety Issues
Feel the fixture’s base for heat. It should not be too hot. Smell near the fixture to detect any burning odors. If anything seems unusual, turn off the power and recheck wiring.
Credit: www.amazon.com
Troubleshooting Common Issues
Replacing a can light with a pendant light can sometimes present challenges that may leave you scratching your head. Understanding and troubleshooting common issues can make the process smoother and more enjoyable. Let’s dive into some frequent problems and how to solve them.
Compatibility Issues
Not all pendant lights are compatible with existing can light fixtures. Before purchasing, ensure your new pendant light fits the existing housing. Check the size and type of the mounting bracket to avoid unnecessary returns.
Installation Height Adjustments
Sometimes, the pendant light may hang too low or too high. Adjusting the chain or rod length can fix this issue. Always consider the room’s ceiling height and how the light will affect the room’s ambiance.
Electrical Connection Problems
Loose or incorrect wiring can lead to flickering or non-functional lights. Double-check all connections and ensure the wires are securely fastened. If you’re unsure, consulting with a professional can prevent potential hazards.
Weight Support Concerns
Pendant lights can be heavier than can lights, requiring additional support. Ensure the electrical box is rated to support the weight of the new fixture. Reinforce the ceiling if necessary to avoid future mishaps.
Aesthetic Mismatches
Sometimes, the new pendant light might not complement the room’s decor. Consider the color, material, and design before installation. Visual harmony can elevate the entire space, making the light a statement piece.
Encountering these common issues can be a minor setback, but addressing them effectively ensures a successful installation. Have you faced any unique challenges while replacing lights? Share your experiences and solutions in the comments!

Credit: www.xhlux.com
Frequently Asked Questions
How Do I Safely Remove A Can Light Fixture?
Turn off the power at the circuit breaker first. Unscrew the can light trim and bulb. Disconnect the wiring carefully and remove the fixture from the ceiling.
Can I Use The Existing Wiring For A Pendant Light?
Yes, you can use the existing wiring if it’s in good condition. Verify the wiring supports the new fixture’s voltage and amperage before installation.
What Tools Are Needed To Replace Can Light With Pendant?
You’ll need a screwdriver, wire stripper, voltage tester, wire nuts, and possibly a drill. These tools help ensure a safe, secure installation.
How To Choose The Right Pendant Light Size?
Measure the ceiling height and room size. Pick a pendant that complements the space and provides adequate light without overpowering the room.
Conclusion
Replacing a can light with a pendant light can change a room’s look. It adds style and better light where you need it. The process is simple if you follow the right steps. Always turn off power before starting work.
Use the correct tools and take your time. With patience, you can do this safely and well. Enjoy your new light and the fresh feel it brings. Ready to brighten your space? This upgrade is worth the effort.


