
Are you tired of your plain recessed lights and want to add a touch of style to your room? Converting a recessed light to a pendant light can completely transform the look and feel of your space.
Imagine a beautiful pendant hanging from your ceiling, creating a warm, inviting atmosphere that draws everyone’s attention. In this guide, you’ll discover simple steps to make this switch yourself, saving money and adding personality to your home. Keep reading, and by the end, you’ll have the confidence to upgrade your lighting in a way that suits your style perfectly.

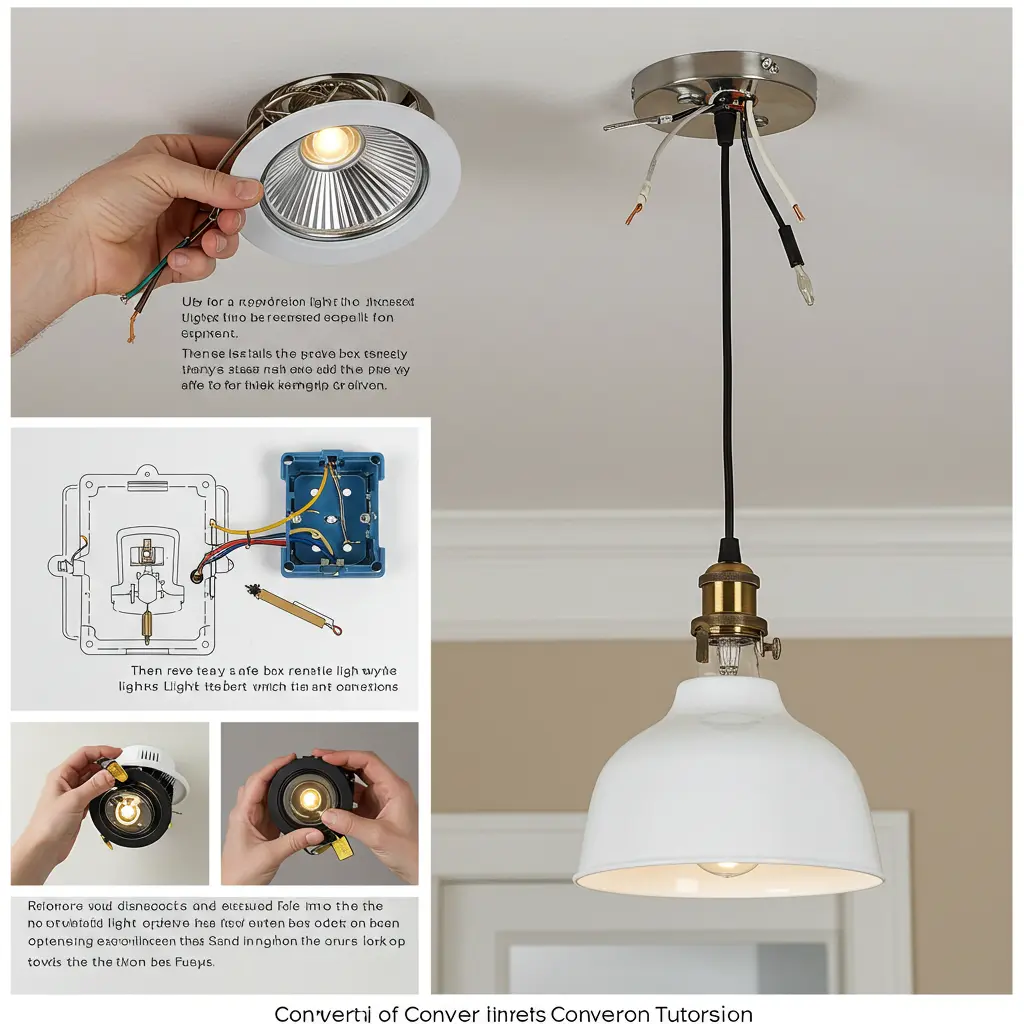
Credit: www.create-enjoy.com
Tools And Materials Needed
Converting a recessed light to a pendant light requires specific tools and materials. Having the right items ensures a smooth and safe installation. This section covers everything needed to get started on this project.
Essential Tools
- Voltage tester to check power safety
- Wire stripper for clean wire ends
- Drill with appropriate bits
- Screwdriver set for mounting hardware
- Measuring tape for accurate placement
- Wire nuts for secure connections
- Utility knife for cutting ceiling material
- Ladder to reach the ceiling safely
Choosing The Right Pendant Light
Select a pendant light that fits your room size. Consider the style that matches your decor. Check the weight to ensure your ceiling can support it. Look for lights with adjustable cords for flexible hanging height. Opt for energy-efficient bulbs to save on electricity.
Safety Gear
- Insulated gloves to protect against electric shock
- Safety glasses to guard your eyes
- Dust mask to avoid inhaling particles
- Protective clothing to keep skin safe
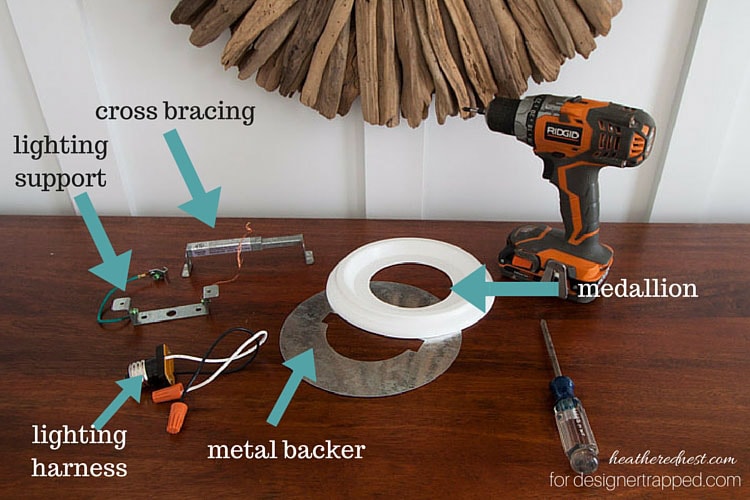
Credit: designertrapped.com
Preparing The Workspace
Preparing your workspace is the foundation of a smooth and safe conversion from a recessed light to a pendant. Taking the time to set up properly can save you from unexpected hiccups later. It also ensures you work efficiently and avoid hazards.
Turn Off Power
Safety must be your top priority. Before touching any wires, switch off the power at the circuit breaker. Don’t just rely on the light switch being off—cutting power completely prevents electric shocks.
Use a voltage tester to double-check that the wires are dead. This extra check gives you peace of mind to work confidently.
Clear The Area
Remove furniture, rugs, and decorations near your workspace to avoid damage. You want plenty of room to move around and lay out your tools.
Cover the floor with a drop cloth or old sheet to catch dust and debris. This simple step makes cleanup faster and keeps your home tidy.
Gather Supplies
Having everything ready before you start cuts down on frustration. Make a checklist including:
- New pendant light fixture
- Wire strippers and screwdrivers
- Voltage tester
- Wire nuts and electrical tape
- Measuring tape and ladder
Think about your specific pendant’s installation instructions and any extra parts you might need. Being prepared means you won’t stop midway to hunt for forgotten tools.
Removing The Recessed Light
Removing a recessed light involves turning off power and carefully detaching the fixture from the ceiling. Disconnect wires and remove the housing to prepare for installing a pendant light. This process creates space and wiring access for the new pendant fixture.
Transitioning your home lighting from recessed lights to pendant lights can dramatically change the ambiance and style of a room. However, before enjoying the new glow, you need to carefully remove the existing recessed light. This task might seem daunting, but with a little patience and attention to detail, you can do it safely and efficiently. Here’s how you can start by removing the recessed light.Detach The Trim And Housing
Begin by ensuring the power to the light fixture is turned off at the circuit breaker. Safety should always be your first priority. Once confirmed, gently remove the trim of the recessed light using a flathead screwdriver to pry it off if necessary. With the trim removed, you will see the housing. The housing is usually secured with clips or screws inside the ceiling. Loosen these carefully and lower the housing. If it’s a retrofit light, it might just be clipped in place, making it easier to take out.Disconnect Wiring Safely
Now that the housing is out, the next step involves dealing with the wiring. Identify the wiring connections inside the junction box. Typically, these will be secured with wire nuts. Carefully unscrew the wire nuts to disconnect the wires. Take note of the wire colors and connections for your new pendant light. This step is crucial for ensuring your new fixture will be connected correctly. Are you considering changing the light in your kitchen or perhaps the dining room? Remember, each room might present different challenges, so adapt accordingly. Taking on this project not only saves money but also gives you the satisfaction of enhancing your home’s style. What room will you transform next?Installing The Pendant Mount
Installing the pendant mount is a crucial step when converting a recessed light to a pendant fixture. This process ensures your new light hangs securely and safely from the ceiling. Taking your time here will make the difference between a stable setup and a wobbly, risky fixture.
Attach The Mounting Bracket
The mounting bracket acts as the foundation for your pendant light. Start by aligning the bracket with the electrical box in the ceiling. Use the screws provided with your pendant kit to attach the bracket firmly.
Make sure the bracket is flush against the ceiling to avoid any gaps. If the bracket feels loose, check for damaged or oversized holes. Tighten screws evenly to keep the bracket level, which will help your pendant hang straight.
Have you ever noticed a pendant that swings or tilts? Often, that’s because the mounting bracket wasn’t secured properly. Avoid that issue by double-checking your work before moving on.
Secure The Electrical Box
The electrical box must support the weight of your new pendant light. If your recessed light’s box is plastic or too small, replace it with a metal box designed for heavier fixtures. This upgrade is essential for safety.
Use a ceiling joist or a brace bar to anchor the box firmly. This might require a bit of work inside the ceiling, but it’s worth it to prevent any accidents later. Your pendant’s weight should never be supported just by drywall or plaster.
After securing the box, gently pull the electrical wires through the bracket’s center hole. This keeps everything neat and ready for wiring. If you’ve ever wrestled with tangled wires during installation, this step will save you frustration.
Wiring The Pendant Light
Wiring a pendant light might seem tricky at first, but it becomes straightforward when you understand the basics. The key is making secure and correct connections between the pendant wires and your home’s wiring. If you handle this step carefully, your new pendant will shine safely and beautifully.
Connect Wires Correctly
Start by turning off the power at the circuit breaker to avoid any shocks. You’ll find three main wires inside the recessed light box: black (hot), white (neutral), and green or bare copper (ground). Match these wires with the corresponding wires from your pendant light.
Typically, connect the black pendant wire to the black house wire, the white to white, and the green or bare copper to the ground wire. If your pendant has different colors, check the manual or use a voltage tester to confirm. Loose or incorrect connections can cause flickering or even short circuits.
Use Wire Nuts And Tape
After twisting the wires together, secure each connection with a wire nut. Twist the nut clockwise until it feels tight and the wires are firmly held. Don’t stop there—wrap electrical tape around the wire nut and wires to add extra security and prevent the nut from loosening over time.
Wire nuts come in different sizes, so choose one that fits your wires snugly. Have you ever had a light flicker because of a loose connection? Using tape after wire nuts can save you from that frustration. Always double-check your work by gently tugging the wires to ensure they don’t come apart.
Hanging The Pendant
Hanging the pendant is the moment where your project truly comes to life. It’s not just about fixing a light fixture; it’s about setting the right height and ensuring stability so your new pendant complements the space perfectly. Paying attention to details here saves you from future hassles and gives your room a professional finish.
Adjust Cord Length
Start by measuring the ideal height for your pendant. Think about the room’s purpose and the surrounding furniture. For instance, over a dining table, the bottom of the pendant should be about 28 to 34 inches above the surface.
Next, adjust the cord length accordingly. Don’t cut too much at once—leave some extra wire just in case you want to tweak it later. You can coil any excess cord neatly inside the ceiling box to keep it hidden and tidy.
Secure Pendant Fixture
Once the cord is set, focus on securing the pendant firmly. Use the mounting bracket that comes with your fixture to attach it to the electrical box. Make sure all screws are tight, so the fixture doesn’t wobble or shift.
Double-check the connection points—both the wiring and the fixture mount. Loose connections can cause flickering lights or even safety hazards. Have you noticed any slight movement in your fixtures before? Fixing that early prevents bigger problems down the road.
Testing And Final Touches
After installing your pendant light, testing and final touches ensure safety and style. This phase confirms the fixture works well and your workspace is tidy. Proper checks prevent future issues and keep your home safe.
Restore Power
Turn the circuit breaker back on carefully. Double-check the switch that controls the light. Watch for any sparks or unusual sounds as power returns. Safety first—if anything seems off, switch off power immediately.
Check Light Functionality
Flip the light switch to test the pendant. The bulb should light up without flickering. Adjust the height and position of the pendant if needed. Listen for any buzzing noises from the fixture. Make sure the pendant is securely fastened and stable.
Clean Up Workspace
Gather all tools and leftover materials. Dispose of any packaging or wire scraps properly. Wipe dust and fingerprints from the pendant and ceiling area. Keep the workspace clear to avoid accidents. A clean area reflects a job well done.
Troubleshooting Tips
Troubleshooting your new pendant light installation can save time and frustration. Small issues often hide in plain sight, but with a careful eye, you can spot them quickly. Let’s break down common problems and how to fix them effectively.
Common Wiring Issues
Wiring errors are the top reason your pendant light might not work as expected. You could face flickering, no light, or a breaker that keeps tripping.
- Loose Connections:Check if all wire nuts are tightly twisted. Loose wires can cause intermittent power loss.
- Wrong Wire Pairing:Make sure the black (hot) wire connects to the black, white (neutral) to white, and ground wires are properly attached. Mixing these can prevent the light from functioning or create a safety hazard.
- Damaged Wires:Inspect wires for cuts or nicks. Even minor damage can interrupt the electrical flow.
- Test the Circuit:Use a voltage tester to confirm power is reaching the fixture. Sometimes the issue isn’t the light but the circuit itself.
Remember, electricity is dangerous. If you feel unsure about your wiring skills, consult a professional. Have you double-checked every connection before moving on?
Pendant Alignment Problems
A crooked or misaligned pendant light can ruin the look of your room. This issue usually happens during installation or due to the fixture’s weight.
- Check the Mounting Bracket:Ensure it’s level and secured firmly to the ceiling box. An unsteady bracket leads to a tilted pendant.
- Adjust the Cord Length:Sometimes the cord twists inside the canopy, causing the light to hang unevenly. Straighten the cord and re-secure it.
- Balance the Fixture:If your pendant has multiple arms or decorative elements, balance them carefully. Uneven weight distribution pulls the fixture off-center.
- Use a Level Tool:A simple bubble level can confirm if your pendant hangs straight. It’s a quick fix that improves the entire room’s appearance.
Have you noticed your pendant subtly tilting after a few days? This might mean you need to reinforce the mounting or adjust the cord tension.

Credit: hellofromliz.com
Frequently Asked Questions
How Do I Convert Recessed Lighting To Pendant Lighting?
To convert recessed lighting to pendant lighting, first turn off power. Remove the recessed fixture carefully. Install a junction box if needed. Run the pendant light wiring through the ceiling. Secure the pendant canopy and connect the wires. Finally, mount the pendant and restore power.
What Tools Are Needed For This Lighting Conversion?
You will need a screwdriver, wire stripper, voltage tester, drill, and ladder. Also, use wire nuts, electrical tape, and a junction box. Safety gloves and goggles are recommended. These tools ensure a safe and effective conversion from recessed to pendant lighting.
Can I Use Existing Wiring For Pendant Lights?
Yes, you can often use the existing recessed light wiring. Ensure the wiring is in good condition and compatible with the pendant fixture. If unsure, consult an electrician. Proper wiring guarantees safety and functionality for your new pendant light.
Is It Safe To Convert Recessed Lights To Pendant Lights?
Yes, it is safe if done correctly. Always turn off power at the breaker. Follow electrical codes and use proper tools. If uncomfortable with wiring, hire a licensed electrician. Safety is paramount during any lighting conversion project.
Conclusion
Converting a recessed light to a pendant can change your room’s look. It adds style and better lighting in one step. The process is simple if you follow the right steps. Always turn off power before starting any work. Choose a pendant that fits your space and taste.
With care and patience, you can do this yourself. Enjoy the new light and fresh feel in your home. Small changes can make a big difference. Give your room a fresh touch today!


