
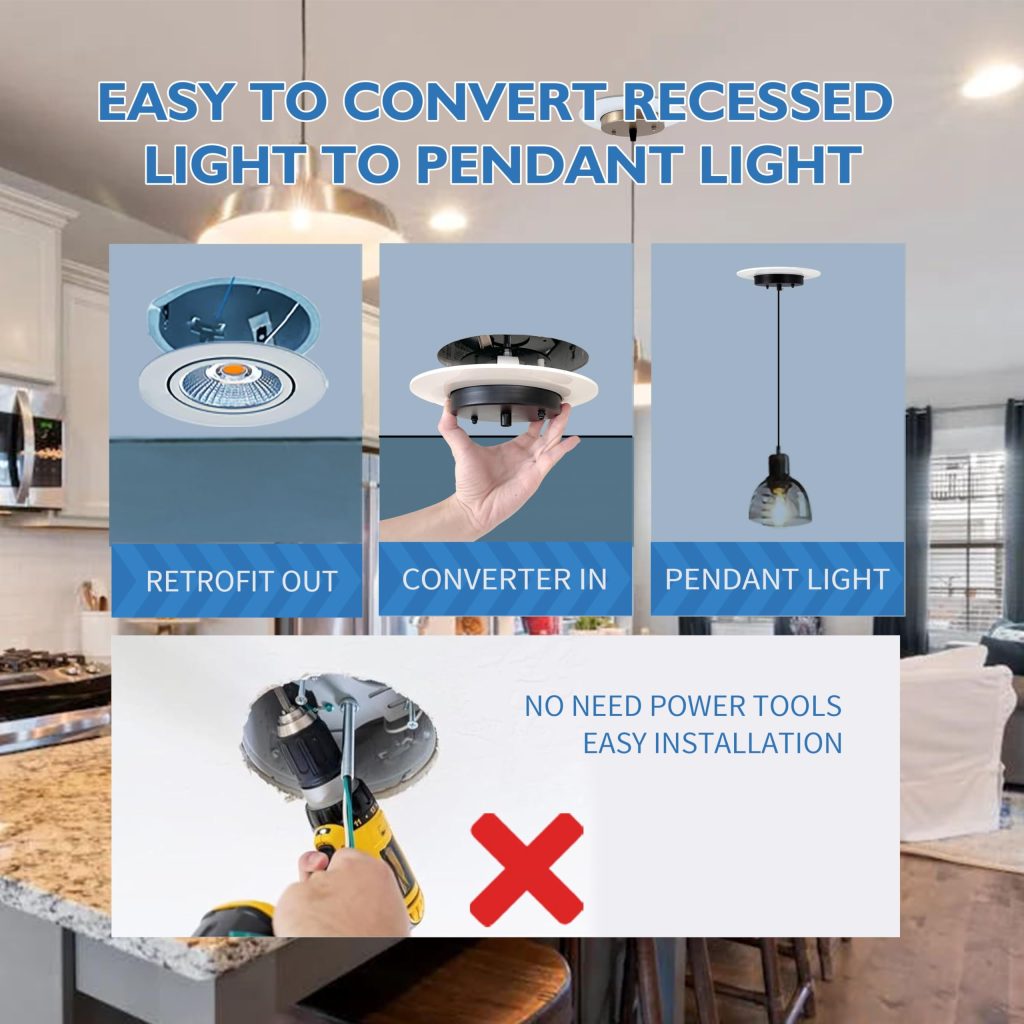
Are you tired of the plain look that your can lights give your room? Imagine transforming your space with a stylish pendant light that adds personality and warmth.
Replacing a can light with a pendant light might sound tricky, but it’s easier than you think. You’ll discover simple, step-by-step instructions to make the switch safely and beautifully. By the end, you’ll have the confidence to update your lighting and give your home that fresh, modern feel you’ve been wanting.
Ready to brighten up your space in a whole new way? Let’s get started!

Credit: www.amazon.com
Tools And Materials Needed
Before you start swapping out your can light for a pendant light, gathering the right tools and materials is key. Having everything ready not only makes the process smoother but also safer. Let’s break down what you’ll need to get the job done efficiently and correctly.
Essential Tools
To remove a can light and install a pendant, you’ll need a few basic tools. A screwdriver is a must-have, preferably both flathead and Phillips, since fixture screws vary. Wire strippers help you handle electrical connections cleanly.
Don’t forget a voltage tester to ensure the power is off before you start working with wires. A ladder or step stool will give you easy access to ceiling fixtures, and a pair of pliers can help with stubborn wiring or clips. Having these tools on hand will make the switch much easier.
Choosing The Right Pendant Light
Picking a pendant light that fits your space and style is more important than you might think. Consider the size of the room and the height of your ceiling—too large or too low can throw off the balance. Think about the light’s brightness and bulb type to match your needs.
Also, check the fixture’s weight and mounting requirements. Not all pendant lights are designed for the same wiring setup as can lights. Make sure your new fixture is compatible with your ceiling’s electrical box or be ready to upgrade it.
Safety Gear
Working with electricity demands caution, so safety gear is non-negotiable. Insulated gloves protect your hands from shocks, and safety glasses shield your eyes from dust or debris. Wearing a dust mask might also help if you’re dealing with older fixtures or insulation.
Always turn off the power at the circuit breaker before touching any wiring. Have a buddy nearby if possible—someone to assist or call for help in case of emergency. Your safety should always come first, no matter how simple the task seems.
Preparing The Work Area
Preparing the work area is an essential step before replacing a can light with a pendant light. It ensures safety and makes the process easier. A clean, organized space helps avoid accidents and keeps tools within reach. Follow these simple steps to get ready.
Turning Off Power
Safety comes first. Locate the circuit breaker for the light fixture. Switch it off to cut the power supply. Use a voltage tester to confirm the power is off. Never skip this step to avoid electric shock.
Clearing The Space
Remove furniture and items near the work area. Cover the floor with a drop cloth or old sheet. This protects surfaces from dust and debris. Clear enough space to move ladders or stools safely.
Gathering Supplies
Collect all tools and materials before starting. Typical items include:
- Screwdriver set
- Wire stripper
- Voltage tester
- Wire nuts
- Electrical tape
- Pendant light kit
- Ladder or step stool
Having everything handy saves time and avoids interruptions.
Removing The Can Light
Swapping a can light for a pendant light adds style and charm to any room. Begin by removing the old fixture and disconnecting wires. Install the pendant light’s mounting bracket, connect wires, and secure the pendant light. Enjoy the new ambiance created by your stylish lighting update.
Replacing a can light with a pendant light can transform the vibe of your space, bringing in a touch of style and sophistication. However, before you can enjoy the ambient glow of your new pendant, you need to safely remove the existing can light. This process might seem daunting, but with a little guidance, you’ll find it straightforward and rewarding. Let’s dive into the steps of removing the can light, ensuring you set the stage for your pendant masterpiece.Taking Out The Bulb And Trim
Begin by ensuring your safety—turn off the power to the light fixture from your circuit breaker. This step is non-negotiable. Once the power is off, remove the bulb from the can light. Next, focus on the trim. Most trims are secured with small springs or clips. Carefully pull them down and remove the trim to reveal the inner workings of the can light. Have you ever wondered how something so simple could hold everything together?Disconnecting Wiring
Now that you have access, it’s time to disconnect the wiring. Locate the junction box, usually accessible once the trim is removed. Open the box to expose the wire connections. Carefully untwist the wire nuts connecting the wires. Be sure to separate the wires and take note of how they were connected. This knowledge will be invaluable when connecting your new pendant light. Do you feel the excitement of the new beginning just around the corner?Removing The Housing
With the wiring disconnected, the next step is to remove the housing. Can light housings are often secured with screws or clips. Unscrew or unclip them, allowing the housing to be free. Gently slide the housing out of the ceiling. You may need to maneuver it slightly to avoid damaging the drywall. What stories might your ceiling tell, watching over countless meals and conversations? By following these steps, you’re well on your way to successfully replacing your can light with a pendant light. Remember, each task you complete is a step towards a brighter, more personalized space. Are you ready to embrace the change and light up your room with your new pendant?
Credit: jolux-light.com
Installing The Pendant Light Bracket
Installing the pendant light bracket is a crucial step when replacing a can light with a pendant light. This bracket will support the weight of your new fixture, so getting it right ensures safety and a clean look. Taking your time here can prevent future headaches, like a wobbly light or worse, a falling fixture.
Securing The Mounting Bracket
Start by aligning the mounting bracket with the existing electrical box in your ceiling. Use the screws provided with your pendant light kit to attach the bracket firmly to the box. If the box is old or loose, consider reinforcing it with additional support to hold the pendant’s weight.
Make sure the bracket sits flush against the ceiling. A bracket that’s not properly secured can cause the light to hang unevenly or create stress on the wiring. Double-check the tightness of every screw before moving on.
Checking Stability
After securing the bracket, gently wiggle it to test its stability. The bracket should feel rock solid without any movement. If it shifts or feels loose, tighten the screws or adjust the mounting until it’s completely secure.
Think about the weight of your pendant light. Heavier fixtures need extra care here. Have you ever noticed a light fixture that sways or seems unstable? That’s a sign the bracket isn’t installed properly, and it’s best to fix it before you connect the wiring.
Wiring The Pendant Light
Wiring the pendant light is a critical part of the installation process. It involves connecting the electrical wires from your ceiling to the new fixture. Proper wiring ensures the light works safely and efficiently.
Connecting Wires Safely
Turn off the power at the circuit breaker before handling any wires. Identify the wires: typically black or red is live, white is neutral, and green or bare copper is ground. Match the wires from the pendant light to the ceiling wires by color. Hold the ends together firmly for a secure connection.
Using Wire Nuts And Electrical Tape
Twist wire nuts clockwise over the joined wires until tight. Tug gently to check the connection is secure. Wrap electrical tape around the base of the wire nuts for extra safety. This prevents the wire nuts from loosening over time.
Testing Connections
Switch the power back on at the breaker. Use a voltage tester to ensure the wires are live. Turn on the pendant light switch. If the light does not turn on, double-check all connections. Turn off the power before making adjustments.
Attaching The Pendant Light Fixture
Attaching your new pendant light fixture is where the transformation truly begins. This step demands attention to detail and patience to ensure your fixture hangs securely and looks great. Let’s break down the process so you feel confident handling the electrical box and mounting hardware.
Mounting The Fixture
First, make sure the power is off at the breaker to avoid any electrical hazards. Locate the mounting bracket that came with your pendant light and secure it to the electrical box using the screws provided. This bracket acts as the anchor, so it must fit tightly without any wobble.
Next, connect the wires from your pendant to the house wiring. Match colors carefully—usually black to black (hot), white to white (neutral), and green or copper to the ground wire. Twist the wire connectors clockwise until snug, then gently tuck the wires into the box to avoid pinching.
Once the wiring is secure, lift the pendant fixture and align it with the mounting bracket. Attach the fixture base using the screws or nuts specified in the instructions. If your fixture feels loose, don’t tighten blindly; loosen and re-check the bracket fit first.
Adjusting Height And Position
Before fully tightening everything, adjust the pendant’s height to suit your space. Most fixtures allow you to shorten or lengthen the cord or chain—choose a length that complements your room’s scale and lighting needs. A good rule is to keep pendant lights about 30 to 36 inches above a countertop or table.
Check the fixture’s position from multiple angles to ensure it hangs straight and centered. You might notice slight tilts or twists that can be corrected by adjusting the mounting bracket or repositioning the cord. Take your time here; a crooked pendant can ruin the entire look.
Have you ever installed a pendant light only to realize it was too high or low after turning on the power? Avoid that frustration by double-checking measurements and visual balance before finalizing your installation. This extra step saves time and keeps your space looking polished.
Final Checks And Power Restoration
After installing your new pendant light, the last phase involves careful final checks and restoring power safely. This ensures your light works properly and the setup is secure. Take time to review every detail before switching the electricity back on.
Inspecting The Installation
Look over all wiring connections to confirm they are tight and correct. Check that the pendant light is firmly mounted and balanced. Make sure no wires are exposed or touching metal parts. Verify that the fixture’s weight is supported by the ceiling box.
Turning Power Back On
Go to your circuit breaker and switch the power back on for the room. Double-check that the breaker controlling the fixture is fully in the “on” position. Avoid turning on the power if you see loose wires or signs of damage. Safety first.
Testing The Light
Flip the wall switch to see if the pendant light illuminates. Observe the light for any flickering or unusual behavior. If the light stays steady, your installation is complete. If not, turn off power and re-inspect connections before trying again.
Troubleshooting Tips
Replacing a can light with a pendant light can transform the look of your space, but it doesn’t always go perfectly smooth. Troubleshooting is a crucial part of the process to ensure your new light fixture works safely and looks great. Below are some common issues you might face and how to handle them effectively.
Common Installation Issues
One frequent problem is the pendant light not fitting properly into the existing ceiling hole made for the can light. This happens because can light openings are usually smaller or differently shaped. You may need to adjust the mounting bracket or enlarge the hole slightly to accommodate the new fixture.
Another issue is dealing with the wiring connections. Sometimes wires don’t match perfectly, or the connections feel loose. Make sure to turn off the power before handling wires, and use wire nuts to secure connections tightly.
Fixing Flickering Or No Light
If your pendant light flickers or doesn’t turn on at all, start by checking the bulb. Use a bulb that matches the fixture’s specifications in wattage and type. Loose bulbs or incompatible bulbs often cause flickering.
Next, inspect the wiring connections again. A loose wire can interrupt power flow and cause flickering. Tighten all connections and ensure the fixture is properly grounded.
Have you tested the wall switch controlling the light? Sometimes the issue lies with a faulty switch or dimmer. Try replacing the switch if the problem persists after checking the fixture.
When To Call A Professional
If you notice exposed wiring, sparks, or a burning smell during installation, stop immediately and call a professional electrician. These signs indicate serious electrical hazards that require expert handling.
Complex wiring setups, like multi-switch controls or older homes with outdated electrical systems, often need professional assessment. Don’t risk your safety trying to fix complicated issues on your own.
Remember, investing in professional help can save you from costly repairs and keep your home safe. When in doubt, it’s better to have an expert take a look rather than guess your way through a risky situation.
Design Ideas For Pendant Lights
Choosing the right pendant light can completely change the vibe of your space. The design you pick should not only replace the old can light but also add character and enhance the room’s function. Let’s look at some ideas that can help you find a pendant light that fits perfectly with your style and needs.
Styles To Consider
Pendant lights come in many styles, from industrial to modern to rustic. Think about the mood you want to create: sleek metal fixtures offer a contemporary feel, while glass or fabric shades bring softness and warmth.
If you want a bold statement, try a cluster of small pendants instead of one large fixture. Alternatively, a single oversized pendant can act as a focal point in your room. What style grabs your attention and feels right for your space?
Matching Your Room Decor
Matching your pendant light with your room’s decor is key to a balanced look. Consider the colors, materials, and shapes already present in your room. For example, if your room features natural wood and neutral tones, a pendant with a wooden accent or a warm bronze finish can blend beautifully.
In a minimalist space, choose a pendant with clean lines and simple design to maintain that calm atmosphere. Don’t forget the scale—too large or too small can throw off the room’s harmony. How does your pendant choice complement or contrast your existing decor?
Energy-efficient Options
Energy efficiency is more important than ever, and pendant lights offer many smart choices. LED bulbs are a great fit—they use less power and last longer than traditional bulbs. Many pendant fixtures now come with built-in LED options designed to maximize light output while minimizing energy use.
Look for dimmable models to adjust brightness and save even more energy. This flexibility lets you create different moods without wasting electricity. Have you thought about how your new pendant light can help reduce your energy bills?

Credit: www.amazon.com
Frequently Asked Questions
How Do I Safely Remove A Can Light?
Turn off power at the circuit breaker first. Remove the trim and bulb. Detach the housing from the ceiling. Handle wiring carefully to avoid damage or shock.
What Tools Are Needed To Install A Pendant Light?
You will need a screwdriver, wire strippers, voltage tester, and a ladder. Also, have wire nuts and electrical tape ready for secure connections.
Can I Use Existing Wiring From The Can Light?
Yes, the existing wiring can often be reused. Ensure wires are in good condition. Match wire colors when connecting the pendant light.
How Do I Choose The Right Pendant Light Size?
Measure the space and ceiling height. Select a pendant that complements the room scale. Avoid fixtures that are too large or too small.
Conclusion
Replacing a can light with a pendant light adds style and warmth. It’s a simple way to change your room’s look. Follow safety steps carefully to avoid problems. Choose a pendant that fits your space and taste. Take your time and enjoy the process.
Soon, your new light will brighten the room beautifully. Small changes can make a big difference in your home. Give your space a fresh, inviting feel today.


