
Are you ready to transform your space with stylish pendant lights but worried about installing them on your finished ceiling? You’re not alone.
Installing pendant lights can seem tricky, especially when your ceiling is already complete. But what if you could do it yourself, quickly and safely, without calling in a professional? In this guide, you’ll discover simple, step-by-step instructions that make the process clear and manageable.
By the end, you’ll know exactly how to add that perfect touch of light and style to your room. Keep reading, and let’s get your ceiling glowing!
Tools And Materials Needed
Installing pendant lights in a finished ceiling requires the right tools and materials. Having everything ready makes the process smoother and safer. This section covers the essential items needed for a successful installation.
Essential Tools
- Electric drill with various drill bits
- Voltage tester for electrical safety
- Wire strippers and cutters
- Screwdrivers (flathead and Phillips)
- Measuring tape for accurate placement
- Level to ensure straight installation
- Ladder or step stool for reaching the ceiling
- Pliers for gripping and twisting wires
- Stud finder to locate ceiling joists
Choosing The Right Pendant Lights
Select pendant lights that match your room’s style and size. Consider the light’s weight to ensure your ceiling can hold it.
Check the fixture’s height and adjustability for ideal hanging length. Choose bulbs with the right brightness and color temperature for your space.
Safety Gear
- Insulated gloves to protect from electrical shocks
- Safety goggles to shield eyes from debris
- Dust mask if drilling creates dust particles
- Non-slip shoes for stable footing on ladders
Preparing The Ceiling
Preparing the ceiling is a crucial stage before installing pendant lights in a finished ceiling. It sets the foundation for a smooth and safe installation process. Paying attention to details here can save you from headaches later and ensure your new lighting looks professional and functions perfectly.
Locating The Electrical Box
Start by finding the existing electrical box in your ceiling. This box holds the wiring and supports the fixture, so it must be sturdy and properly positioned. If there’s no box where you want the pendant light, you’ll need to install one designed to hold the weight of your fixture.
Use a stud finder or gently tap the ceiling to locate joists and avoid drilling into them. You want the box to be between joists for the best support. Have you ever tried to hang a heavy item only to find the wall can’t hold it? That’s exactly what you want to avoid here.
Turning Off Power
Safety must come first. Before touching any wires, turn off the power at your circuit breaker. This simple step prevents electrical shocks and protects both you and your home’s wiring.
Double-check the power is off by using a voltage tester on the wires in the box. It’s a small step that ensures you won’t have any surprises during installation. Have you ever skipped this and regretted it? Don’t let safety be an afterthought.
Marking The Installation Spot
Once the electrical box is ready and power is off, mark the exact spot where your pendant light will hang. Use a pencil to make small marks on the ceiling; these will guide your drilling and mounting.
Consider the height and position carefully—too low or off-center can ruin the room’s look and feel. Step back and visualize how the light will spread and whether it complements your space. Have you ever placed a light only to realize it cast strange shadows or blocked the view? Taking your time here prevents that.
Wiring The Pendant Light
Begin by turning off the power to ensure safety during installation. Connect the pendant light wires to the ceiling wires, matching colors carefully. Secure all connections with wire nuts and attach the fixture to the ceiling bracket firmly.
Wiring a pendant light in a finished ceiling can seem daunting, but with a little guidance, it’s a manageable task. The key is ensuring every step is followed carefully to guarantee safety and functionality. You’ll need a few basic tools like a screwdriver, voltage tester, and wire strippers to get started.Removing The Old Fixture
Start by turning off the power at the breaker to avoid any electrical mishaps. Use a voltage tester to double-check there’s no power running to the fixture. Once confirmed, carefully remove the old light fixture by unscrewing the mounting screws and gently lowering it.Connecting Wires Safely
With the old fixture out of the way, it’s time to connect your pendant light wires. Identify the wires—typically, you’ll see a black (hot), white (neutral), and green or bare (ground) wire. Match each wire from the pendant to its corresponding wire in the ceiling. Twist the wires together using wire connectors, ensuring they are secure but not overly tight. This connection is crucial for both safety and functionality. Double-check your connections with a gentle tug to ensure they hold firm.Securing The Electrical Connections
Now, neatly tuck the connected wires into the electrical box. This keeps them organized and prevents any interference when attaching the pendant. Attach the pendant light fixture to the mounting bracket using the screws provided. Ensure everything is aligned correctly and secure before restoring power. When you switch the breaker back on, your newly installed pendant light should illuminate the room beautifully, adding both style and functionality. Have you ever wondered how a small change like new lighting can transform your space? With these steps, you’re not just installing a fixture—you’re enhancing your home’s atmosphere.
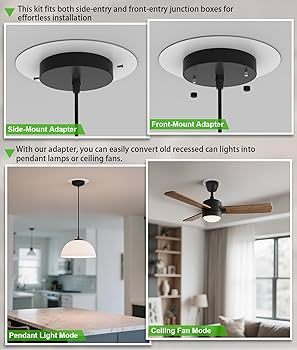
Credit: trubuildconstruction.com
Mounting The Pendant Light
Mounting the pendant light properly ensures safety and a polished look. This step involves securing the fixture to the ceiling and adjusting it for the best fit. Attention to detail here prevents future problems and keeps the light stable.
Attaching The Mounting Bracket
First, locate the ceiling box where the light will hang. Align the mounting bracket with the holes on the box. Use screws to fasten the bracket tightly. Check that it feels solid and does not wiggle. This bracket supports the entire pendant light.
Hanging The Pendant
Next, connect the electrical wires carefully. Match the wires by color: black to black, white to white, and green or copper to ground. Secure the connections with wire nuts. Then, lift the pendant light and hook or screw it onto the mounting bracket. Make sure the light is balanced and stays in place.
Adjusting Height And Position
Adjust the cord or chain length to set the pendant at the desired height. Shorten or lengthen it by sliding the cord through the canopy or adjusting the chain links. Center the light over the area it will illuminate. Confirm the pendant hangs straight and looks even from all sides.
Final Checks And Testing
After installing pendant lights in a finished ceiling, final checks and testing are essential. These steps ensure the fixture works safely and correctly. Proper testing helps avoid electrical hazards and confirms the light functions as intended.
Restoring Power
Turn the circuit breaker back on carefully. Make sure no tools or wires touch the fixture. Inform others in the house about the power restoration. Avoid rushing this step to prevent electric shocks.
Testing The Light
Use the wall switch to turn the pendant light on. Check if the light bulb glows steadily without flickering. Observe the fixture for any unusual sounds or smells. Confirm the light covers the desired area properly.
Troubleshooting Common Issues
If the light does not turn on, check the bulb first. Ensure it is screwed in tightly and is not burnt out. If flickering occurs, inspect the wiring connections for looseness. Use a voltage tester to verify power flow if needed. Tighten any loose screws or connections carefully. Replace faulty bulbs or parts promptly to ensure safety.
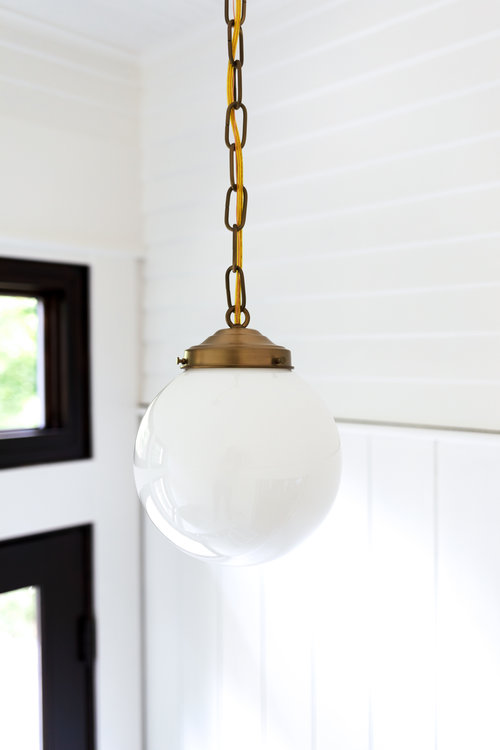
Credit: www.thegritandpolish.com
Tips For A Professional Finish
Achieving a professional finish when installing pendant lights enhances your room’s style. Small details make a big difference in appearance and function. Careful planning and execution help your lights look seamless and elegant.
Hiding Wires Neatly
Conceal wires inside ceiling channels or use decorative covers. Use cable clips to keep wires tight and straight. Avoid letting wires dangle or twist visibly. Choose wire colors that blend with the ceiling or paint them. Proper wiring hides distractions and keeps your ceiling clean.
Choosing Bulbs For Ambiance
Select bulbs with the right brightness for your space. Warm white bulbs create a cozy, inviting glow. Cool white bulbs work well in kitchens or work areas. Consider dimmable bulbs to adjust light intensity easily. The correct bulb sets the room’s mood and improves comfort.
Maintaining Your Pendant Lights
Clean shades and bulbs regularly to keep light clear and bright. Turn off power before cleaning or changing bulbs. Check connections periodically to ensure safety and function. Replace bulbs promptly to maintain consistent lighting. Proper care prolongs your pendant lights’ life and appearance.

Credit: www.amazon.com
Frequently Asked Questions
How Do I Safely Install Pendant Lights In A Finished Ceiling?
Turn off power at the breaker before starting. Use a voltage tester to ensure wires are dead. Follow the fixture’s instructions carefully. Securely attach the mounting bracket to a ceiling joist or use a suitable anchor for drywall.
What Tools Are Needed To Install Pendant Lights?
You’ll need a voltage tester, screwdriver, wire stripper, drill, and mounting hardware. A ladder and electrical tape are also helpful. Having the right tools ensures a smooth and safe installation process.
Can Pendant Lights Be Installed Without Ceiling Joists?
Yes, use strong drywall anchors or toggle bolts designed for heavy fixtures. However, ceiling joists provide more secure support. Always check the fixture’s weight and follow manufacturer recommendations for safe installation.
How Do I Choose The Right Height For Pendant Lights?
Hang pendant lights 28-34 inches above a table or countertop. For general lighting, 7 feet from the floor works well. Adjust height based on room size and fixture style for best aesthetics and function.
Conclusion
Installing pendant lights in a finished ceiling is easier than it seems. Careful steps keep the process safe and smooth. Always turn off the power before starting work. Use the right tools and follow instructions closely. Take your time to measure and position lights well.
A well-done installation improves your room’s look instantly. Bright, stylish lighting makes any space feel warm. Enjoy the new light and the cozy atmosphere it brings. You can do this project yourself with patience and care.


