
Have your string lights suddenly stopped working? Before you toss them out or buy new ones, there’s a simple fix you can try yourself: changing the fuse.
Knowing how to change a fuse in string lights can save you time, money, and frustration. In this guide, you’ll learn exactly what to look for and how to do it safely, step by step. Keep reading—you’re just a few easy moves away from bringing your lights back to life.
Credit: www.homedepot.com
Tools Needed
Changing a fuse in string lights requires a few simple tools. Having the right tools makes the job safe and quick. These tools help you remove the old fuse and insert a new one with ease.
Gather these items before starting. Each tool plays an important role in the process. Using the proper tools ensures the string lights work well again.
Fuse Puller Or Small Flathead Screwdriver
This tool helps remove the fuse from its holder. A fuse puller is best, but a small flathead screwdriver works too. Use it carefully to avoid damaging the fuse compartment.
Replacement Fuses
Keep the correct size and rating of replacement fuses ready. Check the string light’s manual or fuse holder for fuse specifications. Using the wrong fuse can cause damage or safety issues.
Needle-nose Pliers
Needle-nose pliers help grip and hold small parts. They make removing and inserting fuses easier, especially in tight spaces. Use them gently to avoid breaking the fuse or wires.
Flashlight
A flashlight helps you see inside the fuse compartment clearly. This is useful in low light or when working outdoors. Good visibility prevents mistakes and speeds up the process.
Multimeter (optional)
A multimeter tests the fuse for continuity. It confirms if the fuse is blown or still good. This tool is helpful but not always necessary for simple fuse changes.

Credit: www.youtube.com
Identify The Fuse Type
Identifying the fuse type is the first step to fix string lights. Different lights use different fuses. Knowing the right fuse helps avoid damage and ensures safety.
Fuses come in various shapes and sizes. Most string lights have small glass or plastic fuses. Some are inside the plug, while others are part of the light set.
Check The Light Set Packaging
The packaging often lists the fuse type. Look for terms like “fuse rating” or “replacement fuse.” This info guides you to the correct fuse size and rating.
Inspect The Fuse Holder
Find the fuse holder on the plug. It usually has a small door or cap. Open it gently to see the fuse inside. Note its shape, size, and markings.
Read Fuse Markings
Fuses have numbers and letters printed on them. These indicate voltage and amperage ratings. Write down these details to find an exact match.
Use A Multimeter For Testing
A multimeter checks if the fuse is good. Set it to continuity mode. Touch the probes to both ends of the fuse. A beep means the fuse works.
Know Common Fuse Types
- Glass tube fuses – clear and cylindrical
- Blade fuses – flat with two metal prongs
- Thermal fuses – small discs inside plastic casing
Understanding these types helps in quick identification.
Locate The Fuse Holder
Locating the fuse holder is the first step to fixing string lights. It protects the lights from power surges. Finding it is simple with a few tips.
The fuse holder is usually near the plug. It looks like a small, rectangular box or compartment. You might see a sliding cover or a small door on it.
Look closely at the plug’s base. The fuse holder often blends with the plug casing but stands out once noticed.
Check The Plug For A Fuse Holder
Examine the plug carefully. The fuse holder is part of the plug. It may have a small tab or cover to open.
Look For A Sliding Or Snap Cover
The fuse holder cover slides or snaps open. Use your fingernail or a small tool to open it gently. Avoid force to prevent damage.
Identify The Fuse Inside The Holder
Inside, you will see a tiny glass or ceramic fuse. It may look like a small tube with metal ends. This part needs replacement if blown.
Remove The Old Fuse
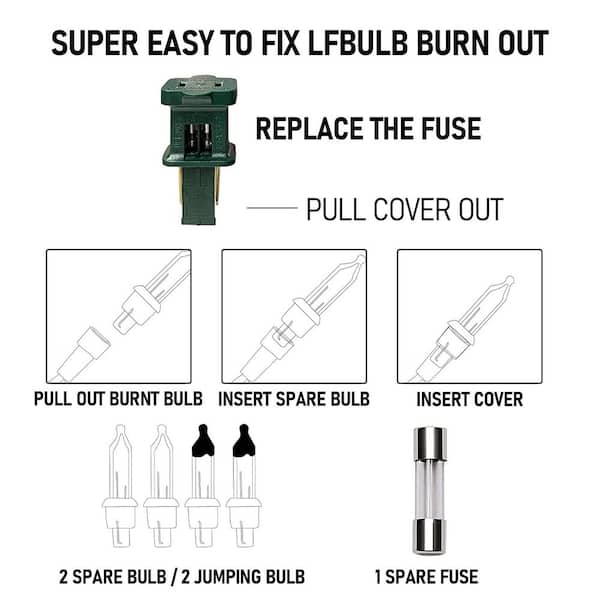
Removing the old fuse is the first important step in fixing string lights. The fuse protects your lights from electrical damage. Over time, the fuse may blow and stop the lights from working. You need to carefully take out this old fuse before replacing it.
Handle the fuse box gently. It is usually located near the plug of the string lights. Opening it correctly helps avoid damage to the wiring inside.
Locate The Fuse Compartment
Find the small fuse compartment on the plug of your string lights. It often has a sliding or snap-open cover. Look for a small tab or indentation to open it easily. Avoid using sharp tools that might break the plastic.
Open The Fuse Holder
Slide or gently pry open the fuse holder. Use your fingers to avoid slipping. If the cover feels stuck, press lightly and try again. Be patient to prevent cracking the holder.
Remove The Old Fuse Safely
Once open, spot the fuse inside. It looks like a small glass or plastic tube with metal ends. Carefully pull it out using your fingers or a small pair of tweezers. Avoid forcing it out to stop breaking the fuse.
Check The Fuse Type
Look at the old fuse for its size and rating. This info helps you buy the right replacement. Usually, the fuse has numbers printed on it, such as voltage and amperage.
Select The Correct Replacement Fuse
Selecting the correct replacement fuse for your string lights is crucial for safety and functionality. Using the wrong fuse can cause damage or create a fire hazard. Take your time to identify the exact specifications before making a purchase.
Check The Fuse Rating On The Packaging Or Manual
Look at the original string light packaging or user manual for the fuse rating. This information usually includes the amperage and voltage your fuse needs. If you don’t have the manual, the packaging often has a small label or sticker with this data.
Using a fuse with a different amperage can cause it to blow too quickly or not blow at all, risking damage. Always match the amperage rating exactly to keep your lights safe and working.
Examine The Old Fuse For Specifications
Remove the blown fuse from your string lights and examine it closely. Most fuses have tiny numbers printed on them that show their rating. This helps if you lost the manual or packaging.
Take a clear photo or write down these numbers so you can find the exact replacement. Don’t guess based on size alone; the electrical specs matter more than appearance.
Understand Different Types Of Fuses
Fuses come in various types like glass tube fuses, blade fuses, and ceramic fuses. Your string lights may require a specific type based on design and safety standards. Using a different type can cause poor contact or failure to protect the circuit.
Check what fuse style your lights use and buy the same type. If you’re unsure, take the old fuse to the store or compare it with online images before purchasing.
Ask Yourself: Is The Fuse Easily Replaceable In The Future?
Some string lights have fuse compartments that are easy to open, while others are sealed or hard to access. Knowing this can influence the type of replacement fuse you buy. Choosing a standard fuse size and type makes future replacements simpler.
Think about how often you use your string lights and how easily you want to replace fuses next time. Planning ahead saves frustration and keeps your lights shining longer.
Where To Buy Reliable Replacement Fuses
Not all fuses are created equal. Buy replacements from trusted hardware stores or reputable online sellers. Cheap or counterfeit fuses might not meet safety standards and could damage your lights or worse.
Look for fuses labeled with safety certifications like UL or CE marks. These ensure the fuse has been tested and meets quality requirements.
Insert The New Fuse
Carefully place the new fuse into the fuse holder, matching its size and rating. Ensure it fits snugly to restore the string lights’ power. Test the lights after inserting the fuse to confirm they work properly.
Changing a fuse in string lights is simple. Once you’ve removed the old fuse, it’s time to insert the new one. This process ensures your lights work perfectly and remain safe. Follow these steps to replace the fuse efficiently.Gather Your Replacement Fuses
Before starting, ensure you have the correct replacement fuses. Check the packaging of your string lights for the right fuse type. Most string lights come with spare fuses.Align The New Fuse
Hold the new fuse carefully. Align it with the fuse holder. Make sure it matches the orientation of the old fuse. This prevents any installation issues. Gently slide the new fuse into the holder. Use a firm but gentle touch. Ensure the fuse sits snugly in place. This keeps the electrical connection secure.Secure The Fuse Holder
Once the fuse is in place, close the fuse holder. Snap it shut until it clicks. A secure closure is essential for safety. Plug in your string lights. Check if they light up. If they do, the fuse replacement was successful. If not, ensure the fuse is correctly inserted.Test The String Lights
Testing string lights is an important step after changing a fuse. It confirms if the repair worked. This process helps you avoid further problems and saves time. Testing also ensures all bulbs glow evenly. Follow simple checks to see if the lights are ready for use.
Check The Power Source
Plug the string lights into a working outlet. Watch for any flickering or dim bulbs. A steady glow means the power is stable. If the lights do not turn on, check the fuse again.
Inspect Each Bulb
Look closely at every bulb on the string. Replace any bulbs that are broken or missing. Faulty bulbs can stop the whole string from working. Make sure all bulbs are properly seated in their sockets.
Use A Light Tester
A light tester helps find electrical issues quickly. Touch the tester to each bulb socket. The tester will light up if the socket works. This tool saves time and shows exactly where the problem is.
Observe For Heat
After the lights stay on for a few minutes, feel for heat. Warm bulbs and wires are normal. Too much heat can mean a problem. Turn off the lights if anything feels too hot.
Safety Tips
Safety must come first when changing a fuse in string lights. Handling electrical parts carelessly can cause shocks or fires. Follow these safety tips to protect yourself and your home.
Unplug The String Lights Before Starting
Always disconnect the string lights from the power source before touching the fuse. This stops any electric current from flowing, reducing the risk of shock.
Use The Correct Replacement Fuse
Check the fuse rating on the string lights. Use a fuse with the same voltage and amperage to avoid damage or fire hazards.
Handle The Fuse With Dry Hands
Make sure your hands are dry before touching the fuse or any electrical parts. Water increases the chance of electric shock.
Inspect The Light Cord For Damage
Look for cracks, frays, or exposed wires on the cord. Do not change the fuse if the cord is damaged. Replace the entire string instead.
Work In A Well-lit Area
Good lighting helps you see small parts clearly. It also reduces mistakes during the fuse replacement process.
Avoid Using Excessive Force
Be gentle when removing and inserting the fuse. Forcing parts can break the fuse holder or other components.
Store Spare Fuses Safely
Keep extra fuses in a dry, cool place. Store them away from children and pets to prevent accidents.

Credit: www.youtube.com
Frequently Asked Questions
How Do I Know If A Fuse In String Lights Is Blown?
Check for no light or flickering bulbs. Inspect the fuse visually for a broken wire or discoloration. Use a multimeter to test continuity if unsure. A blown fuse prevents electricity flow and stops the lights from working.
What Type Of Fuse Do String Lights Use?
Most string lights use a 3-amp, 125-volt glass fuse. Always check the manufacturer’s label for specific fuse ratings. Using the correct fuse ensures safety and proper functioning of your lights.
Can I Replace A Fuse Without Unplugging The Lights?
No, always unplug string lights before replacing the fuse. This prevents electrical shock and damage. Safety is crucial when handling electrical components like fuses.
Where Is The Fuse Located In String Lights?
The fuse is usually inside the plug’s fuse compartment. Open the small cover on the plug to access it. This design allows easy fuse replacement when needed.
Conclusion
Changing a fuse in string lights keeps them working safely. Always turn off the power before starting the repair. Use the right fuse type for your string lights. Check the fuse holder carefully to avoid damage. Replace the fuse gently to ensure a good fit.
Test the lights after changing the fuse. This simple fix saves money and extends light life. Now, you can enjoy your string lights without worry. Safe and easy steps make the process quick. Keep your decorations bright and hassle-free all year.


