
Are your string of LED lights flickering or not lighting up at all? It can be frustrating when your favorite decoration or cozy lighting suddenly stops working.
But don’t worry—you don’t have to replace the entire set or call a professional right away. In this guide, you’ll learn simple, step-by-step methods to fix your LED lights quickly and safely. By the end, you’ll have your lights shining bright again, making your space warm and inviting.
Keep reading to discover easy tips that anyone can follow, even if you’re not tech-savvy!

Credit: www.reddit.com
Common Issues With Led Strings
LED string lights are popular for decoration, but they can face common problems. These issues often cause sections to stop working or the entire string to fail. Knowing the usual faults helps fix them quickly. It saves money and avoids buying new lights.
Most problems with LED strings come from dead sections, power supply troubles, or damaged bulbs and wiring. Each issue shows different signs and needs a specific check. Understanding these helps keep your lights bright and glowing.
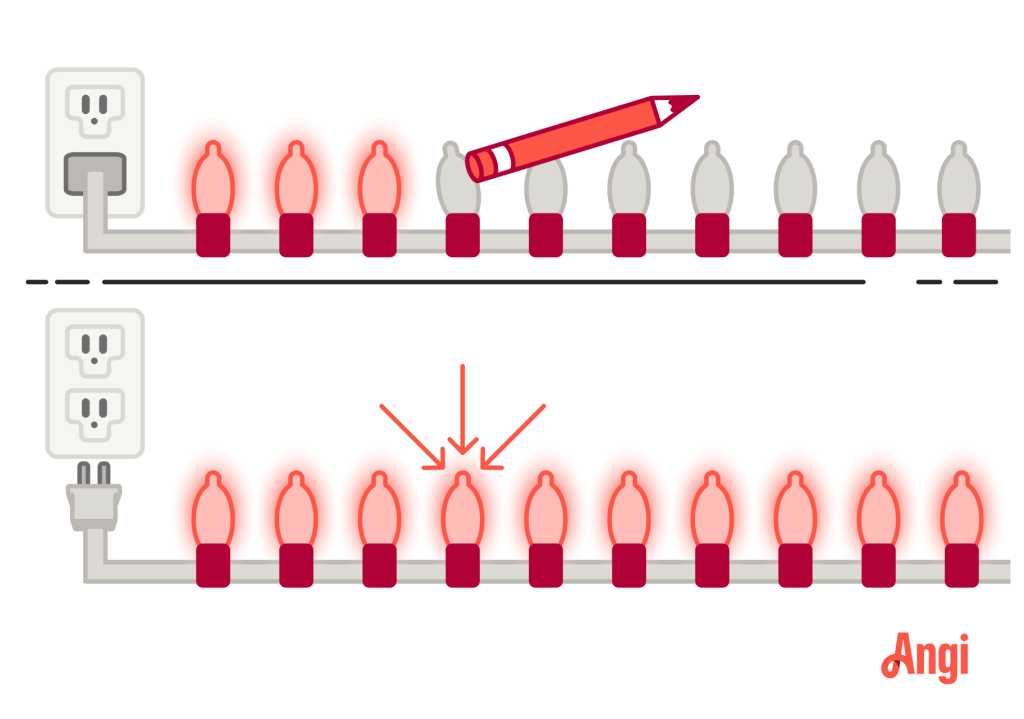
Identifying Dead Sections
Dead sections are parts of the LED string that do not light up. These often appear as a group of bulbs that stay dark. The problem may lie in a broken wire or a failed bulb in that section. Checking each section carefully helps find where the fault is. Sometimes, shaking the string gently reveals loose connections causing dead spots.
Checking Power Supply
Power supply issues stop the whole LED string from lighting. Check if the plug fits tightly into the socket. Inspect the adapter or transformer for damage or overheating. Use a different socket to test if power flows. A multimeter can measure voltage to confirm power is available. Low or no voltage means the power source may be faulty.
Inspecting Bulbs And Wiring
Burnt-out bulbs or broken wiring cause flickering or dark spots. Look closely at each bulb for cracks or dark marks. Replace bulbs that look damaged or do not light. Examine the wiring for cuts, bends, or corrosion. Repair small wire breaks with electrical tape or soldering. Proper wiring ensures consistent current flow to all bulbs.

Credit: www.reddit.com
Tools You’ll Need
Fixing a string of LED lights requires the right set of tools to make the process smooth and efficient. Having everything ready before you start saves time and prevents frustration. These tools help you identify the problem accurately and repair it safely.
Basic Repair Kit
Start with a basic repair kit that includes essential items like wire cutters, electrical tape, and a soldering iron. Wire cutters help you remove damaged sections cleanly without hurting other parts of the string. Electrical tape is vital to insulate exposed wires after repairs, ensuring safety.
A soldering iron lets you reconnect broken wires or components securely. If you don’t have one, a simple twist-and-tape fix might work temporarily, but soldering provides a durable connection. Having spare LED bulbs or fuses matching your string is also a smart move—these small parts often cause the issue.
Testing Devices
Testing devices are your best friends when troubleshooting LED lights. A multimeter is indispensable; it measures voltage, current, and resistance to help locate faulty sections. You can check if power is reaching each bulb or if a wire is broken somewhere along the string.
Another helpful tool is a continuity tester, which quickly tells you if two points are electrically connected. This saves you from guessing where the break might be. Investing in these devices can seem like extra work, but they make your repair more precise and less trial-and-error.
Step-by-step Troubleshooting
When your string of LED lights suddenly stops shining bright, it can be frustrating. But fear not, as troubleshooting these tiny beacons of joy can be simpler than you think. Let’s dive into a step-by-step guide to help you bring those lights back to life, illuminating your space with their vibrant glow once again.
Testing Individual Bulbs
The first step in troubleshooting your LED string lights is to test each bulb individually. Start by unplugging the lights for safety. Then, gently remove a bulb from its socket and insert a known working bulb in its place.
Plug the lights back in to see if the string lights up. If it does, the problem lies with the original bulb. Repeat this process for each bulb to identify any others that might be faulty.
Replacing Faulty Bulbs
Once you’ve pinpointed the problematic bulbs, it’s time to replace them. Ensure you have spare bulbs that match the voltage and type of your LED string lights. This is crucial to avoid damaging the entire string.
Gently remove the faulty bulb and insert a new one, making sure it’s securely in place. Plug the lights back in to check if the replacement works. If so, continue replacing any other faulty bulbs identified in the previous step.
Fixing Loose Connections
Loose connections can often be the culprit behind non-functioning LED lights. Begin by inspecting the sockets for any signs of wear or damage. Sometimes, simply pushing the bulb more firmly into the socket can resolve the issue.
If the problem persists, examine the plug and wire connections. Make sure everything is secure and intact. You might be surprised how often a simple connection adjustment can bring your lights back to life.
Remember, a little patience and careful handling can go a long way in fixing your string of LED lights. Have you ever experienced a similar issue with your lights? What troubleshooting steps did you find most effective?
Advanced Repair Techniques
Advanced repair techniques help fix string lights that simple fixes can’t solve. These methods restore the flow of electricity and bring the lights back to life. They require more tools and care but deliver great results.
Soldering Broken Wires
Soldering joins broken wires with melted metal for a strong connection. Start by stripping the wire ends to expose copper. Heat the soldering iron and apply solder to the wires. Hold the wires together and touch them with the soldering iron. Add solder until it flows smoothly around the wires. Let it cool before testing the lights. This creates a durable, low-resistance join that lasts long.
Using Conductive Paint
Conductive paint repairs small breaks without heavy tools. Clean the broken area and apply the paint over the gap. Let it dry completely to form a conductive path. This paint contains metal particles that carry electricity. It works well for tiny cracks or delicate sections. Multiple layers may be needed for better conductivity. It is a simple, neat fix for minor wire damage.
Bypassing Damaged Sections
Sometimes, damaged sections cannot be repaired. Bypass these parts by connecting wires around the broken area. Cut out the bad section and strip the wire ends on both sides. Use wire connectors or solder wires to create a new path. Insulate the new connection with electrical tape or heat shrink tubing. This method restores power flow and saves most of the string lights. It works best when damage is limited to a short segment.
Preventive Maintenance Tips
Keeping your string of LED lights in top shape is easier than fixing them after they break. Preventive maintenance helps you avoid frustrating outages and extends the life of your lights. Small habits can make a big difference in how well your lights perform season after season.
Proper Storage
Storing your LED lights carefully prevents damage before you even plug them in. Avoid tangling the wires by winding them neatly around a spool or a piece of cardboard. Store them in a cool, dry place away from direct sunlight or moisture, which can degrade the wiring and bulbs.
I once tossed a string of lights loosely into a box, and when I pulled them out months later, several bulbs were broken or missing. Taking the extra time to wrap them properly saved me from that hassle in the future.
Safe Installation Practices
How you set up your LED lights matters a lot. Always use clips or hooks designed for lights instead of nails or staples, which can damage wires and cause shorts. Make sure the lights are not stretched too tightly to avoid stress on the wires.
Also, check that your power source matches the voltage requirements of your lights to prevent overheating. Have you ever wondered why some lights flicker or fail quickly? It often comes down to improper installation.
Regular Inspections
Inspect your lights before and during use to catch any issues early. Look for frayed wires, loose bulbs, or discoloration that could signal a problem. Replacing a single faulty bulb or fixing a small wire break is easier and safer than dealing with a full string failure.
Set a reminder to check your lights every season. This simple habit can save you from surprises when you want to enjoy your decorations the most.

Credit: www.homehardware.ca
Frequently Asked Questions
How Do I Identify The Faulty Led Bulb In A String?
Check each bulb individually by removing and testing it in a working socket. Look for dark or broken filaments. Replace any bulbs that don’t light up. This helps pinpoint the exact faulty bulb causing the issue.
What Tools Are Needed To Fix Led Light Strings?
You need a multimeter to check continuity, replacement bulbs, and electrical tape. A small screwdriver and needle-nose pliers are also helpful. These tools help safely diagnose and repair the LED string.
Can I Fix Led Lights Without Replacing Bulbs?
Yes, sometimes cleaning connections or re-soldering wires can restore function. Check for loose wires or corrosion at bulb sockets. Minor repairs often fix issues without needing new bulbs.
Why Does The Entire Led String Go Out If One Bulb Fails?
Many LED strings are wired in series, so one bad bulb breaks the circuit. This stops current flow to all bulbs. Replacing the faulty bulb usually restores the whole string.
Conclusion
Fixing a string of LED lights can be simple and quick. Check each bulb and connection carefully. Replace any broken parts with the right tools. Test the lights often while working. This way, you avoid bigger problems later. Taking small steps saves time and money.
Keep your lights bright and safe. Enjoy the warm glow without worries. Remember, patience and care lead to good results. Now, your LED lights should shine perfectly again.


