
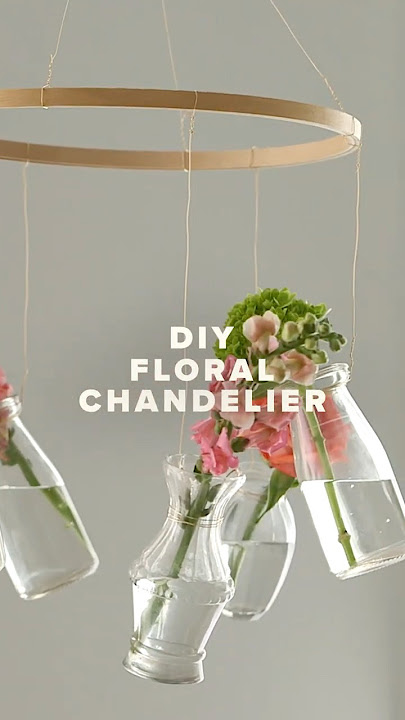
Looking to add a fresh, stunning touch to your space? A floral chandelier is the perfect way to brighten any room with natural beauty and charm.
Imagine your guests’ eyes lighting up as they walk under a cascade of vibrant flowers hanging gracefully above. You don’t need to be an expert or spend a fortune to create this showstopper. In this guide, you’ll discover simple steps and insider tips to make your own floral chandelier that will wow everyone.
Ready to transform your home with a unique, blooming centerpiece? Let’s get started!
Choosing Flowers And Materials
Choosing the right flowers and materials is key to creating a stunning floral chandelier that lasts and looks vibrant. The flowers you pick will set the mood and style, while the materials ensure your chandelier holds together securely. Think about the space where your chandelier will hang and the atmosphere you want to create—this will guide your choices.
Best Flowers For Chandeliers
Not all flowers are suitable for hanging arrangements. You want blooms that are lightweight, durable, and can handle some exposure to air without wilting quickly.
- Roses:Classic and elegant, they add a romantic touch and come in many colors.
- Orchids:Exotic and long-lasting, perfect for a modern or tropical vibe.
- Hydrangeas:Their fullness creates volume, but they can be heavy—balance with lighter flowers.
- Baby’s Breath:Great filler with a delicate look; it’s light and airy.
- Succulents:If you want something unique and low-maintenance, these can add texture.
Think about combining sturdy flowers with delicate ones to create a balanced look. Have you ever tried mixing textures in your floral designs? It can make your chandelier pop.
Selecting A Chandelier Frame
The frame holds everything together, so choose one that fits your design and is strong enough to support your flowers. Metal frames work well because they’re durable and easy to attach flowers to.
- Wire hoops:Simple, lightweight, and flexible for different shapes.
- Wooden rings:Give a rustic feel but might need extra support.
- Pre-made chandelier bases:If you want a polished look and a ready structure.
Consider the weight of your flowers when picking a frame. Would you prefer a circular shape or something more creative like a geometric design? Your choice can completely change the vibe.
Additional Supplies Needed
Beyond flowers and frames, a few more materials will make your work easier and your chandelier secure.
- Floral wire:For attaching flowers firmly to the frame.
- Floral tape:Helps bind stems and wires neatly.
- Green floral foam:Keeps flowers hydrated and in place if your design allows.
- Fishing line or strong twine:To hang your chandelier safely from the ceiling.
- Wire cutters and scissors:Essential tools for trimming and shaping.
Think about how accessible these supplies are for you. Have you checked if your local craft store stocks these or will you need to order online? Planning ahead saves last-minute stress.

Credit: www.youtube.com
Preparing Your Workspace
Preparing your workspace is key to making a floral chandelier. A clean and organized area helps your creativity flow. It also keeps your flowers fresh and your tools ready. Taking time to set up saves effort later. Here’s how to prepare well before you start crafting.
Setting Up Tools
Gather all tools before you begin. Common tools include:
- Floral wire cutters
- Floral tape
- Wire frames or hoops
- Hot glue gun (optional)
- Scissors
- String or fishing line for hanging
Arrange tools within easy reach. Use small containers for tiny items like pins and clips. Keep your workspace flat and sturdy for better control.
Organizing Flowers
Sort flowers by type and size. This helps in choosing the right blooms during assembly. Trim stems to a workable length. Place flowers in water to keep them fresh. Group filler flowers separately from main blooms. Lay everything out neatly so you can see all your options.
Safety Tips
Handle sharp tools with care. Cut away from your body to avoid injuries. Keep hot glue guns on heat-resistant surfaces. Work in a well-lit area to see clearly. Clean spills immediately to prevent slips. Take breaks to avoid hand strain. Safety keeps your project fun and stress-free.
Building The Base Structure
Begin by choosing a sturdy frame to support the flowers. Secure wires or hoops tightly to create a strong base. This structure holds the arrangement and ensures the chandelier stays balanced.
Building the Base Structure Creating a floral chandelier is an art that combines creativity with meticulous planning. Before diving into the vibrant world of blooms, you need to establish a strong base structure. This foundation is crucial for ensuring your chandelier is stable and visually appealing. Start by selecting a sturdy frame. An old lampshade or a wire wreath form can work wonders. Ensure it is lightweight yet robust enough to hold the weight of the flowers and greenery. Next, cover the frame with chicken wire. This provides a grid that helps in attaching the flowers securely. Remember, a well-built base is the secret to a stunning chandelier that lasts. Are you ready to bring your floral vision to life? Let’s dive deeper into the next steps.Attaching Flowers To The Frame
Once your base is set, it’s time to adorn it with nature’s beauties. Begin by choosing a variety of flowers that complement each other in color and size. Wrap the stems with floral wire to ensure they stay in place. Start from the top and work your way down, layering as you go. Mix fresh and faux flowers for a lasting effect. Experiment with different angles to give your chandelier a dynamic look.Creating A Balanced Design
Balance is key in creating a visually appealing chandelier. Distribute the flowers evenly around the frame to prevent it from looking lopsided. Use a mix of large blooms and smaller fillers. This creates depth and texture, making the chandelier more interesting. Step back frequently to assess your work. Adjust as needed to achieve harmony in your design.Securing The Arrangement
Ensure your arrangement is secure by double-checking all attachments. Use additional floral wire if needed to reinforce any loose areas. Think about the longevity of your chandelier. Mist the flowers with water to keep them fresh, especially if you’re using real blooms. Hang the chandelier in a location where it won’t be disturbed often. This minimizes the risk of flowers falling out of place. Now that you know how to build the base structure, how will you personalize your floral chandelier to make it truly unique?Adding Lighting Elements
Adding lighting elements to your floral chandelier can transform it from a simple decoration into a stunning centerpiece. The right lights will highlight the beauty of your flowers and set the perfect mood for your space. However, choosing and placing lights requires some thought to keep your creation safe and visually appealing.
Choosing The Right Lights
LED string lights are a popular choice for floral chandeliers. They stay cool, use less energy, and come in various colors and sizes. Fairy lights with tiny bulbs work well for delicate arrangements, while larger globe lights create a bolder look.
Think about the effect you want: soft white lights create a romantic vibe, while warm yellow lights add coziness. Battery-operated lights offer flexibility if you can’t access a power outlet nearby. What kind of atmosphere do you want your chandelier to create?
Incorporating Lights Safely
Safety is key when adding lights around real flowers and greenery. Avoid using lights that generate heat, as they can dry out or even burn your flowers. Always check the product specifications for temperature ratings.
Secure your wires carefully to prevent any strain or damage. Use clear zip ties or floral wire to attach lights without crushing petals or stems. Keep batteries and plugs away from water to avoid any electrical hazards.
Enhancing Floral Features
Place lights inside clusters of flowers to create a glowing effect that draws attention to your favorite blooms. Position lights at different depths to add dimension and shadow play. This technique can make your chandelier look fuller and more dynamic.
Try mixing light colors with flower shades for interesting contrasts. For example, cool blue lights can make white flowers pop, while warm amber lights enhance reds and oranges. How can you arrange lights to highlight your floral choices best?
Finishing Touches
The final phase of creating a floral chandelier focuses on the finishing touches. These small details enhance the overall look and make your chandelier stand out. Proper care here ensures your design looks polished and lasts longer.
Trimming And Adjusting Flowers
Trim flower stems to fit perfectly within the frame. Remove any wilted or damaged petals carefully. Adjust flowers to face outward evenly. Check for gaps and fill them with smaller blooms or greenery. This step ensures balance and fullness.
Adding Decorative Accents
Decorative accents add charm and personality. Consider using:
- Ribbons or lace for softness
- Beads or crystals for sparkle
- Twinkling fairy lights for a warm glow
Secure accents without damaging flowers. Place them where they complement the arrangement best.
Ensuring Durability
Durability keeps your chandelier looking fresh longer. Use floral wire to reinforce weak stems. Spray a light mist of water to maintain moisture. Hang the chandelier in a cool, shaded area. Avoid direct sunlight and drafts to prevent drying out.

Credit: www.youtube.com
Hanging And Displaying
Hanging and displaying your floral chandelier is where your creative effort truly shines. It’s not just about finding any spot—it’s about choosing the right place that enhances both the flowers and your space. Proper installation ensures safety and longevity, while thoughtful maintenance keeps your chandelier looking fresh and inviting.
Finding The Perfect Spot
Look for a location that naturally draws the eye, like above a dining table or in an entryway. Consider the chandelier’s size—does it fit without crowding the space? Lighting matters too; natural light can highlight the flowers’ colors beautifully, but avoid direct sunlight to prevent fading.
Think about how people move around the area. You want the chandelier to be visible but not in the way. Is there a hook or beam sturdy enough to hold the weight? If not, you might need to install one or choose a lighter design.
Installing The Chandelier
Start by gathering the right tools: a strong hook, anchor, and possibly a ladder. Make sure the hook is rated for the chandelier’s weight to avoid accidents. If you’re unsure about ceiling strength, test it carefully or consult a professional.
Attach the hook securely, then use durable wire or chains to hang your floral chandelier. Adjust the height so it’s easy to admire but not obstructive. Remember, a steady hang will prevent swaying, which could damage delicate flowers.
Maintenance Tips
Keep your chandelier fresh by gently dusting it weekly with a soft brush or cloth. If you used real flowers, replace them as they wilt—this keeps your display vibrant. For artificial arrangements, occasional cleaning with a damp cloth can remove dust without harming the materials.
Check the hanging mechanism regularly to ensure it remains secure. Small tweaks in positioning might be needed over time as flowers settle or fade. How often do you think your space needs a little floral refresh? Regular attention keeps your chandelier a stunning centerpiece.
Creative Variations
Creative variations can transform a simple floral chandelier into a unique centerpiece. Different materials and styles let you match any occasion or room. Changing flowers based on seasons or mixing real and faux blooms creates fresh looks. Combining styles can add charm and personality to your design.
Seasonal Flower Choices
Seasonal flowers bring natural beauty and color to your chandelier. Spring offers tulips, daffodils, and cherry blossoms. Summer shines with sunflowers, roses, and lilies. Autumn features chrysanthemums, marigolds, and berries. Winter allows evergreens, holly, and white roses. Using seasonal blooms keeps your design fresh and relevant.
Using Faux Flowers
Faux flowers last longer and require less care. They come in many colors and styles all year round. Good quality faux blooms look very real and vibrant. They work well for events or places without much light. Mixing faux flowers with real ones adds texture and depth.
Combining Different Styles
Mixing styles creates a unique floral chandelier. Blend rustic with elegant for a charming contrast. Use wildflowers with classic roses for a natural yet refined look. Try geometric shapes with soft blooms for a modern touch. Layering colors and textures adds visual interest and personality.

Credit: thecrownedgoat.com
Frequently Asked Questions
What Materials Are Needed For A Floral Chandelier?
You need a metal hoop, floral wire, fresh or artificial flowers, greenery, wire cutters, and hanging chains. These materials ensure your chandelier is sturdy and beautiful.
How Do You Secure Flowers On A Chandelier Frame?
Use floral wire to wrap flower stems tightly to the metal hoop. Ensure even spacing and secure attachment for durability.
Can I Use Real Flowers For A Floral Chandelier?
Yes, but real flowers have a short lifespan. Choose sturdy blooms and mist them to keep fresh longer. Artificial flowers last longer and require less maintenance.
What Is The Best Lighting For A Floral Chandelier?
LED fairy lights or battery-operated candles work well. They add a soft glow without heating or damaging the flowers.
Conclusion
Creating a floral chandelier brings beauty to any room. Choose fresh or artificial flowers that you love. Follow the steps carefully, and take your time. This project adds charm and a personal touch to events or home decor. Enjoy the process and feel proud of your work.
Your floral chandelier will impress guests and brighten the space. Try different flower colors and shapes for unique looks. Making one is fun, simple, and rewarding. Start today and bring nature’s beauty indoors.


