
Have you ever struggled to get your string lights working just right, only to find out the fuse needs attention? Knowing how to open the fuse plug on your string lights can save you time and frustration.
Whether your lights flicker or won’t turn on at all, this simple skill puts the power back in your hands. In this guide, you’ll learn clear, step-by-step instructions that anyone can follow. Keep reading to unlock the secret to fixing your string lights quickly and easily—no electrician needed!
Credit: www.familyhandyman.com
Tools Needed
Before you open the fuse plug on your string lights, gathering the right tools is crucial. Having these tools ready will make the process smoother and safer. You don’t want to be halfway through, realizing you’re missing something important.
Basic Tools For Opening A Fuse Plug
- Small Flathead Screwdriver: This helps you gently pry open the fuse holder without damaging the plastic casing.
- Tweezers: Useful for carefully removing and handling the tiny fuse inside the plug.
- Needle Nose Pliers: Offers better grip on small parts when tweezers are not enough.
Safety Equipment You Should Have
- Insulated Gloves: Protects your hands from accidental shocks, especially if the string lights are plugged in during the process (though unplugging is always best).
- Safety Glasses: Shields your eyes from any tiny debris or fuse fragments that might pop out.
Optional Tools That Make The Job Easier
- Multimeter: Allows you to test the fuse’s condition before and after replacement.
- Magnifying Glass: Helps you see small components clearly, especially if you have vision difficulties.
Do you have these tools already, or will you need to pick some up? Having the right gear at hand saves time and prevents frustration. Think about your workspace too—good lighting and a clean surface can make a surprising difference.

Credit: www.youtube.com
Locate The Fuse Plug
Locating the fuse plug on string lights is the first step to fixing any issues. The fuse plug protects your lights from electrical problems. Finding it is simple once you know where to look.
The fuse plug usually sits near the plug that goes into the power outlet. It is a small, rectangular or cylindrical piece attached to the power cord. Sometimes, it hides inside a small plastic compartment.
Knowing the fuse plug location helps you check the fuse and replace it if needed. This keeps your string lights safe and working well.
Check Near The Power Plug
Look closely at the power plug end of your string lights. The fuse plug is often inside or right next to the plug. It may have a small cover that you can open.
Identify The Fuse Compartment
The fuse compartment is a small box on the power cord. It may have a sliding or snap-open cover. This cover protects the fuse inside.
Look For Markings Or Labels
Fuse plugs often have labels like “Fuse” or symbols showing a fuse inside. These markings help you find it quickly.
Use A Flashlight For Better Visibility
Lighting can be low near the plug. A flashlight helps you see the fuse plug clearly. This makes locating it easier and faster.
Safety Precautions
Before opening the fuse plug on string lights, prioritize safety. Electricity can be dangerous. Following safety precautions can prevent accidents and damage.
Unplug The Lights
Always unplug the lights before opening the fuse plug. This ensures no electrical current is flowing. Handling live wires can result in electric shock.
Use Insulated Tools
Use tools with insulated handles to open the fuse plug. This reduces the risk of electrical shock. Metal tools without insulation can be hazardous.
Work In A Dry Area
Ensure your work area is dry and free of moisture. Water conducts electricity. Wet conditions increase the risk of electrical shock.
Wear Safety Gear
Wear rubber gloves and safety glasses. Rubber insulates against electricity. Glasses protect your eyes from any debris.
Read The Manufacturer’s Instructions
Refer to the manufacturer’s manual for specific instructions. Each string light set may differ. Following guidelines ensures correct handling and safety.
Check The Fuse Rating
Check the fuse rating before replacing it. Use a fuse with the same rating. Using the wrong fuse can cause overheating or failure.
Dispose Of Fuses Properly
Dispose of old fuses according to local regulations. Incorrect disposal can harm the environment. Check local guidelines for safe disposal methods.
Remove The Fuse Plug Cover
Removing the fuse plug cover is the first step in checking or replacing the fuse in your string lights. The fuse plug is usually located near the plug end of the lights. It protects your lights from electrical surges and helps keep them safe to use.
Carefully removing the cover gives you access to the fuse inside. This allows you to inspect the fuse for damage or replace it if needed. The process is simple and requires no special tools.
Locate The Fuse Plug Cover
Find the small rectangular or square cover near the plug end of the string lights. It is often a different color or texture than the rest of the cord. Sometimes it has a small tab or notch to help open it.
Use Your Fingernail Or A Small Tool
Gently pry open the fuse plug cover using your fingernail. If it is too tight, use a small flathead screwdriver or a coin. Insert it into the notch and twist carefully to avoid breaking the cover.
Lift The Cover Off Carefully
Once loosened, lift the cover straight off. Do not force it sideways as this can break the cover or damage the fuse inside. Set the cover aside in a safe place for reassembly.
Check For Hidden Clips Or Tabs
Some fuse plug covers have small clips or tabs that hold them in place. Press or slide these gently before lifting the cover. This helps avoid damage and keeps the cover reusable.
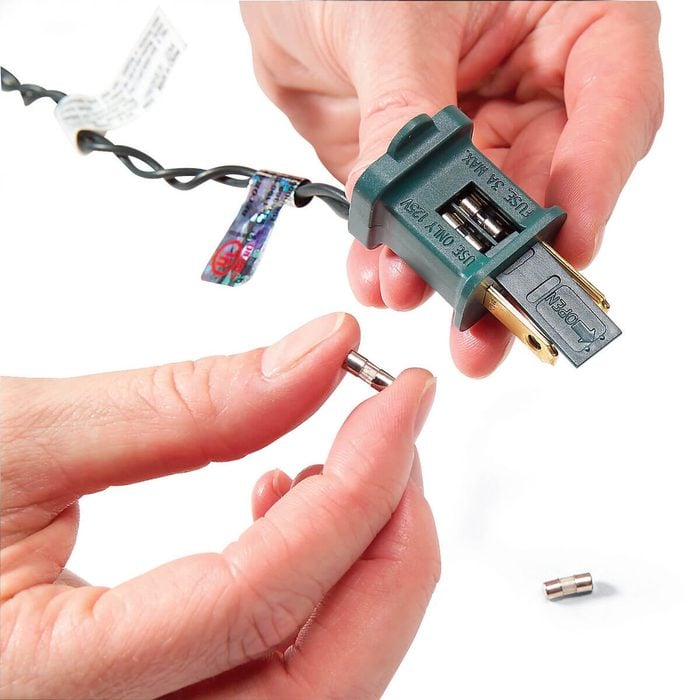
Extract The Fuse
Extracting the fuse from your string lights is a simple yet crucial step to check if the lights are functioning properly or to replace a blown fuse. It involves opening a small compartment usually found near the plug. Knowing how to do this safely can save you time and avoid unnecessary purchases.
Locate The Fuse Compartment
First, find the fuse compartment. It’s typically a small plastic box attached to the plug. Look for a sliding cover or a small tab that you can gently pry open with your fingernail or a flat tool.
Open The Fuse Holder Carefully
Use steady hands to slide or lift the cover without forcing it. If you apply too much pressure, the plastic might break. If it feels stuck, try wiggling it slightly side to side instead of pulling straight out.
Remove The Fuse Gently
Once the compartment is open, you’ll see one or two small glass or plastic fuses. Carefully lift them out with your fingers or tweezers. Avoid using sharp tools that can damage the fuse or the holder.
Inspect The Fuse For Damage
Hold the fuse up to the light and look inside. A blown fuse usually has a broken wire or a darkened interior. This simple inspection helps you decide if you need a replacement or if the issue lies elsewhere.

Credit: www.youtube.com
Check The Fuse Condition
Checking the fuse condition is a crucial step before opening the fuse plug on your string lights. A faulty fuse can be the reason your lights aren’t working, so understanding how to inspect it properly can save you time and frustration. Let’s look at how you can check if the fuse is still good or needs replacement.
Locate The Fuse Holder
First, find the fuse holder on your string lights’ plug. It’s usually a small, rectangular compartment with a sliding or snap-open cover. If you’ve ever struggled to spot it, look for a translucent or opaque plastic piece near the plug’s prongs.
Once located, carefully open the fuse holder cover. You might need a small flathead screwdriver or a fingernail to pry it open gently. Be cautious not to force it too hard, as the plastic can break easily.
Inspect The Fuse Visually
After opening, examine the fuse inside. A good fuse typically looks intact with an unbroken wire inside the glass or plastic casing. If you see a dark spot, a broken filament, or any discoloration, the fuse is likely blown.
Test The Fuse With A Multimeter
Visual inspection isn’t always enough. If you have a multimeter, set it to the continuity test mode. Place the probes on each end of the fuse. A beep or zero resistance reading means the fuse is good; no beep or infinite resistance means it’s blown.
Consider Fuse Ratings Before Replacement
If the fuse needs replacement, check its rating, usually printed on the fuse itself or in the string lights’ manual. Using a fuse with the wrong amperage can cause further damage or even safety hazards. Always match the exact rating for safe operation.
Keep Spare Fuses On Hand
Having spare fuses saves you from last-minute trips to the store. Many string light sets come with extra fuses—store them in a small box or bag labeled “String Light Fuses.” This simple habit can keep your lights shining longer without hassle.
Replace Or Reinsert The Fuse
Replacing or reinserting the fuse in string lights is a simple fix for many lighting problems. The fuse protects the lights from electrical damage. When the fuse blows, the lights stop working. Fixing this involves finding the fuse, removing it, and either putting it back or replacing it.
Knowing how to handle the fuse safely can save time and money. This process does not need special tools. Just a little care and attention will get the lights glowing again.
Locate The Fuse Compartment
The fuse is inside the plug of the string lights. Look for a small sliding cover on the plug. It may have a tiny tab or a notch. Slide or lift this cover gently to open the fuse compartment. The fuse is usually a small glass or plastic tube inside this space.
Remove The Old Fuse
Use your fingers or a small tool to pull out the fuse carefully. Do not use too much force to avoid breaking it. Check the fuse for any signs of damage, like a broken wire inside or dark spots. A damaged fuse means it needs replacement.
Reinsert The Fuse
If the fuse looks fine, you can put it back. Hold the fuse by the ends and place it inside the compartment. Make sure it fits snugly in the slots. Close the cover securely to keep the fuse in place.
Replace The Fuse With A New One
If the fuse is broken, get a new one with the same rating. Check the numbers on the fuse or the string light manual. Insert the new fuse exactly like the old one. Close the cover tightly to avoid loose connections.
Test The Lights
Plug the string lights into an outlet. Watch to see if all bulbs light up. If the lights still do not work, check the fuse and connections again. Sometimes multiple fuses or bulbs can cause issues.
Secure The Fuse Plug Cover
Securing the fuse plug cover is a crucial step when handling string lights. It ensures the fuse stays protected from dust, moisture, and accidental damage. A properly secured cover can save your lights from short circuits and prolong their lifespan.
Check The Fuse Plug For Proper Alignment
Before closing the cover, make sure the fuse is correctly seated inside its slot. Misalignment can cause the cover not to fit properly or damage the fuse. Take a moment to adjust the fuse so it rests flat and snug within the compartment.
Align The Cover With The Fuse Plug Base
Carefully place the cover over the fuse plug base, aligning any tabs or grooves. Many covers have small notches that fit only one way. If you feel resistance, don’t force it; recheck the alignment to avoid breaking the cover.
Apply Gentle Pressure To Snap The Cover Closed
Once aligned, press down gently but firmly until you hear or feel a click. This snap indicates the cover is locked in place. Avoid using excessive force, which can crack the plastic or bend the fuse inside.
Test The Security Of The Cover
Give the cover a slight tug to ensure it’s secure. A loose cover can fall off during use, exposing the fuse. If it moves, repeat the alignment and pressing steps until the cover stays firmly in place.
Why Does A Secure Fuse Plug Cover Matter?
Have you ever had your string lights stop working unexpectedly? Often, a loose fuse cover lets in moisture or dust, causing the fuse to blow. Keeping the cover secure protects your investment and keeps your lights shining bright during every occasion.
Test The String Lights
Testing string lights is essential before opening the fuse plug. It helps find out if the lights work or if there is a problem. This step saves time and avoids unnecessary repairs. Testing also ensures safety by checking for electrical issues early.
Use simple tools and follow clear steps to test string lights properly. Understanding how the lights respond can guide the next actions. Testing is quick and easy but very effective.
Gather Necessary Tools
- A multimeter or voltage tester
- Power source or outlet
- Gloves for safety
- Proper lighting for clear visibility
Inspect The Lights Visually
- Look for broken bulbs or wires
- Check for discoloration or burn marks
- Ensure plugs and connectors are intact
- Note any damage before testing
Perform A Power Test
- Plug the string lights into a power source
- Turn on the power and watch for lights
- Check if all bulbs light up evenly
- Note any flickering or dim lights
Use A Multimeter To Check Continuity
- Set the multimeter to continuity mode
- Touch the probes to both ends of the fuse
- Listen for a beep or look for a reading
- A beep means the fuse is good; no beep means it is blown
Troubleshooting Tips
Carefully pry open the fuse plug cover using a small flat tool. Gently remove the fuse to check for damage or replace it if needed. Ensure the fuse fits snugly before closing the cover to restore your string lights safely.
Troubleshooting string lights can be simple with the right tips. Knowing how to open the fuse plug is crucial. It ensures your lights shine brightly throughout the season. Follow these troubleshooting tips to keep your string lights in top shape.Check The Power Source
Ensure the lights are plugged into a working outlet. Test the outlet with another device. Confirm the outlet provides power. This step can save you time.Inspect The Plug
Look for any visible damage on the plug. Check for cracks or signs of wear. Damaged plugs may need replacement. A secure connection is important.Examine The Fuse
Open the plug to inspect the fuse. Use a small flathead screwdriver. Ensure the fuse is not blown. Replace it if necessary.Replace Burnt-out Bulbs
Identify and replace any burnt-out bulbs. Use the same type and wattage. A single burnt bulb can affect the entire string. After troubleshooting, plug the lights back in. Observe if they light up. If not, recheck each troubleshooting step.Frequently Asked Questions
How Do I Open A Fuse Plug On String Lights?
To open a fuse plug, locate the fuse compartment near the plug. Use a small screwdriver or fingernail to gently pry open the cover. Be careful not to damage the plug or fuse.
What Tools Are Needed To Open A Fuse Plug?
You usually need a small flathead screwdriver or a coin. These tools help you gently pry open the fuse compartment without damaging it.
How To Safely Replace A Fuse In String Lights?
First, unplug the lights. Open the fuse plug carefully. Remove the blown fuse and replace it with an identical one. Close the compartment and test the lights.
Why Won’t The Fuse Plug Open On My String Lights?
The fuse plug might be stuck due to dirt or damage. Avoid forcing it open. Try gently prying with a small tool or check for manufacturer instructions.
Conclusion
Opening the fuse plug on string lights is simple with the right steps. Always handle the plug carefully to avoid damage. Checking the fuse ensures your lights work safely and well. Remember to replace the fuse with the correct type when needed.
Taking these small actions helps keep your string lights shining bright. Now, you can enjoy your lights without worry or hassle.


