
Have you ever wanted to add a smart touch to your home or project? Creating a motion sensor might be easier than you think.
Imagine a device that can detect movement and respond instantly—turning on lights, triggering alarms, or even starting cameras. You’ll discover simple steps to build your own motion sensor, using easy-to-find parts and clear instructions. Whether you’re a beginner or just curious, this guide will help you bring your ideas to life quickly and confidently.
Ready to take control and add some smart sensing power to your space? Let’s get started!

Credit: www.youtube.com
Motion Sensor Basics
Understanding the basics of motion sensors is crucial before building your own device. A motion sensor detects movement in a specific area and sends a signal to trigger an action, like turning on a light or sounding an alarm. Knowing how these sensors work and what components they need will make your project smoother and more effective.
Types Of Motion Sensors
You’ll find several types of motion sensors, each designed to detect movement differently. The most common ones include:
- Passive Infrared (PIR) Sensors:These sense body heat and are great for indoor security systems.
- Ultrasonic Sensors:They emit sound waves and measure the reflection time to detect objects.
- Microwave Sensors:These send microwave pulses and detect motion by analyzing the reflected waves.
- Tomographic Sensors:They use radio waves to detect movement through walls and other obstacles.
Choosing the right type depends on your project’s environment and what you want to detect. Have you considered where your sensor will be placed and what kind of motion it needs to pick up?
Key Components Needed
Building a motion sensor requires a few essential parts. Here’s what you’ll typically need:
| Component | Purpose |
|---|---|
| Sensor Module (e.g., PIR sensor) | Detects motion by sensing changes in the environment |
| Microcontroller (e.g., Arduino, Raspberry Pi) | Processes sensor data and controls outputs |
| Power Supply | Provides necessary electrical power to the circuit |
| Output Device (LED, buzzer, relay) | Indicates detection or triggers another device |
| Connecting Wires and Breadboard | Helps assemble and test the circuit easily |
Gathering these components is your first step. Think about which microcontroller suits your skill level and project needs best. Have you worked with any of these parts before?
Tools And Materials
Before you start building your motion sensor, gathering the right tools and materials is crucial. Having everything on hand helps you stay focused and efficient throughout the project. Let’s look closely at what you’ll need to bring your motion sensor to life.
Essential Tools
- Soldering Iron:A good soldering iron lets you connect wires and components securely. If you prefer, a solderless breadboard can work for testing circuits.
- Wire Strippers:These make it easy to remove insulation from wires without damaging them.
- Multimeter:Use it to check voltages and continuity. It helps ensure your circuit works correctly before final assembly.
- Screwdriver Set:Small screwdrivers come handy for assembling parts and securing components.
- Hot Glue Gun:It’s great for fixing sensors and wires in place, providing a neat finish.
Do you have a favorite tool that always makes your projects easier? Having the right tools can save you hours of frustration.
Recommended Materials
- Passive Infrared (PIR) Sensor:This sensor detects movement by sensing infrared light from objects.
- Microcontroller Board (like Arduino):It processes signals from the sensor and controls the output.
- Resistors and Capacitors:These help manage electrical flow and stabilize your circuit.
- LED or Buzzer:Use these to indicate when motion is detected.
- Jumper Wires:Flexible wires for connecting components without soldering.
- Power Supply:Batteries or a USB power source to keep your sensor running.
Think about how you want your motion sensor to respond. Will it light up an LED, trigger an alarm, or send a notification? Choosing materials that match your goal makes your project more rewarding.
Step-by-step Assembly
Gather all parts like sensors, wires, and power source before starting. Connect each component carefully following the circuit design. Test the sensor to ensure it detects motion correctly and adjust if needed.
Creating your own motion sensor can be a rewarding DIY project. Imagine the satisfaction of seeing a device you assembled with your own hands coming to life. Let’s dive into the detailed steps of assembling your motion sensor, ensuring each component is connected perfectly for optimal performance.Wiring The Sensor
Begin by organizing your workspace with all necessary tools and components. Having everything in sight can save you time and frustration. Gather your motion sensor, breadboard, jumper wires, and resistors. Start by identifying the pins on your motion sensor. Typically, you’ll find a ground pin, a power pin, and an output pin. Use jumper wires to connect the ground pin to the ground rail on your breadboard. Next, connect the power pin to the positive rail. This setup ensures that your sensor is ready to receive power. Finally, connect the output pin to a digital input on your microcontroller. This connection is crucial for sending signals when motion is detected.Connecting The Power Supply
Powering your motion sensor correctly is vital for its functionality. Choose a reliable power source, such as a battery or a USB power supply. Connect the positive lead of your power supply to the positive rail of your breadboard. This connection will distribute power to all components linked to the rail. Similarly, attach the ground lead to the ground rail. This completes the power circuit, ensuring your sensor is energized and ready to function.Testing The Circuit
Once everything is wired and powered, it’s time to test the circuit. Does the sensor detect motion and send a signal to your microcontroller? Activate your circuit and observe the output. You should see a change in the digital input when motion is detected. If the sensor isn’t responding, double-check your connections. Misplaced wires or loose connections can often be the culprit. Testing allows you to troubleshoot and refine your setup. What adjustments can you make to improve sensitivity or accuracy? Remember, patience is key. Each tweak brings you closer to a fully operational motion sensor.
Credit: circuitdigest.com
Programming The Sensor
Programming the motion sensor is where your project truly comes to life. This stage transforms hardware into a smart system that reacts to movement. You’ll write code that tells the sensor how to detect motion and what to do when it senses activity.
Choosing A Microcontroller
Your choice of microcontroller affects how easily you can program the sensor and add features later. Popular options include Arduino, ESP8266, and Raspberry Pi Pico. Each has strengths: Arduino is beginner-friendly, ESP8266 offers built-in Wi-Fi, and Raspberry Pi Pico provides more processing power.
Think about your project’s needs. Do you want wireless alerts? Or just a simple light trigger? Your microcontroller should match those goals without making programming too complex.
Writing Basic Code
Start by writing simple code that reads the sensor’s signal. Typically, this means setting a digital pin to input mode and checking if it detects motion.
- Initialize the sensor and microcontroller pins.
- Use conditional statements to check sensor output.
- Define actions like turning on an LED or sending a message.
Keep your code clean and comment each part. This helps you understand what each section does and makes debugging easier.
Uploading And Debugging
Uploading your code to the microcontroller usually involves a USB connection and software like the Arduino IDE. Make sure your device is properly connected and the right port is selected.
Once uploaded, test the sensor by moving in front of it. If it doesn’t respond, check the wiring and code logic.
Use serial print statements to see real-time data from the sensor. This simple trick helped me find a wiring mistake on my first try, saving hours of frustration. Don’t hesitate to adjust your code step-by-step and retest often.
Mounting And Placement
Mounting and placement are crucial steps in setting up a motion sensor. The right spot ensures your sensor detects movement effectively, while secure installation prevents false alarms or damage. Choosing the perfect location and securing your device properly will make your motion sensor reliable and long-lasting.
Ideal Sensor Locations
Think about areas where motion is most likely to occur. Entrances such as front doors, back doors, and windows are top choices. Hallways and staircases also work well because they act as natural pathways inside your home or office.
Consider the sensor’s range and angle. Mount it high enough—usually around 6 to 8 feet—to cover a wide area without obstructions. Avoid placing sensors near heating vents, air conditioners, or direct sunlight to reduce false triggers.
Ask yourself: Where would an intruder move first? Position sensors to cover these spots. Also, think about pets—can your sensor differentiate between a person and a small animal? Adjust placement accordingly.
Securing The Device
Use the right tools to attach your sensor firmly. Most sensors come with mounting brackets or adhesive pads. Screws provide the most secure fit, especially for outdoor sensors exposed to wind or rain.
If you use adhesive, clean the surface well before sticking the sensor. This simple step makes a big difference in how long the sensor stays put. Double-check that the device is level and aimed correctly before finalizing the installation.
Think about future maintenance. Can you easily remove or adjust the sensor without damage? Planning for this saves time and frustration down the line. A well-secured sensor means fewer false alarms and better security overall.
Troubleshooting Tips
Troubleshooting a motion sensor can sometimes feel like solving a small mystery. You might have built your sensor carefully, but it still doesn’t work as expected. Understanding common issues and knowing quick fixes can save you time and frustration.
Common Issues
One frequent problem is the sensor not detecting motion at all. This could be due to incorrect wiring or a faulty connection. Have you double-checked that all wires are securely connected?
Another issue is false triggers, where the sensor activates without any movement. This often happens if the sensor is placed near heat sources like radiators or direct sunlight. Is your sensor positioned away from anything that could confuse it?
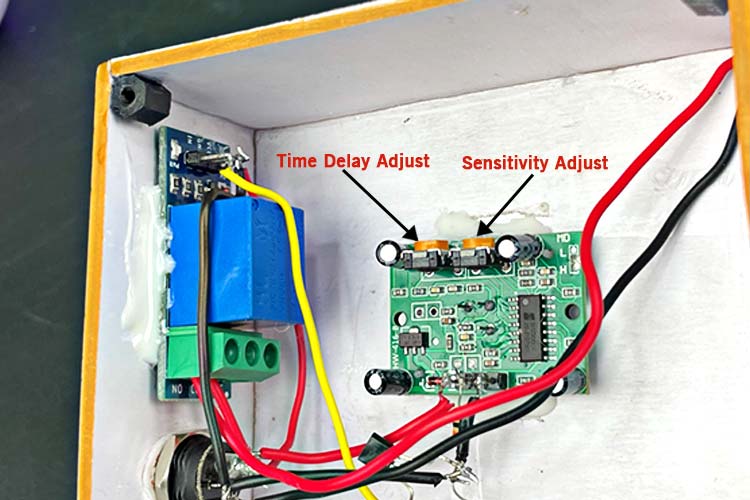
Sometimes the sensor’s detection range is too short or too long. This might happen if the sensor’s sensitivity setting is off or if the lens is dirty. When was the last time you cleaned your sensor’s lens or adjusted its sensitivity?
Quick Fixes
- Check connections:Ensure all wires are tight and connected according to the circuit diagram. Loose connections are a common cause of failure.
- Adjust placement:Move the sensor to avoid heat sources and reflective surfaces that could cause false alarms.
- Clean the sensor:Gently wipe the lens with a soft cloth to remove dust or smudges that block detection.
- Modify sensitivity:Many motion sensors have an adjustable knob or switch. Try lowering or increasing sensitivity to match your needs.
- Test power supply:Verify the sensor is getting the correct voltage. Sometimes a weak battery or unstable power source causes problems.
Have you tried these fixes and still face issues? Sometimes replacing the sensor module itself is the fastest solution. What’s your experience with troubleshooting sensors? Sharing your story might help others facing the same challenges.
Enhancing Sensor Features
Enhancing your motion sensor improves its performance and makes it more useful. You can adjust settings to match your needs and connect it to other devices. These upgrades add flexibility and better control to your sensor setup.
Adding Sensitivity Controls
Adjusting sensitivity helps the sensor detect motion more accurately. You can set it to react to small movements or only to larger ones. This reduces false alarms from pets or background activity. Use a simple dial or a digital setting to change sensitivity levels.
Common options include:
- Low sensitivity for big movements only
- Medium sensitivity for normal use
- High sensitivity to catch small motions
Test your sensor in different settings to find the best sensitivity for your space.
Integrating With Smart Home Systems
Connecting your motion sensor to smart home systems adds more control. It can trigger lights, alarms, or cameras automatically. Use popular platforms like Google Home, Amazon Alexa, or Apple HomeKit for easy integration.
Integration benefits include:
- Remote monitoring through mobile apps
- Custom automation based on motion detection
- Voice control to turn sensors on or off
Choose sensors with compatible wireless protocols like Wi-Fi or Zigbee for smooth connection.

Credit: circuitdigest.com
Frequently Asked Questions
What Components Are Needed To Build A Motion Sensor?
To build a motion sensor, you need a PIR sensor, microcontroller, resistors, and a power source. These parts detect movement by sensing infrared radiation changes.
How Does A Motion Sensor Detect Movement?
A motion sensor detects movement by sensing changes in infrared heat emitted by objects. When a warm object moves, the sensor triggers a signal.
Can I Use Arduino To Create A Motion Sensor?
Yes, Arduino is ideal for creating motion sensors. It reads signals from a PIR sensor and processes movement detection efficiently.
What Are Common Applications Of Homemade Motion Sensors?
Homemade motion sensors are used in security systems, automatic lighting, and home automation. They help save energy and improve safety.
Conclusion
Creating a motion sensor is easier than it seems. Follow the steps carefully to build one yourself. This project helps you learn about sensors and electronics. You can use your motion sensor for many tasks at home. Experiment with different parts to improve its function.
Keep practicing to get better results every time. Enjoy the process of making and testing your sensor. Simple tools and clear steps make it possible. Start today and see how your sensor works!


