
Are your motion sensor lights not working the way you want them to? Maybe they turn on too late, stay on too long, or don’t detect movement properly.
Adjusting these lights might seem tricky, but it’s easier than you think. In this guide, you’ll learn simple steps to fine-tune your motion sensor lights so they respond perfectly to your needs. Keep reading, and you’ll save energy, boost security, and get the most out of your lighting—all with just a few quick adjustments.
Choosing The Right Motion Sensor Light
Choosing the right motion sensor light is essential to ensure your space is both secure and energy-efficient. The perfect light not only detects movement accurately but also suits your specific environment and needs. Let’s look at the types available, key features to watch for, and smart placement ideas to make your motion sensor light work best for you.
Types Of Motion Sensor Lights
There are several types of motion sensor lights designed for different uses. Understanding each type helps you pick one that fits your space and purpose.
- Floodlights:Great for illuminating large outdoor areas like driveways or backyards.
- Spotlights:Focused beams ideal for highlighting specific spots or entryways.
- Wall-mounted lights:Common for porch or garage lighting, combining sensor and fixture in one unit.
- Solar-powered lights:Energy-saving options perfect for locations without easy access to power.
Think about where you want the light and what it should cover to decide which type fits best.
Key Features To Consider
Not all motion sensor lights are created equal. Some features can make a huge difference in performance and convenience.
- Detection range:Look for a sensor that covers the area you want without false triggers.
- Adjustable sensitivity:Helps reduce unnecessary activations from small animals or passing cars.
- Light duration settings:Choose one that lets you control how long the light stays on after detecting motion.
- Brightness levels:Adjustable brightness ensures the light isn’t too harsh or too dim.
- Weather resistance:Essential if the light will be outdoors to withstand rain and extreme temperatures.
I once installed a motion sensor light without adjustable sensitivity and had it triggered constantly by neighborhood cats. It taught me to always check this feature before buying.
Placement Tips
Where you install your motion sensor light affects how well it works. Position it thoughtfully for maximum security and efficiency.
- Mount the sensor at about 6 to 10 feet high for optimal detection.
- Avoid pointing sensors towards busy streets or trees to prevent false alarms.
- Place lights near entry points like doors, garages, or pathways for safety and convenience.
- Consider overlapping coverage if you use multiple lights to eliminate dark spots.
Have you noticed certain spots around your home where lights never seem to turn on? Changing the angle or height can make a big difference.
Basic Components Of Motion Sensor Lights
Understanding the basic components of motion sensor lights is key to adjusting them effectively. Each part plays a specific role in how the light responds to movement and how long it stays on. Knowing these details can save you time and help you customize the settings to fit your needs perfectly.
Sensor Sensitivity
Sensor sensitivity controls how easily the motion detector picks up movement. If set too high, even small animals or leaves might trigger the light, which can be annoying. Too low, and you might miss important activity, like someone approaching your door.
Think about your space: Do you want the light to react to distant or subtle movements? Adjusting sensitivity lets you fine-tune this balance. Try moving the sensor and testing the response to find the sweet spot for your environment.
Light Duration
Light duration determines how long the light stays on after detecting motion. You can set it for just a few seconds or several minutes depending on what you need. For example, longer duration works well for pathways, while shorter bursts might be better for security purposes.
Experiment with different times to see what feels natural and saves energy. Have you noticed how some lights stay on too long, wasting power? Adjusting duration helps you avoid that while keeping your space well-lit.
Detection Range
Detection range controls how far away movement can be detected. This is important for covering the right area without triggering the light unnecessarily. A narrow range works well for small yards, while a wider range suits larger spaces or driveways.
Ask yourself: Do you want the light to catch movement far away, or just near the entry point? Adjusting this helps you focus the sensor where you need it most, improving both security and convenience.
Preparing For Adjustment
Check the sensor’s position and clear away any objects that might block its view. Adjust the sensitivity and timer settings to match your needs. Ensure the power supply is stable before making changes.
Adjusting motion sensor lights can improve security and save energy. Before making adjustments, prepare thoroughly to ensure the process goes smoothly. Proper preparation helps achieve the desired results without complications.Safety Precautions
Safety is paramount when working with electrical devices. Turn off power to the motion sensor light at the circuit breaker. This step prevents accidental electric shocks. Ensure the area around the light is dry to avoid slipping. Use a sturdy ladder if the light is high up. Wear protective gloves to protect your hands from sharp edges.Tools Needed
Gather the necessary tools before starting the adjustment. A screwdriver is essential for accessing the sensor components. Use a ladder for reaching higher fixtures. A flashlight helps in low-light conditions. A cloth is useful for cleaning the sensor lens. A user manual can guide you through specific adjustments.Initial Setup
Begin by locating the motion sensor on the light fixture. Check the sensor’s current settings and note them down. Remove any dust or debris from the sensor lens. This can enhance its sensitivity. If the light has a switch, set it to the “off” position. This prevents accidental activation during adjustments.
Credit: manuals.plus
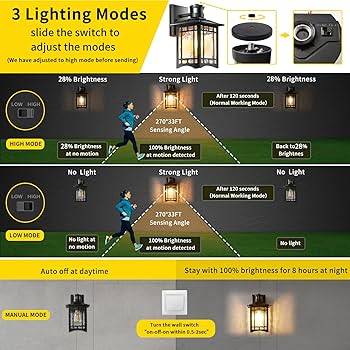
Adjusting Sensor Sensitivity
Adjusting the sensor sensitivity on your motion sensor lights can make a huge difference in how well they work for you. Too sensitive, and the light might turn on every time a small animal walks by. Not sensitive enough, and it might fail to detect someone approaching your home.
Finding the right balance ensures your lights activate only when needed, saving energy and avoiding unnecessary disturbances.
How Sensitivity Affects Performance
Sensitivity controls how much movement the sensor detects before triggering the light. High sensitivity picks up tiny motions like leaves blowing in the wind, which can cause frequent false alarms. Low sensitivity might ignore legitimate movement, leaving dark areas unlit when you need them most.
Think about your environment. Is your light near a busy street with a lot of passing cars or animals? If yes, setting the sensitivity too high could mean your light is constantly flickering on and off. On the other hand, if your light covers a quiet backyard, a higher sensitivity might be helpful to catch any unexpected visitors.
Step-by-step Sensitivity Adjustment
- Locate the sensitivity dial or switch:Most motion sensor lights have a small knob or button labeled “sensitivity” or “SENS.” It’s usually near the sensor or inside the light’s casing.
- Start with a medium setting:Set the sensitivity to about the middle of the scale. This gives you a good baseline to test from.
- Test the sensor:Walk through the detection area to see if the light turns on at the right distance and movement level.
- Adjust gradually:If the light triggers too often, lower the sensitivity in small steps. If it doesn’t turn on when you expect, increase sensitivity.
- Observe over time:Test at different times of day and in different weather. Sensitivity might need tweaking depending on conditions.
Have you ever been frustrated by your motion light turning on for a stray cat or a passing car? Adjusting sensitivity can fix that. Pay close attention to how your sensor reacts to real-life movement to find the perfect setting for your space.
Setting Light Duration
Setting the light duration for motion sensor lights controls how long the light stays on after detecting movement. Adjusting this time helps save energy and improves security. The right duration depends on the area and how often people pass by.
Choosing The Right Duration
Select a duration based on your needs. Short times work well for busy places. Long times suit quiet areas or where you need steady light. Think about safety and convenience. Avoid setting it too short, or the light may turn off too quickly.
Adjusting Time Settings
Most motion sensor lights have a dial or buttons to change the duration. Turn the dial or press buttons to increase or decrease time. Test the setting by walking in front of the sensor. Adjust until the light stays on for the desired time. Check the manual for specific instructions on your model.

Credit: www.youtube.com
Modifying Detection Range And Angle
Modifying the detection range and angle of your motion sensor lights can dramatically improve their performance. By fine-tuning these settings, you control how much area the sensor covers and avoid false triggers from unwanted movements. Let’s look at how you can adjust these settings to fit your specific needs.
Understanding Detection Zones
Detection zones are the specific areas where your motion sensor can detect movement. These zones are usually shaped like cones or wedges extending from the sensor. Knowing the shape and size of your sensor’s detection zone helps you position it effectively.
Different sensors have different detection patterns. Some cover a wide angle but shorter distance, while others detect movement far away but in a narrower field. Have you noticed your sensor turning on when a car passes by the street? That’s your detection zone picking up movement outside your intended area.
Adjusting Range And Angle
Most motion sensor lights come with simple controls or screws to adjust the detection range and angle. To reduce false alarms, try narrowing the angle first. This limits the sensor to detect motion only in a focused area.
You can usually twist or slide a dial to change the range—shortening it if you want the light to trigger only when someone is close. For angle adjustment, physically tilt or rotate the sensor so it points exactly where you want it. Have you tested your adjustments by walking through the detection zone? This helps you see if the settings are just right.
- Start with a mid-range setting and adjust gradually.
- Use a ladder to reach the sensor comfortably.
- Check your sensor’s manual for specific adjustment instructions.
Properly modifying the detection range and angle ensures your motion sensor lights work efficiently, saving energy and enhancing security around your home.
Testing And Fine-tuning Settings
Testing and fine-tuning your motion sensor lights is crucial to ensure they work exactly how you want. It’s not just about installing and forgetting them. You need to observe their behavior in real situations and tweak the settings to match your needs perfectly.
Conducting Effective Tests
Start testing your motion sensor lights during different times of the day. Try walking at various speeds and distances to see how far and quickly the sensor detects movement.
Observe how the light responds to pets or passing cars. This helps you decide if you need to adjust the sensitivity to avoid false triggers.
Test the duration the light stays on after activation. Ask yourself: Is it enough time for you to get through the area safely, or does it turn off too soon?
Common Troubleshooting Tips
- False triggers:If your lights turn on too often, lower the sensitivity or adjust the sensor angle away from busy streets or sidewalks.
- Light doesn’t turn on:Check if the sensor lens is clean and free from obstructions like dirt or spider webs.
- Short light duration:Increase the timer setting so the light stays on longer, especially if your space requires more time to pass through.
- Sensor range issues:Adjust the sensor’s position or angle to better cover the area you want illuminated.
Have you ever noticed your motion sensor light activating at odd times and wondered why? These troubleshooting steps usually solve most common problems without needing professional help.

Credit: www.amazon.com
Maintaining Motion Sensor Lights
Maintaining motion sensor lights keeps them working well and extends their life. Dirt, weather, and worn parts can stop sensors from detecting motion properly. Simple care and timely fixes make sure your lights respond fast and shine bright when needed.
Regular Cleaning
Clean the sensor lens often to remove dust and spider webs. Use a soft cloth and mild soap with water. Avoid harsh chemicals that can damage the lens. Dirt blocks the sensor’s view and lowers its accuracy. Check the light cover for dirt too.
Seasonal Adjustments
Change settings as seasons shift. In winter, lower the sensitivity to avoid false triggers from small animals. In summer, increase sensitivity for larger areas and more motion. Adjust the light timer to match longer or shorter nights. This keeps your motion sensor lights smart and energy-efficient year-round.
Replacing Components
Replace bulbs that flicker or burn out quickly. Use the correct bulb type and wattage for your fixture. Swap out batteries in wireless models every year. Check sensor parts for cracks or wear and replace if broken. Using original parts helps maintain good performance and safety.
Frequently Asked Questions
How Do I Adjust The Sensitivity Of Motion Sensor Lights?
To adjust sensitivity, locate the sensor’s control dial or switch. Turn it to increase or decrease detection range. Test by walking in front of the sensor. Adjust until the light activates at your desired distance and ignores small movements.
What Is The Best Angle For Motion Sensor Lights?
Position the sensor between 30 to 45 degrees from the ground. This angle maximizes detection while reducing false triggers. Avoid facing it directly towards roads or busy sidewalks to prevent constant activation from passing vehicles or pedestrians.
How Can I Change The Duration Motion Sensor Lights Stay On?
Most motion sensor lights have a time delay dial. Rotate this dial to set how long the light remains on after motion stops. Adjust the time from a few seconds to several minutes, depending on your needs.
Why Is My Motion Sensor Light Not Detecting Movement?
Check if the sensor lens is clean and unobstructed. Ensure the sensitivity is set correctly and the sensor is powered. Also, confirm the sensor isn’t facing direct sunlight or reflective surfaces that may interfere with detection.
Conclusion
Adjusting motion sensor lights takes only a few simple steps. You can set the sensitivity to catch movement clearly. Change the light timer to fit your needs. Direct the sensor to cover the right area. Proper adjustments save energy and improve safety.
Small tweaks make your outdoor space brighter and smarter. Try different settings until you find what works best. Enjoy the comfort and security motion lights provide.


