
Are you tired of your motion sensor light switch turning on at the wrong times? Maybe it’s too sensitive, or you just want to control your lights manually.
Whatever your reason, disabling a motion sensor light switch can give you the freedom you’re looking for. You’ll discover simple, step-by-step ways to turn off your motion sensor light switch quickly and safely. Keep reading, and you’ll learn how to take back control of your lighting without hassle.
Tools And Materials Needed
Disabling a motion sensor light switch requires some basic tools and materials. Having everything ready makes the task easier and safer. Gather all items before starting to avoid interruptions.
Using the correct tools ensures you do not damage the switch or wiring. Safety gear protects you from electrical hazards. Prepare a clean workspace with good lighting.
Essential Tools
- Screwdriver set (flathead and Phillips)
- Voltage tester or multimeter
- Wire stripper and cutter
- Needle-nose pliers
- Electrical tape
Safety Equipment
- Insulated gloves
- Protective eyewear
- Non-conductive mat or rubber-soled shoes
Materials Needed
- Replacement standard light switch (if needed)
- Wire connectors (wire nuts)
- Instruction manual for your motion sensor switch
Safety Precautions
Safety is the top priority when disabling a motion sensor light switch. Handling electrical devices without care can cause shocks or damage. Follow clear safety steps to protect yourself and your home.
Always prepare before starting work on any electrical switch. Simple precautions reduce risks and ensure a smooth process.
Turn Off The Power At The Circuit Breaker
Locate the correct circuit breaker for the light switch. Switch it off to cut the power supply. Never rely on the wall switch alone for safety.
Use A Voltage Tester To Confirm Power Is Off
Check the wires with a voltage tester after turning off the breaker. This step confirms no electricity flows to the switch. Safety comes first.
Wear Insulated Gloves And Use Tools With Insulated Handles
Protect your hands with insulated gloves while working. Use tools designed for electrical work with insulated grips. This reduces electric shock risks.
Work In A Well-lit Area
Good lighting helps you see wires and connections clearly. Avoid working in the dark or dim light to prevent mistakes.
Keep The Work Area Dry
Water and electricity do not mix. Ensure the area around the switch is dry before starting. Avoid standing on wet floors or surfaces.
Locate The Motion Sensor Switch
Finding the motion sensor switch is the first step to disable it. These switches control lights by detecting movement. Knowing where the switch is helps you manage its settings or turn it off. The location can vary depending on your home or building setup.
Most motion sensor switches look different from regular switches. They often have a small sensor window or a light indicator on the switch face. Finding this switch is easier if you focus on the areas where lights turn on automatically.
Check Common Areas For Motion Sensor Switches
Motion sensor switches are usually near entrances or hallways. Look around doors, staircases, and garages. These spots often have sensors to save energy and improve safety. Sometimes, they are installed in bathrooms or basements too.
Identify The Motion Sensor On The Switch
The sensor part usually looks like a small round or square window. It may be clear or tinted plastic. This part detects movement and controls the light. Regular switches do not have this feature.
Use A Flashlight To Spot The Sensor
In dim light, a flashlight helps find the sensor. Shine light on the switch area. The sensor might reflect light or show a slight glow. This trick works well if the sensor blends with the wall color.
Look For Labels Or Markings
Some motion sensor switches have labels or brand names. Check for words like “motion,” “sensor,” or “auto.” These clues help confirm the switch type. Labels may be on the front or inside the switch cover.
Credit: blog.1000bulbs.com
Turn Off Power Supply
Cut the power supply before working on the motion sensor light switch to ensure safety. This prevents electrical shocks and damage while disabling the device. Always confirm the power is off by testing the switch or circuit breaker.
Turning off the power supply is a crucial step. It ensures safety while working with electrical components. Before touching any wires or devices, this step is necessary.Locate Your Circuit Breaker
The circuit breaker controls the electricity flow in your home. Find the breaker panel, usually in a basement or utility room. Open the panel door to access the switches.Identify The Correct Switch
Identify the switch that controls your motion sensor light. It might be labeled or grouped with other switches. If unsure, you may need to test each switch.Turn Off The Power
Switch off the breaker connected to your motion sensor light. The switch should move easily into the “Off” position. This stops electricity from flowing to the light.Verify The Power Is Off
Ensure the light does not turn on by itself. Flip the motion sensor switch to see if the light remains off. This confirms the power is indeed cut off.Remove The Switch Cover
Removing the switch cover is the first crucial step toward disabling your motion sensor light switch safely and effectively. It gives you direct access to the wiring and internal components, allowing you to make any necessary adjustments or replacements.
Before you start, make sure to turn off the power at the circuit breaker to avoid any electrical hazards. Safety always comes first when working with electrical fixtures.
Gather The Necessary Tools
Having the right tools makes the process smoother. Typically, you will need a flathead screwdriver or a small Phillips screwdriver to remove the switch cover screws.
Sometimes, the cover plate is snapped in place and can be gently pried off with a flathead screwdriver or even your fingernail. Do not rush this step—forcing the cover can damage your wall or the switch itself.
Locate And Remove The Screws
Look closely at your switch cover to find the screws holding it in place. They are usually located at the top and bottom of the plate.
Use your screwdriver to carefully unscrew them. Keep the screws in a safe place; you’ll need them when putting the cover back on.
Gently Pry Off The Switch Cover
After removing the screws, gently pull the switch cover away from the wall. It should come off easily, but if it feels stuck, wiggle it slightly to loosen it.
Be mindful not to use excessive force. You don’t want to crack the cover or damage the surrounding wall paint.
Inspect The Switch And Wiring
With the cover off, take a moment to observe the switch and wiring. Are there any visible labels or markings? This can help you identify the type of sensor or switch you have.
Noticing the wiring setup now can save you time and confusion later, especially if you plan to bypass or replace the sensor.
Identify Motion Sensor Wires
Identifying the motion sensor wires is the first key step in disabling a motion sensor light switch. Knowing which wires control the sensor helps avoid damage or incorrect connections. This process requires caution and attention to detail to ensure safety and effectiveness.
Different models may have varied wiring colors and functions. Understanding these differences makes the task easier and safer. Tools like a voltage tester and wire stripper come in handy for this job.
Locate The Electrical Box
Start by turning off the power at the circuit breaker. Remove the switch cover plate carefully. Use a flashlight if the area is dark. Identify the electrical box where the motion sensor switch is installed.
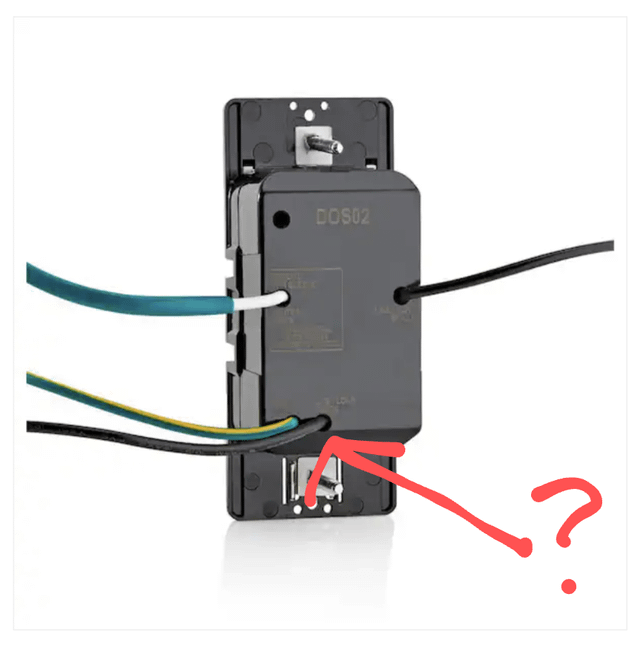
Identify Common Wire Colors
Look at the wires connected to the switch. Common colors include:
- Black – usually the hot wire
- White – neutral wire
- Red – often traveler or load wire
- Green or bare copper – ground wire
Note that motion sensor switches may have extra wires for the sensor function.
Recognize Motion Sensor Specific Wires
Motion sensor switches often have an additional wire. This wire controls the sensor’s operation. It can be:
- Yellow
- Blue
- Orange
Check the switch manual or label for exact wire functions.
Use A Voltage Tester For Safety
Test each wire for live current after turning the power back on. Confirm the power is off before touching any wires. This step prevents electric shock and helps identify the hot wire.
Label Each Wire
Use masking tape or labels to mark each wire’s function. This helps during reassembly or if troubleshooting is needed. Clear labels prevent confusion and errors.
Disconnect The Motion Sensor
Disconnecting the motion sensor is a key step if you want to disable a motion sensor light switch. This process involves safely cutting off the sensor’s connection to the electrical circuit, allowing you to control the light manually without automatic triggers.
It might seem tricky at first, but with the right approach, you can do it yourself without calling an electrician. Have you ever wondered how much control you lose when relying fully on automation? Taking back control starts here.
Turn Off The Power Supply
Before touching anything, ensure the power to the light switch is off. Locate your home’s circuit breaker panel and switch off the breaker that controls the room with the motion sensor light.
This step is crucial for your safety and to prevent any electrical accidents. Double-check by flipping the switch to confirm the light doesn’t turn on.
Remove The Light Switch Cover
Use a screwdriver to carefully remove the screws holding the switch cover plate. Gently pull the cover away to expose the wiring and the motion sensor unit behind the switch.
Take a moment to observe how the wires are connected. If you find yourself confused, snapping a photo can help you remember the original setup.
Identify The Motion Sensor Wires
Motion sensor switches typically have extra wires compared to regular switches. Look for wires connected to the sensor module—these often include a load wire, line wire, and sometimes a neutral wire.
Knowing which wire belongs to the sensor is essential. If you’re unsure, consult the switch’s manual or look up the model online for wiring diagrams.
Disconnect The Sensor Wires
Carefully disconnect the wires leading to the motion sensor. You may need to untwist wire nuts or unscrew terminal screws.
Once detached, cap off the sensor wires with wire nuts to prevent any accidental contact. This isolates the sensor from the circuit.
Reconnect The Light Switch Wires
After disconnecting the motion sensor, reconnect the remaining wires to the standard light switch terminals. Make sure the connections are secure and match the original wiring scheme.
Proper reconnection ensures your light switch will function manually without the sensor interfering.
Test The Manual Switch
Replace the switch cover and turn the circuit breaker back on. Test the light switch by flipping it on and off to confirm the motion sensor is no longer controlling the light.
If the light responds only when you flip the switch, you’ve successfully disabled the motion sensor. What new possibilities does manual control open up for your space?
Bypass The Sensor Function
Bypassing the sensor function on a motion sensor light switch lets you control the light manually, without relying on motion detection. This can be handy if you want the light to stay on continuously or if the sensor isn’t working as expected. The process involves altering the wiring or settings to bypass the automatic sensor feature while keeping the switch functional.
Understanding Your Motion Sensor Switch Wiring
Before you start, take a close look at your motion sensor switch and its wiring. Most switches have three or four wires: line (live), load, neutral, and sometimes a sensewire.
Knowing which wire controls the sensor function is key to bypassing it. Check the switch’s manual or labels on the wires. If you don’t have the manual, look for manufacturer details online to identify the sensor wire.
Disconnecting The Sensor Wire Safely
Once you’ve identified the sensor wire, the next step is to disconnect it safely. Turn off the power at the circuit breaker to avoid any risk of electric shock.
After the power is off, use a screwdriver to remove the switch faceplate and gently pull out the switch. Locate the sensor wire and either disconnect it or cap it off with a wire nut to prevent accidental contact.
Wiring The Switch For Manual Control
To bypass the sensor, connect the line wire directly to the load wire, bypassing the sensor input. This way, the switch will simply turn the light on or off without sensor interference.
Use wire nuts to secure your connections and wrap them with electrical tape for extra safety. Double-check that no wires are loose or exposed before pushing the switch back into the wall box.
Testing Your Bypass Setup
After rewiring, restore power at the circuit breaker and test the switch. Flip the switch on and off to see if the light responds instantly without waiting for motion detection.
If the light turns on manually and stays on until you turn it off, you’ve successfully bypassed the sensor. If it doesn’t work, recheck your wiring or consult a professional electrician.
When To Consider A Bypass Instead Of Replacing
Bypassing the sensor can save you money and time if the sensor is malfunctioning but the switch itself is still good. It’s also a quick fix if you want manual control temporarily, like during a party or home project.
However, if you want to restore automatic function later, be sure to keep the original wiring intact or note your changes clearly.
Reassemble The Switch
Reassembling the switch is a crucial final step after you have disabled the motion sensor function. It ensures everything is safely and correctly put back together so your light switch works as intended. Taking your time here can prevent future issues and avoid the need to redo the work.
Check All Connections Before Closing
Before you start putting the switch back into the wall, double-check each wire connection. Make sure no wires are loose or exposed, as this can be dangerous or cause the switch to malfunction.
Take a moment to gently tug each wire to ensure it’s firmly attached. This small step saves you from troubleshooting later.
Secure The Switch Into The Wall Box
Once you confirm all wires are properly connected, carefully push the switch back into the electrical box. Avoid forcing it, which might damage the wires or the switch itself.
Align the switch so the screw holes match up perfectly with the box holes. This makes tightening easier and keeps the switch stable.
Fasten The Switch Plate
After the switch is securely in place, attach the faceplate with its screws. Tighten these screws just enough to hold the plate firmly without cracking it.
Have you noticed how overtightening can lead to unnecessary damage? Handle the screws gently and stop as soon as the plate feels secure.
Test The Switch Functionality
Once everything is reassembled, turn the power back on and test your light switch. Does it operate smoothly without the motion sensor triggering?
If it doesn’t work as expected, don’t panic. You can always switch off the power and review your wiring connections again.

Credit: www.avatarcontrols.com
Restore Power And Test
Turn the power back on at the circuit breaker to restore electricity. Test the switch by activating the light to ensure it works properly. Confirm the motion sensor is disabled and the light stays on as desired.
Restoring power and testing your motion sensor light switch is an essential step in ensuring everything is functioning correctly after making any adjustments or disabling features. The process might seem straightforward, but taking the time to do it right can prevent unnecessary frustrations later on. Imagine flipping the switch with anticipation, only to find the lights stay off—definitely not the outcome you want. Properly testing ensures your changes are effective and your space is illuminated just the way you like.Restore Power
Once you’ve completed any modifications, it’s time to restore power to the circuit. Head back to your circuit breaker panel and locate the switch for your motion sensor light circuit. Flip it back to the ‘on’ position. Make sure you’ve securely fastened any screws or covers you removed earlier. This prevents any loose connections that might cause issues down the line. If you’re unsure about the right breaker, ask a friend to stand by the light while you toggle switches. Teamwork makes this step quicker and prevents unnecessary trips back and forth.Test The Light Switch
With power restored, it’s time to test your adjustments. Approach the motion sensor light and check if it activates as expected. If the light doesn’t turn on, double-check your settings or any wires you might have adjusted. Sometimes, a small oversight can be the culprit. Consider the environment—are there any obstacles obstructing the sensor? Ensure the path is clear for the sensor to detect movement accurately. If everything is in order and the light responds properly, you’ve successfully completed the task. If issues persist, you might need to revisit previous steps or consult the light switch’s manual for troubleshooting tips. Testing your adjustments not only confirms your work but also gives you peace of mind. It’s satisfying to see the results of your efforts light up your space, literally!Troubleshooting Common Issues
Troubleshooting common issues with motion sensor light switches can save time and effort. These devices sometimes behave unexpectedly or fail to turn off. Understanding typical problems helps restore proper function quickly.
Many issues arise from sensor sensitivity, wiring errors, or power supply problems. Identifying the root cause is essential to fix the switch without causing damage. The following sections cover frequent concerns and simple checks to perform.
Incorrect Sensor Sensitivity Settings
Motion sensors often have adjustable sensitivity levels. Too high sensitivity causes lights to stay on longer than needed. Too low sensitivity might prevent lights from turning on at all. Adjust the dial or settings on the switch carefully. Test the light after each change to find the right balance.
Power Supply And Wiring Problems
Loose or incorrect wiring can stop the sensor switch from working. Turn off the power before inspecting connections. Check that wires match the switch’s instructions. Look for damaged wires or burnt contacts. Tighten any loose screws to ensure proper contact.
Obstructions Blocking The Sensor
Objects or dirt can block the sensor’s detection range. Clean the sensor lens gently with a soft cloth. Remove furniture or decorations that might interfere with motion detection. Position the sensor to cover the desired area without obstructions.
Interference From Other Light Sources
Bright lights or reflective surfaces near the sensor may cause false triggers. Avoid placing the sensor facing windows or strong light bulbs. Adjust the sensor angle or move nearby lights to reduce interference. This helps the sensor detect actual motion accurately.
Faulty Sensor Or Switch Unit
Sometimes the sensor or switch itself is defective. Test the switch by temporarily replacing it with a normal light switch. If the issue persists, the problem lies elsewhere. If the normal switch works fine, consider replacing the motion sensor switch. Choose a reliable brand for better durability.

Credit: howlandhammer.com
Frequently Asked Questions
How Do I Turn Off A Motion Sensor Light Switch?
To turn off a motion sensor light switch, locate the switch’s settings or use the manual override. Some models have a dedicated off button or a dial to disable the sensor temporarily.
Can I Disable The Motion Sensor Without Removing The Switch?
Yes, many motion sensor switches allow temporary disabling via a manual override or adjusting sensitivity to zero. Check your switch’s instructions for specific steps.
Why Would I Want To Disable A Motion Sensor Light Switch?
Disabling a motion sensor switch can prevent unwanted triggers, save energy, or allow manual control during specific activities or maintenance.
Is It Safe To Disable A Motion Sensor Light Switch Myself?
Yes, if you follow manufacturer instructions and turn off power at the breaker before handling the switch. Otherwise, consult a professional electrician for safety.
Conclusion
Disabling a motion sensor light switch is simple and quick. Follow safety steps carefully for best results. Turning off the sensor lets you control the light manually. This helps avoid unwanted switching on or off. Remember to check the switch’s instructions for specific details.
With patience and care, you can fix it yourself. Enjoy better control of your lighting at home. No need to worry about sudden light changes anymore. Stay safe and take your time while working. You’ve got this!


