

Looking to add a unique touch to your workspace? Imagine creating a stylish desk lamp using simple plumbing parts you can find at any hardware store.
Not only will this lamp brighten your room, but it will also showcase your creativity and skills. If you’ve ever wanted a cool DIY project that’s both practical and eye-catching, this guide is made just for you. Stick with me, and you’ll learn step-by-step how to turn ordinary plumber’s tools into a one-of-a-kind desk lamp that’s sure to impress.
Ready to light up your desk in a whole new way? Let’s get started!
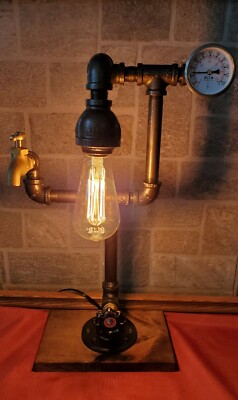
Credit: www.ebay.co.uk
Materials Needed
Creating a desk lamp from plumbing parts is a fun and creative project. Gathering the right materials makes the process smooth and enjoyable. This guide lists the essential items needed to build a stylish and functional lamp. Focus on quality parts for safety and durability. Below are the main categories of materials required.
Basic Plumbing Supplies
- Steel or copper pipes (1/2 inch diameter works well)
- Pipe connectors and elbows to shape the lamp
- Pipe flanges to create a stable base
- Threaded caps or plugs for finishing touches
- Pipe clamps to secure parts together
Electrical Components
- Light socket compatible with your bulb type
- Electrical cord with a plug
- On/off switch for easy control
- Wire nuts for safe electrical connections
- Bulb (LED bulbs are energy efficient and last long)
Tools Required
- Pipe wrench or adjustable wrench
- Wire stripper and cutter
- Screwdriver set (flathead and Phillips)
- Drill with bits for mounting
- Electrical tape for insulation
Choosing The Right Pipe
Choosing the right pipe is crucial for making a sturdy and stylish desk lamp. The pipe forms the main structure and affects the lamp’s look and function. Picking the correct pipe ensures your lamp stands firm and fits your workspace perfectly.
Selecting Pipe Material
Common pipe materials include copper, steel, and PVC. Copper pipes offer a warm, vintage look and resist rust. Steel pipes are strong and give an industrial style. PVC pipes are light, easy to cut, and budget-friendly. Choose the material that matches your lamp’s style and durability needs.
Determining Pipe Size
Pipe size affects the lamp’s stability and appearance. Thicker pipes hold the lamp steady and look bold. Thin pipes work well for delicate designs but might need extra support. Consider the lamp’s height and weight when choosing pipe diameter. Balance between strength and style for the best result.
Planning The Lamp Design
Think about the lamp’s shape and how pipes will connect. Sketch your design first to visualize the structure. Decide if you want straight lines or curves. Plan the pipe lengths and joints carefully for easy assembly. Proper planning saves time and helps avoid mistakes.
Assembling The Lamp Base
Begin by connecting the plumbing pipes securely to form a stable lamp base. Tighten all joints carefully to ensure the structure stands firm. Use a flat surface to keep the base level and steady.
Creating a desk lamp from plumber’s pipes is a rewarding DIY project that transforms industrial materials into a functional piece of art. Assembling the lamp base is a crucial part of this process, as it provides stability and sets the foundation for the lamp’s design. Let’s dive into the steps needed to construct a sturdy and stylish lamp base.Cutting And Preparing Pipes
Before you start cutting, make sure you have a clear design in mind. Measure the length of pipes you’ll need based on your design plan. Use a pipe cutter for clean cuts and ensure all edges are smoothened to prevent injuries. Once cut, lay out all your pieces to confirm they match your design. This step helps you visualize the final product and ensures you have all the necessary components. It’s a satisfying moment when the scattered parts start forming a cohesive shape.Joining Pipe Fittings
Begin connecting the pipe fittings by screwing them into the cut pipes. Hand-tighten each fitting to ensure a snug fit, but avoid over-tightening to prevent damage. This part reminds me of assembling a puzzle; each piece clicks into place, bringing the design to life. If you want a more permanent structure, consider using a thread sealant. A touch of sealant adds durability and stability, making sure your lamp stands the test of time.Securing The Base
A stable base is essential for any lamp. Consider using a flange as the foundation, securing it onto a wooden or metal platform. Bolt the flange firmly to ensure the lamp won’t topple over. Think about the aesthetics and functionality of your base. Does it complement your workspace? Is it sturdy enough to withstand daily use? These questions help in making thoughtful decisions that enhance the lamp’s utility and style. Creating the base is more than just assembly; it’s about crafting a piece that reflects your style while maintaining practical functionality. Engage with the process, enjoy each step, and soon you’ll have a unique desk lamp ready to light up your space.Wiring The Lamp
Wiring your desk lamp is where the project truly comes alive. This part demands your full attention and care because electrical work can be tricky and, if done incorrectly, dangerous. Wiring connects all the components, enabling the lamp to function perfectly once powered on.
Safety Precautions
Before handling any wires, ensure your workspace is dry and uncluttered. Always unplug your power source or switch off the circuit breaker to avoid shocks. Use insulated tools and wear rubber-soled shoes to add an extra layer of protection.
Double-check the wire insulation for any damage. Faulty insulation can lead to short circuits or electric shocks. Have a fire extinguisher nearby, just in case, and never rush through this step.
Connecting Electrical Components
Start by stripping about half an inch of insulation from the wire ends using wire strippers. Twist the exposed copper wires tightly to prevent fraying.
Connect the lamp socket wires to the power cord wires—usually, black or brown is live, white or blue is neutral, and green or bare copper is ground. Secure the connections with wire nuts or electrical tape to maintain a strong and safe bond.
- Attach the live wire to the brass terminal on the socket.
- Connect the neutral wire to the silver terminal.
- Fasten the ground wire to the green terminal or the metal body if your lamp has one.
Ask yourself: Are the wires firmly connected without any loose strands? Loose connections can cause flickering or worse.
Testing The Circuit
After wiring, never assume everything is correct—test it carefully. Use a multimeter to check for continuity and proper voltage flow before plugging in.
Once confident, plug your lamp into a socket and switch it on. Observe if the bulb lights up steadily without flickering or unusual sounds.
If the lamp doesn’t work, recheck your connections. Sometimes, a small mistake is all it takes to stop the flow of electricity.
Adding The Lamp Shade
Adding the lamp shade is a key step in crafting your desk lamp from plumbers’ materials. The shade not only controls the light but also shapes the lamp’s style. Choosing and fixing the shade correctly ensures your lamp looks great and works well. Here’s how to pick and attach the perfect shade and add final touches for a polished finish.
Selecting A Shade Style
Think about the room’s look and how much light you need. Shades come in many shapes like drum, cone, or bell. Fabric shades create soft light. Metal or glass shades add a modern touch. Choose a size that fits your lamp base. The shade should not be too big or too small. Pick colors and patterns that match your space.
Attaching The Shade To The Lamp
Check the lamp holder type before attaching the shade. Most plumbers’ lamps use a harp or clip-on style. For a harp, place the shade on the frame and secure it with a finial. Clip-on shades attach directly to the bulb. Tighten any screws or fasteners gently. Make sure the shade sits straight and is stable. Avoid blocking the bulb to keep the light bright.
Finishing Touches
Inspect the lamp for any loose parts. Adjust the shade angle for the best light direction. Clean the shade and lamp base to remove dust. Add a decorative trim or ribbon for a personal touch. Test the lamp by turning it on and off. Ensure the light is soft but bright enough for work. Your plumbers’ desk lamp is now ready to shine.
Credit: lights.relyonpdi.com
Customizing And Decorating
Customizing and decorating your desk lamp made from plumbers’ pipes lets you create a unique piece. This step transforms a simple lamp into a stylish accessory that fits your space. You can play with colors, textures, and features to match your room’s vibe and your needs.
Painting And Finishing
Painting your lamp adds personality and protects the metal. Use spray paint for a smooth, even coat. Choose colors that match your decor or make a bold statement.
- Clean the pipes before painting to remove dust and grease.
- Apply a primer to help paint stick better.
- Use rust-resistant paint for durability.
- Finish with a clear coat to protect the paint.
Adding Functional Features
Enhance your lamp’s use with added features. These upgrades improve convenience and style.
- Install a dimmer switch for adjustable brightness.
- Add a USB port for charging devices.
- Attach a flexible arm for directing light.
- Use Edison bulbs for a vintage look.
Personalizing Your Lamp
Make your lamp truly yours by adding personal touches. Small details turn it into a one-of-a-kind item.
- Wrap the pipes with rope or leather for texture.
- Attach decorative knobs or gears for an industrial feel.
- Engrave or stencil your name or favorite quotes.
- Use fabric or paper lampshades to soften the light.
Maintenance Tips
Keeping your desk lamp made from plumbing parts in top shape is easier than you might think. Regular maintenance not only extends its life but also keeps it looking sharp and working efficiently. Let’s dive into some simple tips that will help you care for your unique creation.
Cleaning The Lamp
Dust and grime can dull the finish of your lamp and block light. Use a soft cloth dampened with mild soap and water to wipe down the pipes and fittings. Avoid harsh chemicals that might damage the metal or the paint.
Pay special attention to the joints where dust tends to accumulate. A small, soft brush can reach tight spots without scratching the surface. Have you noticed how a clean lamp instantly brightens your workspace?
Replacing Bulbs
Choosing the right bulb is key to maintaining your lamp’s performance. Check the lamp’s socket for the recommended wattage and type before buying a replacement. LED bulbs are great because they last longer and use less energy.
When replacing the bulb, make sure the lamp is unplugged to avoid electric shock. Handle the bulb gently to prevent damage. How often do you check your bulbs, or do you wait until the light goes out unexpectedly?
Troubleshooting Common Issues
If your lamp flickers or doesn’t turn on, start by inspecting the bulb and socket. Loose connections are a common cause and can usually be fixed by tightening the bulb or checking the wiring. If you built your lamp with a switch, test it for wear or damage.
Sometimes, the power cord might be the culprit. Look for frayed wires or loose plugs. Would you try fixing electrical problems yourself, or prefer calling a professional?

Credit: maxsold.com
Frequently Asked Questions
What Materials Are Needed To Make A Desk Lamp From Plumbers?
You need plumbing pipes, fittings, a lamp kit, a bulb, and electrical wiring. These materials are affordable and easy to find. Using metal pipes adds an industrial look and durability to your desk lamp project.
How Do You Safely Wire A Plumber’s Pipe Lamp?
Turn off power before wiring. Connect the lamp kit wires to the electrical cord. Use wire nuts and electrical tape for secure connections. Follow local electrical codes to ensure safety and proper functioning.
Can I Customize The Size Of The Desk Lamp?
Yes, you can adjust pipe lengths to create different lamp heights. Customizing allows you to fit the lamp perfectly on any desk. It also lets you personalize the design to match your style.
What Type Of Bulb Works Best With A Plumber’s Pipe Lamp?
LED bulbs are ideal because they are energy-efficient and long-lasting. Choose bulbs with warm light for a cozy ambiance. Ensure the bulb fits the lamp socket size for proper installation.
Conclusion
Making a desk lamp from plumbers’ parts is simple and fun. You only need basic tools and some creativity. This project saves money and gives your desk a unique look. You can change the design anytime to fit your style.
Try this DIY task to brighten your workspace easily. It’s a great way to learn and enjoy crafting. Start today and see the difference a handmade lamp makes.


