
Wiring a motion sensor might sound tricky, but you can do it yourself with just a little guidance. Imagine your home lighting up automatically when you enter a room or your outdoor lights turning on only when someone approaches.
This not only saves energy but also adds a layer of security. If you want to learn how to wire a motion sensor quickly and safely, you’re in the right place. Keep reading, and by the end, you’ll have the confidence to install it yourself and enjoy the benefits immediately.

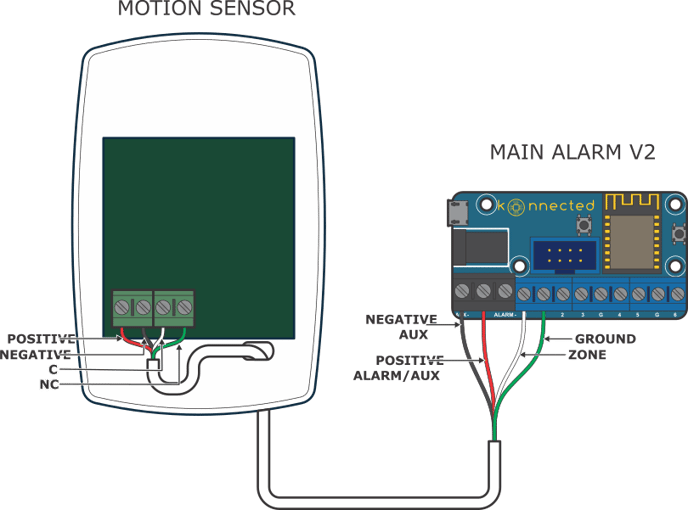
Credit: www.hardwareresources.com
Tools And Materials Needed
Wiring a motion sensor requires specific tools and materials. Having the right items makes the job easier and safer. This section lists essential tools and materials for successful installation.
Basic Electrical Tools
- Screwdriver (flathead and Phillips) for securing wires and mounting
- Wire stripper to remove insulation without damaging wires
- Voltage tester to ensure power is off before working
- Needle-nose pliers for bending and twisting wires
- Electrical tape for securing wire connections
Materials For Wiring
- Motion sensor unit compatible with your electrical system
- Electrical wires (usually 14 or 12 gauge, depending on circuit)
- Wire nuts to connect wires safely
- Mounting screws and brackets for sensor placement
- Conduit or cable clips for protecting and organizing wires
Safety Gear
- Insulated gloves to protect against electric shock
- Safety glasses to protect eyes from debris
- Flashlight or headlamp for working in dark spaces
Choosing The Right Motion Sensor
Choosing the right motion sensor is crucial to ensure your wiring project works smoothly and effectively. The sensor you pick should match your specific needs and the environment where it will be installed. Understanding the types and features of motion sensors can save you time and money, while also preventing frustration during installation.
Types Of Motion Sensors
There are several types of motion sensors, each designed for different uses. The most common ones include:
- Passive Infrared (PIR) Sensors:Detect body heat and movement. Ideal for indoor use and energy-efficient lighting control.
- Ultrasonic Sensors:Emit sound waves and measure reflections to detect movement. Work well in enclosed spaces but can trigger false alarms from non-human movement.
- Microwave Sensors:Send microwave pulses and detect changes in the reflected signal. They cover a larger area but may interfere with other devices.
- Dual-Technology Sensors:Combine two sensing methods, often PIR and microwave, to reduce false alarms.
Choosing a sensor type depends on your location and what you want to detect. Ask yourself, do you need the sensor to detect heat, sound, or both?
Sensor Features To Consider
Not all motion sensors are created equal. Look for these features to make sure your sensor fits your project:
- Detection Range:How far can the sensor detect movement? Make sure it covers the necessary area without being too sensitive.
- Adjustable Sensitivity:Allows you to fine-tune the sensor to avoid false triggers from pets or passing cars.
- Time Delay Settings:Lets you control how long the light or alarm stays on after detecting motion.
- Power Source:Check if the sensor requires batteries, hardwiring, or both. This affects installation complexity.
- Weather Resistance:For outdoor sensors, choose ones rated for rain, dust, and temperature extremes.
When I installed a motion sensor in my garage, I quickly realized that a sensor without adjustable sensitivity kept turning on unnecessarily. Adjusting this feature made a huge difference in convenience and energy savings.
Preparing The Installation Site
Ensure the motion sensor’s location is clear of obstructions. Check for stable and secure surfaces to mount the sensor. Confirm that the area has easy access to power sources.
Preparing the installation site for your motion sensor is a crucial step to ensure optimal performance. A well-prepared site not only enhances the sensor’s effectiveness but also ensures your safety during installation. Before diving into the technical details, take the time to plan and organize your approach.Selecting The Sensor Location
Choosing the right location for your motion sensor is vital. Aim for a spot that covers the area you want to monitor effectively. Consider high-traffic zones, like hallways or entry points, where motion detection is most needed. Avoid placing the sensor near heat sources or direct sunlight, as these can trigger false alarms. Reflective surfaces can also interfere with the sensor’s accuracy, so keep that in mind when selecting a spot. Think about the sensor’s height. Mounting it too low may limit its range, while too high might miss crucial movements. Usually, a height of 6-8 feet is ideal for most sensors.Safety Precautions
Safety should always be a priority when preparing the installation site. Before you begin, make sure to turn off the power supply to the area where you will be working. This prevents any accidental shocks. Use a voltage tester to double-check that the wires are not live. It’s a simple step but can save you from potential harm. Wear protective gear like gloves and safety goggles. These protect you from dust, debris, and any unexpected hazards during the installation process. Make sure your ladder or step stool is stable and positioned on a flat surface. An unstable ladder can lead to accidents, so take the time to set it up correctly. Have you thought about the tools you’ll need? Gather them in advance to avoid interruptions. A well-prepared toolkit can make your installation process smoother and more efficient.Turning Off Power
Before you start wiring your motion sensor, turning off the power is crucial for your safety. Working with electricity without cutting the power can lead to shocks or damage to your equipment. Taking this simple yet essential step protects both you and your home.
Locate The Correct Circuit Breaker
Start by finding the main electrical panel in your home. It’s usually in the basement, garage, or a utility room. Identify the breaker that controls the circuit where you’ll install the motion sensor.
If you’re unsure, turn off the main breaker to cut power to the entire house. Although less convenient, this guarantees the circuit is dead and safe to work on.
Use A Voltage Tester To Confirm Power Is Off
Never rely solely on the breaker switch position. Always test the wires with a voltage tester or a multimeter. This small step confirms there’s no current running through the wires.
Holding the tester leads to the wires, you should see no voltage reading. If the tester still detects electricity, double-check the breaker or shut off the main power.
Inform Others And Mark The Panel
Before you begin, let others in your household know you’re working on the electrical system. This prevents someone from accidentally turning the power back on. Use a piece of tape or a sign to mark the breaker as “Off – Do Not Turn On.”
This simple communication can save you from a dangerous surprise and keeps the work area secure.
Wiring Basics For Motion Sensors
Wiring a motion sensor requires a clear understanding of the basics. These sensors detect movement and control electrical devices like lights. Correct wiring ensures the sensor works safely and efficiently.
Before starting any wiring, it is important to know the different wires and their roles. Understanding the wiring diagram helps avoid mistakes and keeps the installation smooth.
Identifying Wires And Connections
Most motion sensors have three main wires:
- Live (Line) Wire:Carries power to the sensor.
- Neutral Wire:Completes the electrical circuit.
- Load Wire:Connects to the device controlled by the sensor, like a light.
Wires usually have color codes:
- Live wire is often black or brown.
- Neutral wire is white or blue.
- Load wire can be red or another color.
Check the sensor’s manual for wire colors and functions. Use a voltage tester to confirm wires before connecting.
Understanding Wiring Diagrams
Wiring diagrams show how to connect each wire correctly. They use symbols to represent wires, switches, and devices.
Look for these key parts in a diagram:
- Power source:Shows where electricity comes from.
- Sensor:Indicates wire connections on the sensor.
- Load device:Shows the light or appliance controlled by the sensor.
Follow the diagram to connect wires in the right order. This prevents short circuits and ensures proper sensor function.
Step-by-step Wiring Process
Wiring a motion sensor might seem tricky at first, but breaking it down into clear steps makes it manageable. Each connection has a specific role to ensure your sensor works smoothly and safely. Let’s go through the key parts of the wiring process so you can feel confident handling your sensor installation.
Connecting Power Wires
Start by identifying the power source wires—usually black (live) and white (neutral). Connect the black wire from your sensor to the black (live) wire coming from the power supply. Then, join the white wire from the sensor to the white (neutral) wire from the power source.
Make sure you twist the wires tightly together and secure them with wire nuts. A loose connection can cause the sensor to malfunction or create a safety hazard. Have you ever had a light flicker because of a bad connection? That’s what you want to avoid here.
Linking The Load Wire
The load wire controls the device your sensor will turn on, like a light or fan. Typically, this wire is red or another color different from the power wires. Connect the sensor’s load wire to the load wire of your device.
This connection directs power to your device only when motion is detected. Double-check which wire goes to your light or appliance; mixing them up means your sensor won’t work as expected. Have you checked your device’s wiring before? It’s a crucial step that saves troubleshooting headaches later.
Ground Wire Connection
Grounding is essential for safety, so don’t skip this part. Find the green or bare copper ground wire in your electrical box and connect it to the sensor’s ground wire. This connection helps prevent electrical shocks and protects your equipment.
If your sensor doesn’t have a ground wire, confirm that your electrical box is grounded. Sometimes, older wiring setups lack proper grounding, which might require professional help. Have you ever felt a static shock from a device? Proper grounding prevents that kind of problem.
Securing The Sensor
Once all wires are connected, gently tuck them into the electrical box. Avoid cramming wires, as this can loosen connections over time. Use the mounting screws to fix the sensor firmly in place.
Make sure the sensor faces the area you want to monitor and is positioned at the correct height according to the manufacturer’s instructions. Take a moment to test the sensor’s response before finishing up—does it detect motion accurately? Adjusting the angle or sensitivity now saves you from repeated installations later.
Testing The Motion Sensor
Testing the motion sensor ensures it works correctly after wiring. This step helps catch any wiring mistakes early. It also confirms the sensor detects movement and triggers the light or alarm as planned. Proper testing saves time and prevents future issues.
Restoring Power
Turn the power back on at the circuit breaker. Check the sensor’s indicator light. A steady or blinking light usually means it has power. If there is no light, double-check your wiring connections. Make sure the sensor is receiving electricity before moving on.
Adjusting Sensor Settings
Set the sensor’s sensitivity to detect motion accurately. Use the adjustment knobs or buttons on the device. Test different settings by walking in front of the sensor. Adjust the time delay so the light stays on long enough. Fine-tune the detection range to avoid false triggers from far away.
Troubleshooting Common Issues
Wiring a motion sensor can be straightforward, but sometimes things don’t go as planned. Troubleshooting common issues helps you pinpoint what’s wrong and fix it quickly. Let’s dive into some typical problems you might face and how to tackle them effectively.
Sensor Not Turning On
If your motion sensor refuses to power up, start by checking the power source. Confirm that the circuit breaker hasn’t tripped and that the sensor is receiving the correct voltage. Sometimes, the issue is as simple as a loose connection or a dead battery if your sensor uses one.
Test the sensor by connecting it to a different power outlet or circuit. If it still doesn’t turn on, consider swapping the sensor with a new one to rule out a faulty device. Have you ever overlooked a tiny wire loose in the back? It’s often the cause of this problem.
False Triggers
False triggers can be frustrating and waste energy. They often happen due to environmental factors like moving tree branches, pets, or even sunlight reflecting on surfaces. Adjusting the sensor’s sensitivity settings can reduce these unwanted activations.
Try repositioning the sensor away from common sources of movement that aren’t relevant. Adding physical barriers or changing the sensor’s angle might help. Have you noticed how sometimes a slight tilt can stop constant false alarms? It’s worth experimenting.
Wiring Problems
Incorrect wiring is a leading cause of motion sensor failures. Double-check your connections against the manufacturer’s wiring diagram. Look for crossed wires, loose terminals, or damaged insulation that could cause shorts or open circuits.
Using a voltage tester can help you verify if the wires are live and correctly connected. Labeling your wires before starting the installation can save you a lot of headaches later. What’s your approach to keeping wiring organized during projects?
Maintenance Tips For Longevity
Proper maintenance helps your motion sensor work well for many years. It keeps the sensor accurate and prevents damage. Regular care lowers the chance of faults and saves money on repairs. Follow simple tips to extend your sensor’s life and keep it responsive.
Cleaning The Sensor Lens
Dust and dirt block the sensor’s view. Clean the lens gently with a soft cloth. Avoid harsh chemicals that can damage the surface. Wipe the lens every few months or after bad weather.
Checking Electrical Connections
Loose wires cause sensor failure or flickering lights. Turn off power before inspecting connections. Tighten any loose screws or wire nuts. Ensure wires are not frayed or damaged.
Testing Sensor Sensitivity
Test the sensor regularly to keep its range accurate. Walk in front of it to check if the lights turn on. Adjust the sensor’s sensitivity settings if needed. Proper sensitivity avoids false alarms or missed motion.
Replacing Batteries Timely
Battery-powered sensors need fresh batteries for best performance. Replace batteries once a year or when lights dim. Use high-quality batteries to avoid leaks and corrosion. Dispose of old batteries safely.
Protecting From Harsh Weather
Extreme heat, cold, or moisture can harm the sensor. Install the sensor under a cover or shield if possible. Use weatherproof models for outdoor locations. Inspect for water damage after storms.

Credit: www.youtube.com

Credit: www.reddit.com
Frequently Asked Questions
How Do I Wire A Motion Sensor To A Light?
To wire a motion sensor to a light, first turn off power. Connect the sensor’s live wire to the power source. Attach the sensor’s load wire to the light fixture. Connect the neutral wires together. Finally, secure all connections and restore power.
What Tools Are Needed To Wire A Motion Sensor?
You need a screwdriver, wire stripper, voltage tester, and electrical tape. These tools help safely strip, connect, and secure wiring. Always ensure power is off before starting the wiring process to avoid electric shock.
Can I Wire A Motion Sensor Without Professional Help?
Yes, if you have basic electrical knowledge and follow safety guidelines. Turn off power, use correct wiring, and test connections. If unsure, consult an electrician to prevent hazards and ensure proper installation.
Where Should I Install The Motion Sensor For Best Results?
Install the motion sensor at a height of 6 to 10 feet. Aim it toward the area you want to monitor. Avoid placing near heat sources or direct sunlight to reduce false triggers.
Conclusion
Wiring a motion sensor can improve your home’s safety and convenience. Follow the steps carefully to avoid mistakes. Always turn off power before starting any wiring work. Use the right tools and check all connections twice. Testing the sensor after wiring ensures it works correctly.
Take your time and stay safe. This simple upgrade helps save energy and adds security. Now you know how to wire a motion sensor with confidence.


