

Are you looking to add a warm, personal touch to your workspace? Making your own wood desk lamp is easier than you think—and it gives you a unique piece that lights up your room and your creativity.
Imagine having a lamp that fits perfectly with your style, made by your own hands. In this guide, you’ll discover simple steps to create a beautiful, sturdy wood desk lamp that brightens your space and sparks your pride every time you turn it on.
Ready to transform your desk? Let’s get started!
Materials And Tools Needed
Gathering the right materials and tools is the first step to successfully creating your own wood desk lamp. Having everything prepared not only saves time but also ensures your project runs smoothly. Before you start cutting or assembling, make sure you have all the essentials within reach.
Wood Selection
Choosing the right wood affects both the look and durability of your lamp. Hardwoods like oak, maple, or walnut offer strength and a beautiful finish. Pine or cedar are softer options and easier to work with if you’re new to woodworking.
Lighting Components
Your lamp needs a bulb, socket, and cord to work safely and effectively. Opt for an LED bulb to save energy and reduce heat. Make sure the socket fits the bulb type and that the cord is long enough to reach your power source comfortably.
Basic Tools
- Saw (hand saw or electric saw for precise cuts)
- Drill with drill bits for holes
- Screwdriver for assembling parts
- Sandpaper or sanding block to smooth edges
- Measuring tape or ruler to ensure accurate dimensions
Each tool plays a critical role in shaping and putting your lamp together. Missing even one can lead to frustration or less-than-perfect results.
Additional Supplies
- Wood glue for extra strength
- Wood stain or paint to customize your lamp’s look
- Protective finish like polyurethane to guard against wear
- Clamps to hold pieces steady while glue dries
- Wire stripper for preparing electrical wires
These supplies help you add personal touches and make your lamp last longer. Have you ever tried crafting something without clamps? It’s a challenge worth avoiding.
Credit: medium.com
Choosing The Right Wood
Choosing the right wood for your desk lamp is a crucial step that shapes both its look and durability. The type of wood you pick affects how your lamp will age and how easy it is to work with during the build. Your choice also sets the mood of the lamp—whether it feels rustic, modern, or somewhere in between.
Types Of Wood
Different woods bring different qualities to your project. Hardwoods like oak, maple, and cherry are strong and have a fine grain, making them great for a sturdy, elegant lamp. Softwoods such as pine and cedar are easier to shape and lighter but might dent more easily.
If you want a warm, classic look, cherry wood’s reddish tones can be very appealing. For a cleaner, modern style, maple’s light and smooth surface works well. Thinking about the wood’s color and grain can help you picture the final result and match it with your room’s decor.
Wood Quality And Texture
Look closely at the wood’s texture before you buy. Smooth wood with tight grain usually means fewer knots and imperfections, which makes your lamp easier to sand and finish. Rough or uneven textures can add character but might require more prep work.
Check for defects like cracks, knots, or warping. These can weaken your lamp’s structure and complicate assembly. I once chose a piece of wood with small knots, thinking it would add charm, but it ended up cracking during drilling—so quality really matters.
Ask yourself: Do you want your lamp to have a perfect, polished look or a more natural, rustic vibe? This decision will guide your choice in wood quality and texture, so pick what fits your vision and skill level.
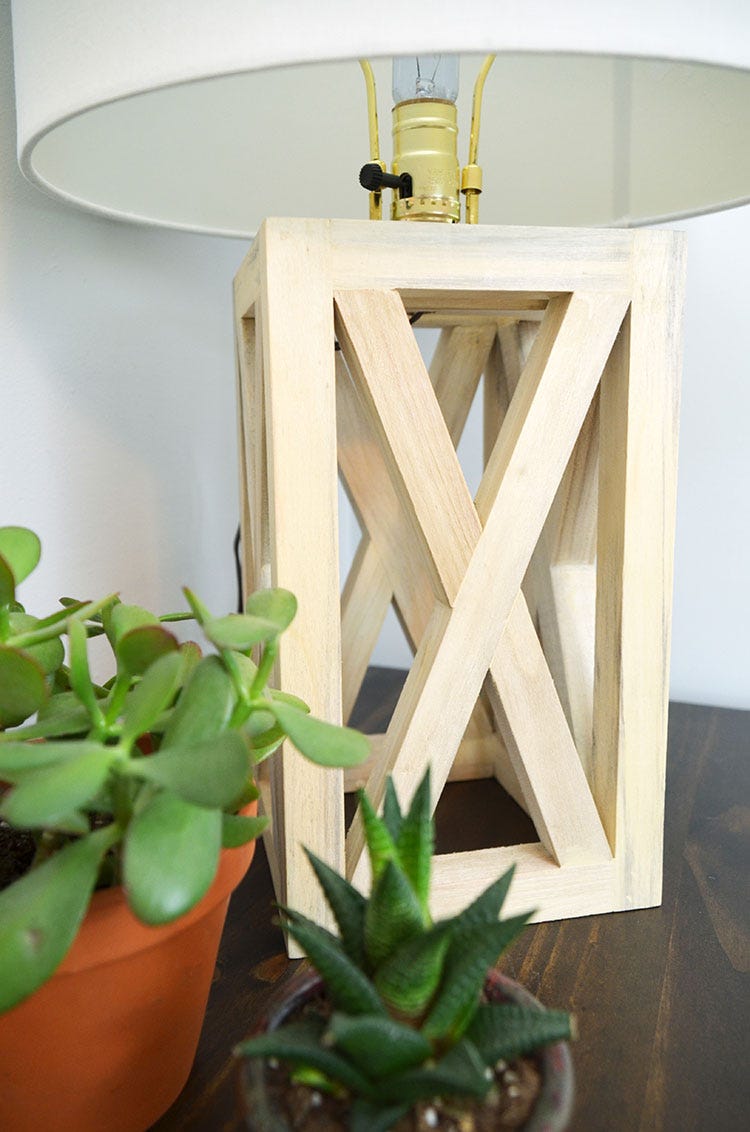
Designing Your Desk Lamp
Crafting a wood desk lamp adds warmth and charm to your workspace. Choose quality wood and a simple design. Assemble carefully and ensure the wiring is secure. This project can enhance your room’s aesthetics while providing functional lighting.
Designing a wood desk lamp is a creative journey. Your design sets the tone for your lamp’s uniqueness. Start by choosing a design that reflects your style and needs. Consider the space where the lamp will sit. A well-designed lamp enhances both functionality and aesthetics.Simple Vs. Complex Designs
Decide between a simple or complex design. Simple designs are minimal and elegant. They suit modern and small spaces. Complex designs are intricate and detailed. They become a focal point in any room. Consider your skills and tools. A simple design might be easier to execute. A complex design may require more time and precision.Sketching Your Lamp
Begin with a rough sketch. Visualize your lamp’s shape and size. Use pencil and paper for flexibility. Sketch different angles to understand the structure. Include details like the base, stem, and shade. Add measurements for accuracy. Refine your sketch until you’re satisfied. A clear sketch will guide your construction process.
Credit: www.youtube.com
Cutting And Shaping The Wood
Cutting and shaping the wood is the foundation of crafting your wood desk lamp. This stage transforms raw lumber into the precise pieces that will form your lamp’s structure. Your accuracy here affects both the lamp’s look and stability.
Measuring And Marking
Take your time with measuring and marking each piece of wood. Use a reliable tape measure and a sharp pencil for clear, precise lines. Double-check your measurements before marking to avoid costly mistakes.
Marking isn’t just about length; consider the angles and curves you want in your design. If you want a sleek, modern look, straight lines work best. For a rustic vibe, gentle curves add character.
Have you ever tried cutting wood without clear marks? It often leads to uneven edges and wasted material. A good tip is to use painter’s tape along your cut line—it helps reduce splintering when you saw.
Safe Cutting Techniques
Safety is non-negotiable when cutting wood. Always wear safety goggles and a dust mask to protect your eyes and lungs. Secure your wood firmly with clamps before you start cutting to prevent slips.
Choose the right saw for your cuts. A handsaw is great for small, detailed pieces, while a circular saw handles larger boards quickly. Keep your saw blades sharp for clean cuts and less effort.
Cut slowly and steadily, letting the saw do the work. Rushing can cause your cut to veer off line or damage the wood. Think about your cutting angle—cutting slightly outside your line gives room for sanding and perfect shaping later.
Assembling The Lamp Base
Assembling the lamp base is a key part of making a wood desk lamp. This step shapes the lamp’s foundation and supports its structure. Careful assembly ensures the lamp stands strong and looks great. It requires joining wood pieces correctly and securing the base for stability.
Joining Wood Pieces
Start by aligning the wood pieces. Use wood glue to bond the edges firmly. Clamp the pieces together to hold them while drying. For extra strength, drill pilot holes and insert screws carefully. Sand the joints smoothly to blend the seams. This creates a neat, solid connection between parts.
Securing Stability
Check the base for balance before finalizing. Add small wooden blocks at corners if needed. Screw these blocks underneath to prevent wobbling. Use a level tool to confirm the base is flat. Tighten all screws to ensure no movement. A steady base keeps the lamp safe and durable.
Wiring And Electrical Setup
Wiring and electrical setup are key to building a safe and functional wood desk lamp. Proper connections ensure the lamp works well and prevents hazards. Take your time to handle wires and sockets carefully. Follow clear steps to connect each part correctly.
Choosing The Right Bulb And Socket
Select a bulb that fits the lamp’s style and power limits. LED bulbs are good for energy saving and low heat. Match the socket size to the bulb base to avoid loose fits or damage. Use sockets made for desk lamps, with secure wiring terminals. Check the maximum wattage allowed for the socket. This prevents overheating and potential fire risks.
Safe Wiring Practices
Use wires rated for lamp voltage and current. Avoid using damaged or thin wires. Strip wire ends carefully to expose enough copper for a firm connection. Twist wire strands tightly before attaching to terminals. Secure all connections with screws or wire nuts. Keep wires clear of sharp edges or moving parts. Use electrical tape to cover exposed wires for extra safety. Always test the wiring with a voltage tester before powering the lamp. This confirms correct installation and prevents shocks.
Finishing Touches
Finishing touches transform your wood desk lamp from a simple project into a polished piece of art. This stage is where the texture, color, and protection come together to enhance both the look and durability of your lamp. Paying attention to these final steps ensures your creation not only shines but lasts through everyday use.
Sanding And Smoothing
Start by sanding every surface of your lamp carefully. Use fine-grit sandpaper to remove any rough spots, splinters, or uneven edges. This step is crucial because a smooth surface helps the stain or paint adhere better and gives the lamp a professional feel.
Don’t rush this process. Take your time to sand in the direction of the wood grain. Running your hand over the surface can help you feel any areas that still need work. Have you ever noticed how a rough patch can ruin the look of an otherwise beautiful piece?
Applying Stain Or Paint
Once the lamp is smooth, decide whether you want to highlight the natural wood with a stain or cover it with paint. Stain allows the wood grain to show through, adding warmth and depth. Paint offers a chance to add color that matches your workspace or décor.
Use a brush or cloth to apply your chosen finish evenly. Apply thin coats and let each one dry fully before adding the next. This prevents drips and uneven coloring. Remember, the right finish not only beautifies but protects your lamp from moisture and wear.
Testing And Adjusting
Testing and adjusting your wood desk lamp is essential for safety and function. This step ensures the lamp works well and looks great on your desk. Take time to check all parts carefully.
Checking Electrical Safety
First, inspect all electrical connections. Make sure wires are secure and not exposed. Use a voltage tester to confirm there is no current leakage. Check the plug and socket for any damage. Test the lamp in a safe area before use. Avoid overloading the socket. This prevents fire hazards and electrical shocks. Always follow safety rules to protect yourself and your workspace.
Adjusting Lamp Position
Position the lamp to give the best light for your tasks. Adjust the angle so the light does not create glare or shadows. Move the lamp base to a stable spot on your desk. Ensure the lamp arm can be easily moved without falling. Try different heights and angles until the light feels comfortable. This makes working or reading easier and reduces eye strain.
Tips For Customization
Customizing your wood desk lamp makes it unique and fits your style. Small changes create a big difference in appearance and function. Focus on simple additions that enhance the look without complicating the build. Use your creativity to make the lamp truly yours.
Adding Decorative Elements
Decorative touches can improve the lamp’s charm. Use natural wood stains to highlight the grain. Paint patterns or shapes for a fun effect. Attach metal accents like small brackets or screws for an industrial feel. Consider using fabric or paper lampshades with colors or prints that match your room.
- Wood burning designs for a rustic look
- Carved details on the lamp base
- Using washi tape or decals on the shade
- Adding small hooks to hang lightweight items
Personalizing Your Lamp
Make the lamp reflect your personality. Choose hardware that fits your taste, such as vintage switches or modern knobs. Adjust the lamp height and arm angle for comfort. Add your name or a meaningful word by engraving or painting. Use LED bulbs that change color or brightness to suit moods.
- Engraving initials or symbols on wood parts
- Attaching a photo frame or small shelf
- Using a dimmer switch for light control
- Choosing a power cord color that matches décor

Credit: m.youtube.com
Frequently Asked Questions
What Materials Are Needed For A Wood Desk Lamp?
You need wood, a lamp kit, screws, sandpaper, wood glue, and finish. Select quality wood for durability and appearance. A lamp kit includes the bulb, socket, and cord. These basics ensure a functional and stylish desk lamp.
How Do You Assemble A Wooden Desk Lamp?
First, cut and sand the wood pieces. Assemble the base and lamp arm with screws and glue. Install the lamp kit by attaching the socket and wiring. Test the electrical connections before adding the bulb and shade.
Can I Customize The Design Of My Wood Desk Lamp?
Yes, you can customize size, shape, and finish. Choose different wood types or paint colors. Add decorative elements like carvings or metal accents. Customizing makes your lamp unique and matches your decor style.
How Do I Safely Wire A Wood Desk Lamp?
Turn off power before wiring. Follow the lamp kit instructions carefully. Use insulated wires and secure connections with wire nuts. Test the lamp with a low watt bulb first. Safety prevents electrical hazards or damage.
Conclusion
Creating a wood desk lamp brings warmth and style to any room. You can customize the lamp to fit your space and taste. The process is simple and fun, even for beginners. Using basic tools and materials saves money and adds personal touch.
Enjoy the glow from a lamp you built yourself. Try making one today and brighten your workspace.


