
If you’ve ever wanted to create your own 3D desk lamp but didn’t know where to start, you’re in the right place. Modeling a desk lamp in Maya might sound tricky, but with the right steps, you can bring your design to life quickly and easily.
This guide will walk you through each part of the process, breaking it down so you won’t feel overwhelmed. By the end, you’ll have the skills to create a clean, professional-looking lamp model that you can use for your projects or personal portfolio.
Ready to see how simple it can be? Let’s get started!
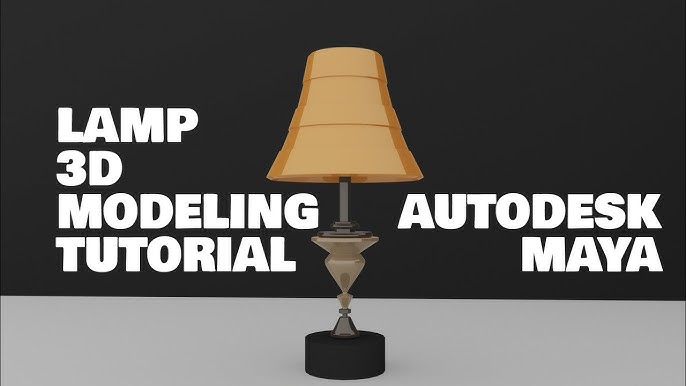
Credit: www.cgtrader.com
Setting Up Your Workspace
Setting up your workspace properly in Maya is the first step to a smooth modeling process. A clean and organized environment helps you focus on creating your desk lamp without distractions. Arrange your tools and images so you can access them quickly. This saves time and reduces frustration.
Configuring Maya For Modeling
Start by adjusting Maya’s interface for modeling tasks. Use the Modeling menu set for easy access to needed tools. Hide panels that are not useful to keep the screen clean. Set your grid size to match the scale of your desk lamp. Enable snapping options to help with precise placement. Customize hotkeys for frequently used commands. This speeds up your workflow and keeps your hands on the keyboard.
Organizing Reference Images
Gather clear images of the desk lamp from different angles. Use front, side, and top views to guide your modeling. Import these images into Maya as image planes. Position them in the orthographic views for easy tracing. Name each image plane clearly to avoid confusion. Lock the image planes so they don’t move accidentally. Keep your reference images visible but not distracting. This keeps you on track and improves accuracy.
Creating The Lamp Base
Creating the lamp base is the first important step in modeling a desk lamp in Maya. The base supports the whole lamp and gives it stability. It also sets the style and feel of the lamp. This part should be simple yet strong in design. Focus on clear shapes that look good from all angles.
Choosing The Right Primitive Shape
Start by picking a basic shape to form the lamp base. Maya offers several primitives like cylinders, cubes, and spheres. Cylinders work well because they look like many real lamp bases. Cubes can create modern, boxy designs. Spheres give a smooth, rounded look. Select the primitive that fits the style you want for your lamp.
Consider the lamp’s size and weight when choosing the shape. The base should look heavy enough to hold the lamp steady. Avoid shapes that seem too thin or fragile.
Shaping And Scaling The Base
After choosing the primitive, adjust its size and form. Use Maya’s scale tools to widen or flatten the base. Make it wider than the lamp’s neck for balance. Change the height to fit the overall lamp design. Keep proportions natural to avoid an odd look.
Use the move and rotate tools to refine the base shape. Add subtle curves or edges by editing vertices if needed. Keep the base simple but visually solid. This step sets a strong foundation for the rest of the lamp model.
Modeling The Lamp Arm
Creating a desk lamp in Maya requires careful attention to details. The lamp arm is a crucial part of this process. It connects the lamp head to the base, allowing movement and flexibility. This section will guide you through building and detailing the lamp arm.
Building The Arm Structure
Start by selecting the cylindrical shape tool in Maya. Adjust its dimensions to match a typical lamp arm length and width. Use the extrusion tool to extend the cylinder, forming the basic arm shape. Ensure the arm is straight and proportionate to the lamp’s overall size. This basic structure forms the backbone of your lamp.
Adding Joints And Details
Joints are essential for the lamp’s flexibility. Use the joint tool to insert joints at strategic points along the arm. Typically, adding joints at the base and near the lamp head works well. Adjust the joint size to match the arm’s thickness.
Next, refine the arm with details. Add rivets or screws using small cylinder shapes. These details enhance realism and functionality. Position them carefully along the arm where joints meet. This attention to detail brings your desk lamp model to life.
Designing The Lamp Head
Designing the lamp head is a key part of modeling a desk lamp in Maya. It defines the lamp’s style and how light will spread. Starting with a clear shape helps create a realistic model. Focus on smooth curves and proper proportions. This section guides you through forming the lamp shade and refining its shape with edge loops.
Forming The Lamp Shade
Begin by creating a basic cylinder for the lamp shade. Adjust the height and radius to match your desired size. Use the scale tool to taper the shape slightly at the top or bottom. Delete the bottom face if the lamp shade is open there. Apply smooth shading to see the form better.
Work with the vertices to push or pull areas for a natural curve. Use the extrude tool to add thickness to the shade. This gives it a solid, 3D look. Keep the shape simple but close to your reference image.
Refining The Shape With Edge Loops
Add edge loops along the lamp shade to control its curvature. Insert loops near the edges to keep them sharp. Space loops evenly for a balanced shape. Use the multi-cut tool for precise placement.
Adjust vertices on these edge loops to smooth out any irregularities. This step improves the lamp head’s realism. Avoid too many loops, which can make the model heavy and hard to edit.
Adding Small Details
Adding small details to your desk lamp model in Maya can dramatically boost its realism and overall appeal. These tiny elements might seem minor, but they contribute significantly to the authenticity of your design. Paying attention to details like screws, bolts, switches, and cords turns a basic model into a convincing, professional piece.
Modeling Screws And Bolts
Screws and bolts are essential for making your desk lamp look believable. Start by creating simple cylinders for the main body, then add grooves or ridges on top to mimic screw heads. Using the extrudeand beveltools in Maya can help you shape these features accurately.
Try to place these screws at logical points—where lamp parts would realistically be joined. This adds a subtle but powerful touch of detail that viewers often notice subconsciously. Do you find that adding such details makes you more confident about your modeling skills?
Creating The Switch And Cord
The switch is a small but vital part of your lamp model. A simple box or capsule shape can form the base, but adding tiny buttons or toggles makes it more interesting. Use the edge looptool to refine shapes and add realistic curves.
The cord can be modeled using a curved cylinder or a path with a sweep. Don’t forget to add slight bends or twists to avoid a stiff, unnatural look. Have you ever noticed how a lamp’s cord often tells a story about its use and placement? Adding these imperfections can make your model feel more alive.

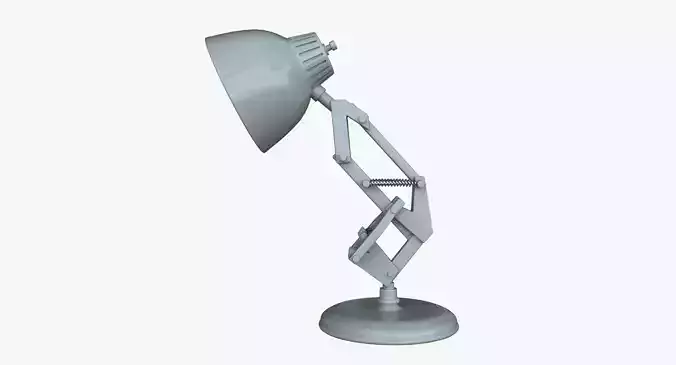
Credit: www.artstation.com
Applying Materials And Textures
Applying materials and textures is key to making your desk lamp model look real. This step adds color, shine, and surface details. It helps viewers see the lamp as a physical object, not just a 3D shape.
Materials define how light interacts with the lamp’s surface. Textures add patterns or imperfections like scratches or dust. Together, they create a believable and detailed look.
Assigning Basic Materials
Start by selecting the parts of your desk lamp. Assign simple materials like metal, plastic, or glass. Use Maya’s built-in shaders such as Lambert, Blinn, or Phong. Each shader controls different light effects.
Adjust the material properties:
- Color:Pick a base color for each part.
- Specularity:Control how shiny or dull the surface appears.
- Transparency:Apply this to glass or lampshade areas.
- Bump Mapping:Add slight surface bumps for texture.
Keep materials simple at first. This helps to see the overall look before adding details.
Adding Textures For Realism
Textures make your lamp feel real by adding fine details. Use image files like JPEG or PNG for texture maps. Apply them to different material channels such as color, bump, and specular.
Common texture types include:
- Diffuse Map:Adds color patterns or decals.
- Bump Map:Simulates surface roughness or dents.
- Specular Map:Controls the shine in specific areas.
- Normal Map:Gives detailed lighting effects on flat surfaces.
Use UV mapping to place textures correctly on the lamp model. Adjust scale and position to fit the shape. Test render often to see how textures look under light.
Lighting And Rendering Setup
Setting up lighting and rendering in Maya is essential to bring your desk lamp model to life. Proper lighting highlights the lamp’s details and materials, giving it a realistic or stylized look depending on your goal. Rendering settings then ensure your final image is sharp, balanced, and visually appealing.
Positioning Lights For Effect
Where you place your lights changes everything. Try starting with a three-point lighting setup: a key light, fill light, and rim light to add depth and dimension to your lamp model.
- Key Light:Place this as your main source, mimicking natural or artificial light hitting the lamp’s surface.
- Fill Light:Use a softer light to reduce harsh shadows created by the key light.
- Rim Light:Position behind the lamp to create a subtle outline that separates the model from the background.
Adjust the intensity and color of each light to match the mood you want. Ever noticed how a slightly warmer key light can make a lamp feel cozy? Experiment to see what suits your scene best.
Choosing Render Settings
Your render settings control the quality and realism of the final image. Start by selecting the right renderer in Maya, such as Arnold, known for its balance of speed and quality.
- Sampling:Increase sampling rates to reduce noise, especially in shadows and reflections.
- Resolution:Choose a resolution that fits your purpose—higher for close-ups, moderate for quick previews.
- Ray Depth:Adjust ray depth to manage reflections and refractions without slowing down the render unnecessarily.
Have you ever waited hours for a render only to find grainy spots? Tweaking these settings before you hit render saves time and frustration. Don’t be afraid to run quick test renders to find the right balance between quality and speed.

Credit: 3dmodels.org
Final Touches And Exporting
After completing your desk lamp model in Maya, it is important to polish the final details. This stage ensures your model looks perfect and works well in other software. Carefully reviewing and exporting the model prepares it for use in projects or presentations. Take your time to finalize every aspect before moving on.
Checking For Errors
Start by examining the model for any mistakes. Look closely at the geometry to find missing faces or flipped normals. Use Maya’s cleanup tools to fix these errors quickly.
Check the mesh for:
- Non-manifold geometry
- Overlapping vertices
- Unwanted holes or gaps
- Proper UV mapping
Ensure the lamp parts connect properly. Test the pivot points and hierarchy for smooth animation if needed. Fix any texture or shading issues before export. A clean model saves time and avoids problems later.
Exporting The Model
Choose the right file format based on your next use. Common formats include OBJ, FBX, and STL. OBJ works well for most 3D projects. FBX is best for animations or game engines. STL suits 3D printing needs.
Before exporting, check these settings:
- Scale and unit consistency
- Include or exclude textures
- Apply transformations (freeze transforms)
- Export selected objects only
Save a backup copy of your Maya file. Export the model and import it into the target software to test. Confirm the lamp appears correctly without errors or missing parts. Proper export ensures your desk lamp model is ready for any creative use.
Frequently Asked Questions
How Do I Start Modeling A Desk Lamp In Maya?
Begin by creating basic shapes like cylinders and spheres in Maya. Use reference images to match proportions. Combine and refine these shapes to form the lamp’s base, arm, and shade. This approach helps create an accurate and detailed desk lamp model efficiently.
What Tools Are Essential For Desk Lamp Modeling In Maya?
Key tools include the Extrude, Bevel, and Insert Edge Loop tools. Use these for shaping and detailing the lamp parts. The Move, Rotate, and Scale tools help position components correctly. These tools ensure precision and smooth workflow during modeling.
How Can I Make The Desk Lamp Model Realistic?
Add smooth edges and proper bevels to avoid sharp corners. Apply realistic textures and materials, such as metal or plastic shaders. Use proper lighting in the scene to enhance realism. These steps bring the desk lamp model to life visually.
What Are Common Mistakes To Avoid In Maya Modeling?
Avoid excessive polygon use to keep the model optimized. Don’t neglect proper edge flow for smooth surfaces. Ensure all parts are correctly aligned and scaled. These practices prevent issues during rendering and animation.
Conclusion
Modeling a desk lamp in Maya takes practice and patience. Start with simple shapes and build your design step by step. Use basic tools to create the lamp’s parts clearly. Keep checking your work from different angles. This helps catch any mistakes early on.
Remember, each model improves as you try again. Soon, you will create detailed and realistic lamps. Stay curious and keep experimenting with new techniques. Maya offers many ways to bring your ideas to life. Enjoy the process and watch your skills grow day by day.


