
If you’ve ever felt overwhelmed by the complex screens and numbers on a ventilator, you’re not alone. Understanding how to read a ventilator is crucial—whether you’re a healthcare worker, a student, or someone caring for a loved one.
Knowing what each setting and reading means can empower you to make better decisions and respond quickly in critical moments. You’ll discover simple, clear steps to decode ventilator displays and gain confidence in interpreting the vital information they provide. Keep reading, because mastering this skill could make all the difference when it matters most.
Credit: www.harvardonline.harvard.edu
Basics Of Ventilator Function
Understanding how a ventilator works is key to reading its settings and data. Ventilators help patients breathe by moving air in and out of the lungs. They support breathing when patients cannot do so on their own or need extra help.
Ventilators come in different types and use various methods to assist breathing. Knowing their parts and functions helps you interpret the information on the display. This knowledge also aids in understanding the modes of ventilation used to tailor breathing support.
Types Of Ventilators
- Invasive Ventilators:Use a tube inserted into the airway for direct lung support.
- Non-invasive Ventilators:Deliver air through masks without needing tubes inside the body.
- Portable Ventilators:Small and mobile, used for patient transport or home care.
- Stationary Ventilators:Larger machines found in hospitals for intensive care.
Key Components To Know
- Display Screen:Shows vital breathing data and settings.
- Control Panel:Allows adjustment of ventilation parameters.
- Airflow Sensors:Monitor the amount and speed of air delivered.
- Alarms:Alert caregivers to problems like low oxygen or disconnection.
- Battery or Power Supply:Keeps the ventilator running continuously.
Modes Of Ventilation
- Assist-Control (A/C):The machine gives full breaths, triggered by the patient or timer.
- Synchronized Intermittent Mandatory Ventilation (SIMV):Mixes machine breaths with patient’s own breaths.
- Pressure Support Ventilation (PSV):Helps patient take breaths by adding pressure during inhalation.
- Continuous Positive Airway Pressure (CPAP):Keeps airways open without giving extra breaths.

Credit: www.anaestheasier.com
Interpreting Ventilator Settings
Interpreting ventilator settings can feel overwhelming at first. But breaking down each parameter helps you understand how the machine supports breathing. Knowing what each setting does lets you spot issues early and adjust care effectively.
Tidal Volume And Respiratory Rate
Tidal volume (TV) is the amount of air delivered to the lungs with each breath. It’s usually measured in milliliters (mL). A typical adult tidal volume ranges from 400 to 600 mL, but this depends on the patient’s size and lung condition.
Respiratory rate (RR) tells you how many breaths the ventilator gives per minute. Normal adult rates are around 12 to 20 breaths per minute. If you see a high RR, it might mean the patient needs more oxygen or is struggling to breathe.
Always check if the tidal volume and respiratory rate are balanced. Too high a volume can harm the lungs, and too low might not provide enough oxygen. Have you noticed how small changes in these settings can impact patient comfort?
Peep And Fio2 Levels
Positive End-Expiratory Pressure (PEEP) keeps the lungs slightly inflated at the end of each breath. This prevents the tiny air sacs from collapsing. Typical PEEP values range from 5 to 10 cm H2O but can be higher for severe lung issues.
Fraction of Inspired Oxygen (FiO2) indicates the oxygen percentage the ventilator provides. Room air has 21% oxygen, but ventilators can supply up to 100%. Adjusting FiO2 helps manage oxygen levels in the blood without causing oxygen toxicity.
Watch how PEEP and FiO2 work together. Increasing PEEP can improve oxygenation, sometimes allowing you to lower FiO2 safely. How often do you reassess these settings to avoid lung injury?
Inspiratory To Expiratory Ratio
The Inspiratory to Expiratory (I:E) ratio controls how long the ventilator spends delivering air versus allowing the patient to exhale. A common I:E ratio is 1:2, meaning the exhale phase is twice as long as the inhale.
Changing this ratio can help with different lung conditions. For example, patients with obstructive lung disease might benefit from a longer exhalation time to prevent air trapping.
Understanding and adjusting the I:E ratio can improve comfort and breathing efficiency. Have you experimented with this setting to tailor ventilation to your patient’s needs?
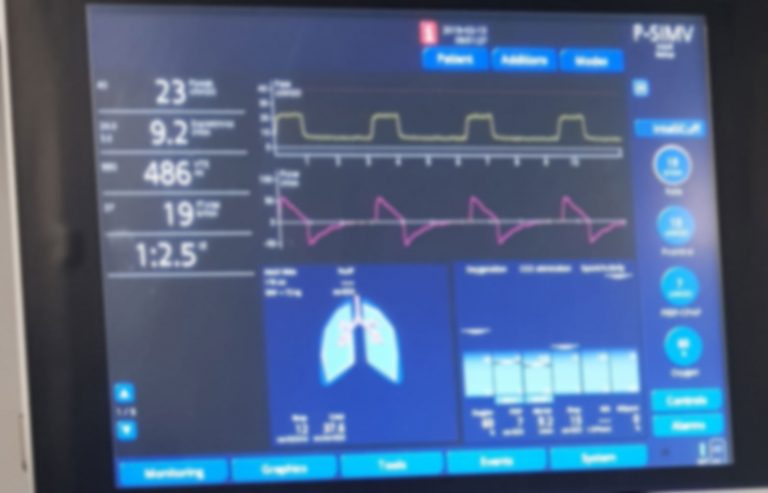
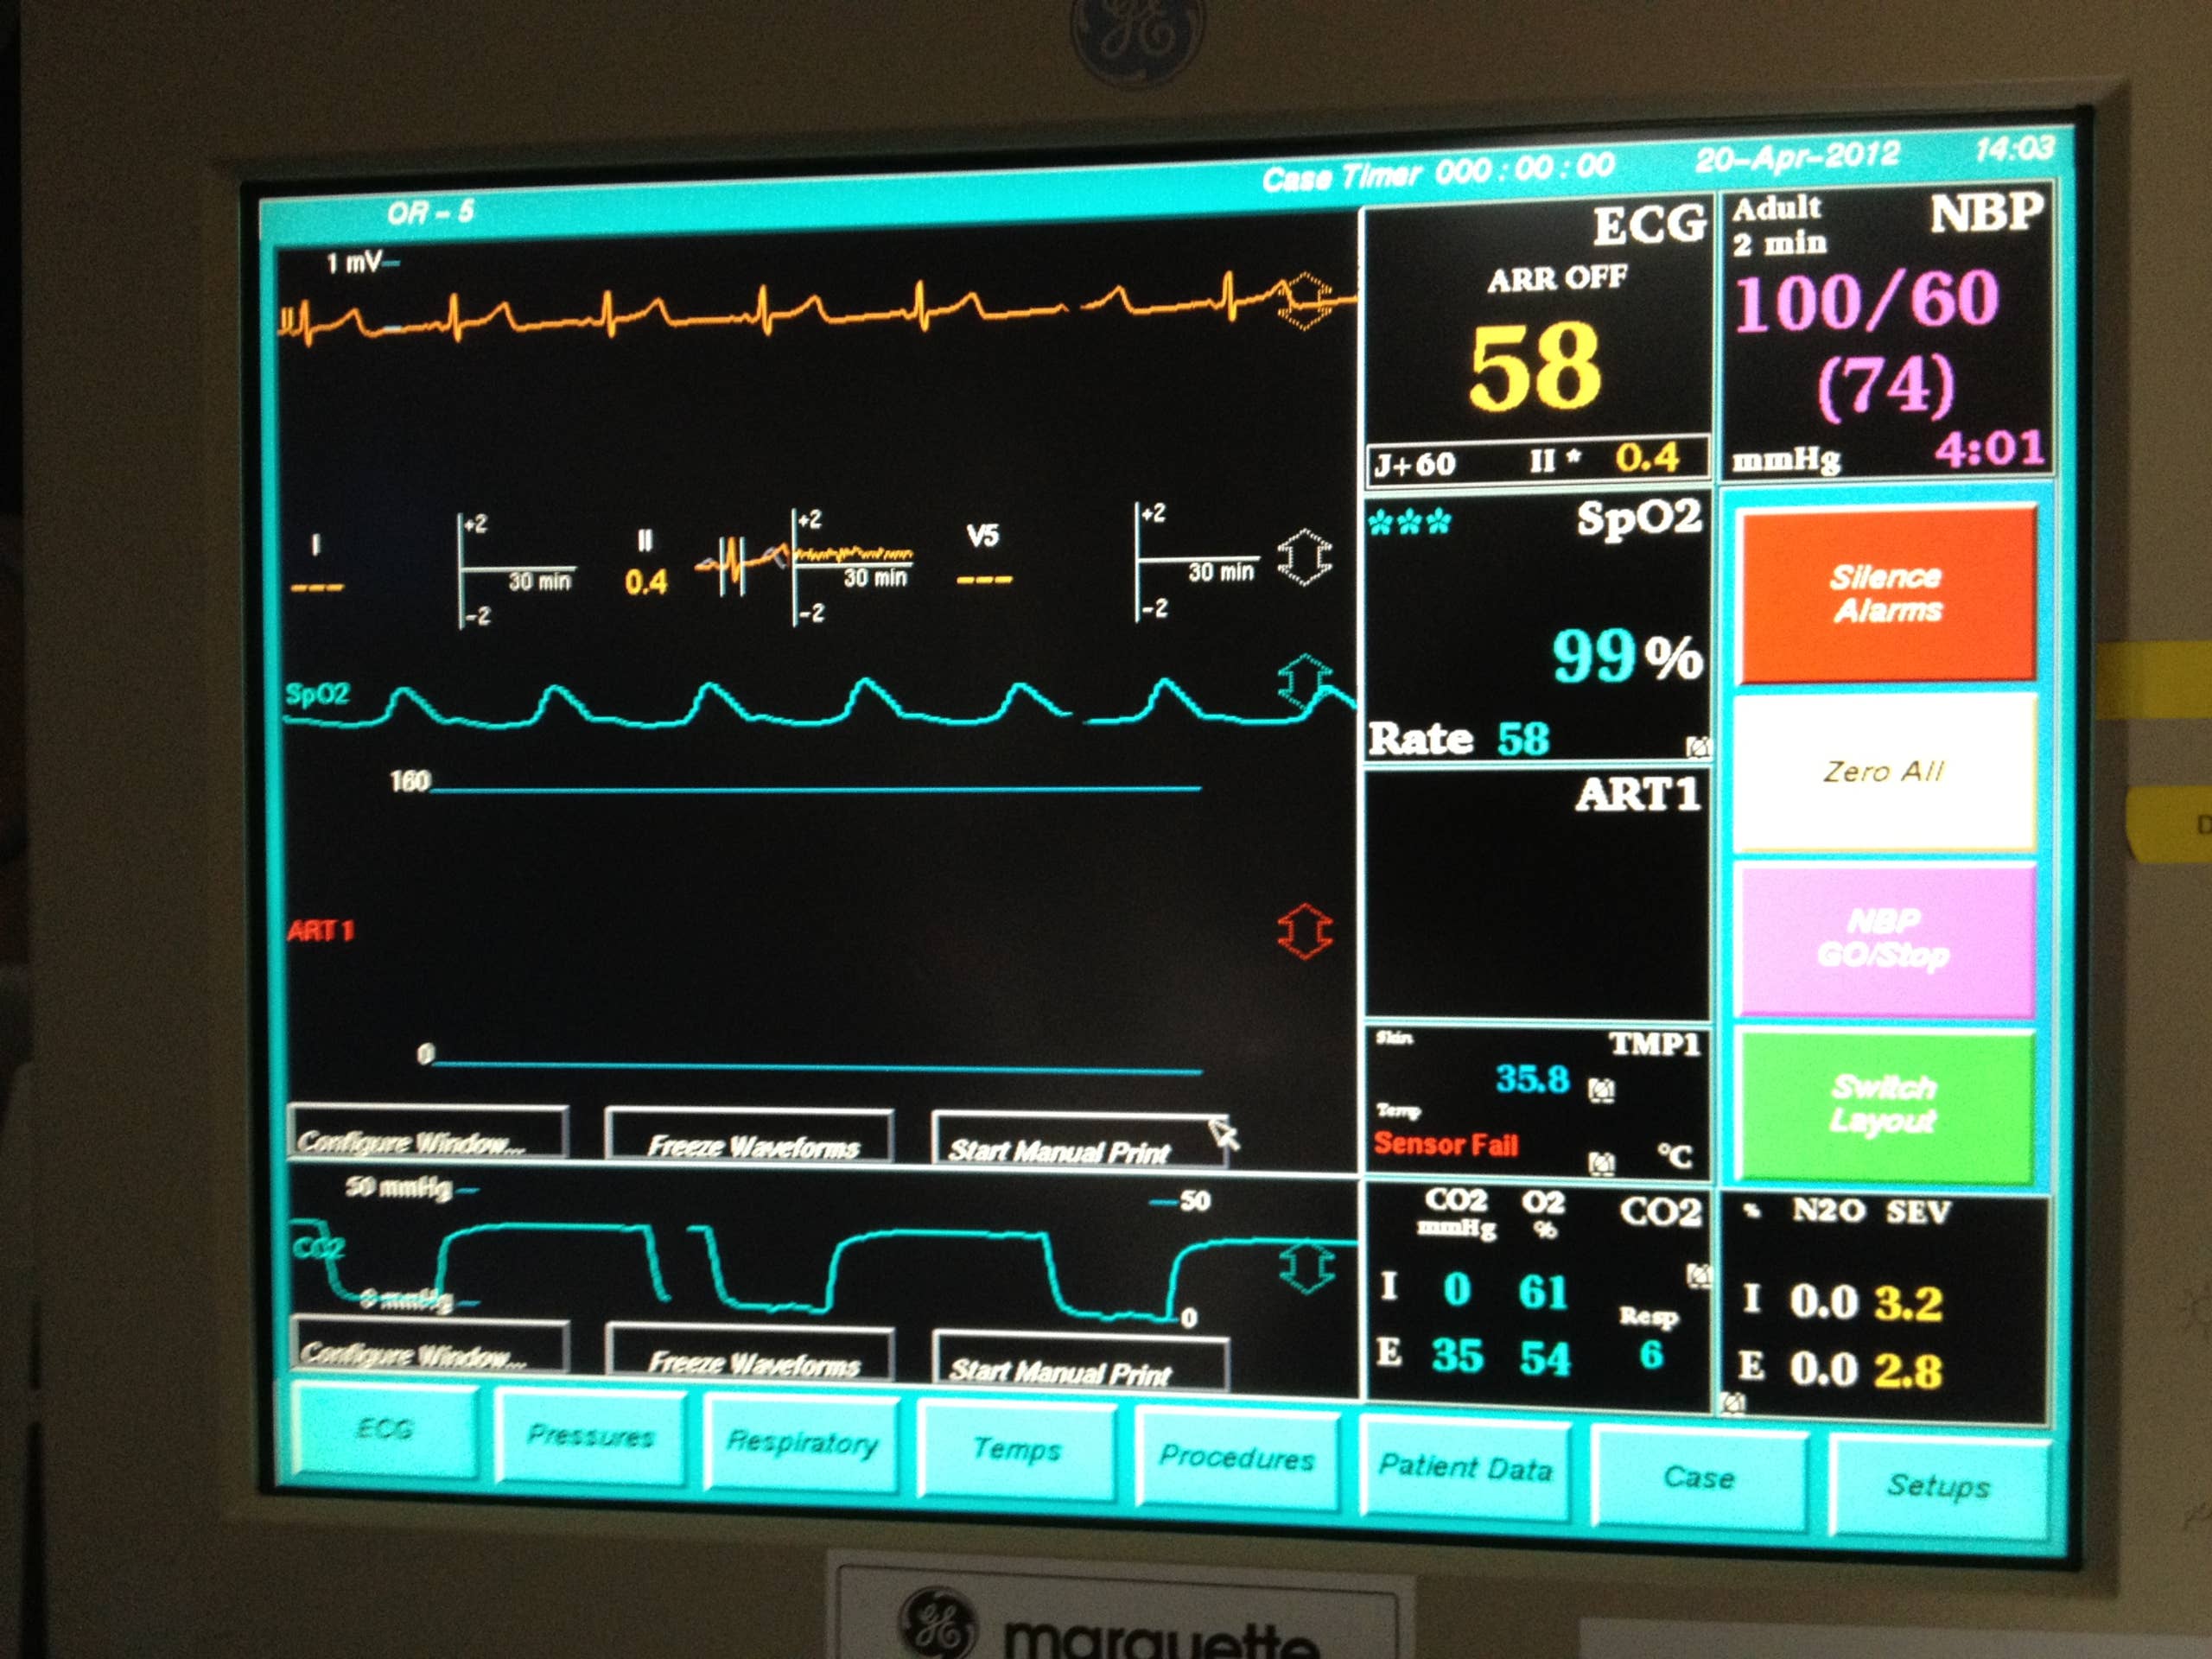
Reading Ventilator Monitors
Reading ventilator monitors is key to understanding patient breathing support. These monitors show real-time data on lung mechanics and ventilation status. They help healthcare providers adjust settings for better care and detect problems early.
Ventilator monitors display various graphs and alarms. Each has a specific meaning related to pressure, volume, and flow. Knowing how to read these helps track patient progress and ventilator performance.
Pressure And Volume Curves
Pressure curves show the pressure inside the lungs during breathing cycles. They help assess lung compliance and airway resistance. Volume curves track the amount of air delivered with each breath.
- Pressure curves rise during inhalation and fall during exhalation.
- Volume curves increase as air fills the lungs, then drop during exhalation.
- Sudden changes in these curves may indicate leaks or blockages.
Flow Waveforms
Flow waveforms display the speed of airflow into and out of the lungs. They provide details on the breathing pattern and ventilator response. A smooth waveform suggests normal flow; irregular shapes may signal issues.
- Inhalation flow is usually positive; exhalation flow is negative.
- Sharp peaks or dips can mean airway obstruction or patient effort changes.
- Flat lines may show disconnection or apnea.
Alarm Indicators
Alarms alert caregivers to potential problems with ventilation. They warn about high pressure, low volume, or disconnection. Understanding alarm types helps in quick and correct responses.
- High-pressure alarms signal resistance or blockages.
- Low-volume alarms indicate leaks or insufficient air delivery.
- Disconnection alarms show loss of airway connection.
Credit: owlcation.com
Assessing Patient-ventilator Interaction
Assessing patient-ventilator interaction is crucial for effective respiratory support. It ensures the machine works with the patient’s breathing efforts smoothly. Poor interaction may cause discomfort or delay recovery. Clinicians must carefully observe and interpret ventilator waveforms and patient signs. This section guides you through detecting asynchrony, adjusting ventilator settings, and considering weaning strategies for better care.
Detecting Asynchrony
Asynchrony happens when the patient’s breathing and ventilator cycles do not match. Common signs include:
- Delayed or missed breaths
- Double triggering or auto-triggering
- Increased work of breathing
- Irregular flow or pressure waveforms
Check ventilator screens for unusual patterns. Watch the patient for signs like muscle strain or distress. Early detection helps prevent complications and improves comfort.
Adjusting Settings For Comfort
Adjust ventilator settings to match the patient’s needs. Focus on:
- Tidal volume and respiratory rate
- Trigger sensitivity to detect patient effort
- Inspiratory flow and pressure limits
- PEEP to keep airways open
Small changes can reduce discomfort and improve synchrony. Always monitor the patient’s response after adjustments. Comfort leads to better cooperation and faster recovery.
Weaning Considerations
Weaning means gradually reducing ventilator support. Assess readiness by checking:
- Patient’s spontaneous breathing ability
- Stable vital signs and oxygen levels
- Minimal asynchrony during support
- Patient’s alertness and strength
Plan weaning carefully to avoid stress or failure. Support the patient with breathing trials and monitor closely. Successful weaning reduces ventilation time and complications.
Common Troubleshooting Scenarios
Ventilators are crucial in medical settings, providing essential support for patients. Understanding how to troubleshoot common issues is vital for effective care. Here, we’ll explore common scenarios and solutions for ventilator management.
Handling High Pressure Alarms
High pressure alarms indicate an obstruction in the airflow. Check for blockages in the tubing. Look for kinks or mucus build-up. Ensure the patient’s airway is clear. Adjust the ventilator settings if necessary. Consider reducing the tidal volume or respiratory rate. These adjustments help maintain optimal pressure levels.
Addressing Low Volume Alerts
Low volume alerts occur when the ventilator delivers insufficient air. Inspect the circuit for leaks. Ensure all connections are secure. Check the settings for any incorrect inputs. Adjust the tidal volume or frequency if needed. Confirm the patient’s position is optimal for ventilation. This ensures efficient air delivery to the patient.
Responding To Disconnection
Disconnection alerts signal a break in the ventilator circuit. Quickly reattach any loose connections. Check the patient’s interface for a secure fit. Inspect the ventilator tubing for damage. Ensure all parts are intact and functioning. Restart the ventilator to resume normal operation. Always monitor the patient’s response closely.
Safety And Best Practices
Understanding safety and best practices is crucial when reading a ventilator. These guidelines help protect patients and healthcare workers. Following strict procedures reduces risks and ensures the ventilator works correctly. Clear communication and careful equipment handling support better patient care.
Infection Control Measures
Clean hands before and after touching the ventilator. Use gloves and masks to prevent germs spreading. Disinfect the ventilator surfaces regularly. Avoid unnecessary contact with the breathing circuit. Change filters and tubing as per hospital rules. Keep the area around the ventilator clean and dry.
Regular Equipment Checks
Check the ventilator settings every few hours. Look for alarms or error messages on the screen. Inspect power sources and backup batteries. Test the oxygen supply and air pressure regularly. Ensure all cables and tubes are connected firmly. Report any faults or unusual sounds immediately.
Documentation And Communication
Record ventilator settings clearly in the patient’s chart. Note any changes and the time they occurred. Share updates with the healthcare team during shift changes. Use simple language to avoid confusion. Confirm that everyone understands the patient’s ventilation needs. Accurate records help track patient progress and treatment.
Frequently Asked Questions
What Are The Basic Ventilator Settings To Understand?
Basic ventilator settings include tidal volume, respiratory rate, FiO2, and PEEP. These control breath size, frequency, oxygen level, and airway pressure, essential for patient care and monitoring.
How Do You Interpret Ventilator Waveforms?
Ventilator waveforms show pressure, volume, and flow changes during breathing. They help identify patient-ventilator synchrony, airway resistance, and potential complications for effective respiratory management.
Why Is Monitoring Tidal Volume Important?
Tidal volume indicates the amount of air delivered per breath. Monitoring it ensures proper ventilation, prevents lung injury, and maintains adequate oxygen and carbon dioxide exchange.
What Does Fio2 On A Ventilator Mean?
FiO2 stands for fraction of inspired oxygen. It represents the oxygen percentage delivered to the patient, crucial for managing oxygen therapy and maintaining blood oxygen levels.
Conclusion
Reading a ventilator can seem hard at first. Focus on key numbers like breaths per minute and oxygen levels. Watch the screen and listen to alerts closely. Practice helps you understand the settings better. Always ask questions if something feels unclear.
Clear knowledge can improve patient care and safety. Keep learning step by step. Soon, reading a ventilator will feel natural and easy.


