

Understanding how to read ventilator settings can feel overwhelming at first. But what if you could quickly grasp the key numbers and terms that control a patient’s breathing support?
Whether you’re a healthcare worker, a student, or just curious, knowing these settings gives you confidence and clarity in critical moments. You’ll discover simple explanations and practical tips to decode ventilator settings with ease. Keep reading—your ability to interpret this vital information could make all the difference.
Key Ventilator Parameters
Understanding key ventilator parameters is essential for anyone involved in patient care or studying respiratory support. These settings control how the ventilator assists breathing and directly impact patient outcomes. Grasping these basics empowers you to monitor, adjust, and interpret ventilator readings confidently.
Tidal Volume
Tidal volume (Vt) refers to the amount of air delivered to the lungs with each breath. It is usually measured in milliliters or milliliters per kilogram of body weight.
Setting the right tidal volume matters because too much air can damage the lungs, while too little may not provide enough oxygen. You might see typical values between 6-8 ml/kg for adults, but always consider the patient’s condition.
Respiratory Rate
The respiratory rate indicates how many breaths the ventilator delivers per minute. Adjusting this rate controls the overall ventilation and carbon dioxide removal.
For example, a higher rate may be needed if the patient has high CO2 levels, but raising it too much can cause discomfort or breath stacking. Are you checking both rate and volume together to balance ventilation effectively?
Fio2 Levels
FiO2 stands for the fraction of inspired oxygen—the percentage of oxygen in the air the patient breathes. This setting ranges from 21% (room air) to 100% oxygen.
You want to provide enough oxygen to keep blood saturation safe but avoid prolonged high oxygen exposure, which can harm lung tissue. How often do you reassess FiO2 to prevent oxygen toxicity?
Peep Settings
Positive End-Expiratory Pressure (PEEP) keeps the lungs partially inflated at the end of exhalation. This helps prevent alveolar collapse and improves oxygenation.
PEEP levels usually start around 5 cm H2O but can be adjusted higher in cases of lung injury. Remember, too much PEEP can reduce blood return to the heart, so monitor blood pressure as you adjust.
Inspiratory Pressure
Inspiratory pressure controls the force used to push air into the lungs during each breath. This setting is crucial in pressure-controlled ventilation modes.
Too high pressure can cause lung injury, while too low may lead to insufficient ventilation. When you read ventilator settings, check inspiratory pressure alongside tidal volume and patient comfort to ensure safe support.
Credit: www.anaestheasier.com
Modes Of Ventilation
Understanding the different modes of ventilation is key to interpreting ventilator settings effectively. Each mode controls how the machine assists or takes over breathing, tailored to a patient’s specific needs. Grasping these modes helps you anticipate patient responses and adjust care accordingly.
Assist-control Mode
In Assist-Control mode, the ventilator delivers a preset volume or pressure with every breath. It allows the patient to trigger breaths, but if they don’t, the machine takes over completely. This mode ensures the patient gets enough ventilation even if their own effort is weak.
Think about a situation where a patient’s respiratory drive is low. Assist-Control guarantees consistent support, preventing fatigue. Have you noticed how this mode can sometimes lead to over-ventilation if the patient breathes rapidly? That’s why monitoring is crucial.
Simv Mode
SIMV stands for Synchronized Intermittent Mandatory Ventilation. It combines machine-delivered breaths with spontaneous breathing by the patient. The ventilator synchronizes mandatory breaths with the patient’s efforts, allowing for more natural breathing between machine breaths.
This mode helps patients practice breathing on their own while still receiving support. It’s often used during weaning from the ventilator. Ask yourself—how does allowing spontaneous breaths affect the patient’s comfort and lung function?
Pressure Support Mode
Pressure Support Mode assists only when the patient initiates a breath. The ventilator adds a preset pressure to reduce the work of breathing but does not control the breath rate or volume. This mode is often used alongside spontaneous breathing to ease the patient’s effort.
Using Pressure Support can improve patient comfort and promote faster recovery. It’s ideal when you want the patient to take more control over their breathing. Could this mode help in your practice by encouraging stronger respiratory muscles?
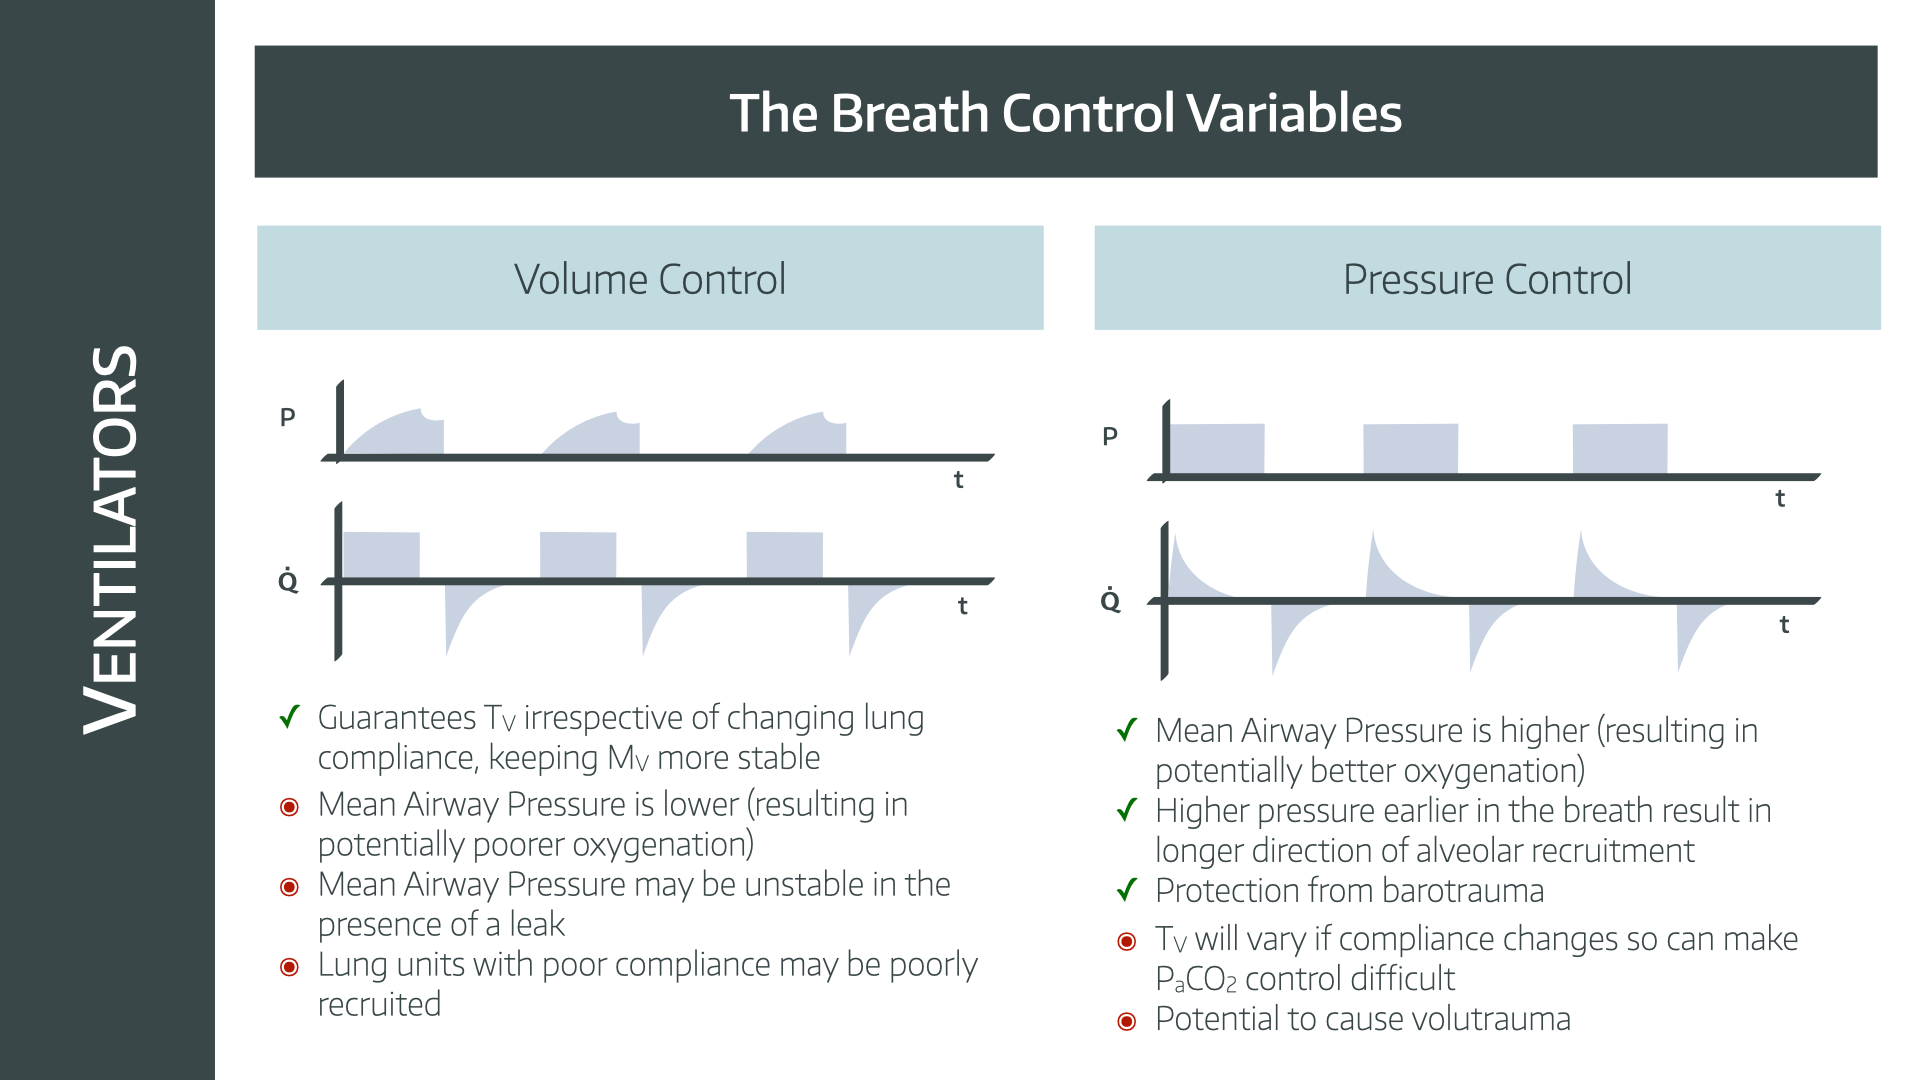
Interpreting Waveforms
Understanding ventilator settings is crucial for patient care. One key aspect is interpreting waveforms. Waveforms provide real-time data about a patient’s breathing. They help detect and diagnose respiratory issues. Let’s explore how to interpret these waveforms.
Pressure Waveform
The pressure waveform shows the pressure in the airways. It helps identify if the ventilator is delivering the right pressure. Watch for peaks and valleys in the waveform. High peaks may indicate resistance. Low valleys might suggest a leak or obstruction. Regular patterns suggest stable breathing.
Flow Waveform
The flow waveform displays the speed of air entering and exiting the lungs. It helps evaluate the patient’s breathing effort. A smooth upward line indicates steady inhalation. A gradual downward slope shows controlled exhalation. Sharp spikes may suggest coughing or secretions. Consistent patterns suggest effective ventilation.
Volume Waveform
The volume waveform shows the amount of air the patient receives. It helps ensure the patient gets enough air. A steady rise and fall suggest proper tidal volume. Sudden drops may indicate leaks or disconnection. Steady patterns suggest consistent ventilation. Watch for any irregularities for timely intervention.

Credit: www.anaestheasier.com
Adjusting Settings Safely
Adjusting ventilator settings safely is crucial to ensure your patient receives the right support without causing harm. Small changes can have big effects, so understanding when and how to adjust each parameter matters. Paying attention to patient response and clinical goals helps you make smart decisions.
When To Increase Or Decrease Tidal Volume
Tidal volume controls how much air the ventilator delivers with each breath. You might need to increase it if the patient’s oxygen levels are low and their lungs can handle more volume without injury.
Lower tidal volumes reduce the risk of lung damage, especially in patients with fragile lungs like those with ARDS. Watch for signs like rising carbon dioxide levels or patient discomfort—they can signal a need to adjust.
Ask yourself: Is the current volume helping the patient breathe comfortably? If not, tweak it carefully and observe the effects immediately.
Managing Oxygen Levels
Oxygen settings balance providing enough oxygen without causing toxicity. If oxygen saturation is below target, increasing the FiO2 can help, but only temporarily.
Long-term high oxygen levels may harm tissues, so aim to reduce FiO2 once saturation stabilizes. Use frequent blood gas analyses to guide your adjustments.
Remember, sometimes improving ventilation or circulation can boost oxygen levels better than just adding more oxygen.
Optimizing Peep
PEEP keeps the lungs open at the end of each breath, improving oxygen exchange. Increasing PEEP can help recruit collapsed alveoli but may reduce blood flow if set too high.
Lowering PEEP might be necessary if you see signs of low blood pressure or worsening oxygenation. Always balance oxygenation benefits with possible side effects.
Try small changes and monitor closely: How does the patient’s breathing and circulation respond? Your adjustments should always protect overall stability.
Common Alarms And Troubleshooting
Understanding common alarms on a ventilator is crucial for quick troubleshooting and ensuring patient safety. These alarms alert you to changes that need immediate attention, guiding you to adjust settings or check equipment. Let’s break down what these alarms mean and how you can respond effectively.
High Pressure Alarms
High pressure alarms signal that the pressure in the airway is higher than the set limit. This can happen if there’s a blockage, like mucus buildup, or if the patient coughs or bites the tube.
Check for:
- Patient coughing or biting the tube
- Kinks or blockages in the ventilator tubing
- Excessive secretions in the airway
Clearing secretions with suction or adjusting sedation to reduce coughing often resolves this. Make sure the tubing is straight and not twisted. Have you noticed how quick action here can prevent more serious complications?
Low Volume Alarms
Low volume alarms indicate the ventilator is delivering less air than it should. This might mean there’s a leak in the system or the patient is not taking full breaths.
Common causes include:
- Loose or disconnected tubing
- Leaks around the endotracheal tube cuff
- Patient effort not matching ventilator settings
Double-check connections and ensure the cuff is properly inflated. Sometimes, adjusting the ventilator sensitivity helps the machine better detect patient breaths. Have you ever seen how a small leak can throw off the whole system?
Apnea Alarms
Apnea alarms warn you when the patient stops breathing for a preset time. This is a critical alert and needs immediate evaluation.
First, assess the patient’s condition—are they truly apneic or is the ventilator not sensing breaths correctly?
- Verify patient’s respiratory effort
- Check ventilator connections and sensors
- Ensure backup ventilation modes are ready if needed
Quickly responding to apnea alarms can save lives. You might find that recalibrating sensitivity or switching to a mandatory breath mode keeps the patient safe during periods of apnea. How prepared are you to act when this alarm sounds?

Credit: www.icureach.com
Clinical Scenarios And Tips
Understanding ventilator settings in different clinical scenarios is crucial. Each condition demands specific adjustments to ensure patient safety and comfort. Clear knowledge helps prevent complications and improves outcomes.
Clinical scenarios often involve complex challenges. Recognizing common patterns in ventilator management supports better decision-making. Practical tips can simplify this process for healthcare providers.
Ards Management
Acute Respiratory Distress Syndrome (ARDS) requires lung-protective ventilation. Use low tidal volumes around 6 ml/kg of predicted body weight. Maintain plateau pressure below 30 cm H2O to avoid lung injury.
Apply higher positive end-expiratory pressure (PEEP) to keep alveoli open. Monitor oxygenation closely and adjust FiO2 to the lowest level that keeps saturation above 90%. Avoid excessive ventilation pressures and volumes.
Copd Considerations
Chronic Obstructive Pulmonary Disease (COPD) patients need careful control of ventilation. Use longer expiratory times to prevent air trapping and auto-PEEP. Set lower respiratory rates around 10-12 breaths per minute.
Maintain moderate tidal volumes, usually 6-8 ml/kg, to reduce lung overdistension. Monitor for signs of dynamic hyperinflation. Adjust PEEP cautiously, usually low or zero, to avoid worsening air trapping.
Weaning Strategies
Weaning from mechanical ventilation requires gradual reduction of support. Begin with spontaneous breathing trials to test patient readiness. Observe respiratory rate, tidal volume, and oxygen saturation during trials.
Use minimal pressure support to assist breathing while encouraging patient effort. Monitor for signs of fatigue or distress. Increase support promptly if the patient struggles.
- Check arterial blood gases regularly
- Assess mental status and airway protection
- Ensure patient comfort and effective secretion clearance
Frequently Asked Questions
What Are The Basic Ventilator Settings To Understand?
Basic ventilator settings include tidal volume, respiratory rate, FiO2, PEEP, and inspiratory pressure. These control airflow, oxygen, and pressure. Knowing these helps monitor patient breathing and adjust support effectively.
How Do You Read Tidal Volume On A Ventilator?
Tidal volume is the amount of air delivered per breath, shown in milliliters (mL). It helps assess ventilation adequacy and lung protection.
What Does Peep Mean In Ventilator Settings?
PEEP stands for Positive End-Expiratory Pressure. It prevents alveolar collapse by maintaining pressure after exhalation, improving oxygenation.
Why Is Fio2 Important In Ventilator Management?
FiO2 indicates the fraction of inspired oxygen given to the patient. Adjusting FiO2 ensures sufficient oxygen without causing toxicity.
Conclusion
Reading ventilator settings becomes easier with practice and patience. Focus on key terms like tidal volume, rate, and pressure. Understanding these helps you monitor patient care safely. Always ask questions if a setting confuses you. Keep learning step by step to build your confidence.
This skill supports better communication with healthcare teams. Small efforts lead to steady improvement over time. Stay curious and attentive during each reading session. You will find it less intimidating as you go.


