
Are you looking to give your room a stylish upgrade without the hassle of a full lighting overhaul? A Light to Chandelier Conversion Kit might be just what you need.
This simple solution lets you transform your existing light fixture into an elegant chandelier quickly and easily. Imagine adding a touch of sophistication and charm to your space without calling an electrician or spending a fortune. Keep reading to discover how this kit can change your lighting game and make your home feel more inviting right away.

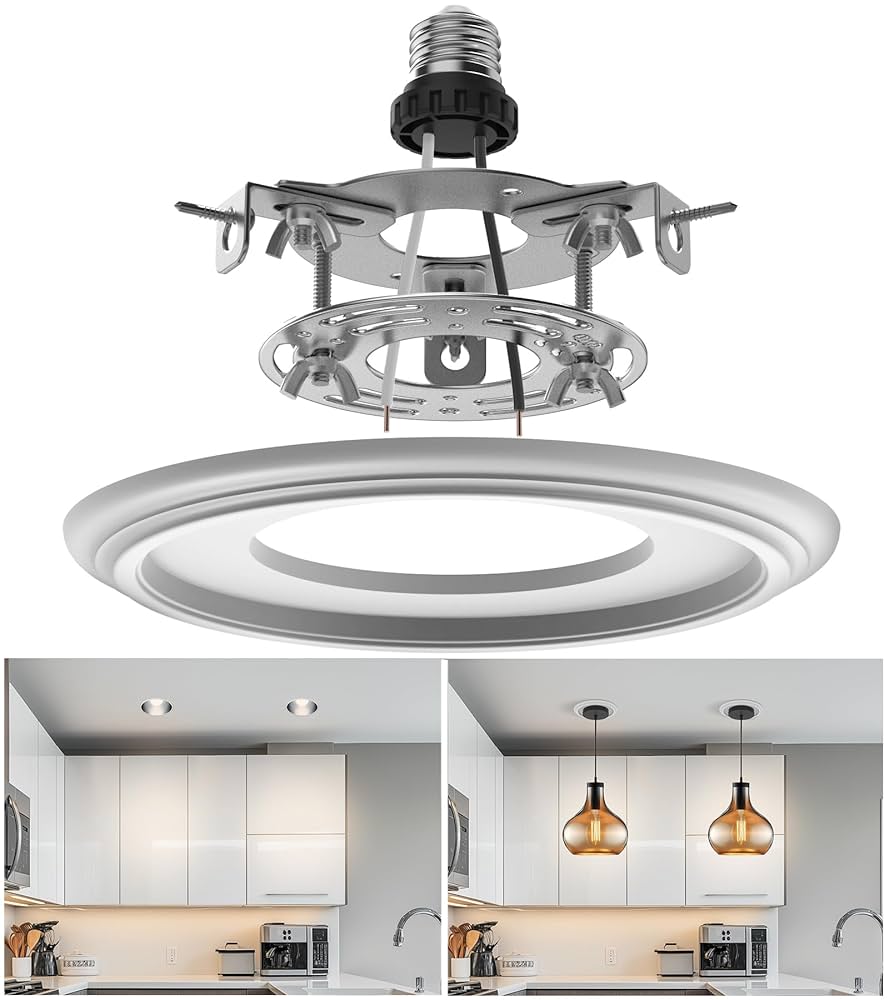
Credit: www.amazon.com
Benefits Of Conversion Kits
Choosing a light to chandelier conversion kit can transform your space without hassle. These kits offer more than just a new look—they bring practical benefits that make upgrading your lighting simple and affordable. Understanding these advantages will help you decide if a conversion kit fits your home improvement plans.
Cost-effective Lighting Upgrade
Conversion kits save you money by eliminating the need for full rewiring or professional installation. You can upgrade your existing ceiling light to a stylish chandelier without buying all new fixtures. This means you get a fresh, elegant look at a fraction of the price of replacing the entire setup.
Think about the last time you wanted to refresh a room. How much did the new lighting cost you? With a conversion kit, you keep your original wiring and just add the chandelier, which cuts down on both material and labor expenses.
Easy Installation Process
These kits are designed for easy installation, often requiring just basic tools and a bit of patience. You don’t need to be an expert electrician to complete the upgrade, which saves time and avoids the stress of complicated electrical work.
Imagine turning your ordinary ceiling light into a chandelier in under an hour. That’s possible with most kits, making the process manageable even if you’re tackling it yourself for the first time.
Versatility In Design Choices
Conversion kits come in a variety of styles, allowing you to match your chandelier to any decor. Whether you want a modern, minimalist design or a classic, ornate look, there’s a kit that fits your taste.
Have you noticed how lighting sets the mood in your room? By choosing the right chandelier style from a conversion kit, you can create the exact atmosphere you want without being limited by your existing fixture’s design.
Types Of Conversion Kits
Conversion kits make changing a simple light into a chandelier easy. Different types fit various needs and skill levels. Choosing the right kit depends on your room, wiring, and style.
Plug-in Chandelier Kits
These kits connect directly to an outlet. No hard wiring is needed. They come with a cord and plug for easy installation. Ideal for renters or those who want a quick update.
Plug-in kits allow moving the chandelier to different spots. They usually include a ceiling hook and canopy for a neat look. Best for rooms with accessible outlets near the ceiling.
Hardwired Conversion Kits
Hardwired kits connect to your home’s electrical wiring. They require turning off power and some electrical knowledge. These kits offer a clean, permanent look with no visible cords.
Perfect for those who want a professional finish. Many kits come with mounting brackets and wiring instructions. Ideal for new construction or full room remodels.
Battery-operated Options
Battery-powered kits need no wiring or plugs. They use rechargeable or replaceable batteries. Great for rooms without easy access to power.
These kits offer flexible placement and simple installation. They often include LED bulbs to save battery life. Best for small chandeliers or temporary setups.
Choosing The Right Kit
Choosing the right light to chandelier conversion kit can transform your space effortlessly. Selecting the perfect kit ensures a smooth installation and a stunning final look. Several factors play a key role in making the best choice for your home.
Matching Your Existing Fixture
Check the style of your current light fixture. The conversion kit should blend well with your room’s design. Choose a kit that complements the color and finish of your fixture. This harmony enhances the overall appearance. Avoid kits that clash with your existing decor.
Considering Room Size And Style
Measure the size of your room before choosing a chandelier kit. Large rooms need bigger or multiple chandeliers for proper lighting. Small rooms benefit from simpler, smaller kits. Match the chandelier style to the room’s theme. Classic rooms suit traditional chandeliers, while modern rooms fit sleek designs.
Assessing Electrical Compatibility
Check your current wiring setup for compatibility. The conversion kit must match your home’s voltage and wiring type. Ensure the kit supports the bulb type you want to use. Safety comes first—improper kits can cause electrical issues. Consult an electrician if unsure about compatibility.

Credit: www.amazon.com
Step-by-step Installation Guide
Begin by turning off the power to ensure safety. Remove the existing can light and attach the chandelier kit’s mounting bracket. Connect the wires carefully, then secure the chandelier in place and restore power to enjoy your new lighting.
Transforming your space with a chandelier can add a touch of elegance and sophistication. But how do you go from a simple can light to a stunning chandelier? This step-by-step installation guide will walk you through the entire process, ensuring you have a seamless experience.Preparing Your Space
First, ensure your workspace is safe and accessible. Turn off the power at the breaker to avoid any electrical accidents. Gather all necessary tools such as a screwdriver, voltage tester, and ladder. Clear the area beneath the fixture to prevent any damage during installation. A clean, clutter-free environment will make the process smoother and more efficient. Have someone assist you if possible, as an extra pair of hands can be invaluable.Removing The Old Fixture
Start by removing the existing can light. Gently detach the trim and bulb from the fixture. Use your screwdriver to loosen the screws and disconnect the wires carefully. Check for any signs of wear or damage on the wiring. If anything looks suspicious, consult a professional electrician. Ensuring a solid foundation is crucial for the next steps.Installing The Conversion Kit
Unbox your conversion kit and familiarize yourself with its components. Attach the mounting plate securely to the junction box. Connect the wires from the kit to the existing wires, matching colors to ensure proper connection. Tighten all screws and ensure the fixture is stable. Once secure, attach the chandelier according to the manufacturer’s instructions. Double-check everything is aligned and firmly in place.Testing And Adjustments
Restore power to the circuit and test the chandelier to ensure it illuminates correctly. If it doesn’t light up, double-check your wire connections. Adjust the height and angle of the chandelier if necessary. Step back and admire your work—how does it transform the room? Isn’t it satisfying to see your efforts shine? Remember, a well-lit space can change how you feel in your home. What’s your next DIY project?Safety Tips And Precautions
Converting a ceiling light to a chandelier can instantly elevate your space, but it requires careful attention to safety. Electrical work always comes with risks that you must respect to avoid accidents. Taking the right precautions protects you, your home, and your new chandelier investment.
Handling Electrical Components
Always turn off the power at the circuit breaker before touching any wiring. Use a voltage tester to double-check that no electricity flows through the wires.
Wear insulated gloves to reduce shock risks. Avoid working in wet or damp conditions to prevent electrocution.
Keep wires organized and properly capped if not connected immediately. Exposed wires can cause shorts or shocks even after the project is complete.
When To Call A Professional
Are you unsure about identifying wires or handling the electrical box? It’s better to call a licensed electrician than risk faulty installation.
Complex setups, like installing heavy chandeliers or upgrading your electrical panel, often require professional expertise. Remember, saving a little money up front isn’t worth the potential hazards or code violations.
Trusting a pro can also give you peace of mind that your chandelier is securely supported and wired correctly.
Maintaining Your Chandelier
Regular cleaning prevents dust buildup that can dull the sparkle and strain the fixture. Use a soft cloth and gentle cleaner designed for delicate surfaces.
Check the wiring and mounting hardware annually. Look for loose screws, frayed wires, or signs of wear and tear.
Replacing bulbs with the correct wattage ensures safety and prolongs the fixture’s life. Have you noticed flickering or dimming? It could signal electrical problems that need immediate attention.
Creative Styling Ideas
Creative styling ideas bring life to your light to chandelier conversion kit. This upgrade transforms a simple light fixture into a stunning centerpiece. Use design tricks to blend styles, control ambiance, and add charm.
Mixing Modern And Classic Elements
Combine sleek modern shapes with vintage chandelier details for a unique look. Use metal finishes like brushed nickel alongside crystal or glass accents. This contrast highlights both old and new styles beautifully. Try pairing minimalist bulbs with ornate arms for balanced design.
Using Dimmer Switches
Install dimmer switches to adjust light levels with ease. Dimming creates cozy moods or bright settings as needed. This control enhances the chandelier’s versatility for different occasions. Soft lighting makes rooms feel warm and inviting instantly.
Adding Decorative Accents
Decorate around the chandelier to boost style impact. Hang small crystals or beads from chains for sparkle. Wrap fabric or ribbon on arms for texture and color. Choose accents that match your room’s theme to tie everything together.
Troubleshooting Common Issues
Troubleshooting common issues during a light to chandelier conversion kit installation can save you time and frustration. Problems like flickering lights or loose connections often hide simple fixes. Understanding these issues helps you enjoy your new chandelier without unnecessary delays or extra costs.
Flickering Lights
Flickering is one of the most common issues you might face after installing a chandelier conversion kit. It often signals a loose bulb or a poor connection in the socket. Double-check if the bulbs are screwed in tightly, but avoid overtightening as this can cause damage.
Another cause could be incompatible dimmer switches. If your chandelier kit uses LED bulbs, make sure your dimmer supports LEDs. Have you noticed flickering only when dimmed? That’s a clear sign to check your dimmer compatibility.
Loose Connections
Loose wiring can cause your chandelier to malfunction or not light up at all. When you open the junction box, look for any wires that are not securely connected. A simple twist of wire nuts or tightening of terminal screws can fix the problem.
Remember, safety first—always turn off the power before touching any wiring. If you feel unsure about handling electrical components, it’s better to call a professional. Have you ever found a loose wire that was the root cause of your lighting issue?
Compatibility Problems
Not every chandelier conversion kit fits all fixtures perfectly. Compatibility issues can arise with the size, shape, or electrical requirements of your existing setup. Measure your current light fixture carefully before buying a kit to avoid surprises.
Also, check the voltage and wattage limits on both the chandelier kit and your home’s wiring. Using a kit that doesn’t match your electrical specifications can lead to safety hazards or poor performance. Did you check if your existing fixture supports the weight and wiring of the new chandelier?

Credit: www.amazon.com
Frequently Asked Questions
What Is A Light To Chandelier Conversion Kit?
A light to chandelier conversion kit allows you to transform a basic light fixture into a stylish chandelier. It includes necessary hardware to attach and support chandelier components easily. This kit helps upgrade lighting without rewiring or major electrical work.
How Easy Is It To Install A Conversion Kit?
Installation is generally simple and quick, requiring basic tools. Most kits come with clear instructions for DIY assembly. You only need to attach the chandelier parts to the existing light fixture’s base, making it a cost-effective upgrade.
Can I Use Any Chandelier With The Conversion Kit?
Not all chandeliers fit every conversion kit. Ensure the kit supports your chandelier’s weight and size. Check compatibility details before purchase to avoid installation issues or potential hazards from improper fitting.
Are Conversion Kits Safe For Home Use?
Yes, conversion kits are designed to meet safety standards when installed correctly. Always follow manufacturer instructions and consider consulting a professional electrician if unsure. Proper installation ensures safe and stable chandelier mounting.
Conclusion
A light to chandelier conversion kit offers a simple way to upgrade lighting. It saves money by avoiding full fixture replacements. Installation usually takes just a few minutes. This kit fits most standard light fixtures easily. It adds style and elegance without extra work.
Choose the right kit to match your room’s look. Brighten your space with a fresh, classic chandelier design. Small changes can bring a big difference. Try it and see how your room transforms.


