
Are you looking for a fun and creative way to add a personal touch to your home? A Do It Yourself Wall Clock Kit lets you build your own unique timepiece with ease.
Imagine the satisfaction of watching the hands move on a clock you made yourself. Not only will you save money, but you’ll also enjoy a project that’s both simple and rewarding. Keep reading to discover how this kit can transform your space and give you a sense of pride every time you check the time.
Benefits Of Diy Wall Clock Kits
DIY wall clock kits offer many benefits for home decorators and craft lovers. They provide a fun and practical way to create something special. These kits let you save money while designing a clock that fits your style perfectly. Building your own clock also helps improve your craft skills and sparks creativity. Here are some key advantages of choosing a DIY wall clock kit.
Cost Savings Compared To Store-bought Clocks
DIY wall clock kits often cost less than ready-made clocks. Buying parts separately or assembling a kit can save money. Store-bought clocks include extra costs for brand and packaging. With a kit, you pay mostly for materials. This makes DIY kits an affordable option for stylish home decor. You get a functional clock without spending a lot.
Customization Options For Unique Designs
DIY kits allow full control over your clock’s look. Choose colors, shapes, and sizes to match your room. Add personal touches that store clocks cannot offer. You can change clock hands, numbers, and backgrounds. Create a design that shows your personality. This flexibility makes your wall clock one-of-a-kind and special.
Enhancing Creativity And Craft Skills
Building a clock from a kit boosts creativity and focus. It encourages problem-solving and attention to detail. You learn new skills like assembly and basic mechanics. Completing the project brings a sense of pride and achievement. Crafting a wall clock is also a relaxing and rewarding hobby. It helps develop patience and fine motor skills.

Credit: www.ebay.com
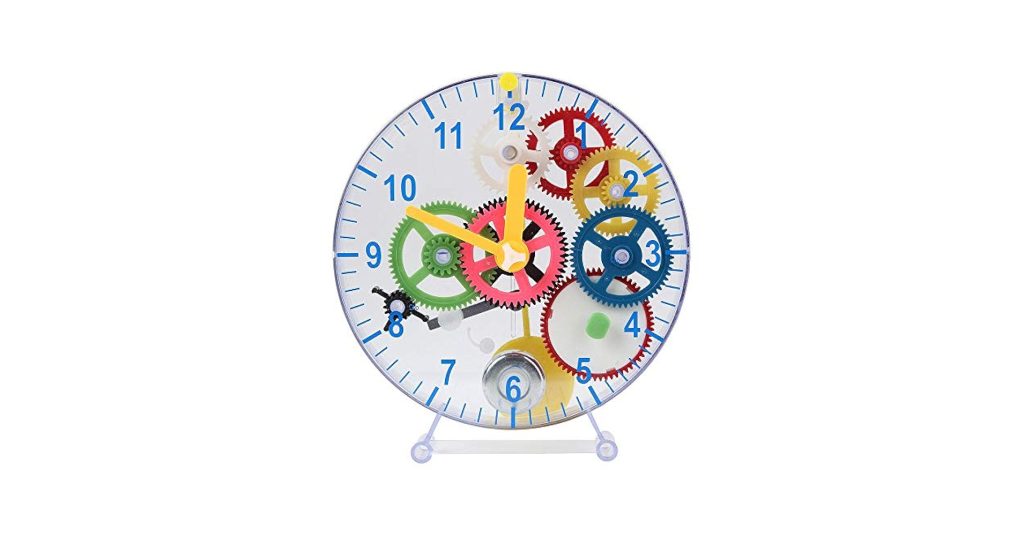
Essential Components Of A Wall Clock Kit
Building a wall clock from a DIY kit is a fun and creative project. Understanding the essential components helps you make a clock that works well and looks great. Each part plays a key role in the clock’s function and style.
Knowing what comes in a typical wall clock kit makes the assembly easier and more enjoyable. Here are the main elements you will find in most kits.
Clock Movement Mechanism
The clock movement mechanism controls the timekeeping. It is the heart of the clock. Usually, it runs on a small battery. Quartz movements are common for their accuracy and quiet operation. Some kits offer silent sweep movements to avoid ticking sounds. The mechanism includes gears and an axle where the clock hands attach.
Clock Hands And Face Options
Clock hands show the time and come in various shapes and sizes. Kits often include hour, minute, and second hands. The face or dial can be simple or decorative. Some kits offer blank faces to personalize with paint or numbers. Others come with printed designs or numbers for easy reading.
Additional Decorative Elements
Decorative elements make the clock unique. These can include frames, stickers, or stencils. Some kits offer wooden or metal accents to enhance the look. You can add your own decorations like paint or decals. These extras help match the clock to your room’s style.
Choosing The Right Kit For Your Style
Choosing the right DIY wall clock kit can reflect your personal style. The selection ranges from sleek modern designs to charming vintage themes. Each option adds a unique touch to your home. Consider your decor and preferences. Find the kit that best matches your style.
Modern And Minimalist Designs
Modern clock kits focus on simplicity and clean lines. These designs fit well in contemporary spaces. Often featuring neutral colors and geometric shapes. They add elegance without overwhelming a room. Perfect for those who love minimalism.
Vintage And Rustic Themes
Vintage kits bring a sense of nostalgia and charm. They often use materials like wood or metal. These clocks suit traditional or country-style interiors. The rustic finish adds warmth and character. Ideal for creating a cozy atmosphere.
Kid-friendly And Educational Kits
Kid-friendly kits combine fun with learning. They include bright colors and engaging designs. Some kits feature numbers and letters. Helping children learn to tell time. These kits make a playful addition to a child’s room.

Credit: www.xtool.com
Step-by-step Assembly Guide
Assembling your DIY wall clock kit can be a fun and rewarding experience. It doesn’t require special skills, just a bit of patience and attention to detail. Let’s walk through the key stages that will help you bring your clock to life.
Preparing Your Workspace
Choose a clean, flat surface with good lighting to keep all parts visible and within reach. Lay down a soft cloth or mat to prevent scratches on your clock components. Make sure you have all the tools ready—usually a small screwdriver and batteries are enough.
Organize the parts by size and type. This simple step saves time and frustration later. Have you noticed how a cluttered workspace can slow down even simple tasks? Keeping things tidy helps you focus and speeds up assembly.
Installing The Clock Mechanism
Start by inserting the clock mechanism through the hole in the clock face. The mechanism should fit snugly without forcing it. Secure it from the back using the provided nut or clip.
Double-check the alignment so the mechanism is straight. Misalignment can cause the hands to stick or not move smoothly. Take your time here—this small detail affects the clock’s accuracy and appearance.
Attaching The Clock Hands
Attach the hour hand first by gently pressing it onto the center spindle. Next, place the minute hand carefully, followed by the second hand if your kit includes one. Each hand should fit firmly but not too tight.
Try moving the hands manually to ensure they don’t touch each other or the clock face. If they do, slightly bend them away to avoid interference. Have you ever had a clock stop because the hands got stuck? Avoid that by testing now.
Final Adjustments And Testing
Insert the battery and set the correct time using the adjustment dial. Watch the clock for a few minutes to confirm the hands move smoothly and keep accurate time. Listen for any unusual noises that might indicate a problem.
If needed, make small tweaks to the hands’ positions or tighten the mechanism. Your patience here ensures your clock will work reliably for years. What’s more satisfying than seeing a handmade piece ticking perfectly on your wall?
Creative Ideas To Personalize Your Clock
Personalizing a DIY wall clock kit is a fun way to express your style. It transforms a simple clock into a unique piece of art. Small touches make a big difference. Explore creative ideas to customize your clock and make it truly yours.
Painting And Decorating The Clock Face
Start with a plain clock face. Use acrylic paints for bright, long-lasting colors. Try patterns like stripes, dots, or waves. Stencils help create neat shapes. Add small drawings or doodles for a personal touch. Seal your design with clear varnish to protect it.
Adding Numbers Or Markers
Numbers help tell time clearly. Choose bold numbers for a modern look. Use Roman numerals for a classic feel. Stick-on numbers make the process quick. For a minimalist style, try small dots or lines as markers. Arrange them evenly around the clock face for balance.
Incorporating Mixed Materials
Mix materials to add texture and interest. Glue small beads or buttons around the edge. Use wood slices or cork for a natural vibe. Add fabric or paper cutouts for color and pattern. Combine metal or plastic pieces for a modern twist. Make sure all materials are light to keep the clock working well.

Credit: www.xtool.com
Troubleshooting Common Issues
Troubleshooting your DIY wall clock kit can be straightforward if you know where to look. Small issues often cause big headaches, but most problems have quick fixes. Let’s break down some of the most common hurdles and how you can tackle them efficiently.
Clock Hands Not Moving Properly
If your clock hands are stuck or moving unevenly, start by checking if they are touching each other. Hands that overlap can block movement, so gently bend them apart to create space.
Sometimes, the hands might be too tight on the center post. Try loosening them slightly and see if that improves motion. If the hands are still sluggish, dust or debris inside the mechanism might be the culprit—clean it carefully with a soft brush.
Battery And Power Concerns
Dead or weak batteries are a common reason clocks stop working. Always use fresh, high-quality batteries to ensure consistent power.
Make sure the battery is inserted correctly, with the positive and negative ends aligned properly. If your clock still doesn’t respond, check the battery contacts for corrosion and clean them gently with a cotton swab dipped in vinegar or rubbing alcohol.
Alignment And Balance Problems
Proper alignment of the clock components is key for accurate timekeeping. Ensure the clock movement is securely fixed to the clock face without any wobbling.
Balance the clock hands carefully; if one hand is heavier or bent, it may cause the clock to stop or run irregularly. Adjust or replace any parts that seem off-balance, and confirm the clock is hung straight on the wall to avoid tilt-related issues.
Displaying And Caring For Your Diy Clock
Displaying and caring for your DIY wall clock ensures it stays beautiful and works well. Proper placement highlights its design and helps keep time accurately. Simple care routines protect your clock from dust and damage. Follow these tips to enjoy your clock for years.
Best Placement Tips
- Choose a wall visible from many angles.
- Avoid direct sunlight to prevent fading.
- Keep away from high humidity areas like bathrooms.
- Hang at eye level for easy time reading.
- Place near other decor to create a balanced look.
Cleaning And Maintenance
- Use a soft, dry cloth for regular dusting.
- Avoid water or harsh chemicals on clock parts.
- Check battery compartments for leaks or corrosion.
- Change batteries once a year to avoid power loss.
- Tighten loose screws or parts gently if needed.
Long-term Durability Tips
- Keep the clock away from extreme temperatures.
- Handle the clock carefully during moves or cleaning.
- Use quality batteries to prevent damage.
- Inspect the clock mechanism yearly for smooth operation.
- Store extra parts safely in case of future repairs.
Frequently Asked Questions
What Is Included In A Diy Wall Clock Kit?
A DIY wall clock kit typically includes clock hands, a clock movement mechanism, numbers or markers, and mounting hardware. Some kits also provide a clock face or template. These kits allow you to customize and assemble your own unique wall clock easily at home.
How Difficult Is Assembling A Diy Wall Clock Kit?
Assembling a DIY wall clock kit is generally easy and beginner-friendly. Most kits come with clear instructions and all necessary parts. Basic tools like a screwdriver may be needed. The process usually takes less than an hour, making it a fun and rewarding project.
Can I Customize The Design Of A Diy Wall Clock?
Yes, DIY wall clock kits are highly customizable. You can paint the clock face, choose different numbers, and arrange components uniquely. This flexibility lets you create a clock that matches your style and decor perfectly, adding a personal touch to your space.
What Tools Are Needed For A Diy Wall Clock Kit?
Most DIY wall clock kits require minimal tools, often just a screwdriver and a pair of pliers. Some kits might include a small wrench or adhesive tape. It’s best to check the kit instructions for specific tool requirements before starting your project.
Conclusion
Creating your own wall clock kit brings fun and pride. It fits any room style and adds a personal touch. You learn new skills while making something useful. The process is simple and relaxing, perfect for all ages. Enjoy watching time pass on a clock you built yourself.
Try a DIY wall clock kit to brighten your space today.


