
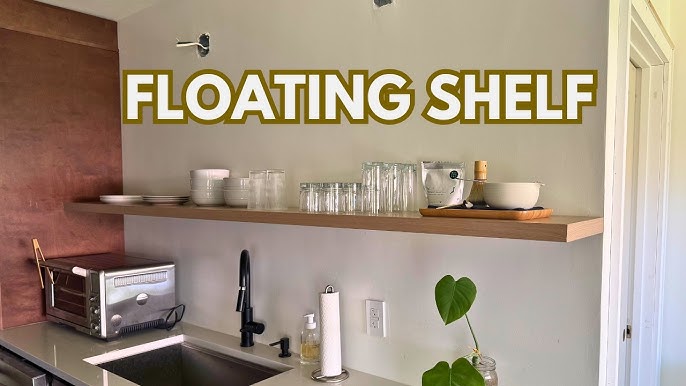
Are you looking to add stylish storage without taking up floor space? Building a floating shelf might be the perfect solution for your home.
Imagine a sleek shelf that seems to hover on your wall, giving your room a modern and clean look. You don’t need to be a pro to create one, and with the right steps, you can do it yourself quickly and easily.
Keep reading, and you’ll discover exactly how to build a floating shelf that fits your space and style perfectly. Your walls are waiting to shine—let’s get started!
Choosing The Right Materials
Choosing the right materials is key to building a sturdy floating shelf. The materials affect the shelf’s strength, look, and how long it lasts. Picking quality wood, strong brackets, and the right tools makes your project easier and the results better.
Selecting Wood Types
Wood choice changes the shelf’s style and durability. Softwoods like pine are easy to cut and affordable. Hardwoods such as oak or maple offer more strength and a polished look. Plywood is budget-friendly and stable, but may need finishing to hide layers.
Consider the shelf’s weight capacity and room style. Smooth, knot-free wood looks clean. Dark wood adds warmth; light wood brightens spaces. Choose wood that fits your needs and matches your décor.
Picking The Best Brackets
Brackets hold the shelf safely on the wall. Look for metal brackets with strong welds or thick steel. Invisible or floating shelf brackets create a clean, modern look. Check the weight rating to ensure they support your shelf and items.
Brackets come in different shapes and sizes. Some fix inside the wood, others mount below it. Pick brackets that fit your wood thickness and wall type. Proper brackets prevent sagging and keep your shelf level.
Tools You’ll Need
- Drill with drill bits for holes
- Level to keep shelf straight
- Screwdriver or power driver
- Measuring tape for accuracy
- Stud finder to locate wall studs
- Sandpaper for smooth edges
- Pencil for marking points
Having the right tools saves time and improves the shelf’s finish. Use each tool carefully for safety and precision.
Measuring And Planning
Measuring and planning are the foundation of building a sturdy and visually pleasing floating shelf. Skipping this step can lead to shelves that don’t fit well or can’t support the weight you need. Taking time here saves frustration and makes the installation smoother.
Determining Shelf Size
Think about what you want to put on your shelf. Will it hold books, plants, or decorative items? This helps you decide the length and depth of the shelf.
Measure the space on your wall carefully. Allow some extra room around the shelf so it doesn’t look cramped. A common depth for floating shelves is 8 to 12 inches, but adjust based on your needs.
Locating Wall Studs
Wall studs are crucial because they support the shelf’s weight. Use a stud finder to locate them behind your drywall. Mark each stud clearly with a pencil.
If you can’t find studs where you want the shelf, consider using strong wall anchors. But remember, mounting directly on studs provides the best stability, especially for heavier items.
Marking The Placement
Once you know your shelf size and stud locations, mark the exact spots on the wall for the brackets or mounting hardware. Use a level to ensure your marks are perfectly horizontal.
Double-check your measurements before drilling. A small mistake here can mean a crooked shelf or holes in the wrong places. Ask yourself: Does the marked spot allow for easy access and look balanced with your room’s layout?
Cutting And Preparing Wood
Choose wood pieces that suit your shelf size and style. Measure carefully, then cut the wood straight for a clean look. Sand edges smooth to avoid splinters and prepare for finishing.
Building a floating shelf starts with cutting and preparing the wood. This step is crucial for a sturdy and attractive shelf. Proper preparation will ensure your shelf fits perfectly and looks polished.Cutting To Size
Measure the space where the shelf will go. Use a tape measure for accuracy. Mark the desired length on the wood with a pencil. Cut the wood using a saw, following the marked line carefully. Ensure your cuts are straight for a perfect fit.Sanding And Finishing
Once cut, the wood edges may be rough. Use sandpaper to smooth these edges. Start with coarse sandpaper, then switch to fine grit for a sleek finish. Sanding will remove splinters and prepare the wood for paint or stain.Applying Paint Or Stain
Choose a paint or stain that matches your decor. Apply it using a brush or cloth. Allow the first coat to dry completely. Apply additional coats if needed for a deeper color. A clear finish can add shine and protection to your shelf.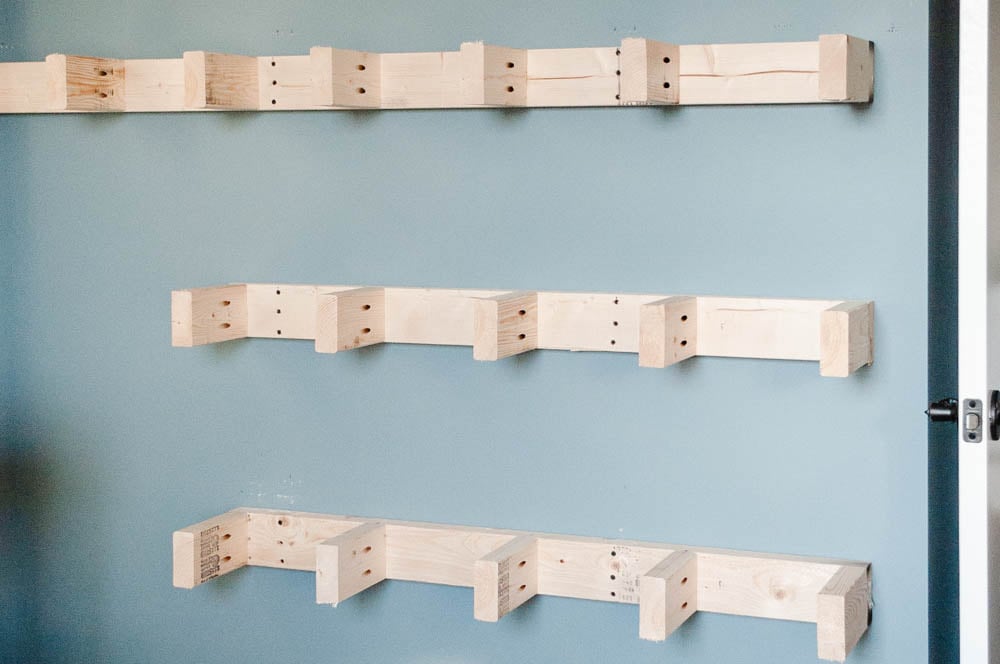
Credit: www.christeneholderhome.com
Installing The Brackets
Installing the brackets is a crucial part of building a floating shelf. This step ensures your shelf holds firmly and looks clean. Paying attention to how you secure and align the brackets will save you time and frustration later.
Securing Brackets To Wall
Start by locating the wall studs using a stud finder. Brackets must be anchored into studs to support weight safely. Mark the spots clearly with a pencil before drilling.
Use a drill to make pilot holes for the screws. This prevents the wall from cracking and makes it easier to insert screws. Then, attach the brackets firmly with heavy-duty screws designed for your wall type.
Have you ever tried to hang something heavy on drywall alone? It rarely ends well. Securing into studs is non-negotiable if you want your shelf to stay put without sagging or falling.
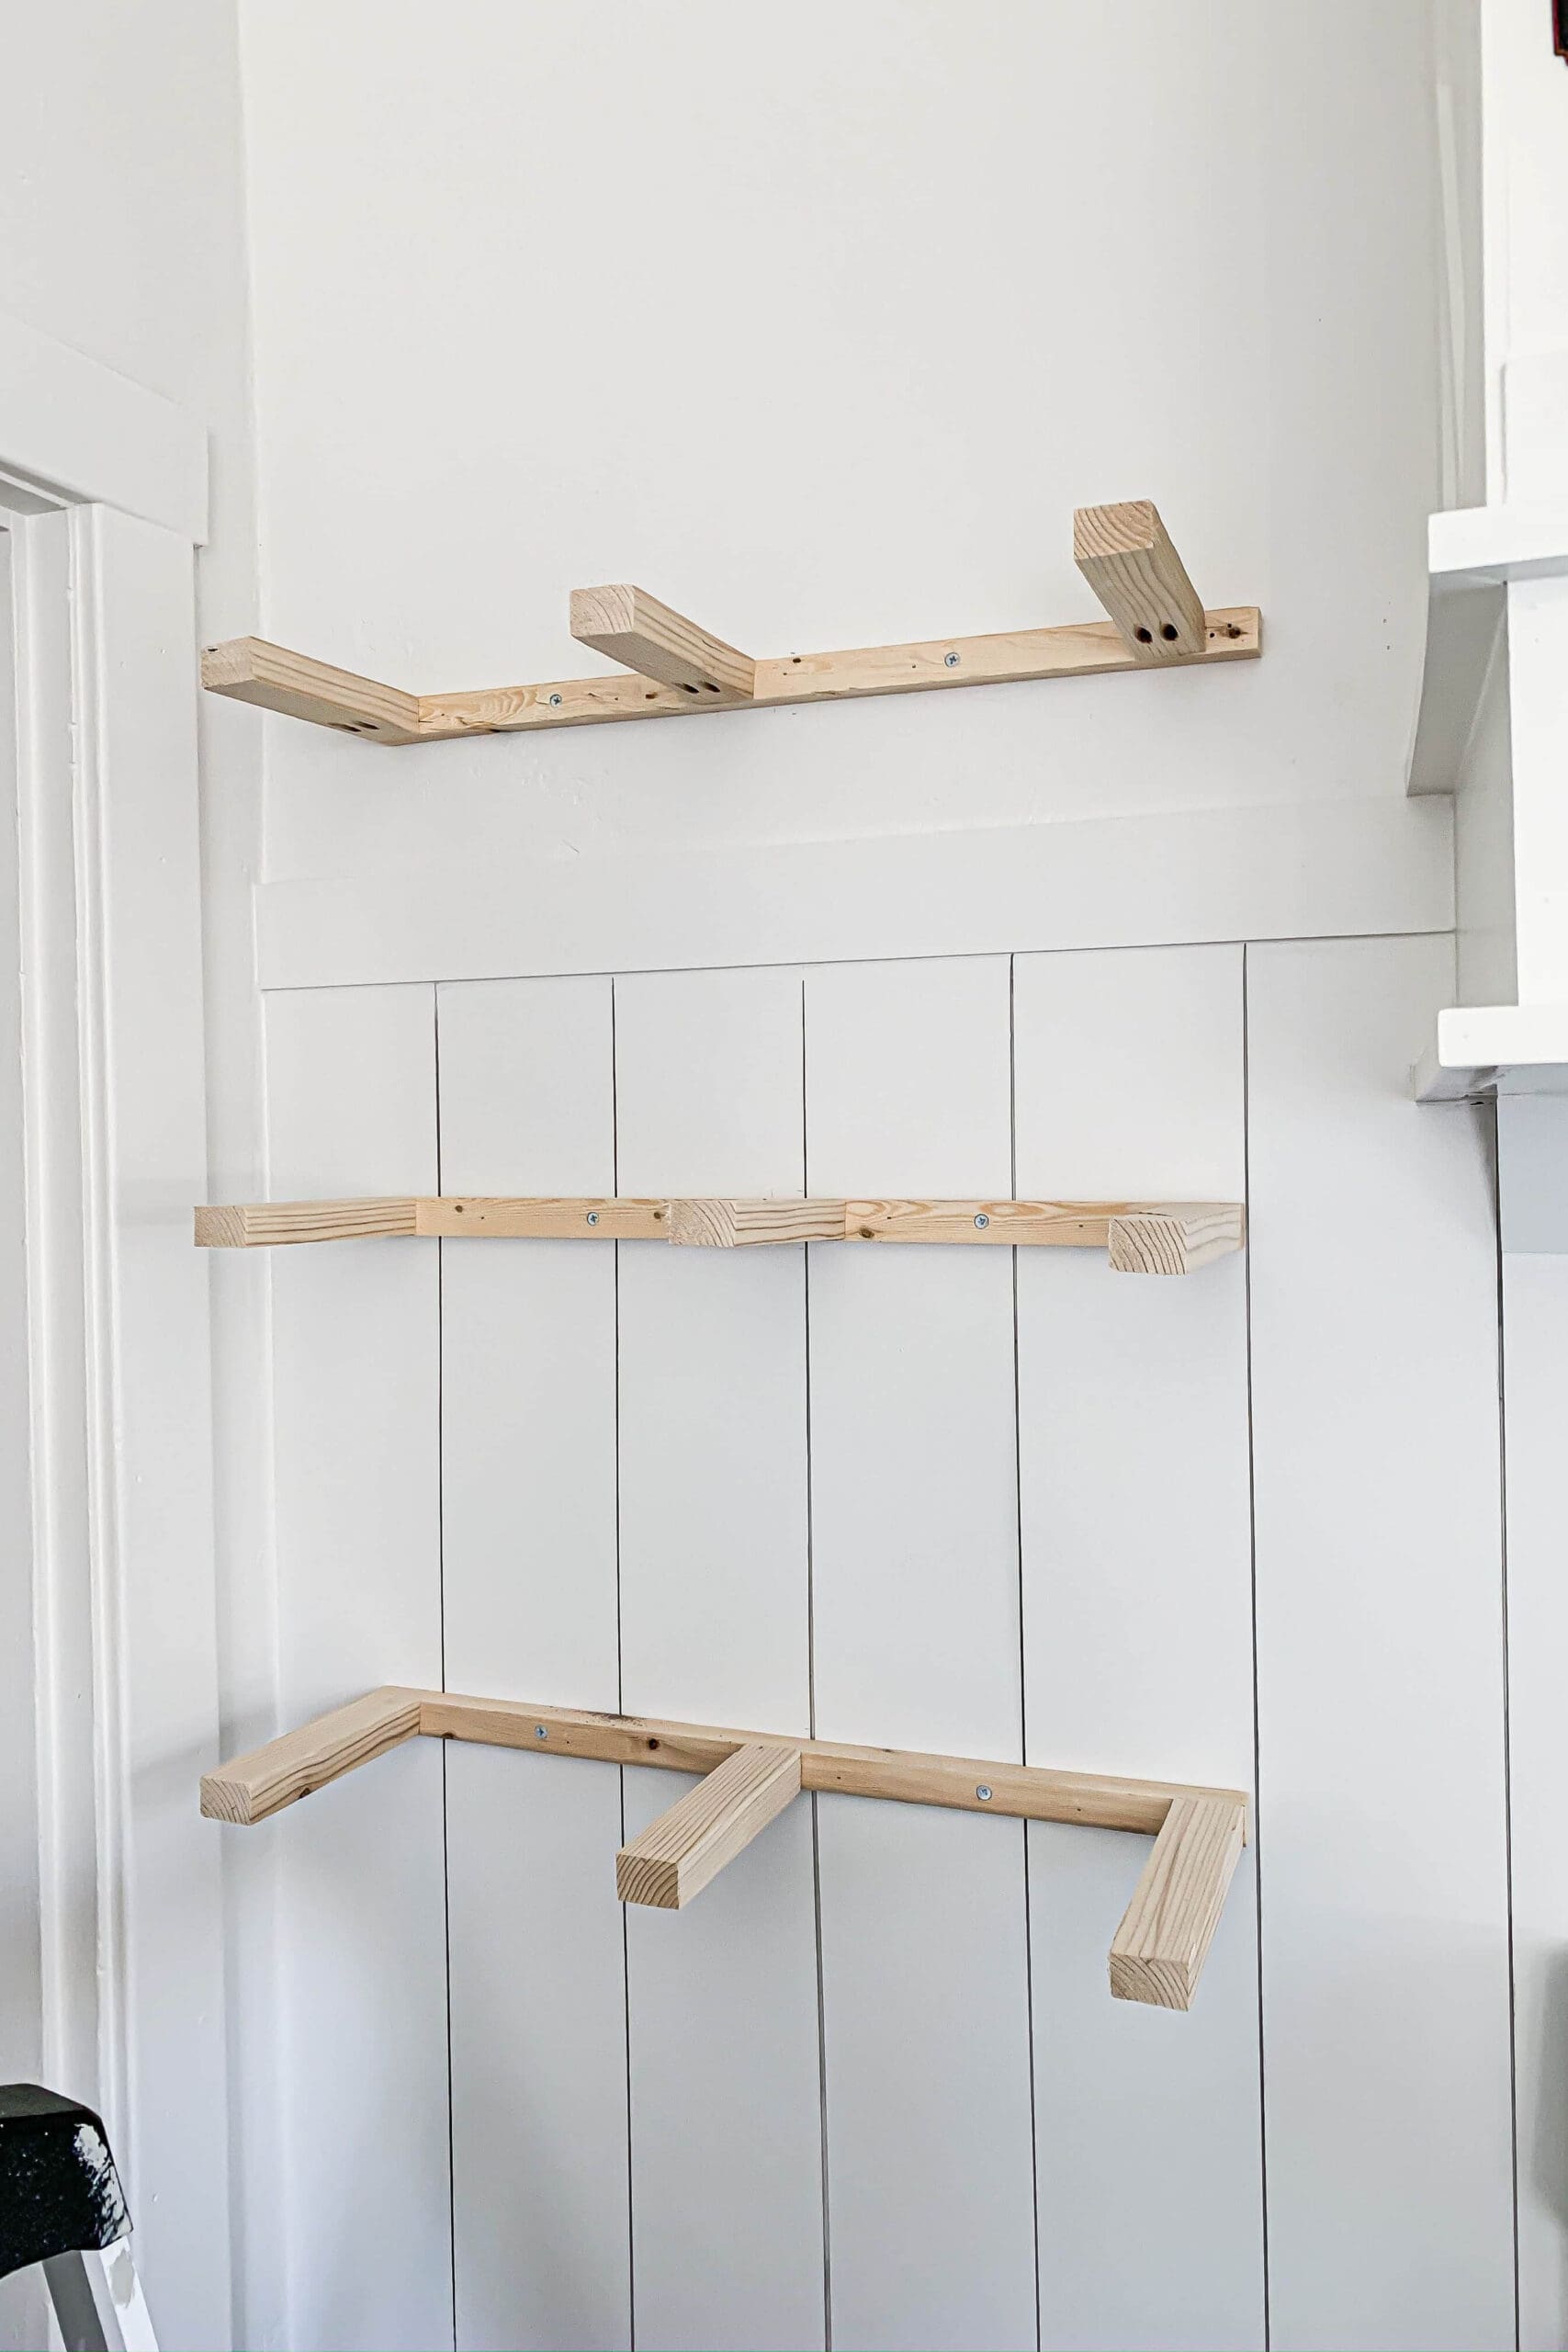
Ensuring Level Alignment
Once the brackets are attached, check their alignment with a spirit level. A shelf that isn’t level quickly becomes an eyesore and can cause items to slide off.
Adjust the brackets as needed before tightening the screws completely. Small shifts at this stage prevent bigger headaches later. Ask yourself: Is the bubble perfectly centered? If not, tweak the brackets.
Using a laser level can make this step even easier and more precise. I found that investing in one saved me multiple attempts and kept my shelves perfectly horizontal every time.
Mounting The Shelf
Mounting the shelf is a key step in building a floating shelf. It ensures the shelf holds weight safely and looks neat on the wall. Proper mounting prevents wobbling and keeps your items secure. Follow these steps carefully to attach your shelf and check its stability.
Attaching Shelf To Brackets
Start by placing the shelf on the brackets. Align the shelf edges evenly. Use screws to fix the shelf to the brackets. Screw through the bracket holes into the shelf bottom. Tighten screws firmly, but avoid cracking the wood. Use a drill or screwdriver for best results.
Checking Stability And Support
Test the shelf for any movement. Push lightly to see if it wobbles. If loose, tighten the screws more. Check the brackets are still securely fixed to the wall. Place some weight on the shelf to confirm support. A strong floating shelf should not tilt or sag.

Credit: m.youtube.com
Styling And Maintenance Tips
Styling and caring for your floating shelf keeps it looking fresh and neat. Proper decoration enhances your room’s style and adds personality. Regular maintenance protects the shelf and extends its life. Here are simple tips for both styling and care.
Decorating Your Floating Shelf
Choose items that fit the shelf size and room theme. Mix books, plants, and small decor pieces for balance. Use different heights and textures for visual interest. Keep some space clear to avoid clutter. Rotate decor seasonally to refresh your space.
- Place a small plant or succulent for natural color.
- Stack a few books horizontally with a decorative object on top.
- Display framed photos or art for a personal touch.
- Add candles or small sculptures for variety.
- Use matching colors to keep a clean look.
Cleaning And Care Advice
Dust your floating shelf weekly to prevent buildup. Use a soft cloth or microfiber duster. Avoid harsh chemicals that can damage the finish. Wipe spills immediately with a damp cloth. Check the shelf brackets regularly to ensure stability.
- Use mild soap and water for deeper cleaning.
- Dry the shelf completely after cleaning.
- Keep heavy items off to avoid sagging.
- Inspect screws and tighten if needed.
- Protect wood shelves with polish or oil, if recommended.
Credit: crystelmontenegrohome.com
Frequently Asked Questions
What Tools Do I Need To Build A Floating Shelf?
You need a drill, level, measuring tape, stud finder, screws, wall anchors, and a saw. These tools help ensure precise and secure shelf installation.
How Do I Find Studs For Floating Shelf Installation?
Use a stud finder to locate wall studs behind drywall. Mark the stud positions to anchor the shelf securely for better weight support.
What Type Of Wood Is Best For Floating Shelves?
Choose hardwoods like oak, maple, or walnut for durability and aesthetics. These woods offer strength and a smooth finish suitable for floating shelves.
How Much Weight Can A Floating Shelf Hold?
Weight capacity depends on the wood type, bracket strength, and wall studs. Properly installed, most floating shelves support 20-50 pounds safely.
Conclusion
Building a floating shelf is simple and rewarding. Gather the right tools and materials first. Measure and mark carefully for a perfect fit. Secure the brackets tightly to hold weight well. Paint or stain the shelf to match your space.
This project adds style and extra storage easily. Try it yourself and enjoy a neat, modern look. Small effort, big difference. Your wall deserves this fresh upgrade.


