
Are you ready to bring your Canva designs to life on paper but unsure how to print them perfectly? Printing your creations should be simple and stress-free, so you get exactly what you imagined.
In this guide, you’ll discover easy steps to print your Canva projects with professional results every time. Whether it’s a flyer, invitation, or poster, you’ll learn the best tips to make your printouts stand out. Keep reading, and soon you’ll be turning your digital designs into stunning physical copies effortlessly.
Preparing Your Design
Ensure your design is complete and error-free before printing. Check colors, fonts, and layout for best results. Save your file in the right format to avoid issues.
Preparing your design for print in Canva can be a fun and fulfilling task if you know how to navigate the platform effectively. With the right settings, your designs will print beautifully, capturing every detail and color you intended. But how do you ensure your design is print-ready? Let’s explore some crucial steps to make your Canva designs stand out in print.Choosing The Right Dimensions
Start by selecting the correct dimensions for your project. Whether you’re creating a business card, flyer, or poster, the size matters. Canva offers preset dimensions for various print materials, ensuring your design fits perfectly. If you’re unsure, you can always customize the dimensions. Double-checking the size can save you from future headaches and ensures your design won’t be cropped unexpectedly.Selecting Print-ready Templates
Choosing the right template can simplify your design process. Canva’s extensive library includes many print-ready templates designed by professionals. These templates are optimized for print, taking into account colors, fonts, and layout. Opt for these templates when you want a polished look without starting from scratch. However, make sure the template aligns with your brand or personal style for a cohesive final product.Setting Up Bleed And Margins
Setting up bleed and margins is a critical step for any print project. Bleed ensures that your design extends beyond the trim line, preventing unwanted white edges. Canva allows you to add bleed with a simple click in the download settings. Margins help keep essential elements like text and logos within the safe zone. This way, nothing important gets cut off during printing. Always preview your design with the bleed and margin settings to avoid costly mistakes. By carefully preparing your design, you ensure a seamless transition from digital to print. What design are you printing next? Take these steps, and watch your ideas come to life on paper!
Credit: www.trupeer.ai
Adjusting Image Quality
Adjusting image quality is crucial when printing from Canva. Poor image quality can turn a stunning design into a blurry mess. Paying attention to details like resolution, pixelation, and color accuracy will ensure your prints look professional and vibrant.
Using High-resolution Images
Always choose images with a resolution of at least 300 DPI for printing. Lower resolution images might look fine on screen but will appear blurry or pixelated in print.
If you upload photos from your phone or camera, check their resolution before adding them to your design. Canva also lets you see image details—use this to confirm you’re working with high-quality visuals.
Avoiding Pixelation
Pixelation happens when you stretch a low-res image beyond its limits. To avoid this, don’t enlarge images too much inside Canva. Instead, pick bigger images or scale your design to fit the image size.
You can also try to preview your design at 100% zoom to spot any pixelated areas before printing. This simple step can save you from printing blurry photos and wasting materials.
Optimizing Colors For Print
Colors on screen often look different when printed. To get the best results, use CMYK color mode if possible, as it matches printer colors better than RGB.
Check your design’s colors by printing a small test section first. This way, you can adjust colors for brightness and contrast before printing the whole project.
Have you ever printed something only to find the colors look dull or off? Small tweaks in Canva can fix this and make your prints pop exactly how you want.
Printing Options In Canva
Printing your designs from Canva is straightforward, but understanding your options can make a big difference in the final result. Whether you want to print directly through Canva or prefer to handle printing yourself, there are several choices to suit your needs. Let’s look at how you can get your designs from screen to paper effectively.
Using Canva’s Print Service
Canva offers a built-in print service that delivers high-quality prints right to your door. You can order everything from business cards to posters without leaving the platform. The convenience is impressive—no need to worry about file formats or print settings.
They handle paper quality, color accuracy, and shipping, so you get professional results with minimal effort. Have you ever struggled with local print shops not matching your design colors? Canva’s print service helps avoid that frustration by controlling the entire process.
Downloading For Local Printing
If you prefer to print your design locally, Canva allows you to download your work in multiple formats. You can save files as PDFs, PNGs, or JPEGs depending on what your printer supports.
This option gives you more control over printing specifics like paper type and finishing options. You might find local printers offer faster turnaround or special materials that Canva’s service doesn’t provide.
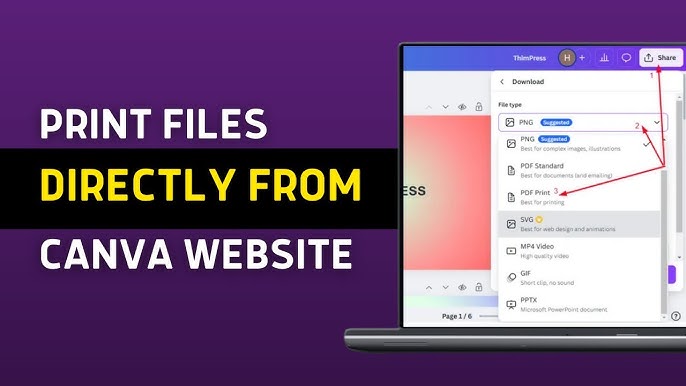
Exporting As Pdf Or Png
Choosing the right file format is key before printing. PDFs are ideal for documents or designs requiring precise layout and vector quality. They keep fonts sharp and colors consistent, which is crucial for professional prints.
PNGs work better for images with transparent backgrounds or when you want to maintain high resolution. Just remember, PNG files can be larger and may not always be the best choice for multi-page documents.
Thinking about your end use helps decide the format. What kind of printer or service will you use? This simple step can save you from reprinting and wasting materials later.

Credit: www.sttark.com
Step-by-step Printing Guide
Printing your design from Canva is simple with the right steps. Follow this guide to turn your digital creation into a physical product. Each step helps ensure your print looks perfect.
Finalizing Your Design
Check your design for errors or missing elements. Make sure all text is readable and images are clear. Confirm the colors match your vision. Use Canva’s preview tool to see how it will look printed. Adjust margins and alignment to avoid cutting off parts.
Choosing Print Settings
Select the correct paper size and type in Canva’s print options. Decide on finish options like matte or glossy. Choose the quantity you want to print. Check resolution settings to keep your design sharp. Confirm whether you want single or double-sided printing.
Placing Your Print Order
Review your order summary carefully. Enter your shipping details accurately. Choose your preferred delivery method. Check payment options and complete your purchase. Canva will send you a confirmation email with order details. Wait for your prints to arrive and enjoy your creation.
Troubleshooting Print Issues
Printing directly from Canva can sometimes throw unexpected challenges your way. Troubleshooting print issues is key to getting your designs to look just right on paper. Tackling these problems early saves time, frustration, and wasted materials.
Common Print Errors
Have you ever clicked print and ended up with a blank page or a cut-off design? These are some of the most frequent print errors users face with Canva. Often, they happen because the printer settings don’t match the design’s size or orientation.
Check if your printer is online and has enough ink. Also, ensure the paper size matches what you set in Canva. If your design is larger than the printable area, the printer might crop it automatically.
Another sneaky issue is missing fonts or images. If your design uses custom fonts or linked images that aren’t embedded, the print output might look different. Downloading your design as a PDF before printing often solves this.
Fixing Color Discrepancies
Colors on screen rarely look exactly the same once printed. This difference can be frustrating, especially if you spent hours perfecting your palette. Why does this happen? Screens use RGB colors, while printers use CMYK, which can’t reproduce all screen colors.
To get closer to what you see on Canva, try downloading your design as a PDF with CMYK settings if available. Adjusting brightness and contrast slightly in your design can also help. Don’t forget to do a test print on regular paper to check colors before using expensive materials.
Have you noticed certain colors appear dull or too bright in print? Calibrating your monitor or using a professional printer can make a significant difference. These steps ensure your printed colors match your vision more closely.
Ensuring Proper File Formats
Choosing the right file format before printing is critical. Canva offers options like PNG, JPG, and PDF, but not all work equally well for print. PDFs are generally the safest choice because they preserve quality and layout.
PNG and JPG files can lose sharpness or introduce compression artifacts, especially at low resolutions. Before printing, always check the resolution—300 DPI is the standard for clear, sharp prints.
If you plan to print through a professional service, ask what file format they prefer. Some printers require specific formats for optimal results. Uploading the wrong format can delay your project or lead to poor-quality prints.
Tips For Perfect Prints
Getting a perfect print from Canva requires attention to detail. Small mistakes can ruin the final look. Follow some simple tips to ensure your design prints exactly as you want.
Proofreading Before Printing
Always check your text carefully. Look for spelling errors, grammar mistakes, and wrong information. Read your design out loud. This helps catch errors that are easy to miss.
Ask someone else to review your work. A fresh pair of eyes spots issues you might overlook. Fix all errors before sending your design to print.
Test Printing Samples
Print a small sample before the full run. Check colors, alignment, and text clarity on the paper. This prevents wasting materials on wrong prints.
Adjust your design if the sample looks off. Test printing saves time and money. It ensures your final product meets your expectations.
Using Quality Paper Types
Choose the right paper for your project. Different paper types affect color and texture. Glossy paper makes images bright and shiny.
Matte paper gives a smooth, non-reflective finish. Thicker paper feels more professional and durable. Select paper that matches your design’s purpose and style.

Credit: www.youtube.com
Frequently Asked Questions
How Do I Print Designs Directly From Canva?
To print directly from Canva, click the “Print” button on your design page. Select print options, then place your order with Canva Print or download and print locally.
What File Format Is Best For Printing In Canva?
PDF Print is the best file format for printing in Canva. It ensures high quality and preserves design details for professional prints.
Can I Print Canva Designs At Home?
Yes, you can download your design as a PDF or image and print it using your home printer for quick and easy results.
How Do I Set Print Margins In Canva?
Canva automatically applies safe print margins. Use the “Show print bleed” option to ensure your design doesn’t get cut off during printing.
Conclusion
Printing your design in Canva is quick and simple. Just choose your format and set your print options. Check your design carefully before printing to avoid mistakes. You can print at home or use a professional service. This saves time and gives you great results.
Now you can create and print with confidence. Enjoy sharing your designs in print form easily.


